

Enterprise Library Step By Step系列(八):日志和监测应用程序块——进阶篇
写在前面:最近一段时间项目比较紧,所以这篇随笔出来的晚一些。今天写的是在日志里面包含名-值对的字典,跟踪活动并记录上下文信息,过滤事件,定制日志消息的格式,自定义Sink,自定义Formatter等。
一.在日志里面包含名-值对的字典:
在日志消息里面,我们可以包含名-值对这样的字典。这时首先需要创建一个Hashtable,通过Key-Value的方式把要记录的内容传入。示例代码如下:
 ///创建一个日志项
2
 LogEntry log = new LogEntry();
3
4
///创建名-值对5
Hashtable logtable = new Hashtable();6
logtable["key1"] = "value1";7
logtable["key2"] = "value2";8
logtable["key3"] = "value3";9
10
log.Message = this.txt_LogMessage.Text;11
log.Category = Category.General;12
log.Priority = Priority.Normal;13
14
///写入日志15
Logger.Write(log,logtable);输出后的文本:在这里我们用了Text Formatter

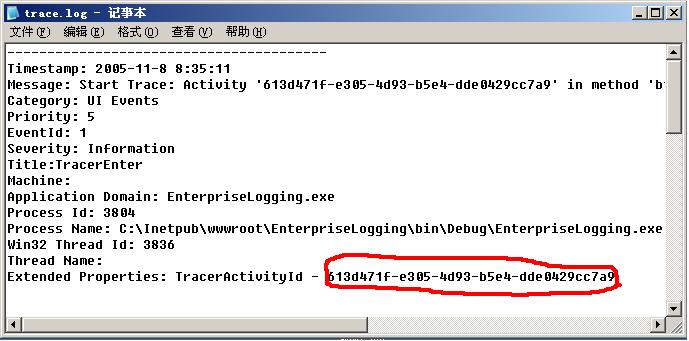
二.跟踪活动并记录上下文信息:
跟踪应用系统的活动是一项常见的功能,我们需要把活动的起始时间和结束时间以及活动的其他的信息记录下来。日志和监测应用程序块支持通过活动ID来跟踪一项活动,活动ID可以在代码中指定,也可以通过程序块来自动生成,程序块自动记录活动的起始时间和结束时间。活动跟踪由Tracer类来提供。示例代码如下:
using(new Tracer("UI Events"))2
{
3
 Logger.Write("Troubleshooting message");
4
 }
}输出后的文本:同样我们用了Text Formatter
三.过滤事件:
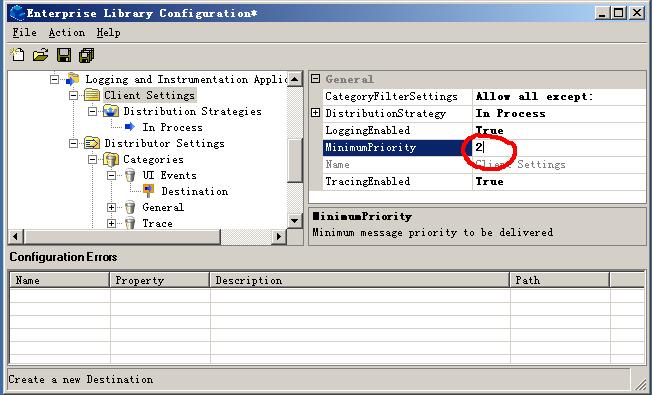
在日志和监测应用程序块里面,支持两种方式的过滤事件:基于优先级过滤事件和基于类别过滤事件。过滤的过程发生在日志项传递给分发策略之前。在入门篇里我们知道,每个日志消息都会有一个优先级,我们可以在代码中指定或默认值为-1。我们可以通过配置 Client Setting使低于某个优先级的消息被过滤掉,只记录某个类别的消息或者过滤掉具有某个类别的日志项。
在下面的图中,日志项为0和1的消息将不被记录。
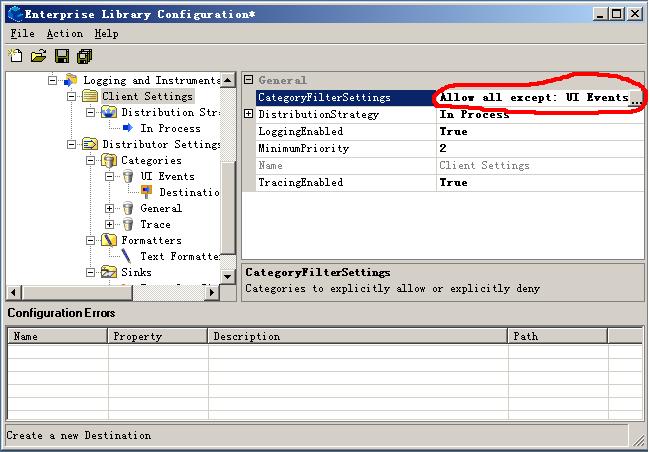
Client Setting的CategoryFilterSettings属性决定某个类别的日志是被记录还是被过滤掉。我们可以自行进行设置:

在下图中,”UI Events”类别的日志将不被记录。
四.定制日志消息的格式:
Formatter接受一个日志项的并返回一个格式化的字符串,应用程序块格式化将字符串传给Sink,Text Formatter 使用模版生成格式化字符串,在应用配置中可以有多个 Text Formatters,每个有自己的模版同时我们也可以定制自己的 Formatter。
日志项根据其类别导向到目的地目的地规定了 Formatter 和接收格式化日志项的 Sink。

Text Formatter 有一个模版配置属性。

模版编辑器定制日志项的格式, {参数}由日志项的值填充。

五.创建和使用自定义Sink:
在日志和监测应用应用程序块里面,允许我们自定义一个Sink,而且使用方法要比其它的应用程序块中的自定义简单的多。下面我们具体看一下:
1.添加对应用程序块的引用:
Microsoft.Practices.EnterpriseLibrary.Configuration.dll
Microsoft.Practices.EnterpriseLibrary.Logging.dll
2.添加命名空间:
using Microsoft.Practices.EnterpriseLibrary.Configuration;2
using Microsoft.Practices.EnterpriseLibrary.Logging;3
using Microsoft.Practices.EnterpriseLibrary.Logging.Sinks;4
using Microsoft.Practices.EnterpriseLibrary.Logging.Distributor.Configuration;3.编写代码:
我们的自定义Sink要继承LogSink这个基类,同时要重载Initialize()和SendMessageCore()这两个抽象方法。
using System;2
using Microsoft.Practices.EnterpriseLibrary.Configuration;3
using Microsoft.Practices.EnterpriseLibrary.Logging;4
using Microsoft.Practices.EnterpriseLibrary.Logging.Sinks;5
using Microsoft.Practices.EnterpriseLibrary.Logging.Distributor.Configuration;6
7
namespace EnterpriseLogging8
{9
 /// <summary>
10
/// 功能说明:自定义Sink11
 /// </summary>
12
public class ConsoleSink: LogSink13
{14
private LoggingConfigurationView configView;15
16
public override void Initialize(ConfigurationView configurationView)17
{18
this.configView = configurationView as LoggingConfigurationView;19
} 20
21
protected override void SendMessageCore(LogEntry logEntry)22
{23
CustomSinkData sinkData;24
sinkData = (CustomSinkData) this.configView.GetSinkData(this.ConfigurationName); 25
26
/// Delimit each log entry27
Console.WriteLine((string) sinkData.Attributes["delimiter"]); 28
29
/// Write the formatted log entry to the Console30
Console.WriteLine(FormatEntry(logEntry));31
} 32
}33
}34
4.打开配置工具,并打开配置文件。在Sink节点上,我们选择Custom Sink。同时起名为Console Sink:

5.单击TypeName右边的省略号,打开Type Selector对话框。单击Load an Assembly …,并浏览选择我们工程文件的DLL。最后选择Console Sink类。

6.单击Attributes 打开NameValueItem Collection Editor。单击Add创建一个新的NameValueItem,起名为delimiter,并设置它的Value值(这个值可以随意设置,比如我们设置************************)。

7.选择General,创建一个Destination,并设置下列属性:
· Formatter = Text Formatter,
· Name = Console Destination
· Sink = Console Sink
8.把程序输出的方式设为控制台的方式,运行程序。
六.创建和使用自定义Formatter:
1.添加如下的命名空间:
using System.Globalization;2
using System.IO;3
using System.Xml;4
using Microsoft.Practices.EnterpriseLibrary.Configuration;5
using Microsoft.Practices.EnterpriseLibrary.Logging;6
using Microsoft.Practices.EnterpriseLibrary.Logging.Distributor.Configuration;7
using Microsoft.Practices.EnterpriseLibrary.Logging.Formatters;2.以Hands On Lab里面的XmlFormatter为例,在自定义Formatter时我们需要继承ConfigurationProvider类和实现 IlogFormatter接口,并且需要重载Initialize()这个抽象方法。
using System;2
using System.Globalization;3
using System.IO;4
using System.Xml;5
using Microsoft.Practices.EnterpriseLibrary.Configuration;6
using Microsoft.Practices.EnterpriseLibrary.Logging;7
using Microsoft.Practices.EnterpriseLibrary.Logging.Distributor.Configuration;8
using Microsoft.Practices.EnterpriseLibrary.Logging.Formatters;9
10
namespace LoggingSink11
{12
/// <summary>13
/// 功能说明:自定义Formatter14
/// </summary>15
public class XmlFormatter : ConfigurationProvider, ILogFormatter16
{17
private LoggingConfigurationView configView = null;18
19
public override void Initialize(ConfigurationView configurationView)20
{21
this.configView = (LoggingConfigurationView) configurationView;22
} 23
24
public string Format(LogEntry log)25
{26
using (StringWriter sw = new StringWriter(CultureInfo.InvariantCulture))27
{28
XmlTextWriter w = new XmlTextWriter(sw);29
w.Formatting = Formatting.Indented;30
w.Indentation = 2; 31
w.WriteStartDocument(true);32
w.WriteStartElement("logEntry");33
w.WriteAttributeString("Category", log.Category);34
w.WriteAttributeString("Priority", log.Priority.ToString(CultureInfo.InvariantCulture)); 35
w.WriteElementString("Timestamp", log.TimeStampString);36
w.WriteElementString("Message", log.Message);37
w.WriteElementString("EventId", log.EventId.ToString(CultureInfo.InvariantCulture));38
w.WriteElementString("Severity", log.Severity.ToString(CultureInfo.InvariantCulture));39
w.WriteElementString("Title", log.Title);40
w.WriteElementString("Machine", log.MachineName);41
w.WriteElementString("AppDomain", log.AppDomainName);42
w.WriteElementString("ProcessId", log.ProcessId);43
w.WriteElementString("ProcessName", log.ProcessName);44
w.WriteElementString("Win32ThreadId", log.Win32ThreadId);45
w.WriteElementString("ThreadName", log.ManagedThreadName);46
w.WriteEndElement();47
w.WriteEndDocument(); 48
return sw.ToString();49
}50
} 51
}52
}53
对于自定义的Formatter我们就介绍到这儿了,它的使用和一般的Formatter没有大的区别,只不过在创建Formatter时我们需要创建一个Custom Formatter,在这里我就不多写了。
结束语:这篇日志和监测应用程序块的进阶篇文章就到这里了,希望能给初学的朋友一些帮助。后面我会写缓存应用程序块的使用。
