RabbitMQ学习笔记(3)----RabbitMQ Worker的使用
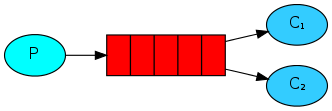
1. Woker队列结构图

这里表示一个生产者生产了消息发送到队列中,但是确有两个消费者在消费同一个队列中的消息。
2. 创建一个生产者
Producer如下:
package com.wangx.rabbitmq.worker;

import com.rabbitmq.client.Channel;
import com.rabbitmq.client.Connection;
import com.rabbitmq.client.ConnectionFactory;

import java.io.IOException;
import java.util.concurrent.TimeoutException;

public class Producer {

    /**
     * 队列名字
     */
    private static final String QUEUE_NAME = "worker-queue";
    public static void main(String[] args) throws IOException, TimeoutException {

        //创建连接工厂
        ConnectionFactory factory = new ConnectionFactory();
        //设置服务器主机
        factory.setHost("127.0.0.1");
        //设置用户名
        factory.setUsername("wangx");
        //设置密码
        factory.setPassword("wangx");
        //设置VirtualHost
        factory.setVirtualHost("/wangx");
        Connection connection = null;
        Channel channel = null;
        try {

            //创建连接
            connection = factory.newConnection();
            //创建消息通道
            channel = connection.createChannel();
            //声明队列
            channel.queueDeclare(QUEUE_NAME, false, false, false, null);
            String message = "Hello World!";
            //发送消息
            for (int i = 0; i < 10; i++) {
                //发送消息
                channel.basicPublish("", QUEUE_NAME, null, (message + i).getBytes());
                System.out.println(" [x] Sent '" + message + i + "'");
            }
        }catch (Exception e) {
            e.printStackTrace();
        } finally {
            channel.close();
            connection.close();
        }
    }
}
这里同时向队列发送了十条消息。
3. 创建两个消费者
Consumer1如下:
package com.wangx.rabbitmq.worker;

import com.rabbitmq.client.*;

import java.io.IOException;
import java.util.concurrent.TimeoutException;

public class Consumer1 {
    /**
     * 队列名字
     */
    private static final String QUEUE_NAME = "worker-queue";
    public static void main(String[] args) throws IOException, TimeoutException {

        //创建连接工厂
        ConnectionFactory factory = new ConnectionFactory();
        //设置服务器主机
        factory.setHost("localhost");
        //设置用户
        factory.setUsername("wangx");
        //设置密码
        factory.setPassword("wangx");
        //设置VirtualHost
        factory.setVirtualHost("/wangx");
        Connection connection = null;
        try {
            //创建连接
            connection = factory.newConnection();
            //创建消息通道
            final Channel  channel = connection.createChannel();
            //声明队列
            channel.queueDeclare(QUEUE_NAME, false, false, false, null);
//            channel.basicQos(1);
            Consumer consumer = new DefaultConsumer(channel){
                //重写DefaultConsumer中handleDelivery方法,在方法中获取消息
                @Override
                public void handleDelivery(String consumerTag, Envelope envelope,
                                           AMQP.BasicProperties properties, byte[] body) throws IOException{
                    try {
                        //消息沉睡一秒
                        Thread.sleep(1000);
                        String message = new String(body, "UTF-8");
                        System.out.println("consumer1 收到消息 '" + message + "'");
                    } catch (InterruptedException e) {
                        e.printStackTrace();
                    }finally {
                        System.out.println("consumer1 消息消费完成....");
                        channel.basicAck(envelope.getDeliveryTag(),false);
                    }

                }
            };
            //监听消息
            channel.basicConsume(QUEUE_NAME, false,consumer);
        }catch (Exception e) {
            e.printStackTrace();
        }finally {
        }
    }
}
Consumer2
package com.wangx.rabbitmq.worker;

import com.rabbitmq.client.*;

import java.io.IOException;
import java.util.concurrent.TimeoutException;

public class Consumer2 {
    /**
     * 队列名字
     */
    private static final String QUEUE_NAME = "worker-queue";
    public static void main(String[] args) throws IOException, TimeoutException {

        //创建连接工厂
        ConnectionFactory factory = new ConnectionFactory();
        //设置服务器主机
        factory.setHost("localhost");
        //设置用户
        factory.setUsername("wangx");
        //设置密码
        factory.setPassword("wangx");
        //设置VirtualHost
        factory.setVirtualHost("/wangx");
        Connection connection = null;
        try {
            //创建连接
            connection = factory.newConnection();
            //创建消息通道
            final Channel  channel = connection.createChannel();
//            channel.basicQos(1);
            //声明队列
            channel.queueDeclare(QUEUE_NAME, false, false, false, null);
            Consumer consumer = new DefaultConsumer(channel){
                //重写DefaultConsumer中handleDelivery方法,在方法中获取消息
                @Override
                public void handleDelivery(String consumerTag, Envelope envelope,
                                           AMQP.BasicProperties properties, byte[] body) throws IOException{
                    try {
                        //消息沉睡100ms
                        Thread.sleep(100);
                        String message = new String(body, "UTF-8");
                        System.out.println("consumer2 收到消息 '" + message + "'");
                    } catch (InterruptedException e) {
                        e.printStackTrace();
                    }finally {
                        System.out.println("consumer2 消息消费完成....");
                        channel.basicAck(envelope.getDeliveryTag(),false);
                    }

                }
            };
            //监听消息
            channel.basicConsume(QUEUE_NAME, false,consumer);
        }catch (Exception e) {
            e.printStackTrace();
        }finally {
        }
    }
}
可以看到consumer1在消息处理的过程中,沉睡了1s,而consumer2沉睡了100ms,以前面的mq的惯性来说,应该是沉睡时间少的消费多一些消息,但是我们来看控制台:
Consumer1:

consumer1 收到消息 'Hello World!0'
consumer1 消息消费完成....
consumer1 收到消息 'Hello World!2'
consumer1 消息消费完成....
consumer1 收到消息 'Hello World!4'
consumer1 消息消费完成....
consumer1 收到消息 'Hello World!6'
consumer1 消息消费完成....
consumer1 收到消息 'Hello World!8'
consumer1 消息消费完成....

Consumer2:

consumer2 收到消息 'Hello World!1'
consumer2 消息消费完成....
consumer2 收到消息 'Hello World!3'
consumer2 消息消费完成....
consumer2 收到消息 'Hello World!5'
consumer2 消息消费完成....
consumer2 收到消息 'Hello World!7'
consumer2 消息消费完成....
consumer2 收到消息 'Hello World!9'
consumer2 消息消费完成....
可以看消息的消费是平均分发的,一个消费奇数,一个偶数消息。但是有时候我们并不希望说消息平均消费,而是让消费快的多消费,慢的少消费。
4. "能者多劳"模式
”能者多劳“即是消费速度快的消费者消费更多的消息,速度慢的消费少的消息。
使用这种模式只需要设置消费者的channel的basicQos即可。
如下:
channel.basicQos(1);表示消息服务器每次只向消费分发一条消息。可以设置多条,只需要在任意的消费者中设置就对所有consumer生效。
控制台打印结果:
Consumer1:

consumer1 收到消息 'Hello World!1'
consumer1 消息消费完成....

Consumer2:

consumer2 收到消息 'Hello World!0'
consumer2 消息消费完成....
consumer2 收到消息 'Hello World!2'
consumer2 消息消费完成....
consumer2 收到消息 'Hello World!3'
consumer2 消息消费完成....
consumer2 收到消息 'Hello World!4'
consumer2 消息消费完成....
consumer2 收到消息 'Hello World!5'
consumer2 消息消费完成....
consumer2 收到消息 'Hello World!6'
consumer2 消息消费完成....
consumer2 收到消息 'Hello World!7'
consumer2 消息消费完成....
consumer2 收到消息 'Hello World!8'
consumer2 消息消费完成....
consumer2 收到消息 'Hello World!9'
consumer2 消息消费完成....
此时Consumer1才消费了1条,Consumer2消费 了其余的九条,这就是”能者多劳“模式的体现。
5. 消息的确认模式
消费者从队列中获取消息,服务端是如何知道消息已经被消费完成了呢?
模式1:自动确认
只要消息从队列中被获取,无论消费者取到消息后是否成功消费消息,都认为消息已经成功消费。
使用方式为:将channel.basicConsume();方法的第二个参数设置为true,如下:
channel.basicConsume(QUEUE_NAME, true,consumer);
模式2: 手动确认模式
消费者从队列中获取消息之后,服务器会将该消息标记为不可用状态,等待消费者的反馈,如果消费者一直没有反馈,那么该消息将一直处于不可用状态。
使用方式为:将channel.basicConsume();方法的第二个参数设置为true,如下:
channel.basicConsume(QUEUE_NAME, false,consumer);
然后在消息的DefaultConsumer.handleDelivery中使用channel.basicAck();方法在消息消费完成时通知服务端消费已经完成。如下:
channel.basicAck(envelope.getDeliveryTag(),false);

