理论:
1.获得微信官方的网址
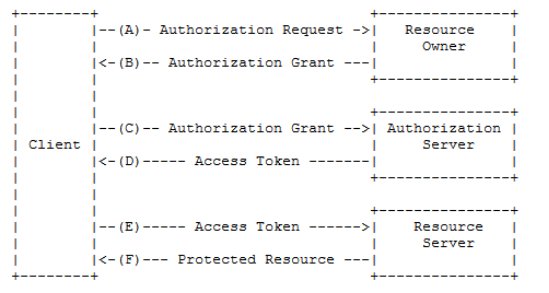
2.使用OAuth2.0
3.登陆需要三步
获得验证
返回一个网站
获得授权
对象
获得用户
对象

然后登陆的时候会和我们数据库中的袁勇绑定,如果没有就创建,有就关联
操作:
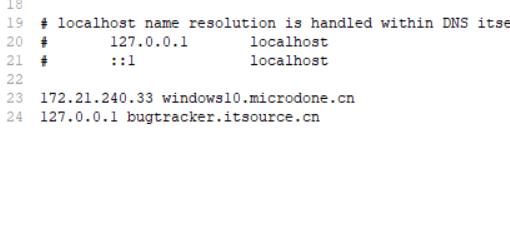
1.更改项目配置


在最后一行添加
127.0.0.1 bugtracker.itsource.cn
这是你去官网注册获得的域名这样才能把二维码返回过来,使用回调函数
2.引入依赖
<!--httpclient的依赖:-->
        <dependency>
            <groupId>org.apache.httpcomponents</groupId>
            <artifactId>httpclient</artifactId>
            <version>4.5.7</version>
        </dependency>

        <!--处理json的包
  https://mvnrepository.com/artifact/com.alibaba/fastjson -->
        <dependency>
            <groupId>com.alibaba</groupId>
            <artifactId>fastjson</artifactId>
            <version>1.2.47</version>
        </dependency>
3.登陆步骤
写一个封装好的
WxConstants把那些固定的常量封装成一个类,方便我们修改等等
package cn.jiedada.crm.web.wechart;

/*这是微信提供的必要字段
只有通过这些方式才能获得我们所有的
* */
public class WxConstants {
    public  final static String APPID = "wxd853562a0548a7d0";

    //用户授权后微信的回调域名,当我们获得该值的时候会调用该方法
    public final static String CALLBACK="http://bugtracker.itsource.cn/callback";

    public final static String SCOPE = "snsapi_login";

    public final static String APPSECRET = "4a5d5615f93f24bdba2ba8534642dbb6";
    //微信上获取code的地址(这里的
    // appid=APPID&redirect_uri=REDIRECT_URI&response_type=code&scope=SCOPE&state=STATE#wechat_redirect)
    //需要我们前台在调用的时候经行拼接REDIRECT_URI=
    public final static String CODEURL = "https://open.weixin.qq.com/connect/qrconnect?appid=APPID&redirect_uri=REDIRECT_URI&response_type=code&scope=SCOPE&state=STATE#wechat_redirect";
    //微信上获取at的地址
    public final static String ACCESSTOKEURL = "https://api.weixin.qq.com/sns/oauth2/access_token?appid=APPID&secret=SECRET&code=CODE&grant_type=authorization_code";
    //微信上获取用户信息的地址
    public final static String USERINFOURL = "https://api.weixin.qq.com/sns/userinfo?access_token=ACCESS_TOKEN&openid=OPENID";

}
因为这些都是我们必须要的字段而且不能够修改所以这样操作
因为我们获取code,at,用户信息是在微信官方获得的所以我们需要发送请求,所以我们封装一个类来发送请求
HttpClientUtils

package cn.jiedada;

import org.apache.http.HttpEntity;
import org.apache.http.HttpResponse;
import org.apache.http.client.ClientProtocolException;
import org.apache.http.client.methods.HttpGet;
import org.apache.http.client.methods.HttpPost;
import org.apache.http.entity.StringEntity;
import org.apache.http.impl.client.DefaultHttpClient;
import org.apache.http.util.EntityUtils;

import java.io.IOException;
import java.util.Iterator;
import java.util.List;
import java.util.Map;

/*因为我们使用微信登陆的时候会发送请求所以要使用
* */
public class HttpClientUtils {

    /**
     * http请求工具类,post请求
     *
     * @param url    url
     * @param params json字符串的参数
     * @return
     * @throws Exception
     */
    public static String httpPost(String url, String params) throws Exception {
        // 创建httpClient对象
        DefaultHttpClient defaultHttpClient = null;
        try {
            defaultHttpClient = new DefaultHttpClient();
            HttpPost httpPost = new HttpPost(url);
            httpPost.setHeader("Content-Type", "application/json;charset=ut-8");
            if (params != null) {
                System.out.println("请求参数:" + params);
                // 设置请求参数
                HttpEntity httpEntity = new StringEntity(params, "utf-8");
                httpPost.setEntity(httpEntity);
            }
            // 执行post请求,并得到相应结果
            HttpResponse httpResponse = defaultHttpClient.execute(httpPost);
            if (httpResponse.getStatusLine().getStatusCode() != 200) {
                String errorLog = "请求失败,errorCode:" + httpResponse.getStatusLine().getStatusCode();
                throw new Exception(url + errorLog);
            }
            // 解析结果
            HttpEntity responseEntity = httpResponse.getEntity();
            String responseStr = EntityUtils.toString(responseEntity, "utf-8");
            System.out.println("请求结果:" + responseStr);
            return responseStr;
        } catch (ClientProtocolException e) {
            e.printStackTrace();
            throw e;
        } catch (IOException e) {
            e.printStackTrace();
            throw e;
        } finally {
            if (defaultHttpClient != null)
                defaultHttpClient.getConnectionManager().shutdown();
        }
    }

    /**
     * http请求工具类,get请求
     *
     * @param url    请求地址:可以已经带参数(?),也可以没有带参数,在params中传过来
     * @param params 参数:值支持字符串和list
     * @return
     * @throws Exception
     */
    public static String httpGet(String url, Map<String, Object> params) throws Exception {
        DefaultHttpClient defaultHttpClient = null;
        try {
            defaultHttpClient = new DefaultHttpClient();
            if (params != null) {
                // 参数的拼接
                StringBuilder stringBuilder = new StringBuilder();
                Iterator<String> iterator = params.keySet().iterator();
                String key;
                while (iterator.hasNext()) {
                    key = iterator.next();
                    Object val = params.get(key);
                    if (val instanceof List) {
                        // 如果是list,则遍历拼接
                        List v = (List) val;
                        for (Object o : v) {
                            stringBuilder.append(key).append("=").append(o.toString()).append("&");
                        }
                    } else {
                        // 字符串:直接拼接
                        stringBuilder.append(key).append("=").append(val.toString()).append("&");
                    }
                }
                // 删除最后一个&
                stringBuilder.deleteCharAt(stringBuilder.length() - 1);
                if (url.indexOf("?") > 0) {
                    // url地址本身包含?
                    url = url + "&" + stringBuilder.toString();
                } else {
                    url = url + "?" + stringBuilder.toString();
                }
            }
            System.out.println("请求地址:" + url);
            HttpGet httpGet = new HttpGet(url);
            httpGet.setHeader("Content-Type", "application/json;charset=ut-8");
            // 执行
            HttpResponse httpResponse = defaultHttpClient.execute(httpGet);
            if (httpResponse.getStatusLine().getStatusCode() != 200) {
                String errorLog = "请求失败,errorCode:" + httpResponse.getStatusLine().getStatusCode();
                throw new Exception(url + errorLog);
            }
            // 解析结果
            HttpEntity responseEntity = httpResponse.getEntity();
            String responseStr = EntityUtils.toString(responseEntity, "utf-8");
            System.out.println("请求结果:" + responseStr);
            return responseStr;
        } catch (ClientProtocolException e) {
            e.printStackTrace();
            throw e;
        } catch (IOException e) {
            e.printStackTrace();
            throw e;
        } finally {
            if (defaultHttpClient != null)
                defaultHttpClient.getConnectionManager().shutdown();
        }
    }
}
下面我们来获取值
获得登陆是的二维码在登陆页面中这是后台中登陆的代码

@RequestMapping(value = "/login",method = RequestMethod.GET)
    @ResponseBody
    public AjaxResoult wecharLogin(Model model){
        String wxLoginUrl = WxConstants.CODEURL.replaceAll("APPID", WxConstants.APPID)
                .replaceAll("REDIRECT_URI", WxConstants.CALLBACK)
                .replaceAll("SCOPE", WxConstants.SCOPE);
        AjaxResoult ajaxResoult = new AjaxResoult();
        ajaxResoult.setWxLoginUrl(wxLoginUrl);
        return ajaxResoult;
    }
前台登陆时的代码

点击登陆
 <el-form-item>
        <el-button type="primary" @click="getWxLoginUrl">微信登陆</el-button>
      </el-form-item>
 getWxLoginUrl(event){
                this.$http.get('/login').then((res)=>{
                    console.debug(res) ;
                    let { msg, success,wxLoginUrl, resultObj } = res.data;
                    if (!success) {
                        this.$message({
                            message: msg,
                            type: 'error'
                        });
                    } else {
                       // this.$router.push({ path: '/wxLoginUrl' });
                        window.location.href=wxLoginUrl
                    }
                })
            },
点击的时候发送请求

会出现图片
当使用手机扫码的时候会调到一个叫callback的方法中去
这是你去官网注册获得的域名这样才能把二维码返回过来,使用回调函数
callback方法(这里面我们需要处理的为获得at,和用户信息,判断用户是否扫过码,如果扫过就判断是否关联上了一个,如果没有就添加一个微信表的数据,并且调转到绑定页面)

 /*
    * 回调处理
    * 需要获得at
    * 和userinfo
    * */
    @RequestMapping(value = "/callback",method = RequestMethod.GET)
    public String wecharLogin(String code,String state) throws Exception {
        //获得at的url
        String atUrl = WxConstants.ACCESSTOKEURL.replaceAll("APPID", WxConstants.APPID)
                .replaceAll("SECRET", WxConstants.APPSECRET)
                .replaceAll("CODE", code);
        //获得at的url然后发送请求
        String atRespone = HttpClientUtils.httpGet(atUrl, null);
        System.out.println("atRespone" + atRespone);
        //因为获得user info的条件是
        // USERINFOURL = "https://api.weixin.qq.com/sns/userinfo?access_token=ACCESS_TOKEN&openid=OPENID";
        //需要access_token和openid
        JSONObject atParse = (JSONObject) JSON.parse(atRespone);
        System.out.println("atParse" + atParse);
        String access_token = atParse.getString("access_token");
        String openid = atParse.getString("openid");
        //获得用户信息
        String userUrl = WxConstants.USERINFOURL.replaceAll("ACCESS_TOKEN", access_token)
                .replaceAll("OPENID", openid);
        //发送请求获得用户信息
        String userInfo = HttpClientUtils.httpGet(userUrl, null);
        System.out.println("userInfo" + userInfo);
        //转化为JSONObject对象
        JSONObject userInfoObj = (JSONObject) JSON.parse(userInfo);
        //取出其中的值
        String useropenid = userInfoObj.getString("openid");
        String nickname = userInfoObj.getString("nickname");
        String unionid = userInfoObj.getString("unionid");
        WeChart weChart = weChartService.findByopenid(useropenid);
        if (weChart == null) {
            //如果不存在就设置值进去
            WeChart weChart1 = new WeChart();
            weChart1.setOpenid(useropenid);
            weChart1.setNickname(nickname);
            weChart1.setUnionid(unionid);
            weChartService.save(weChart1);
            //跳转注册页面
            /*AjaxResoult ajaxResoult = new AjaxResoult();
            ajaxResoult.setBindUrl("redirect:/bind.jsp?openid="+useropenid);*/
            return "redirect:http://localhost:8080/#/Register?openid="+useropenid;
        } else {
            //存在直接登陆并且把数据绑定过去
            WeChart weChart2 = weChartService.findByopenid(useropenid);
            if (weChart2.getEmployee_id() != null) {
                //通过员工id找到员工的username设置login
                Employee employee = employeeService.findOne(weChart2.getEmployee_id());
                //登陆当前用户
                Subject subject = SecurityUtils.getSubject();
                //使用自己的token
                Map<String,Object> result = new HashMap<>();
                //除了返回登录成功与否,还要把登录的用户返回前端
                AjaxResoult ajaxResoult = new AjaxResoult();
                //登录用户
                MyUsernamePasswordToken token = new MyUsernamePasswordToken(employee.getUsername());
                subject.login(token);
                Serializable tokenid = subject.getSession().getId();
                //跳转登陆页面
                //还是返回ajaxResoult上面的自己在前台拼装就可以了
                return "redirect:http://localhost:8080/#/echarts?tokenid="+tokenid;
            } else {
                //跳转注册页面
                /*AjaxResoult ajaxResoult = new AjaxResoult();
                ajaxResoult.setBindUrl("redirect:/bind.jsp?openid="+useropenid);*/
                return "redirect:http://localhost:8080/#/Register?openid="+useropenid;
            }
        }
    }
当第一次没登陆的时候我们需要跳转到登陆页面
因为我们做了登陆权限,只能让登录页面访问,所以我们在main.js中添加了一个钩子函数
router.beforeEach((to, from, next) => {
    if (to.path == '/login') {
        sessionStorage.removeItem('token');
    }
    //如果session没有token信息,跳转到登陆页面
    let token = sessionStorage.getItem('token');
    //获得请求栏上的地址
    let url =  window.location.href;
    //获得后台传过来的openid的值(获取http://localhost:8080/#/echarts=?tokenid如这里的tokenid)
    let openid = url.split("=")[1]; //xxx
    //判断是否放行
    if (!token && to.path != '/login') {
        //判断是否是后台穿过来的,放行注册页面
        if(openid && to.path == '/Register'){
            next();
        }
        //放行我们已经注册了的用户登陆问题
        else if(openid && to.path == '/echarts'){
            sessionStorage.setItem("token",openid);
            next();
        }
        else {
            next({ path: '/login' })
        }
    } else {
        next()
    }
});

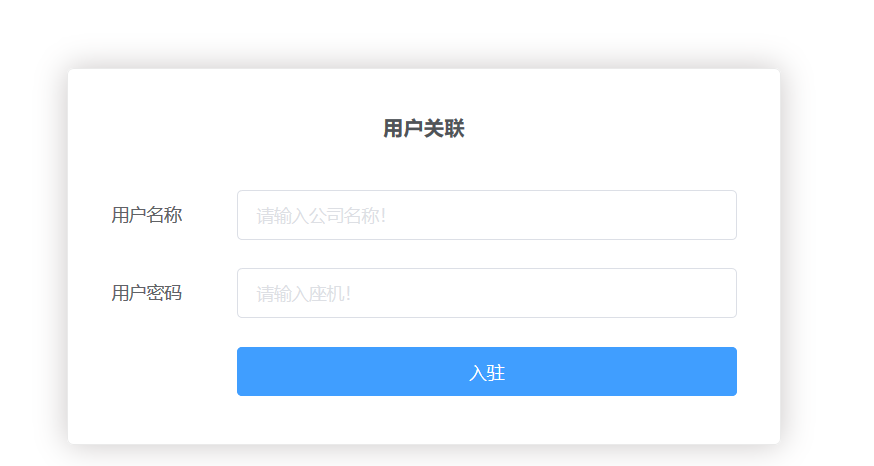
这是这个页面的值这个页面

<template>
    <div>
        <!--:model="tenant" 数据双向绑定-->
        <!--ref="tenantForm" id="tenantForm",给form去一个名字-->
        <!--:rules="formRules" 校验规则-->
        <el-form :model="employee" ref="tenantForm" :rules="formRules" label-position="left" label-width="100px" class="demo-ruleForm login-container">
            <h3 class="title">用户关联</h3>
            <el-form-item prop="companyName"label="用户名称">
                <el-input type="text" v-model="employee.username" auto-complete="off" placeholder="请输入公司名称!"></el-input>
            </el-form-item>
            <el-form-item prop="companyNum" label="用户密码">
                <el-input type="text" v-model="employee.password" auto-complete="off" placeholder="请输入座机!"></el-input>
            </el-form-item>
            <el-form-item style="width:100%;">
                <el-button type="primary" style="width:100%;" @click.native.prevent="settledIn" >入驻</el-button>
            </el-form-item>
        </el-form>
    </div>
</template>

<script>
    export default {
        data() {
            //elementui提供自定义验证 value 当前这个框
            var validatePass2 = (rule, value, callback) => {
                console.log(value); //确认密码 底层提供给我们
                if (value === '') {
                    callback(new Error('请再次输入密码'));
                } else if (value !== this.employee.password) {
                    callback(new Error('两次输入密码不一致!'))
                } else {
                    callback();//表示通过
                }
            }
            return {
                keyword:'',
                mapDialogVisibale:false,
                //employee:tenant 为了做数据表单校验不要嵌套对象
                employee: {
                    username:'',
                    password:'',
                    openid:'',
                },
                formRules: {
                    username: [
                        { required: true, message: '请输入用户名称!', trigger: 'blur' }
                    ],
                    password: [
                        { required: true, message: '请输入用户密码!', trigger: 'blur' }
                    ],
                    comfirmPassword: [
                        {required: true,validator: validatePass2, trigger: 'blur' } //自定义校验规则
                    ]
                }
            };
        },
        methods: {
            selectAdrressConfirm(){
                //把地图里面的值放入到表单地址里面,通过这种方式获得值
                this.employee.address = document.getElementById("searchInput").value;
                //把对话框关闭
                this.mapDialogVisibale = false;
            },
            settledIn(){
                //验证表单数据
                this.$refs.tenantForm.validate((valid) => {
                    //校验表单成功后才做一下操作
                    if (valid) {
                        this.$confirm('确认关联吗?', '提示', {}).then(() => {
                            //拷贝后面对象的值到新对象,防止后面代码改动引起模型变化
                            let url =  window.location.href;
                            let openid = url.split("=")[1]; //xxx
                            let para = Object.assign({}, this.employee); //employee
                            //tenant?
                            para.openid=openid;
                            //判断是否有id有就是修改,否则就是添加
                            this.$http.post("/binder",para).then((res) =>{
                                this.logining = false;
                                //NProgress.done();
                                let { msg, success, resultObj } = res.data;

                                if (!success) {
                                    this.$message({
                                        message: msg,
                                        type: 'error'
                                    });
                                } else {
                                    sessionStorage.setItem('user', JSON.stringify(resultObj.user.username));
                                    sessionStorage.setItem('token',resultObj.token);
                                    this.$router.push({ path: '/echarts' });
                                }
                            });
                        });
                    }
                })
            }
        },
    }

</script>

<style lang="scss" scoped>
    .login-container {
        -webkit-border-radius: 5px;
        border-radius: 5px;
        -moz-border-radius: 5px;
        background-clip: padding-box;
        margin: 180px auto;
        width: 500px;
        padding: 35px 35px 15px 35px;
        background: #fff;
        border: 1px solid #eaeaea;
        box-shadow: 0 0 25px #cac6c6;
        .title {
            margin: 0px auto 40px auto;
            text-align: center;
            color: #505458;
        }
        .remember {
            margin: 0px 0px 35px 0px;
        }
    }
    .bmap{
        width: 100%;
        height: 600px;
    }
    .searchinput{
        width: 300px;
        box-sizing: border-box;
        padding: 9px;
        border: 1px solid #dddee1;
        line-height: 20px;
        font-size: 16px;
        height: 38px;
        color: #333;
        position: relative;
        border-radius: 4px;
    }
</style>
binder方法

 /*绑定微信用户和我们的员工用户
    * */
    @RequestMapping(value = "/binder",method = RequestMethod.POST)
    @ResponseBody
    public AjaxResoult binder(@RequestBody Map<String,String> map){
        String username = map.get("username");
        System.out.println("username"+username);
        String password = map.get("password");
        System.out.println("password"+password);
        String openid = map.get("openid");
        System.out.println("openid"+openid);
        //在数据库中查找是否有该员工
        Employee employee = employeeService.findEmployeeByUsername(username);
        if(employee==null){
            return new AjaxResoult().setMsg("用户或者密码错误").setSuccess(false);
        }else {
            //判断密码是否正确
            String encrypt = MD5Util.encrypt(password);
            if(encrypt.equals(employee.getPassword())){
                WeChart weChart = weChartService.findByopenid(openid);
                //添加用户
                Long employee_id = employee.getId();
                weChart.setEmployee_id(employee_id);
                weChartService.update(weChart);
                AjaxResoult ajaxResoult = new AjaxResoult();
                //登陆当前用户
                Subject subject = SecurityUtils.getSubject();
                //使用自己的token
                MyUsernamePasswordToken token = new MyUsernamePasswordToken(username);
                //登录用户
                subject.login(token);
                Map<String,Object> result = new HashMap<>();
                //除了返回登录成功与否,还要把登录的用户返回前端
                result.put("user",employee);
                result.put("token",subject.getSession().getId());
                ajaxResoult.setResultObj(result);
                return ajaxResoult;
            }else {
                return new AjaxResoult().setMsg("用户或者密码错误").setSuccess(false);
            }
        }
    }
这里就完成了
但是因为我们需要使用免密登陆
需要覆写身份认证过滤器
FormAuthenticationFilter

package cn.jiedada.crm.web.shiro;

import cn.jiedada.crm.web.wechart.LoginType;
import cn.jiedada.crm.web.wechart.MyUsernamePasswordToken;
import org.apache.shiro.authc.AuthenticationToken;
import org.apache.shiro.web.filter.authc.FormAuthenticationFilter;

import javax.servlet.ServletRequest;
import javax.servlet.ServletResponse;
import javax.servlet.http.HttpServletRequest;

/**
 * 自定义身份认证过滤器
 */
public class MyAuthenticationFilter extends FormAuthenticationFilter {

    @Override
    protected boolean isAccessAllowed(ServletRequest request, ServletResponse response, Object mappedValue) {
        //如果是OPTIONS请求,直接放行
        HttpServletRequest httpServletRequest = (HttpServletRequest) request;
        String method = httpServletRequest.getMethod();
        //判断是否是OPTIONS请求
        if("OPTIONS".equalsIgnoreCase(method)){
            return true;
        }
        return super.isAccessAllowed(request, response, mappedValue);
    }
    //薪增方法
    @Override
    protected AuthenticationToken createToken(String username, String password, ServletRequest request, ServletResponse response) {
        boolean rememberMe = isRememberMe(request);
        String host = getHost(request);
        String loginType = LoginType.PASSWORD;//需要密码

        if(request.getParameter("loginType")!=null && !"".equals(request.getParameter("loginType").trim())){
            loginType = request.getParameter("loginType");
        }

        return new MyUsernamePasswordToken(username, password,loginType,rememberMe,host);
    }
}
所以需要覆写他的加密验证方法
HashedCredentialsMatcher

package cn.jiedada.crm.web.wechart;

import com.sun.org.apache.xml.internal.resolver.readers.DOMCatalogReader;
import org.apache.shiro.authc.AuthenticationInfo;
import org.apache.shiro.authc.AuthenticationToken;
import org.apache.shiro.authc.credential.HashedCredentialsMatcher;

public class MyHashedCredentialsMatcher extends HashedCredentialsMatcher {
    //doCredentialsMatch

    @Override
    public boolean doCredentialsMatch(AuthenticationToken token, AuthenticationInfo info) {
        //使用我们自定义的MyUsernamePasswordToken
        MyUsernamePasswordToken mupt = (MyUsernamePasswordToken) token;
        //是否是免密登陆,最后修改配置
        if (mupt.getLoginType().equals(LoginType.NOPASSWD)) {
            //免密登录
            return true;
        }
        return super.doCredentialsMatch(token, info);
    }
}
而其中需要使用覆写
UsernamePasswordToken

package cn.jiedada.crm.web.wechart;

import com.sun.org.apache.xml.internal.resolver.readers.DOMCatalogReader;
import org.apache.shiro.authc.AuthenticationInfo;
import org.apache.shiro.authc.AuthenticationToken;
import org.apache.shiro.authc.credential.HashedCredentialsMatcher;

public class MyHashedCredentialsMatcher extends HashedCredentialsMatcher {
    //doCredentialsMatch

    @Override
    public boolean doCredentialsMatch(AuthenticationToken token, AuthenticationInfo info) {
        //使用我们自定义的MyUsernamePasswordToken
        MyUsernamePasswordToken mupt = (MyUsernamePasswordToken) token;
        //是否是免密登陆,最后修改配置
        if (mupt.getLoginType().equals(LoginType.NOPASSWD)) {
            //免密登录
            return true;
        }
        return super.doCredentialsMatch(token, info);
    }
}
而UsernamePasswordToken需要一个常量类

package cn.jiedada.crm.web.wechart;

public class LoginType {
    public static final String NOPASSWD = "NoPassword";
    public static final String PASSWORD = "Password";
}
并且配置到shiro中
在application-shiro.xml中配置这里是所有的配置

<?xml version="1.0" encoding="UTF-8"?>
<beans xmlns="http://www.springframework.org/schema/beans"
       xmlns:xsi="http://www.w3.org/2001/XMLSchema-instance" xmlns:util="http://www.springframework.org/schema/util"
       xsi:schemaLocation="http://www.springframework.org/schema/beans http://www.springframework.org/schema/beans/spring-beans.xsd http://www.springframework.org/schema/util https://www.springframework.org/schema/util/spring-util.xsd">

    <!--session管理器通过继承DefaultWebSecurityManager来自定义我们的session-->
    <bean id="crmSessionManager" class="cn.jiedada.crm.web.shiro.CrmSessionManager"></bean>
    <!--shiro的核心对象-->
    <bean id="securityManager" class="org.apache.shiro.web.mgt.DefaultWebSecurityManager">
        <!--配置realm-->
        <property name="sessionManager" ref="crmSessionManager"/>
        <property name="realm" ref="myRealm"/>
    </bean>


    <!--Realms-->
    <bean id="myRealm" class="cn.jiedada.crm.web.shiro.MyRealm">
        <property name="credentialsMatcher">
            <bean class="cn.jiedada.crm.web.wechart.MyHashedCredentialsMatcher">
                <property name="hashAlgorithmName" value="MD5"/>
                <property name="hashIterations" value="10"/>
            </bean>
        </property>
    </bean>
    <!--自定义过滤器-->
    <bean id="myAuthenticationFilter" class="cn.jiedada.crm.web.shiro.MyAuthenticationFilter"></bean>
    <bean id="aisellPermissionsAuthorizationFilter" class="cn.jiedada.crm.web.shiro.AisellPermissionsAuthorizationFilter"></bean>
    <!--shiro的过滤器配置-->
    <bean id="shiroFilter" class="org.apache.shiro.spring.web.ShiroFilterFactoryBean">
        <property name="securityManager" ref="securityManager"/>
        <property name="loginUrl" value="/login"/>
        <property name="successUrl" value="/s/index"/>
        <property name="unauthorizedUrl" value="/s/unauthorized"/>
        <!--通过key在下面找到我们需要的东西,需要使用value-ref关联-->
        <property name="filters">
            <map>
                <entry key="myFilter" value-ref="myAuthenticationFilter"></entry>
                <entry key="aisellPers" value-ref="aisellPermissionsAuthorizationFilter"></entry>
            </map>
        </property>
        <!--在这下面使用我们的myFilter-->
        <!--<property name="filterChainDefinitions">
            <value>
                /* = anon
                /js/** = anon
                /** = myFilter
            </value>
        </property>-->
    </bean>
    <bean id="filterChainDefinitionMap" factory-bean="shiroFilterMapFactory" factory-method="createMap" />
    <!--配置返回shiro权限拦截的bean-->
    <bean id="shiroFilterMapFactory" class="cn.jiedada.crm.web.shiro.ShiroFilterMapFactory"/>


</beans>


