Chapter 4 深入理解Caffe MNIST DEMO中的LeNet网络模型
明代思想家王阳明提出了“知行合一”,谓认识事物的道理与在现实中运用此道理,是密不可分的一回事。我以为这样的中国哲学话语,对于学习者来说,极具启发意义,要细细体会。中华文明源远流长,很多做人做事的道理,孕育其中,需用心体会,并学以致用。
以“知”促“行”、以“行”促“知”、知行合一。——The unity of Inner knowledge and action.
在chapter 3 中提供了一个很好的实践样例,这个样例在windows下运行了Caffe源代码的MNIST Demo。本章将以该实践为基础来深入理解LeNet网络模型。
1. 初见LeNet原始模型
Fig.1. Architecture of original LeNet-5.
图片来源: Lecun, et al., Gradient-based learning applied to document recognition, P IEEE, vol. 86, no. 11, 1998, pp. 2278-2324.
在这篇图片的论文中,详细描述了LeNet-5的结构。
这里不对LeNet-5原始模型进行讨论。可以参考这些资料:
http://blog.csdn.net/qiaofangjie/article/details/16826849
http://blog.csdn.net/xuanyuansen/article/details/41800721
2. Caffe LeNet的网络结构
他山之石,可以攻玉。本来是准备画出Caffe LeNet的图的,但发现已经有人做了,并且画的很好,就直接拿过来辅助理解了。
第3部分图片来源:http://www.2cto.com/kf/201606/518254.html
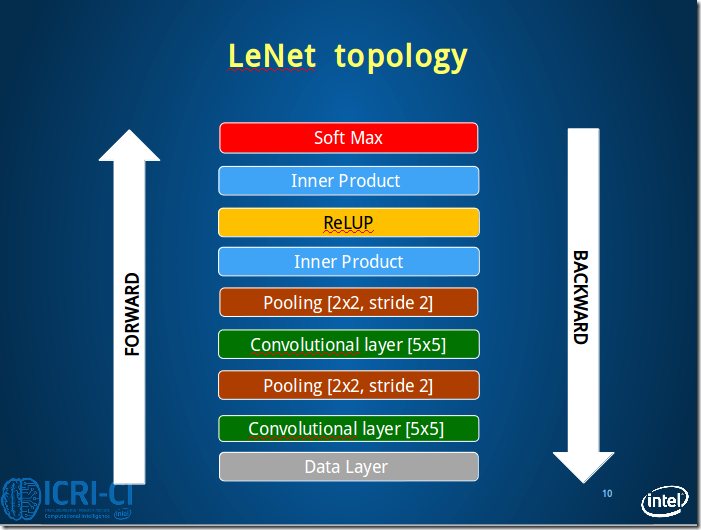
先从整体上感知Caffe LeNet的拓扑图,由于Caffe中定义网络的结构采用的是bottom&top这种上下结构,所以这里的图也采用这种方式展现出来,更加方便理解。
Fig.2. Architecture of caffe LeNet.
From bottom to top: Data Layer, conv1, pool1, conv2, pool2, ip1, relu1, ip2, [accuracy]loss.
本节接下来将按照这个顺序依次理解Caffe LeNet的网络结构。
3. 逐层理解Caffe LeNet
本节将采用定义与图解想结合的方式逐层理解Caffe LeNet的结构。
3.1 Data Layer
#==============定义TRAIN的数据层============================================
layer { name: "mnist" #定义该层的名字 type: "Data" #该层的类型是数据 top: "data" #该层生成一个data blob top: "label" #该层生成一个label blob include {phase: TRAIN #说明该层只在TRAIN阶段使用
}
transform_param {scale: 0.00390625 #数据归一化系数,1/256,归一到[0,1)
}
data_param { source: "E:/MyCode/DL/caffe-master/examples/mnist/mnist_train_lmdb" #训练数据的路径batch_size: 64 #批量处理的大小
backend: LMDB
}
}
#==============定义TEST的数据层============================================
layer { name: "mnist" type: "Data" top: "data" top: "label" include {phase: TEST #说明该层只在TEST阶段使用
}
transform_param {scale: 0.00390625
}
data_param { source: "E:/MyCode/DL/caffe-master/examples/mnist/mnist_test_lmdb" #测试数据的路径batch_size: 100
backend: LMDB
}
}
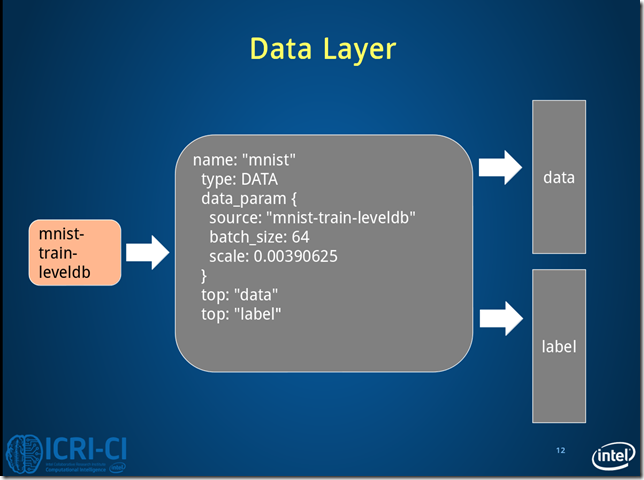
Fig.3. Architecture of data layer.
Fig.3 是train情况下,数据层读取lmdb数据,每次读取64条数据,即N=64。
Caffe中采用4D表示,N*C*H*W(Num*Channels*Height*Width)。
3.2 Conv1 Layer
#==============定义卷积层1=============================
layer { name: "conv1" #该层的名字conv1,即卷积层1 type: "Convolution" #该层的类型是卷积层 bottom: "data" #该层使用的数据是由数据层提供的data blob top: "conv1" #该层生成的数据是conv1 param {lr_mult: 1 #weight learning rate(简写为lr)权值的学习率,1表示该值是lenet_solver.prototxt中base_lr: 0.01的1倍
}
param {lr_mult: 2 #bias learning rate偏移值的学习率,2表示该值是lenet_solver.prototxt中base_lr: 0.01的2倍
}
convolution_param {num_output: 20 #产生20个输出通道
kernel_size: 5 #卷积核的大小为5*5
stride: 1 #卷积核移动的步幅为1
weight_filler { type: "xavier" #xavier算法,根据输入和输出的神经元的个数自动初始化权值比例}
bias_filler { type: "constant" #将偏移值初始化为“稳定”状态,即设为默认值0}
}
}
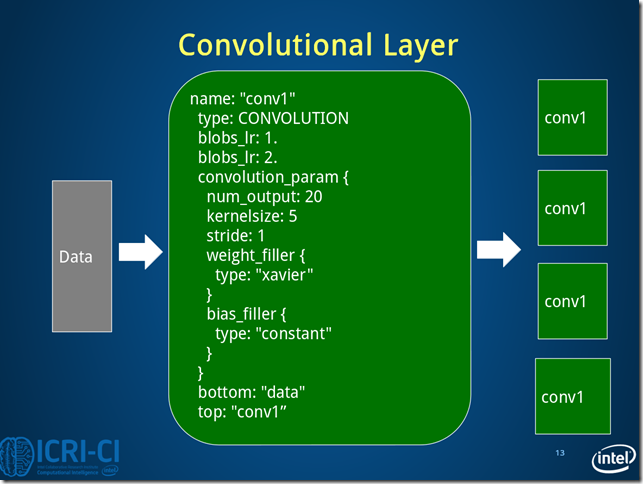
Fig.4. Architecture of conv1 layer.
conv1的数据变化的情况:batch_size*1*28*28->batch_size*20*24*24
3.3 Pool1 Layer
#==============定义池化层1=============================
layer { name: "pool1" type: "Pooling" bottom: "conv1" #该层使用的数据是由conv1层提供的conv1 top: "pool1" #该层生成的数据是pool1 pooling_param {pool: MAX #采用最大值池化
kernel_size: 2 #池化核大小为2*2
stride: 2 #池化核移动的步幅为2,即非重叠移动
}
}
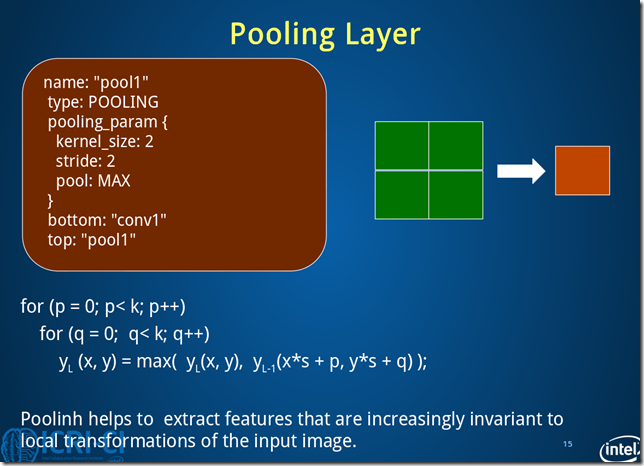
Fig.5. Architecture of pool1 layer.
池化层1过程数据变化:batch_size*20*24*24->batch_size*20*12*12
3.4 Conv2 Layer
#==============定义卷积层2=============================
layer { name: "conv2" type: "Convolution" bottom: "pool1" top: "conv2" param {lr_mult: 1
}
param {lr_mult: 2
}
convolution_param {num_output: 50
kernel_size: 5
stride: 1
weight_filler { type: "xavier"}
bias_filler { type: "constant"}
}
}
conv2层的图与Fig.4 类似,卷积层2过程数据变化:batch_size*20*12*12->batch_size*50*8*8。
3.5 Pool2 Layer
#==============定义池化层2=============================
layer { name: "pool2" type: "Pooling" bottom: "conv2" top: "pool2" pooling_param {pool: MAX
kernel_size: 2
stride: 2
}
}
pool2层图与Fig.5类似,池化层2过程数据变化:batch_size*50*8*8->batch_size*50*4*4。
3.6 Ip1 Layer
#==============定义全连接层1=============================
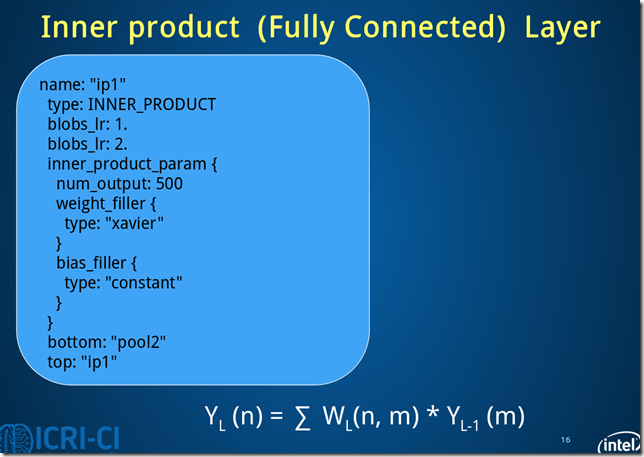
layer { name: "ip1" type: "InnerProduct" #该层的类型为全连接层 bottom: "pool2" top: "ip1" param {lr_mult: 1
}
param {lr_mult: 2
}
inner_product_param {num_output: 500 #有500个输出通道
weight_filler { type: "xavier"}
bias_filler { type: "constant"}
}
}
Fig.6. Architecture of ip11 layer.
ip1过程数据变化:batch_size*50*4*4->batch_size*500*1*1。
此处的全连接是将C*H*W转换成1D feature vector,即800->500.
3.7 Relu1 Layer
#==============定义ReLU1层=============================
layer { name: "relu1" type: "ReLU" bottom: "ip1" top: "ip1"}
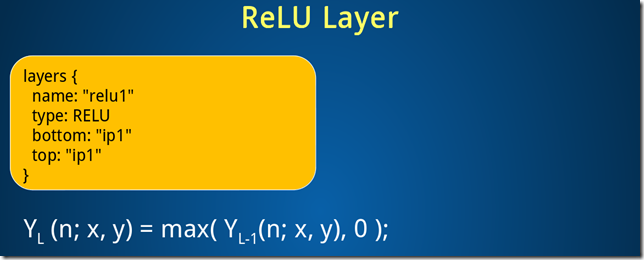
ReLU1层过程数据变化:batch_size*500*1*1->batch_size*500*1*1
3.8 Ip2 Layer
#==============定义全连接层2============================
layer { name: "ip2" type: "InnerProduct" bottom: "ip1" top: "ip2" param {lr_mult: 1
}
param {lr_mult: 2
}
inner_product_param {num_output: 10 #10个输出数据,对应0-9十个数字
weight_filler { type: "xavier"}
bias_filler { type: "constant"}
}
}
ip2过程数据变化:batch_size*500*1*1->batch_size*10*1*1
3.9 Loss Layer
#==============定义损失函数层============================
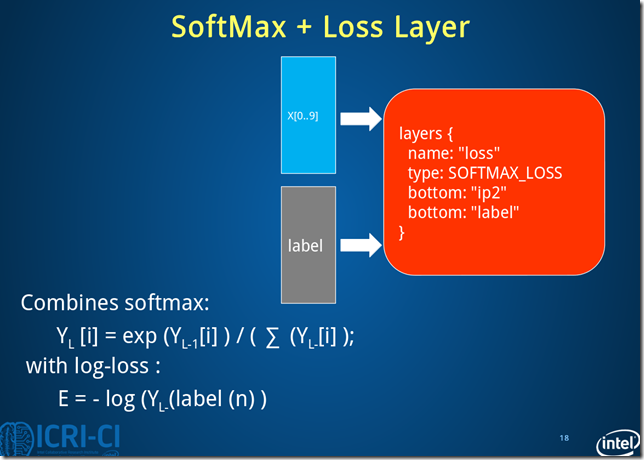
layer { name: "loss" type: "SoftmaxWithLoss" bottom: "ip2" bottom: "label" top: "loss"}
Fig.8. Architecture of loss layer.
损失层过程数据变化:batch_size*10*1*1->batch_size*10*1*1
note:注意到caffe LeNet中有一个accuracy layer的定义,这是输出测试结果的层。
4. Caffe LeNet的完整定义
name: "LeNet" #定义网络的名字#==============定义TRAIN的数据层============================================
layer { name: "mnist" #定义该层的名字 type: "Data" #该层的类型是数据 top: "data" #该层生成一个data blob top: "label" #该层生成一个label blob include {phase: TRAIN #说明该层只在TRAIN阶段使用
}
transform_param {scale: 0.00390625 #数据归一化系数,1/256,归一到[0,1)
}
data_param { source: "E:/MyCode/DL/caffe-master/examples/mnist/mnist_train_lmdb" #训练数据的路径batch_size: 64 #批量处理的大小
backend: LMDB
}
}
#==============定义TEST的数据层============================================
layer { name: "mnist" type: "Data" top: "data" top: "label" include {phase: TEST #说明该层只在TEST阶段使用
}
transform_param {scale: 0.00390625
}
data_param { source: "E:/MyCode/DL/caffe-master/examples/mnist/mnist_test_lmdb" #测试数据的路径batch_size: 100
backend: LMDB
}
}
#==============定义卷积层1=============================
layer { name: "conv1" #该层的名字conv1,即卷积层1 type: "Convolution" #该层的类型是卷积层 bottom: "data" #该层使用的数据是由数据层提供的data blob top: "conv1" #该层生成的数据是conv1 param {lr_mult: 1 #weight learning rate(简写为lr)权值的学习率,1表示该值是lenet_solver.prototxt中base_lr: 0.01的1倍
}
param {lr_mult: 2 #bias learning rate偏移值的学习率,2表示该值是lenet_solver.prototxt中base_lr: 0.01的2倍
}
convolution_param {num_output: 20 #产生20个输出通道
kernel_size: 5 #卷积核的大小为5*5
stride: 1 #卷积核移动的步幅为1
weight_filler { type: "xavier" #xavier算法,根据输入和输出的神经元的个数自动初始化权值比例}
bias_filler { type: "constant" #将偏移值初始化为“稳定”状态,即设为默认值0}
}
}#卷积过程数据变化:batch_size*1*28*28->batch_size*20*24*24
#==============定义池化层1=============================
layer { name: "pool1" type: "Pooling" bottom: "conv1" #该层使用的数据是由conv1层提供的conv1 top: "pool1" #该层生成的数据是pool1 pooling_param {pool: MAX #采用最大值池化
kernel_size: 2 #池化核大小为2*2
stride: 2 #池化核移动的步幅为2,即非重叠移动
}
}#池化层1过程数据变化:batch_size*20*24*24->batch_size*20*12*12
#==============定义卷积层2=============================
layer { name: "conv2" type: "Convolution" bottom: "pool1" top: "conv2" param {lr_mult: 1
}
param {lr_mult: 2
}
convolution_param {num_output: 50
kernel_size: 5
stride: 1
weight_filler { type: "xavier"}
bias_filler { type: "constant"}
}
}#卷积层2过程数据变化:batch_size*20*12*12->batch_size*50*8*8
#==============定义池化层2=============================
layer { name: "pool2" type: "Pooling" bottom: "conv2" top: "pool2" pooling_param {pool: MAX
kernel_size: 2
stride: 2
}
}#池化层2过程数据变化:batch_size*50*8*8->batch_size*50*4*4
#==============定义全连接层1=============================
layer { name: "ip1" type: "InnerProduct" #该层的类型为全连接层 bottom: "pool2" top: "ip1" param {lr_mult: 1
}
param {lr_mult: 2
}
inner_product_param {num_output: 500 #有500个输出通道
weight_filler { type: "xavier"}
bias_filler { type: "constant"}
}
}#全连接层1过程数据变化:batch_size*50*4*4->batch_size*500*1*1
#==============定义ReLU1层=============================
layer { name: "relu1" type: "ReLU" bottom: "ip1" top: "ip1"}#ReLU1层过程数据变化:batch_size*500*1*1->batch_size*500*1*1
#==============定义全连接层2============================
layer { name: "ip2" type: "InnerProduct" bottom: "ip1" top: "ip2" param {lr_mult: 1
}
param {lr_mult: 2
}
inner_product_param {num_output: 10 #10个输出数据,对应0-9十个数字
weight_filler { type: "xavier"}
bias_filler { type: "constant"}
}
}#全连接层2过程数据变化:batch_size*500*1*1->batch_size*10*1*1
#==============定义显示准确率结果层============================
layer { name: "accuracy" type: "Accuracy" bottom: "ip2" bottom: "label" top: "accuracy" include {phase: TEST
}
}
#==============定义损失函数层============================
layer { name: "loss" type: "SoftmaxWithLoss" bottom: "ip2" bottom: "label" top: "loss"}#损失层过程数据变化:batch_size*10*1*1->batch_size*10*1*1


