07.celery在项目中使用和在Django中使用比较
1.1 为什么有这篇博客
1.博客说明
1.在做celery异步任务和定时任务时,有些人使用django-celery+django-redis+celery+redis+django-celery-beat实现
2.但是这种实现方法和django结合过于紧密,不利于分布式部署
3.而且不同版本相结合,一旦不小心安装升级一个包,会导致各种报错
4.配置也比较繁琐,很多同学在使用时易出错
2、安装相关包
pip install Django==2.2
pip install celery==4.4.7
pip install redis==3.5.3
1.2 celery基本使用
1、创建tasks.py文件进行验证


from celery import Celery
import time

app = Celery('TASK',
             broker='redis://localhost',
             backend='redis://localhost')

@app.task
def add(x, y):
   print("running..add.", x, y)
   return x + y

@app.task
def minus(x, y):
   time.sleep(60)
   print("running..minus.", x, y)
   return x - y
1、启动Celery Worker来开始监听并执行任务
celery -A tasks worker --loglevel=info # tasks是tasks.py文件:必须在tasks.py所在目录下执行
2、调用任务:再打开两个终端,进行命令行模式,调用任务
>>> import tasks
>>> import tasks
>>> t2 = tasks.minus.delay(9,11)
#然后在另一个终端重复上面步骤执行
>>> t1 = tasks.add.delay(3,4)
>>> t1.get() #由于t2执行sleep了3s所以t1.get()需要等待
2、celery其他命令
>>> t.ready() #返回true证明可以执行,不必等待
>>> t.get(timeout=1) #如果1秒不返回结果就超时,避免一直等待
>>> t.get(propagate=False) #如果执行的代码错误只会打印错误信息
>>> t.traceback #打印异常详细结果
1.2 在django项目中使用
1、目录结构如下
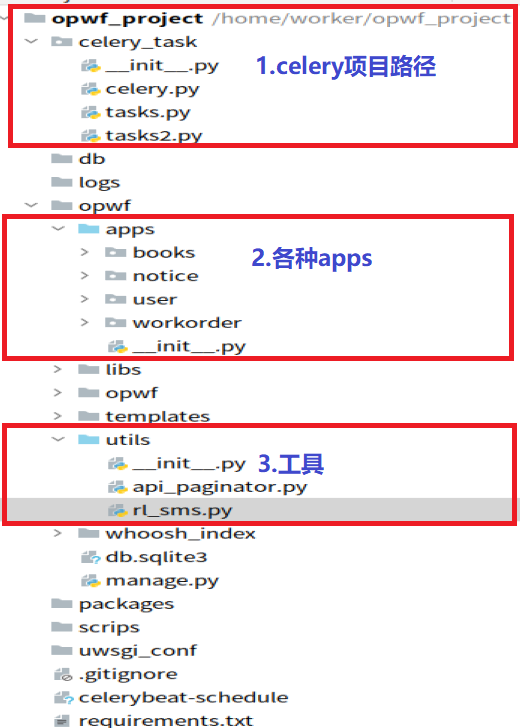
2、opwf_project/celery_task文件夹
# celery.py
# -*- coding: utf-8 -*-
from celery import Celery
import os,sys
import django

# 1.添加django项目根路径
CELERY_BASE_DIR = os.path.dirname(os.path.abspath(__file__))
sys.path.insert(0, os.path.join(CELERY_BASE_DIR, '../opwf'))

# 2.添加django环境
os.environ.setdefault("DJANGO_SETTINGS_MODULE","opwf.settings")
django.setup() # 读取配置


# 3.celery基本配置
app = Celery('proj',
             broker='redis://localhost:6379/14',
             backend='redis://localhost:6379/15',
             include=['celery_task.tasks',
                      'celery_task.tasks2',
                      ])

# 4.实例化时可以添加下面这个属性
app.conf.update(
   result_expires=3600,        #执行结果放到redis里,一个小时没人取就丢弃
)

# 5.配置定时任务:每5秒钟执行 调用一次celery_pro下tasks.py文件中的add函数
app.conf.beat_schedule = {
    'add-every-5-seconds': {
        'task': 'celery_task.tasks.test_task_crontab',
        'schedule': 5.0,
        'args': (16, 16)
    },
}

# 6.添加时区配置
app.conf.timezone = 'UTC'

if __name__ == '__main__':
   app.start()
# -*- coding:utf8 -*-
from .celery import app       #从当前目录导入app
import os,sys
from .celery import CELERY_BASE_DIR


# 1.test_task_crontab测试定时任务
@app.task
def test_task_crontab(x, y):
    # 添加django项目路径
    sys.path.insert(0, os.path.join(CELERY_BASE_DIR, '../opwf'))
    from utils.rl_sms import test_crontab
    res = test_crontab(x, y)
    return x + y


# 2.测试异步发送邮件
@app.task(bind=True)
def send_sms_code(self, mobile, datas):
    sys.path.insert(0, os.path.join(CELERY_BASE_DIR, '../opwf'))
    # 在方法中导包
    from utils.rl_sms import send_message
    # time.sleep(5)
    try:
        # 用 res 接收发送结果, 成功是:0, 失败是:-1
        res = send_message(mobile, datas)
    except Exception as e:
        res = '-1'

    if res == '-1':
        # 如果发送结果是 -1  就重试.
        self.retry(countdown=5, max_retries=3, exc=Exception('短信发送失败'))
# -*- coding:utf8 -*-
from .celery import app
import time,random

@app.task
def randnum(start,end):
    time.sleep(3)
    return random.randint(start,end)
3、opwf_project/opwf/utils
# -*- coding: utf-8 -*-
# utils/rl_sms.py
from ronglian_sms_sdk import SmsSDK
from user.models import User


accId = '8a216da8747ac98201749c0de38723b7'
accToken = '86072b540b4648229b27400414150ef2'
appId = '8a216da8747ac98201749c0de45123be'


def send_message(phone, datas):
    user = User.objects.all()[0]
    print(user.username, '%%%%%%%%%%%%%%%%%%%%%%%%%%%%%%%%%%%%%%%')
    sdk = SmsSDK(accId, accToken, appId)
    tid = '1'  # 测试模板id为: 1. 内容为: 【云通讯】您的验证码是{1},请于{2}分钟内正确输入。
    # mobile = '13303479527'
    # datas = ('666777', '5')  # 模板中的参数按照位置传递
    # resp = sdk.sendMessage(tid, phone, datas)
    print("##########################################")
    print('执行了这个方法 send_message')
    return ''


def test_crontab(x,y):
    print('############### 执行test_crontab测试任务 #############')
    print('############### 邮件审批超时提醒 #############')
4、在django项目中调用
def handle_next_suborder_approve(suborder_obj):
    # 函数内部导报
    from celery_task import tasks
    # .delay()发送异步任务
    tasks.send_sms_code.delay(18538752511,())    # 通知审判者
5、执行命令
### 1.1 进入执行目录
cd opwf_project

### 1.2 celery管理
celery -A celery_task worker -l INFO               # 单线程
celery multi start w1 w2 -A celery_pro -l info     #一次性启动w1,w2两个worker
celery -A celery_pro status                        #查看当前有哪些worker在运行
celery multi stop w1 w2 -A celery_pro              #停止w1,w2两个worker

# 1.项目中启动celery worker
celery  multi start celery_task -A celery_task -l debug --autoscale=50,10      # celery并发数:最多50个,最少5个
# 2.在项目中关闭celery worker
ps auxww|grep "celery worker"|grep -v grep|awk '{print $2}'|xargs kill -9      # 关闭所有celery进程
```

### 1.3 django_celery_beat管理
# 1.普通测试启动celery beat
celery -A celery_task beat -l info
# 2.在项目中后台启动celery beat
celery -A celery_task beat -l debug >> /aaa/Scheduler.log 2>&1 &
# 3.停止celery beat
ps -ef | grep -E "celery -A celery_test beat" | grep -v grep| awk '{print $2}' | xargs kill -TERM &> /dev/null  # 杀死心跳所有进程
作者:学无止境
出处:https://www.cnblogs.com/xiaonq
生活不只是眼前的苟且,还有诗和远方。

 浙公网安备 33010602011771号