
pytorch随笔
pytorch中transform函数
一般用Compose把多个步骤整合到一起:
比如说
transforms.Compose([
transforms.CenterCrop(10),
transforms.ToTensor(),
])
这样就把两个步骤整合到一起
接下来介绍transforms中的函数
Resize:把给定的图片resize到given size
Normalize:Normalized an tensor image with mean and standard deviation
ToTensor:convert a PIL image to tensor (H*W*C) in range [0,255] to a torch.Tensor(C*H*W) in the range [0.0,1.0]
ToPILImage: convert a tensor to PIL image
Scale:目前已经不用了,推荐用Resize
CenterCrop:在图片的中间区域进行裁剪
RandomCrop:在一个随机的位置进行裁剪
RandomHorizontalFlip:以0.5的概率水平翻转给定的PIL图像
RandomVerticalFlip:以0.5的概率竖直翻转给定的PIL图像
RandomResizedCrop:将PIL图像裁剪成任意大小和纵横比
Grayscale:将图像转换为灰度图像
RandomGrayscale:将图像以一定的概率转换为灰度图像
FiceCrop:把图像裁剪为四个角和一个中心
TenCrop
Pad:填充
ColorJitter:随机改变图像的亮度对比度和饱和度
torchvision.transforms.Normalize()
是对数据进行归一化的操作
image = (image - mean) / std
假设你数据的范围是图片的数据范围四[0,1],那么如果mean = [.5, .5, .5],std = [.5, .5, .5],根据上述式子计算
(0−0.5)/0.5=−1
(1−0.5)/0.5=1
就可将数据归一化到[-1,1]。
#逆向归一化
origin = x * 0.5 + 0.5
图像处理、转不同格式显示 cv2, PIL.Image
import torch
import torchvision
import torchvision.transforms as transforms
import cv2
import numpy as np
from PIL import Image

img_path = "./data/timg.jpg"

# transforms.ToTensor()
transform1 = transforms.Compose([
    transforms.ToTensor(),
    ])

##numpy.ndarray
img = cv2.imread(img_path)  # 读取图像 3x1080x1920(通道*高*宽),数值[0, 255]
print("img = ", img)
img1 = transform1(img)  # 归一化到 3x1080x1920(通道*高*宽),数值[0.0,1.0]
print("img1 = ", img1)

# 转化为numpy.ndarray并显示
img_1 = img1.numpy()*255
img_1 = img_1.astype('uint8')
img_1 = np.transpose(img_1, (1,2,0))
cv2.imshow('img_1', img_1)
cv2.waitKey()

##PIL
img = Image.open(img_path).convert('RGB') # 读取图像, 数据格式 [h, w, c]
img2 = transform1(img) # 归一化到 [0.0,1.0] # 转换到[c, h, w]
print("img2 = ",img2)

#转化为PILImage并显示
img_2 = transforms.ToPILImage()(img2).convert('RGB')
#等同于np.transpose(img2, (1, 2, 0))
print("img_2 = ",img_2)
img_2.show()
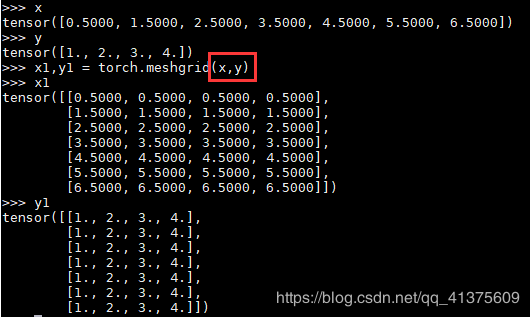
torch.meshgrid()
x1 ,y1 = torch.meshgrid(x,y)
参数是两个,第一个参数我们假设是x,第二个参数假设就是y
输出的是两个tensor,size就是x.size * y.size(行数是x的个数,列数是y的个数)
具体输出看下面
注意:两个参数的数据类型要相同,要么都是float,要么都是int,否则会报错。
torch.clamp()
torch.clamp(input, min, max, out=None) → Tensor
将输入input张量每个元素的夹紧到区间 [min,max][min,max],并返回结果到一个新张量。
操作定义如下:
       | min, if x_i < min
y_i =  | x_i, if min <= x_i <= max
       | max, if x_i > max
参数:
input (Tensor) – 输入张量
min (Number) – 限制范围下限
max (Number) – 限制范围上限
out (Tensor, optional) – 输出张量
示例:

tensor.clamp()
tensor.clamp(min, max, out=None) → Tensor
跟上面是一样的作用,tensor就是input
参数:
min (Number) – 限制范围下限
max (Number) – 限制范围上限
out (Tensor, optional) – 输出张量
示例:

参考:https://blog.csdn.net/qq_41375609/article/details/102828154

 浙公网安备 33010602011771号