使用Nexus做镜像仓库、代理http,去下载谷歌的k8s组件镜像
官网:https://www.sonatype.com/ 下载安装包解压及安装。
运行:nexus.exe /run 访问:http://localhost:8081/ 默认用户 admin 密码存在nexus-3.34.1-01-win64\sonatype-work\nexus3\admin.password
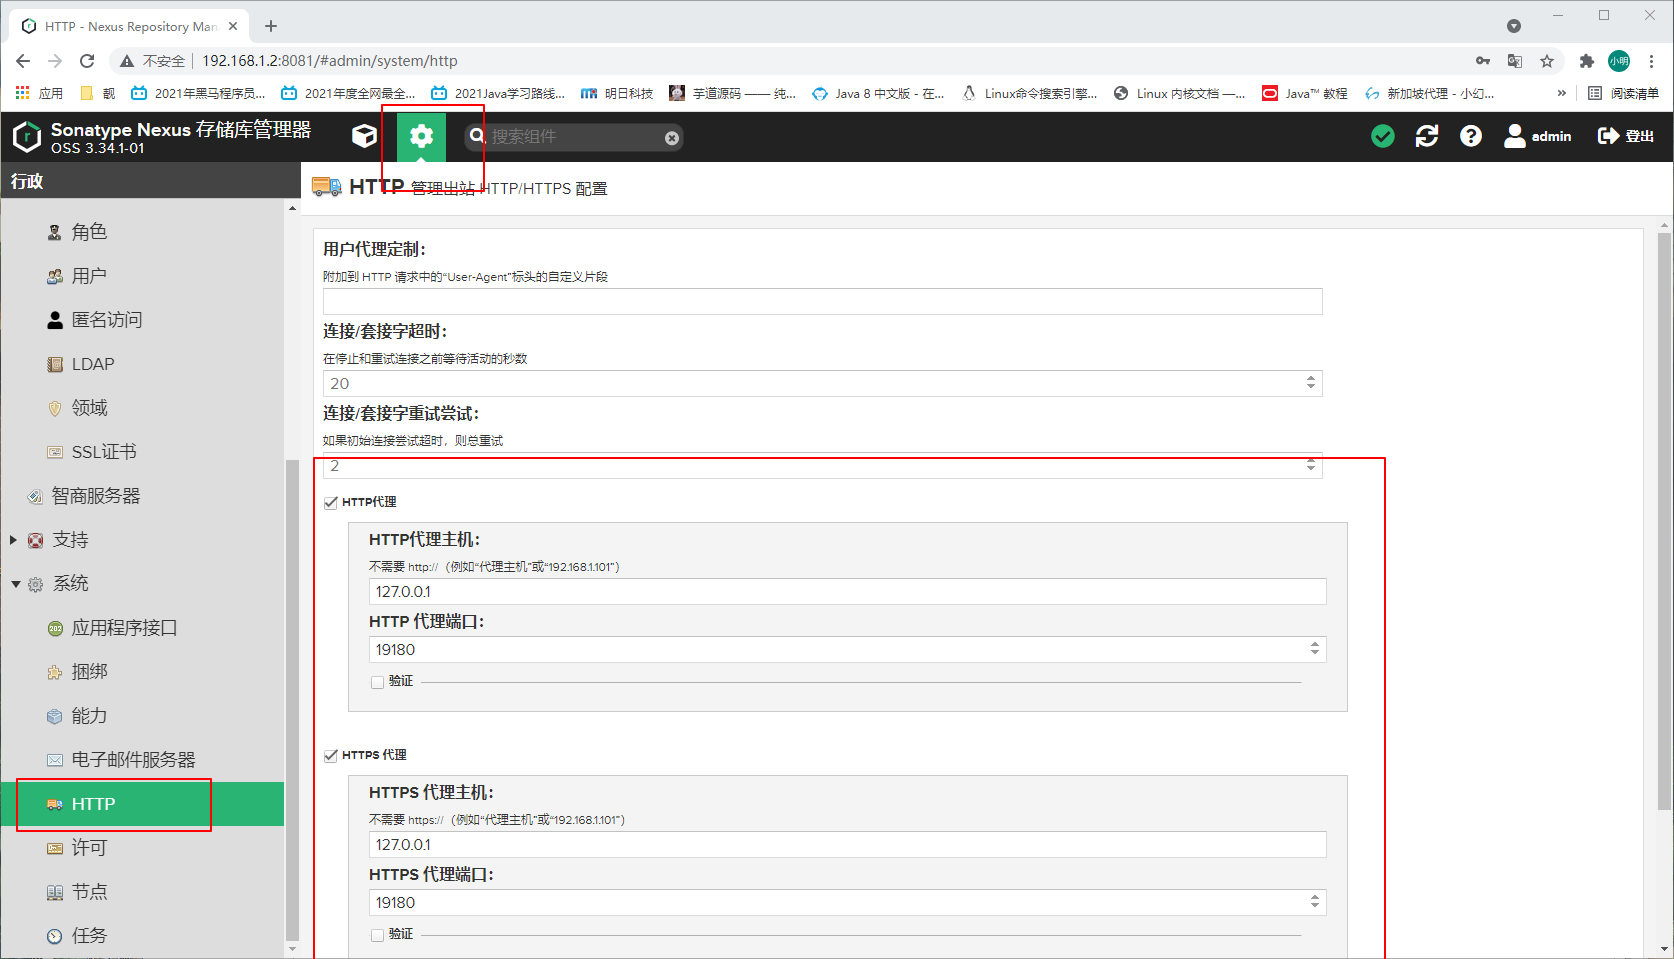
1.设置代理

2.创建仓库
+ hosted: 托管仓库 ,私有仓库,可以push和pull
+ proxy: 代理和缓存远程仓库 ,只能pull
+ group: 将多个proxy和hosted仓库添加到一个组,只访问一个组地址即可,只能pull
代理url https://k8s.gcr.io 、https://gcr.io 、https://registry-1.docker.io 还建了个组仓库
组建k8s高可用集群三控制平面多node详见另篇博客:https://blog.csdn.net/l619872862/article/details/110087605
组建1控制平面多node:
准备工作:
集群中的所有机器的网络彼此均能相互连接
节点之中不可以有重复的主机名、MAC 地址或 product_uuid
关闭swap
端口开放:
控制平面节点:6443、2379-2380、10250、10251、10252
工作节点:10250、30000-32767
加载br_netfilter ip_vs ip_vs_rr ip_vs_wrr ip_vs_sh nf_conntrack_ipv4 模块(注意:使用nf_conntrack而不是nf_conntrack_ipv4用于 Linux 内核 4.19 及更高版本,为后续开启ipvs代理模式做准备)
安装docker
安装 kubeadm、kubelet 和 kubectl
[root@k8s-01 ~]# cat /etc/docker/daemon.json
{
  "exec-opts": ["native.cgroupdriver=systemd"],
  "log-driver": "json-file",
  "log-opts": {
    "max-size": "100m"
  },
  "storage-driver": "overlay2",
  "insecure-registries": ["192.168.1.2:8550"],
  "registry-mirrors": ["http://192.168.1.2:8550"]
}
初始化:
#kubeadm config images pull --image-repository 192.168.1.2:8550 可以提前先拉取镜像
#SVC的ip范围10.96.0.0/16、pod获取的ip范围10.244.0.0/16(因为用的网络插件是flannel,自行根据网络插件的配置ip范围保持一致即可)
kubeadm init --service-cidr 10.96.0.0/16 --pod-network-cidr 10.244.0.0/16 --control-plane-endpoint 192.168.1.15 --image-repository 192.168.1.2:8550 --upload-certs
[addons] Applied essential addon: kube-proxy

Your Kubernetes control-plane has initialized successfully!

To start using your cluster, you need to run the following as a regular user:

  mkdir -p $HOME/.kube
  sudo cp -i /etc/kubernetes/admin.conf $HOME/.kube/config
  sudo chown $(id -u):$(id -g) $HOME/.kube/config

Alternatively, if you are the root user, you can run:

  export KUBECONFIG=/etc/kubernetes/admin.conf

You should now deploy a pod network to the cluster.
Run "kubectl apply -f [podnetwork].yaml" with one of the options listed at:
  https://kubernetes.io/docs/concepts/cluster-administration/addons/

You can now join any number of the control-plane node running the following command on each as root:

  kubeadm join 192.168.1.15:6443 --token fc3a7i.i0yovz66e1qfvitj \
        --discovery-token-ca-cert-hash sha256:4b3ff7faccbc8d73cfef2bfe299b816177f2a849fc78946cec1eb8a4b4c86afa \
        --control-plane --certificate-key 50736746046b79987ceb159f376d128933ab233d613f5bfe44d83d4dcd0efdaf

Please note that the certificate-key gives access to cluster sensitive data, keep it secret!
As a safeguard, uploaded-certs will be deleted in two hours; If necessary, you can use
"kubeadm init phase upload-certs --upload-certs" to reload certs afterward.

Then you can join any number of worker nodes by running the following on each as root:

kubeadm join 192.168.1.15:6443 --token fc3a7i.i0yovz66e1qfvitj \
        --discovery-token-ca-cert-hash sha256:4b3ff7faccbc8d73cfef2bfe299b816177f2a849fc78946cec1eb8a4b4c86afa
网络插件:kubectl apply -f https://raw.githubusercontent.com/coreos/flannel/master/Documentation/kube-flannel.yml
最后该加控制面的加控制面,该加节点的加节点;
[root@k8s-01 ~]# kubectl get node
NAME     STATUS   ROLES                  AGE     VERSION
k8s-01   Ready    control-plane,master   20m     v1.22.2
k8s-04   Ready    <none>                 6m34s   v1.22.2
k8s-05   Ready    <none>                 5m32s   v1.22.2

[root@k8s-01 ~]# kubectl get pod -A -o wide
NAMESPACE     NAME                             READY   STATUS    RESTARTS   AGE   IP             NODE     NOMINATED NODE   READINESS GATES
kube-system   coredns-54c76d684c-gbfhj         1/1     Running   0          25m   10.244.0.2     k8s-01   <none>           <none>
kube-system   coredns-54c76d684c-w892g         1/1     Running   0          25m   10.244.0.3     k8s-01   <none>           <none>
kube-system   etcd-k8s-01                      1/1     Running   0          25m   192.168.1.15   k8s-01   <none>           <none>
kube-system   kube-apiserver-k8s-01            1/1     Running   0          25m   192.168.1.15   k8s-01   <none>           <none>
kube-system   kube-controller-manager-k8s-01   1/1     Running   0          25m   192.168.1.15   k8s-01   <none>           <none>
kube-system   kube-flannel-ds-cwx64            1/1     Running   0          12m   192.168.1.10   k8s-04   <none>           <none>
kube-system   kube-flannel-ds-cxrdp            1/1     Running   0          18m   192.168.1.15   k8s-01   <none>           <none>
kube-system   kube-flannel-ds-svc86            1/1     Running   0          11m   192.168.1.13   k8s-05   <none>           <none>
kube-system   kube-proxy-jkgws                 1/1     Running   0          25m   192.168.1.15   k8s-01   <none>           <none>
kube-system   kube-proxy-pw6qr                 1/1     Running   0          12m   192.168.1.10   k8s-04   <none>           <none>
kube-system   kube-proxy-wb7hm                 1/1     Running   0          11m   192.168.1.13   k8s-05   <none>           <none>
kube-system   kube-scheduler-k8s-01            1/1     Running   0          25m   192.168.1.15   k8s-01   <none>           <none>


