


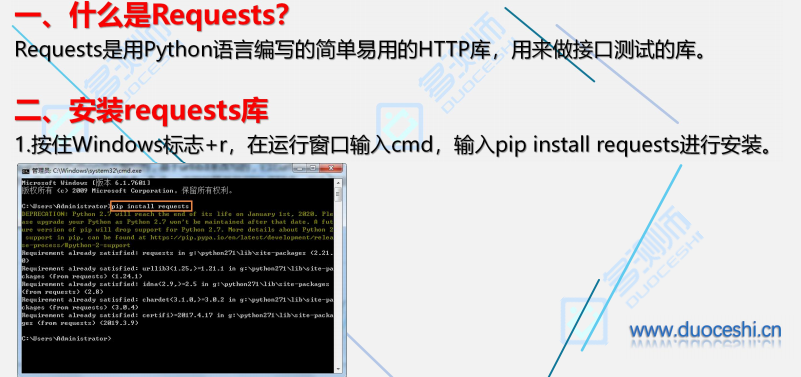
查看我们request库是否存在


第一种:
rep =requests.get(参数)
rep =requests.post(参数)
第二种:
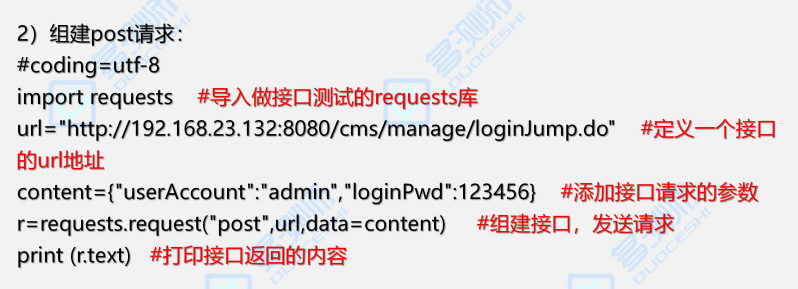
rep =requests.request(post,参数)
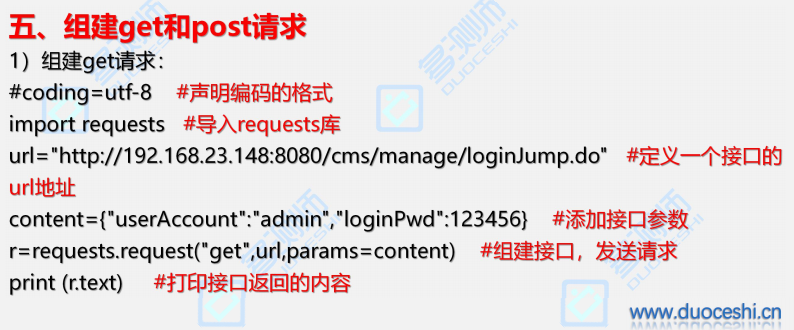
rep =requests.request(get,参数)
第三种:
session =requests.Session()#创建一个session对象,作用就是保持会话和关联
rep =session.get()
rep =session.post()
1、第一种方法:
rep =requests.get(参数)
rep =requests.post(参数)
1.1 post 请求
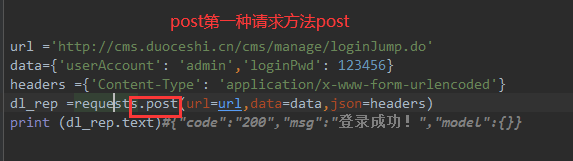
import requests
url ='http://cms.duoceshi.cn/cms/manage/loginJump.do'
data1={'userAccount':'admin','loginPwd': 123456}
headers1 ={'Content-Type':'application/x-www-form-urlencoded'}
dl_rep =requests.post(url=url,data=data1,json=headers1)
print (dl_rep.text)#{"code":"200","msg":"登录成功!","model":{}}
1.2 get请求

import requests
url ='http://cms.duoceshi.cn/cms/manage/loginJump.do'
data1={'userAccount':'admin','loginPwd': 123456}
headers1 ={'Content-Type':'application/x-www-form-urlencoded'}
dl_rep =requests.get(url=url,params=data1,json=headers1)
print (dl_rep.text)#{"code":"200","msg":"登录成功!","model":{}}
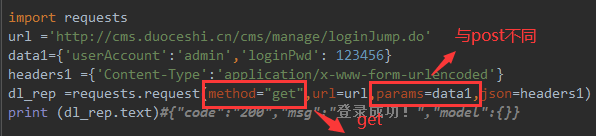
2、第二种方法:
2.1post方法
re=request.request(method="post",url=url,data=data1,json=headers1)
 import requests
url ='http://cms.duoceshi.cn/cms/manage/loginJump.do'
data1={'userAccount':'admin','loginPwd': 123456}
headers1 ={'Content-Type': 'application/x-www-form-urlencoded'}
dl_rep =requests.request(method="post",url=url,data=data1,json=headers1)
print (dl_rep.text)#{"code":"200","msg":"登录成功!","model":{}}

2.2get方法
3、第三种方法:
使用session可以解决接口依赖关系
session= requests.Session() # 创建一session对象来保持上下接口的关联uerlist_rep=session.post(url=uerlist_url,data=uerlist_data,json=uerlist_headers)
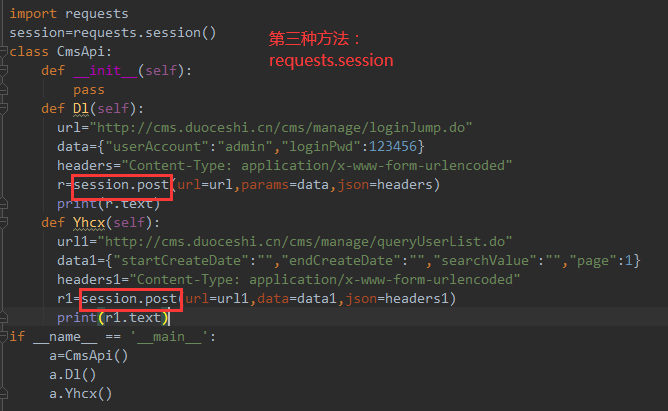
1 2 3 4 5 6 7 8 9 10 11 12 13 14 15 16 17 18 19 20 21 22 23 | import requests #到入 接口库session= requests.Session() # 创建一session对象来保持上下接口的关联class Cms_api: def __init__(self): pass def cms_dl(self): #定义一个登录 url ='http://cms.duoceshi.cn/cms/manage/loginJump.do' data={'userAccount': 'admin','loginPwd': 123456} headers ={'Content-Type': 'application/x-www-form-urlencoded'} # dl_rep=requests.post(url=url,data=data,json=headers) dl_rep =session.post(url=url,data=data,json=headers) print (dl_rep.text)#{"code":"200","msg":"登录成功!","model":{}} def cms_yhgl(self): #定义一个用户管理接口 uerlist_url='http://cms.duoceshi.cn/cms/manage/queryUserList.do' uerlist_data={'startCreateDate': '','endCreateDate': '','searchValue': '', 'page': 1} uerlist_headers={'Content-Type': 'application/x-www-form-urlencoded'} # uerlist_rep=requests.post(url=uerlist_url,data=uerlist_data,json=uerlist_headers) uerlist_rep=session.post(url=uerlist_url,data=uerlist_data,json=uerlist_headers) print (uerlist_rep.text) #{"code":"200","msg":"登录成功!","model":{}}if __name__ == '__main__': a=Cms_api() a.cms_dl() a.cms_yhgl() |
==============================================================
通过cookie来进行接口依赖关系
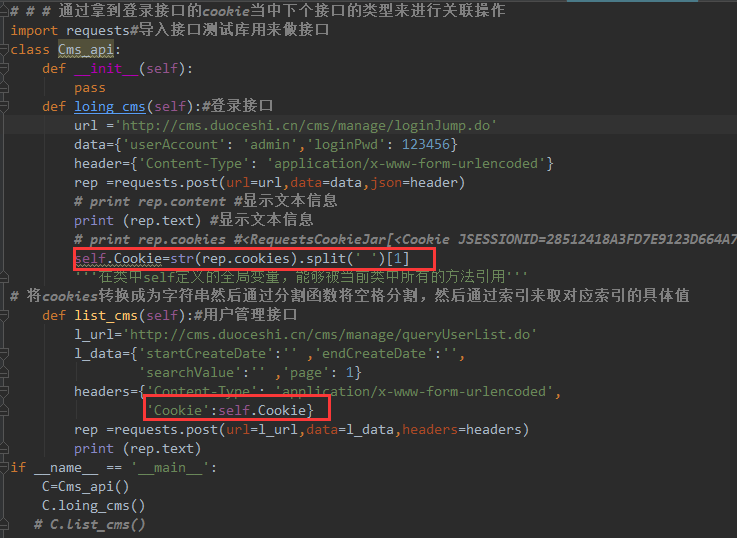
1 2 3 4 5 6 7 8 9 10 11 12 13 14 15 16 17 18 19 20 21 22 23 24 25 26 27 28 | # # # 通过拿到登录接口的cookie当中下个接口的类型来进行关联操作import requests#导入接口测试库用来做接口class Cms_api: def __init__(self): pass def loing_cms(self):#登录接口 url ='http://cms.duoceshi.cn/cms/manage/loginJump.do' data={'userAccount': 'admin','loginPwd': 123456} header={'Content-Type': 'application/x-www-form-urlencoded'} rep =requests.post(url=url,data=data,json=header) # print rep.content #显示文本信息 print (rep.text) #显示文本信息 # print rep.cookies #<RequestsCookieJar[<Cookie JSESSIONID=28512418A3FD7E9123D664A70AF9D2B5 for 192.168.254.129/cms/>]> self.Cookie=str(rep.cookies).split(' ')[1] '''在类中self定义的全局变量,能够被当前类中所有的方法引用'''# 将cookies转换成为字符串然后通过分割函数将空格分割,然后通过索引来取对应索引的具体值 def list_cms(self):#用户管理接口 l_url='http://cms.duoceshi.cn/cms/manage/queryUserList.do' l_data={'startCreateDate':'' ,'endCreateDate':'', 'searchValue':'' ,'page': 1} headers={'Content-Type': 'application/x-www-form-urlencoded', 'Cookie':self.Cookie} rep =requests.post(url=l_url,data=l_data,headers=headers) print (rep.text)if __name__ == '__main__': C=Cms_api() C.loing_cms() # C.list_cms() |
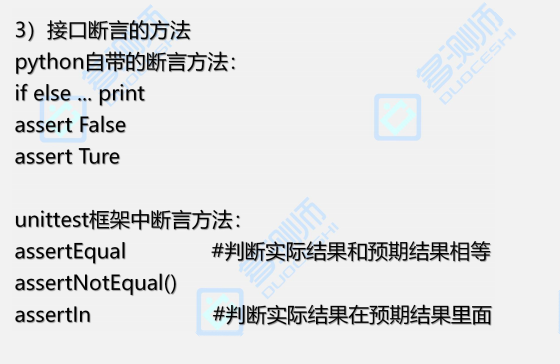
断言:if案例
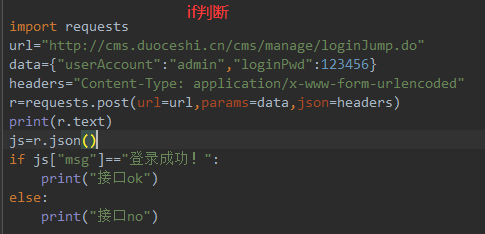
1 2 3 4 5 6 7 8 9 10 11 | import requestsurl="http://cms.duoceshi.cn/cms/manage/loginJump.do"data={"userAccount":"admin","loginPwd":123456}headers="Content-Type: application/x-www-form-urlencoded"r=requests.post(url=url,params=data,json=headers)print(r.text)js=r.json()if js["msg"]=="登录成功!": print("接口ok")else: print("接口no") |
2.assert断言
2.1assert成功断言

1 2 3 4 5 6 7 8 | import requestsurl="http://cms.duoceshi.cn/cms/manage/loginJump.do"data={"userAccount":"admin","loginPwd":123456}headers="Content-Type: application/x-www-form-urlencoded"r=requests.post(url=url,params=data,json=headers)print(r.text)js=r.json()assert js["msg"]=="登录成功!" |
2.2assert失败断言

1 2 3 4 5 6 7 8 | import requestsurl="http://cms.duoceshi.cn/cms/manage/loginJump.do"data={"userAccount":"admin","loginPwd":123456}headers="Content-Type: application/x-www-form-urlencoded"r=requests.post(url=url,params=data,json=headers)print(r.text)js=r.json()assert js["msg"]=="登录成 |
1 2 3 4 5 6 7 8 9 10 11 12 13 14 15 16 17 18 19 20 21 22 | import requestsclass Cms_api: def __init__(self,url,data,headers): self.url=url self.data=data self.headers=headers def fun(self): rep =requests.post(url=self.url,data=self.data,json=self.headers) js=rep.json() #为了断言需要转换格式 return js def fun1(self): a=self.fun() #方法传递 assert a['msg']=="登录成功!" #断言方法 if a['msg']=="登录成功!": #断言方法 print('OK') else: print('NO')if __name__ == '__main__': Cms =Cms_api(url='http://cms.duoceshi.cn/cms/manage/loginJump.do', data={'userAccount': 'admin','loginPwd': 123456}, headers={'Content-Type': 'application/x-www-form-urlencoded'}) Cms.fun1() |
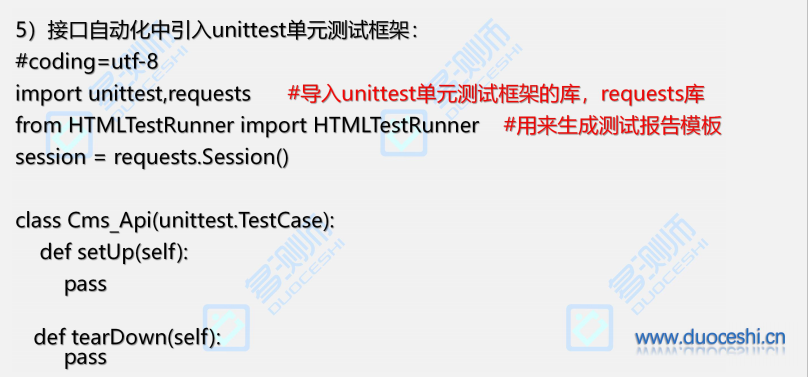
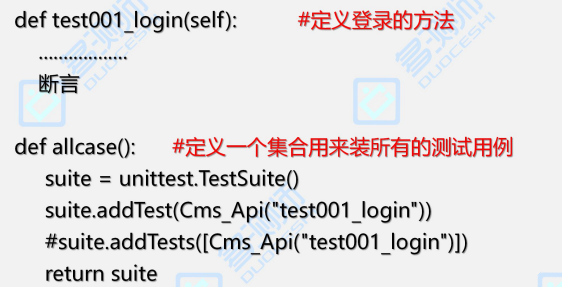

unittest做接口测试
1 2 3 4 5 6 7 8 9 10 11 12 13 14 15 16 17 18 19 20 21 22 23 24 25 26 27 28 29 30 31 32 33 34 35 36 37 38 39 40 41 42 43 44 45 46 47 48 49 50 51 52 53 54 55 56 57 58 | import unittest #导入单元测试框架import requests #导入接口库import timefrom requester.HTMLTestRunner3 import HTMLTestRunner#导入生成报告类class Cms_api(unittest.TestCase): #定义一个类继承单元测试框架中的testcase类 @classmethod def setUpClass(cls): # cls的类的方法 cls.session=requests.Session()#session是一个全局的变量作用是保持上下接口的会话和关联 @classmethod def tearDownClass(cls): print ('类的结束') def setUp(self): print ('方法的开始') def test01(self): #定义一个用例 用例名称要用test '''登录接口''' url ='http://cms.duoceshi.cn/cms/manage/loginJump.do' data={'userAccount': 'admin','loginPwd': 123456} header={'Content-Type': 'application/x-www-form-urlencoded'} # rep =requests.post(url=url,data=data,json=header) rep =self.session.post(url=url,data=data,json=header) print (rep.text) #打印登录接口的结果 def test02(self):#定义一个用例用户管理接口 urlist_url='http://cms.duoceshi.cn/cms/manage/queryUserList.do' urlist_data={'startCreateDate':'', 'endCreateDate':'' ,'searchValue':'', 'page': 1} urlist_he={'Content-Type': 'application/x-www-form-urlencoded'} ur_rep=self.session.post(url=urlist_url,data=urlist_data,json=urlist_he) print (ur_rep.text) #打印用户管理接口的结果 def tearDown(self): print ('方法的结束')def urits(): #创建一个普通函数 作用是容器存放用例 us =unittest.TestSuite() #容器 us.addTest(Cms_api('test01')) #单个执行用例 #us.addTests([Cms_api('test01'),Cms_api('test02')])#执行多条 return usif __name__ == '__main__': # unittest.main() # 第一种方法调用所有 # r=unittest.TextTestRunner() #第二种方法,调用条件中的用例 # r.run(urits()) # start_dir = r'C:\Users\Administrator\PycharmProjects\untitled1\requester' #项目路径 # discover = unittest.defaultTestLoader.discover(start_dir=start_dir, pattern='request001*.py') # 中间* 是通配符 # runner = unittest.TextTestRunner() # runner.run(discover) #三种方法# runner.run(discover)# # #四:自动化搜索+生成测试报告 start_dir = r'C:\Users\Administrator\PycharmProjects\untitled1\requester' discover = unittest.defaultTestLoader.discover(start_dir=start_dir, pattern='request001*.py') # 中间* 是通配符 # 1.定义生成的测试报告的名称 path= r'C:\Users\Administrator\PycharmProjects\untitled1\api' # ##报告生成在我们当前路径,copy本地路径 now = time.strftime('%Y-%m-%d-%H-%M-%S') filename = r'C:\Users\Administrator\PycharmProjects\untitled1\requester' + "\\" + str(now) + 'api_report.html' ###.html'表示 # # print(filename) f = open(filename, 'bw') # 以二进制的方式在...ui.html文件中写入报告模板和测试结果 # ##w 是写,b 是表示二进制方式写入, runner = HTMLTestRunner(stream=f, title='接口自动化测试报告', description='用例执行情况如下:') runner.run(discover)# f.close() # 释放资源、关闭文件 |
得到的接口测试报告:


1、关联接口
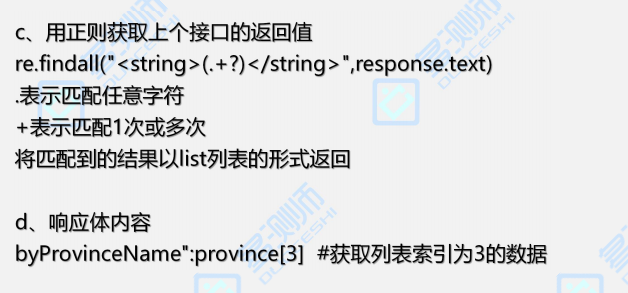
通过正则去提取json内容
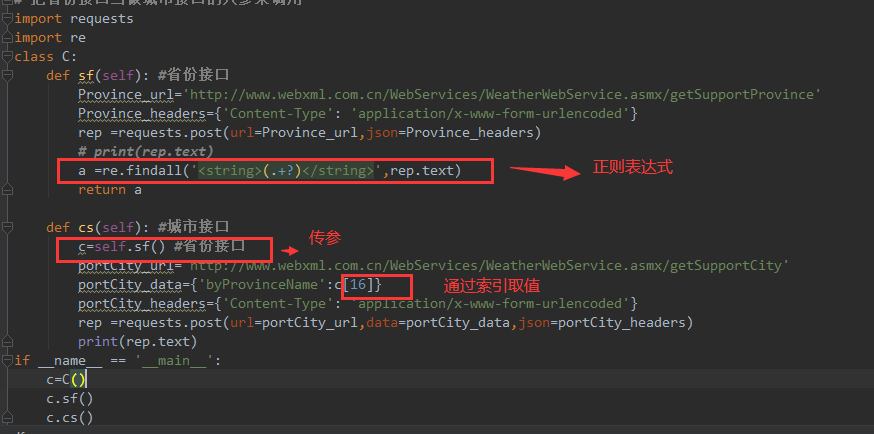
1 2 3 4 5 6 7 8 9 10 11 12 13 14 15 16 17 18 19 20 21 22 23 | # 把省份接口当做城市接口的入参来调用import requestsimport reclass C: def sf(self): #省份接口 Province_url='http://www.webxml.com.cn/WebServices/WeatherWebService.asmx/getSupportProvince' Province_headers={'Content-Type': 'application/x-www-form-urlencoded'} rep =requests.post(url=Province_url,json=Province_headers) # print(rep.text) a =re.findall('<string>(.+?)</string>',rep.text) return a def cs(self): #城市接口 c=self.sf() #省份接口 portCity_url='http://www.webxml.com.cn/WebServices/WeatherWebService.asmx/getSupportCity' portCity_data={'byProvinceName':c[16]} portCity_headers={'Content-Type': 'application/x-www-form-urlencoded'} rep =requests.post(url=portCity_url,data=portCity_data,json=portCity_headers) print(rep.text)if __name__ == '__main__': c=C() # c.sf() c.cs() |


【推荐】国内首个AI IDE,深度理解中文开发场景,立即下载体验Trae
【推荐】编程新体验,更懂你的AI,立即体验豆包MarsCode编程助手
【推荐】抖音旗下AI助手豆包,你的智能百科全书,全免费不限次数
【推荐】轻量又高性能的 SSH 工具 IShell:AI 加持,快人一步
· 10年+ .NET Coder 心语,封装的思维:从隐藏、稳定开始理解其本质意义
· .NET Core 中如何实现缓存的预热?
· 从 HTTP 原因短语缺失研究 HTTP/2 和 HTTP/3 的设计差异
· AI与.NET技术实操系列:向量存储与相似性搜索在 .NET 中的实现
· 基于Microsoft.Extensions.AI核心库实现RAG应用
· 10年+ .NET Coder 心语 ── 封装的思维:从隐藏、稳定开始理解其本质意义
· 地球OL攻略 —— 某应届生求职总结
· 提示词工程——AI应用必不可少的技术
· Open-Sora 2.0 重磅开源!
· 周边上新:园子的第一款马克杯温暖上架