solrcloud
本文收集自网络,部分内容个人编写。收集了一下网页的内容:
http://blog.csdn.net/dingzfang/article/details/42804489
什么是SolrCloud
SolrCloud(solr 云)是Solr提供的分布式搜索方案,当你需要大规模,容错,分布式索引和检索能力时使用 SolrCloud。当一个系统的索引数据量少的时候是不需要使用SolrCloud的,当索引量很大,搜索请求并发很高,这时需要使用SolrCloud来满足这些需求。
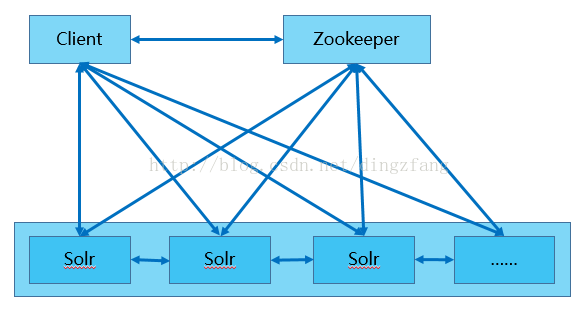
SolrCloud是基于Solr和Zookeeper的分布式搜索方案,它的主要思想是使用Zookeeper作为集群的配置信息中心。
另外,Solr的一些任务也是通过ZK作为媒介发布的。目的是为了容错。接收到任务,但在执行任务时崩溃的机器,在重启后,或者集群选出候选者时,可以再次执行这个未完成的任务。
SolrCloud对索引分片,并对每个分片创建多个Replication。每个Replication都可以对外提供服务。一个Replication挂掉不会影响索引服务。
SolrCloud索引的多个Replication可以分布在多台机器上,均衡查询压力。如果查询压力大,可以通过扩展机器,增加Replication来减缓。
SolrCloud架构
核心概念
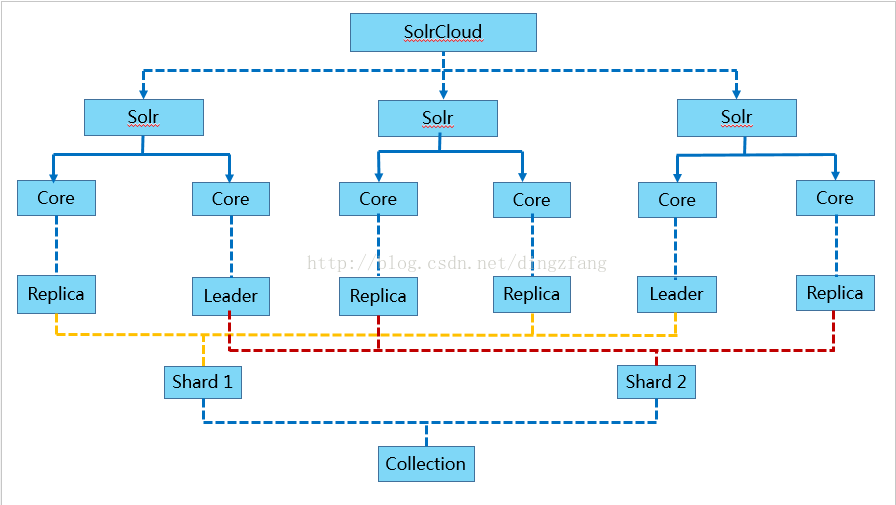
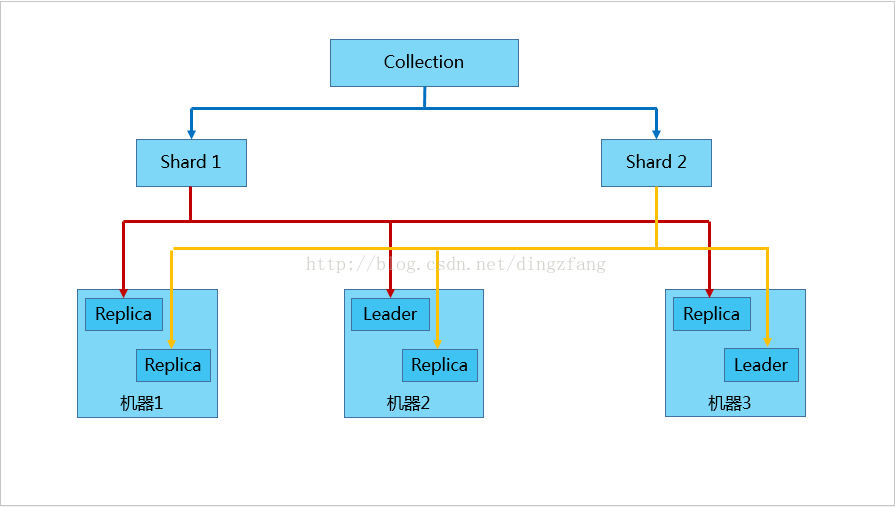
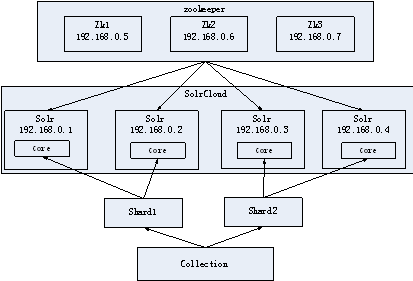
Shard: Collection的逻辑分片。每个Shard被化成一个或者多个replicas,通过选举确定哪个是Leader。
Zookeeper: Zookeeper提供分布式锁功能,对SolrCloud是必须的。它处理Leader选举。Solr可以以内嵌的Zookeeper运行,但是建议用独立的,并且最好有3个以上的主机。
总体架构:
内部结构
Shard架构
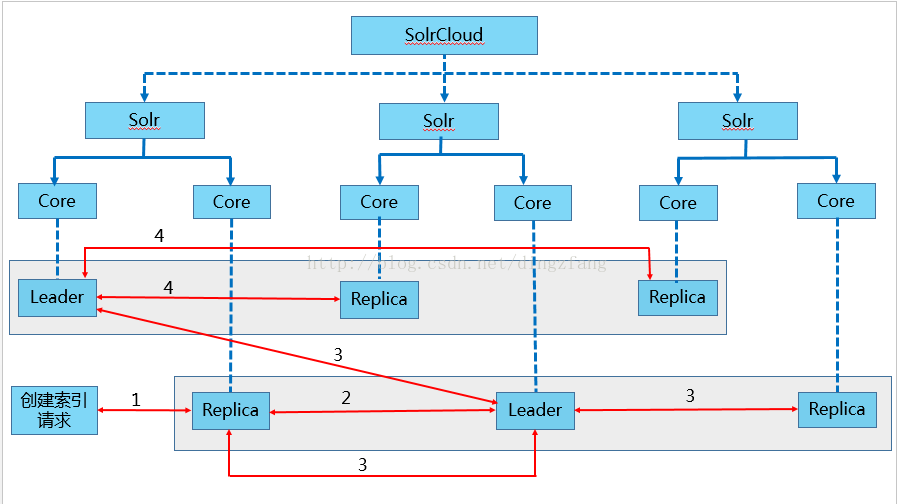
索引的创建
1.用户可以把创建文档索引的请求提交给任一个Replica或Leader
2.如果它不是Leader,它会把请求转交给和自己同Shard的Leader
3.Leader把文档路由给本Shard的每个Replica,各自做索引
4.如果文档基于路由规则并不属于本Shard,Leader会把它转交给该文档对应Shard的Leader
5.对应的Leader会把文档路由给本Shard的每个Replica,各自做索引
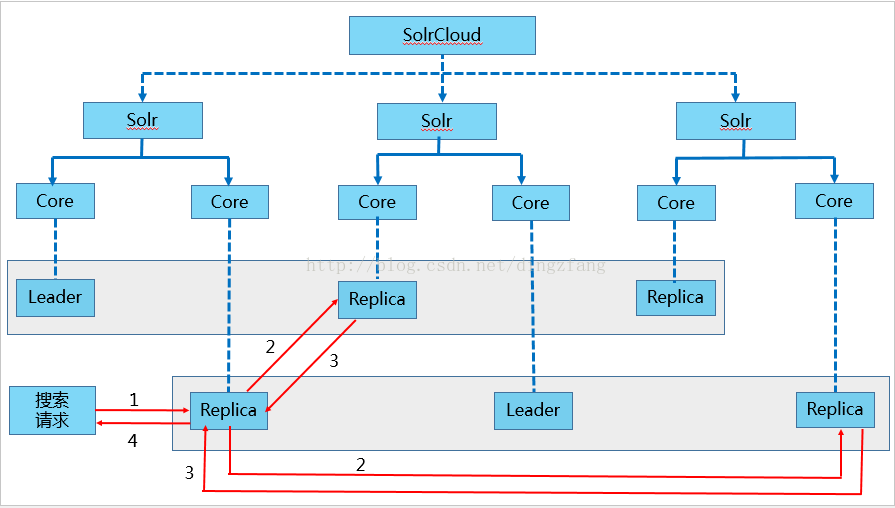
搜索
1.用户的一个查询请求,可以发送到含有该Collection的任意机器,Solr的内部处理逻辑会转到一个Replica
2.此Replica会基于查询索引的方式,启动分布式查询,基于索引的Shard个数,把查询转换为多个子查询,并把每个子查询定位到对应Shard的任意一个Replica
4.最初的Replica合并每个子查询的查询结果,并把最终结果返回给用户
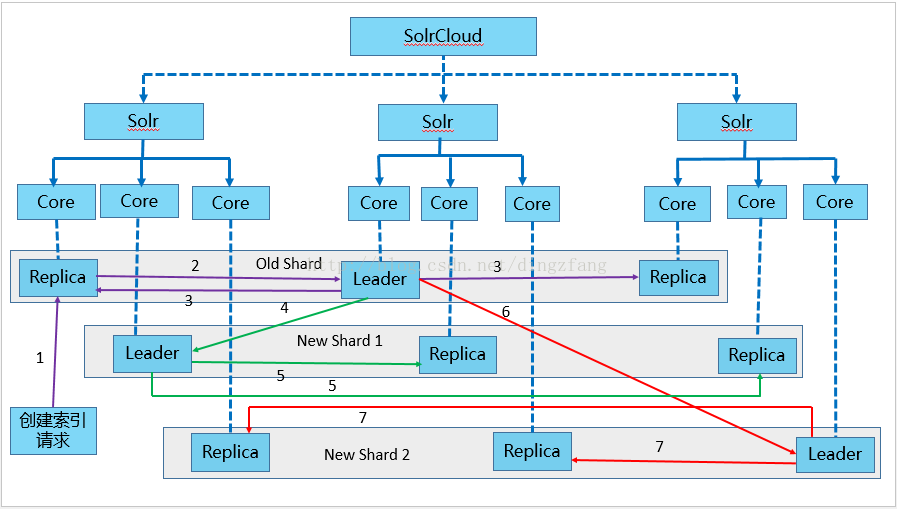
自动shard
1.用户可以把创建文档索引的请求提交给任一个Replica或Leader
2.如果它不是Leader,它会把请求转交给和自己同Shard的Leader
3.Leader将索引文档路由给本Shard的每个Replica,各自做索引
5,7.新的shard的Leader会将索引文档路由给本Shard的每个Replica,各自做索引
在旧的索引文档重新索引完成后,系统会把分发文档的路由切换到对应的新的Leader上,旧Shard关闭
环境的安装
第一步:安装CentOS6.4。
第二步:安装java虚拟机。
第三步:安装zookeeper。
Zookeeper保证是奇数节点。最少三个节点。伪分布式的集群环境,在同一个linux下运行集群环境。
initLimit=10
# The number of ticks that can pass between
# sending a request and getting an acknowledgement
syncLimit=5
# the directory where the snapshot is stored.
# do not use /tmp for storage, /tmp here is just
# example sakes.
dataDir=/usr/local/solrcloud/zookeeper1/data
# the port at which the clients will connect
clientPort=2181
# the maximum number of client connections.
# increase this if you need to handle more clients
#maxClientCnxns=60
#
# Be sure to read the maintenance section of the
# administrator guide before turning on autopurge.
#
# http://zookeeper.apache.org/doc/current/zookeeperAdmin.html#sc_maintenance
#
# The number of snapshots to retain in dataDir
#autopurge.snapRetainCount=3
# Purge task interval in hours
# Set to "0" to disable auto purge feature
#autopurge.purgeInterval=1
server.1=192.168.25.150:2881:3881
server.2=192.168.25.150:2882:3882
server.3=192.168.25.150:2883:3883
[root@bogon solrcloud]# cd zookeeper2
[root@bogon zookeeper2]# mkdir data
[root@bogon zookeeper2]# echo 2 >> data/myid
[root@bogon zookeeper2]# cd conf
[root@bogon conf]# cp zoo_sample.cfg zoo.cfg
[root@bogon conf]# vim zoo.cfg
# The number of milliseconds of each tick
tickTime=2000
# The number of ticks that the initial
# synchronization phase can take
initLimit=10
# The number of ticks that can pass between
# sending a request and getting an acknowledgement
syncLimit=5
# the directory where the snapshot is stored.
# do not use /tmp for storage, /tmp here is just
# example sakes.
dataDir=/usr/local/solrcloud/zookeeper2/data
# the port at which the clients will connect
clientPort=2182
# the maximum number of client connections.
# increase this if you need to handle more clients
#maxClientCnxns=60
#
# Be sure to read the maintenance section of the
# administrator guide before turning on autopurge.
#
# http://zookeeper.apache.org/doc/current/zookeeperAdmin.html#sc_maintenance
#
# The number of snapshots to retain in dataDir
#autopurge.snapRetainCount=3
# Purge task interval in hours
# Set to "0" to disable auto purge feature
#autopurge.purgeInterval=1
server.1=192.168.25.150:2881:3881
server.2=192.168.25.150:2882:3882
server.3=192.168.25.150:2883:3883
/usr/local/solrcloud/zookeeper1/bin/zkServer.sh status
第四步:安装tomcat
第五步:配置solr服务
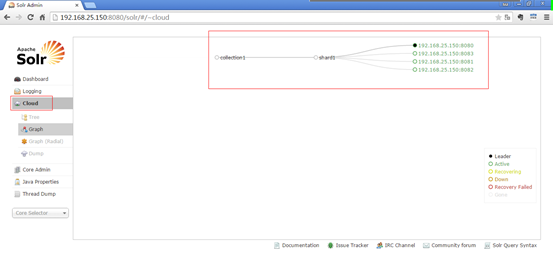
第六步:集群环境搭建
./zkcli.sh -zkhost 192.168.25.150:2181,192.168.25.150:2182,192.168.25.150:2183 -cmd upconfig -confdir /usr/local/solrcloud/solrhome1/collection1/conf -confname myconf
修改每一台solr的tomcat 的 bin目录下catalina.sh文件中加入DzkHost指定zookeeper服务器地址:
JAVA_OPTS="-DzkHost=192.168.25.150:2181,192.168.25.150:2182,192.168.25.150:2183"
(可以使用vim的查找功能查找到JAVA_OPTS的定义的位置,然后添加)
集群管理
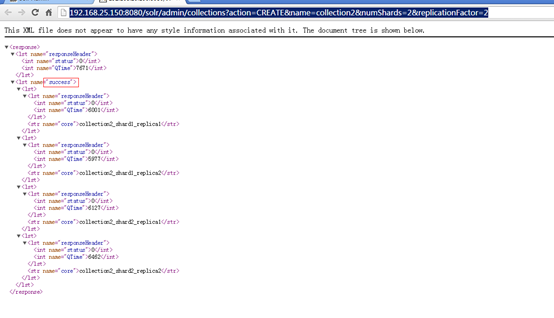
创建有两片的collection
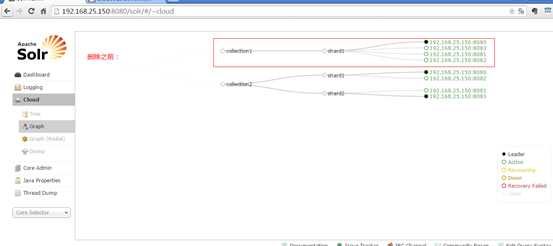
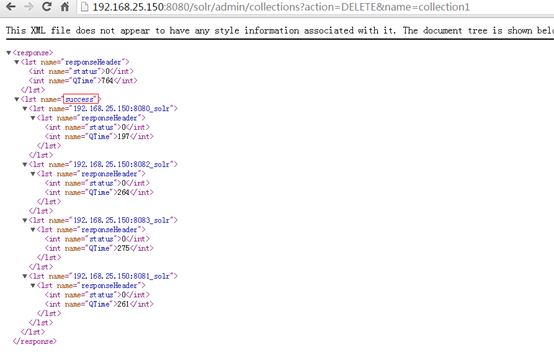
删除collection
http://192.168.25.150:8080/solr/admin/collections?action=DELETE&name=collection1
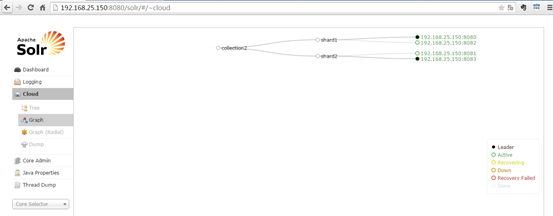
配置dataimport插件
- 需要在每个节点都配置一下,把dataimport插件依赖的jar包添加到每个节点的collection文件夹的lib下。
- 修改solrconfig.xml把solrconfig.xml上传至zookeeper。
使用单机版配置,只需要把单机版的collection1/conf目录上传至zookeeper就可以了。
./zkcli.sh -zkhost 192.168.25.150:2181,192.168.25.150:2182,192.168.25.150:2183 -cmd upconfig -confdir /root/solrhome/collection1/conf -confname myconf
- 重启tomcat集群。
集群环境下SolrJ的使用
步骤:
第一步:创建一java工程
第二步:导入jar包。包括solrJ的jar包solrJ依赖的jar包。Example/lib/ext下的日志相关的jar包。
第三步:集群环境使用CloudSolrServer创建一连接。指定zookeeper的地址列表。还需要指定要连接的collection。
第四步:创建一个查询。
第五步:执行查询。跟单机版一样的。
代码实现
@Test
public void testCloud() throws Exception {
//创建一个连接
String zkHost = "192.168.25.150:2181,192.168.25.150:2182,192.168.25.150:2183";
//参数:zookeeper服务器的地址列表。
CloudSolrServer server = new CloudSolrServer(zkHost);
//指定默认连接的collection
server.setDefaultCollection("collection2");
//创建一查询对象
SolrQuery solrQuery = new SolrQuery();
solrQuery.setQuery("*:*");
//执行查询
QueryResponse queryResponse = server.query(solrQuery);
SolrDocumentList solrDocumentList = queryResponse.getResults();
System.out.println("查询结果总数量:" + solrDocumentList.getNumFound());
for (SolrDocument solrDocument : solrDocumentList) {
System.out.println(solrDocument.get("id"));
System.out.println(solrDocument.get("product_name"));
System.out.println(solrDocument.get("product_price"));
System.out.println(solrDocument.get("product_picture"));
}
}


