
ServerBootstrap
ServerBootstrap
ServerBootstrap:启动类
 ServerBootstrap bootstrap = new ServerBootstrap();
             bootstrap.group(bossGroup, workerGroup)
                     .channel(NioServerSocketChannel.class)
                     .childHandler(new ChannelInitializer<SocketChannel>() {
                         @Override
                         protected void initChannel(SocketChannel ch) throws Exception {
                            ch.pipeline().addLast(new ServerHandler());
                         }
                      })
                      .childOption(ChannelOption.SO_KEEPALIVE, true);
channel(NioServerSocketChannel.class)方法
创建反射通道工厂new ReflectiveChannelFactory,通过反射获得无参构造函数this.constructor,当调用newChannel()的时候可以创建对象。NIO 模型是 Netty 中最成熟且被广泛使用的模型。因此,推荐 Netty 服务端采用 NioServerSocketChannel 作为 Channel 的类型,客户端采用 NioSocketChannel。Netty 提供了多种类型的 Channel 实现类,你可以按需切换,例如 OioServerSocketChannel、EpollServerSocketChannel 等。
1 public B channel(Class<? extends C> channelClass) {
2         return channelFactory(new ReflectiveChannelFactory<C>(
3                 ObjectUtil.checkNotNull(channelClass, "channelClass")
4         ));
5     }
 1 public class ReflectiveChannelFactory<T extends Channel> implements ChannelFactory<T> {
 2
 3     private final Constructor<? extends T> constructor;
 4
 5     public ReflectiveChannelFactory(Class<? extends T> clazz) {
 6         ObjectUtil.checkNotNull(clazz, "clazz");
 7         try {
 8             this.constructor = clazz.getConstructor();
 9         } catch (NoSuchMethodException e) {
10             throw new IllegalArgumentException("Class " + StringUtil.simpleClassName(clazz) +
11                     " does not have a public non-arg constructor", e);
12         }
13     }
14
15     @Override
16     public T newChannel() {
17         try {
18             return constructor.newInstance();
19         } catch (Throwable t) {
20             throw new ChannelException("Unable to create Channel from class " + constructor.getDeclaringClass(), t);
21         }
22     }
23
24     @Override
25     public String toString() {
26         return StringUtil.simpleClassName(ReflectiveChannelFactory.class) +
27                 '(' + StringUtil.simpleClassName(constructor.getDeclaringClass()) + ".class)";
28     }
29 }
channelFactory方法
设置通道工厂,返回自身,继续链式调用。
 1 public B channelFactory(io.netty.channel.ChannelFactory<? extends C> channelFactory) {
 2         return channelFactory((ChannelFactory<C>) channelFactory);
 3     }
 4
 5
 6 public B channelFactory(ChannelFactory<? extends C> channelFactory) {
 7         ObjectUtil.checkNotNull(channelFactory, "channelFactory");
 8         if (this.channelFactory != null) {
 9             throw new IllegalStateException("channelFactory set already");
10         }
11
12         this.channelFactory = channelFactory;
13         return self();
14     }
childHandler(ChannelHandler childHandler)
在 Netty 中可以通过 ChannelPipeline 去注册多个 ChannelHandler,每个 ChannelHandler 各司其职,ServerBootstrap 的 childHandler() 方法需要注册一个 ChannelHandler。ChannelInitializer是实现了 ChannelHandler接口的匿名类,通过实例化 ChannelInitializer 作为 ServerBootstrap 的参数。
1 public ServerBootstrap childHandler(ChannelHandler childHandler) {
2         this.childHandler = ObjectUtil.checkNotNull(childHandler, "childHandler");
3         return this;
4     }
Channel 初始化时都会绑定一个 Pipeline,它主要用于服务编排。Pipeline 管理了多个 ChannelHandler。I/O 事件依次在 ChannelHandler 中传播,ChannelHandler 负责业务逻辑处理。
b.childHandler(new ChannelInitializer<SocketChannel>() {
    @Override
    public void initChannel(SocketChannel ch) {
        ch.pipeline()
                .addLast("codec", new HttpServerCodec())
                .addLast("compressor", new HttpContentCompressor())
                .addLast("aggregator", new HttpObjectAggregator(65536))
                .addLast("handler", new HttpServerHandler());
    }
})
上述 示例中使用链式的方式加载了多个 ChannelHandler,包含HTTP 编解码处理器、HTTPContent 压缩处理器、HTTP 消息聚合处理器、自定义业务逻辑处理器。
b.option(ChannelOption.SO_KEEPALIVE, true);
设置 Channel 参数。ServerBootstrap 设置 Channel 属性有option和childOption两个方法,option 主要负责设置 Boss 线程组,而 childOption 对应的是 Worker 线程组。
经常使用的参数含义,结合业务场景,按需设置。
| 参数 | 含义 |
|---|---|
| SO_KEEPALIVE | 设置为 true 代表启用了 TCP SO_KEEPALIVE 属性,TCP 会主动探测连接状态,即连接保活 |
| SO_BACKLOG | 已完成三次握手的请求队列最大长度,同一时刻服务端可能会处理多个连接,在高并发海量连接的场景下,该参数应适当调大 |
| TCP_NODELAY | Netty 默认是 true,表示立即发送数据。如果设置为 false 表示启用 Nagle 算法,该算法会将 TCP 网络数据包累积到一定量才会发送,虽然可以减少报文发送的数量,但是会造成一定的数据延迟。Netty 为了最小化数据传输的延迟,默认禁用了 Nagle 算法 |
| SO_SNDBUF | TCP 数据发送缓冲区大小 |
| SO_RCVBUF | TCP数据接收缓冲区大小,TCP数据接收缓冲区大小 |
| SO_LINGER | 设置延迟关闭的时间,等待缓冲区中的数据发送完成 |
| CONNECT_TIMEOUT_MILLIS | 建立连接的超时时间 |
ServerBootstrap.bind(hostname, port)
流程图
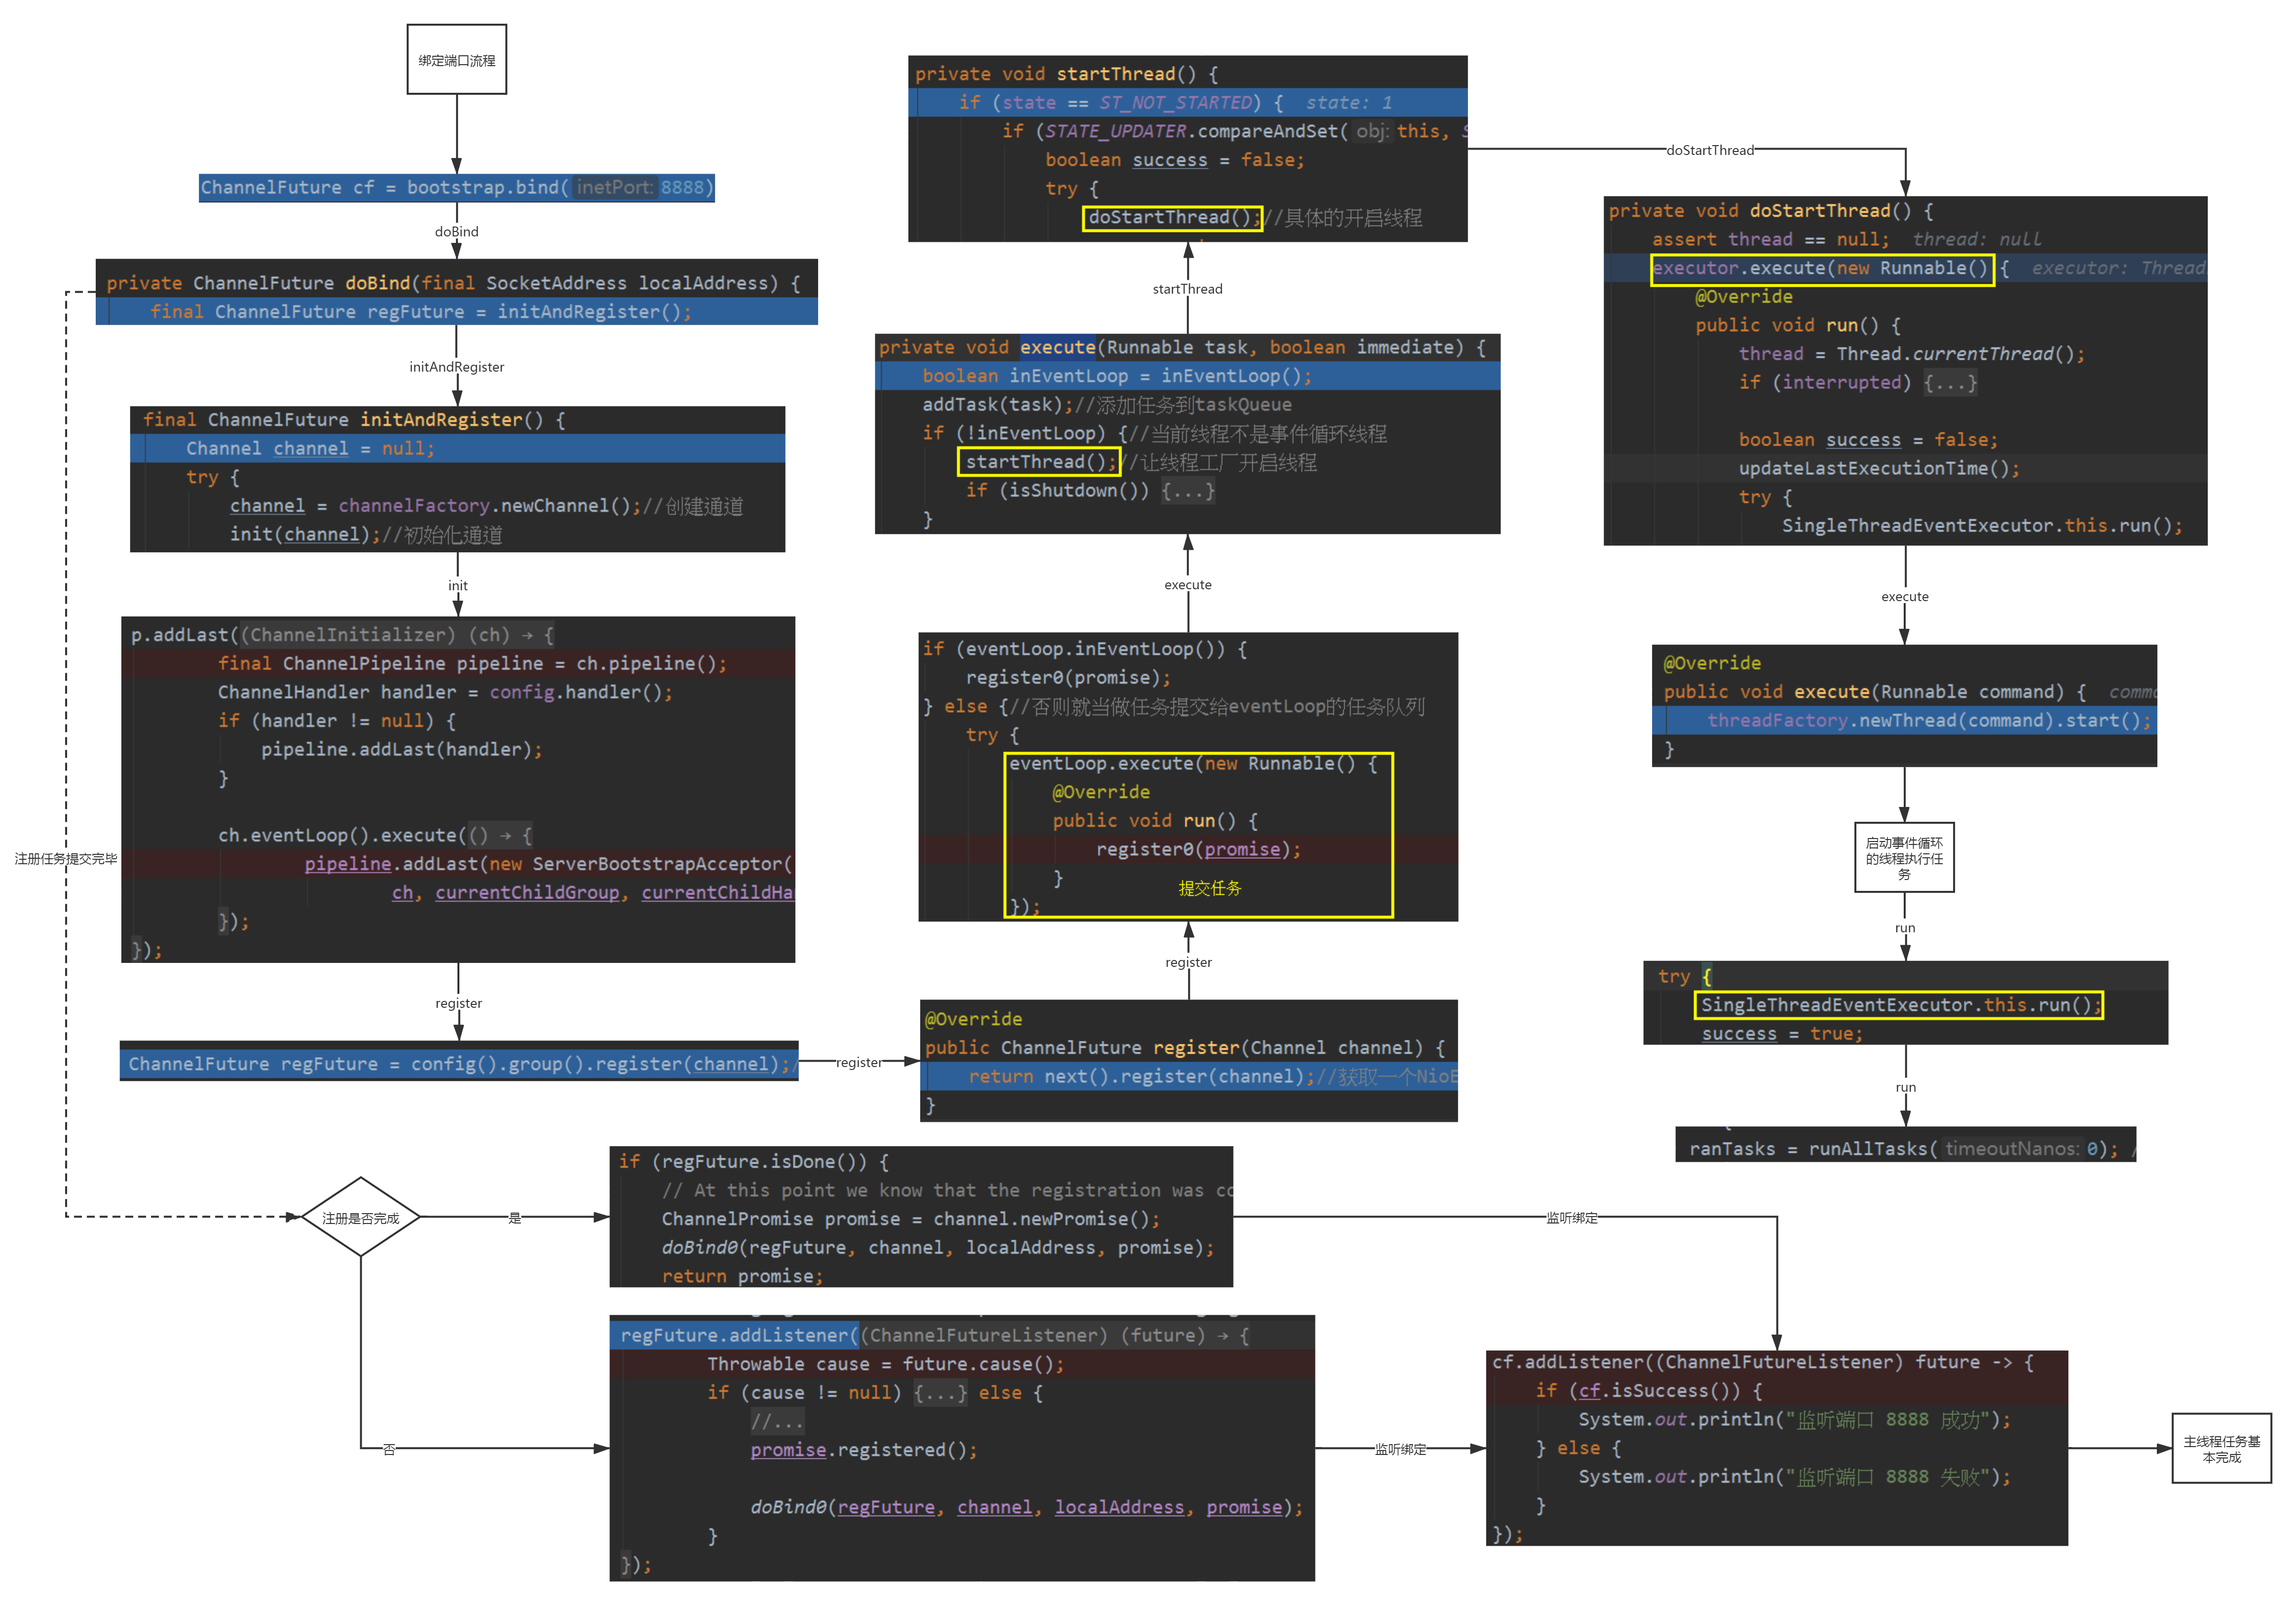
调用的是AbstractBootstrap类的doBind(final SocketAddress localAddress)方法.
 1 private ChannelFuture doBind(final SocketAddress localAddress) {
 2     final ChannelFuture regFuture = initAndRegister();
 3     final Channel channel = regFuture.channel();
 4     if (regFuture.cause() != null) {
 5         return regFuture;
 6     }
 7
 8     if (regFuture.isDone()) {
 9         // At this point we know that the registration was complete and successful.
10         ChannelPromise promise = channel.newPromise();
11         doBind0(regFuture, channel, localAddress, promise);
12         return promise;
13     } else {
14         // Registration future is almost always fulfilled already, but just in case it's not.
15         final PendingRegistrationPromise promise = new PendingRegistrationPromise(channel);
16         regFuture.addListener(new ChannelFutureListener() {
17             @Override
18             public void operationComplete(ChannelFuture future) throws Exception {
19                 Throwable cause = future.cause();
20                 if (cause != null) {
21                     // Registration on the EventLoop failed so fail the ChannelPromise directly to not cause an
22                     // IllegalStateException once we try to access the EventLoop of the Channel.
23                     promise.setFailure(cause);
24                 } else {
25                     // Registration was successful, so set the correct executor to use.
26                     // See https://github.com/netty/netty/issues/2586
27                     promise.registered();
28
29                     doBind0(regFuture, channel, localAddress, promise);
30                 }
31             }
32         });
33         return promise;
34     }
35 }
doBind() 具体做了哪些事情:
- 调用 initAndRegister() 初始化并注册 Channel,同时返回一个 ChannelFuture 实例 regFuture,所以我们可以猜测出 initAndRegister() 是一个异步的过程。
- 接下来通过 regFuture.cause() 方法判断 initAndRegister() 的过程是否发生异常,如果发生异常则直接返回。
- regFuture.isDone() 表示 initAndRegister() 是否执行完毕,如果执行完毕则调用 doBind0() 进行 Socket 绑定。如果 initAndRegister() 还没有执行结束,regFuture 会添加一个 ChannelFutureListener 回调监听,当 initAndRegister() 执行结束后会调用 operationComplete(),同样通过 doBind0() 进行端口绑定。
initAndRegister() 负责 Channel 初始化和注册,doBind0() 用于端口绑定。
initAndRegister()方法
主要负责初始化和注册的相关工作。通道的创建和初始化,这里的channelFactory.newChannel()就是创建上面讲的设置channel(NioServerSocketChannel.class)的NioServerSocketChannel实例。
 1 final ChannelFuture initAndRegister() {
 2     Channel channel = null;
 3     try {
 4         channel = channelFactory.newChannel();
 5         init(channel);
 6     } catch (Throwable t) {
 7         if (channel != null) {
 8             // channel can be null if newChannel crashed (eg SocketException("too many open files"))
 9             channel.unsafe().closeForcibly();
10             // as the Channel is not registered yet we need to force the usage of the GlobalEventExecutor
11             return new DefaultChannelPromise(channel, GlobalEventExecutor.INSTANCE).setFailure(t);
12         }
13         // as the Channel is not registered yet we need to force the usage of the GlobalEventExecutor
14         return new DefaultChannelPromise(new FailedChannel(), GlobalEventExecutor.INSTANCE).setFailure(t);
15     }
16
17     ChannelFuture regFuture = config().group().register(channel);
18     if (regFuture.cause() != null) {
19         if (channel.isRegistered()) {
20             channel.close();
21         } else {
22             channel.unsafe().closeForcibly();
23         }
24     }
25
26     // If we are here and the promise is not failed, it's one of the following cases:
27     // 1) If we attempted registration from the event loop, the registration has been completed at this point.
28     //    i.e. It's safe to attempt bind() or connect() now because the channel has been registered.
29     // 2) If we attempted registration from the other thread, the registration request has been successfully
30     //    added to the event loop's task queue for later execution.
31     //    i.e. It's safe to attempt bind() or connect() now:
32     //         because bind() or connect() will be executed *after* the scheduled registration task is executed
33     //         because register(), bind(), and connect() are all bound to the same thread.
34
35     return regFuture;
36 }
initAndRegister() 可以分为三步:创建 Channel、初始化 Channel 和注册 Channel。
创建服务端 Channel
首先看下创建 Channel 的过程,直接跟进 channelFactory.newChannel() 的源码。
public class ReflectiveChannelFactory<T extends Channel> implements ChannelFactory<T> {

    private final Constructor<? extends T> constructor;

    public ReflectiveChannelFactory(Class<? extends T> clazz) {
        ObjectUtil.checkNotNull(clazz, "clazz");
        try {
            this.constructor = clazz.getConstructor();
        } catch (NoSuchMethodException e) {
            throw new IllegalArgumentException("Class " + StringUtil.simpleClassName(clazz) +
                    " does not have a public non-arg constructor", e);
        }
    }

    @Override
    public T newChannel() {
        try {
            return constructor.newInstance();
        } catch (Throwable t) {
            throw new ChannelException("Unable to create Channel from class " + constructor.getDeclaringClass(), t);
        }
    }

    @Override
    public String toString() {
        return StringUtil.simpleClassName(ReflectiveChannelFactory.class) +
                '(' + StringUtil.simpleClassName(constructor.getDeclaringClass()) + ".class)";
    }
}
在前面服务器的示例中,我们通过 channel(NioServerSocketChannel.class) 配置 Channel 的类型,工厂类 ReflectiveChannelFactory 是在该过程中被创建的。从 constructor.newInstance() 我们可以看出,ReflectiveChannelFactory 通过反射创建出 NioServerSocketChannel 对象,所以我们重点需要关注 NioServerSocketChannel 的构造函数。
实例化NioServerSocketChannel
 1 public NioServerSocketChannel() {
 2         this(newSocket(DEFAULT_SELECTOR_PROVIDER));
 3     }
 4
 5 private static ServerSocketChannel newSocket(SelectorProvider provider) {
 6         try {
 7
 8             return provider.openServerSocketChannel();// 创建 JDK 底层的 ServerSocketChannel
 9         } catch (IOException e) {
10             throw new ChannelException(
11                     "Failed to open a server socket.", e);
12         }
13     }
14
15 public NioServerSocketChannel(ServerSocketChannel channel) {
16         super(null, channel, SelectionKey.OP_ACCEPT);
17         config = new NioServerSocketChannelConfig(this, javaChannel().socket());
18     }
newSocket返回的是默认的ServerSocketChannelImpl,它是NIO里的。SelectionKey.OP_ACCEPT即是NIO的请求连接。SelectorProvider 是 JDK NIO 中的抽象类实现,通过 openServerSocketChannel() 方法可以用于创建服务端的 ServerSocketChannel。而且 SelectorProvider 会根据不同情况,返回不同的实现类,具体可以参考 SelectorProvider 的源码实现:
    public static SelectorProvider provider() {
        synchronized (lock) {
            if (provider != null)
                return provider;
            return AccessController.doPrivileged(
                new PrivilegedAction<SelectorProvider>() {
                    public SelectorProvider run() {
                            if (loadProviderFromProperty())
                                return provider;
                            if (loadProviderAsService())
                                return provider;
                            provider = sun.nio.ch.DefaultSelectorProvider.create();
                            return provider;
                        }
                    });
        }
    }
创建完 ServerSocketChannel,我们回到 NioServerSocketChannel 的构造函数,接着它会通过 super() 依次调用到父类的构造进行初始化工作,最终我们可以定位到 AbstractNioChannel 和 AbstractChannel 的构造函数:
super(null, channel, SelectionKey.OP_ACCEPT)
设置通道NioServerSocketChannel和感兴趣的事件readInterestOp
 1 protected AbstractNioMessageChannel(Channel parent, SelectableChannel ch, int readInterestOp) {
 2         super(parent, ch, readInterestOp);
 3     }
 4
 5 protected AbstractNioChannel(Channel parent, SelectableChannel ch, int readInterestOp) {
 6         super(parent);
 7         this.ch = ch;//设置ServerSocketChannel实例ServerSocketChannelImpl
 8         this.readInterestOp = readInterestOp;//设置事件OP_ACCEPT
 9         try {
10             ch.configureBlocking(false);//设置非阻塞
11         } catch (IOException e) {
12             try {
13                 ch.close();
14             } catch (IOException e2) {
15                 logger.warn(
16                             "Failed to close a partially initialized socket.", e2);
17             }
18
19             throw new ChannelException("Failed to enter non-blocking mode.", e);
20         }
21     }
super(parent);
1 protected AbstractChannel(Channel parent) {
2         this.parent = parent;
3         id = newId();//id
4         unsafe = newUnsafe();//创建NioMessageUnsafe,一些底层的操作都是这个来完成的
5         pipeline = newChannelPipeline();//管道
6     }
创建ChannelPipeline类型的实例,实际类型是DefaultChannelPipeline,还创建了id类型是DefaultChannelId实现了ChannelId,也就是唯一标识符asLongText()的实例。
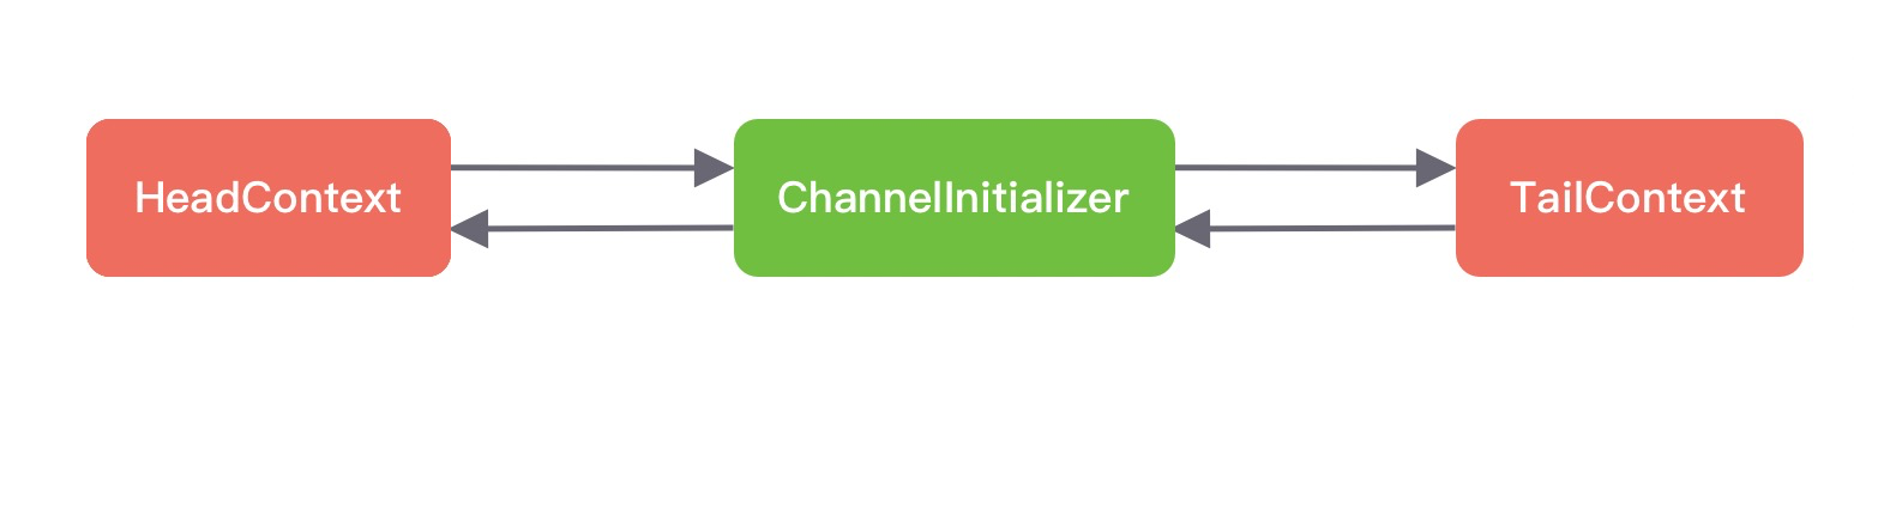
首先调用 AbstractChannel 的构造函数创建了三个重要的成员变量,分别为 id、unsafe、pipeline。id 表示全局唯一的 Channel,unsafe 用于操作底层数据的读写操作,pipeline 负责业务处理器的编排。初始化状态,pipeline 的内部结构只包含头尾两个节点,如下图所示。三个核心成员变量创建好之后,会回到 AbstractNioChannel 的构造函数,通过 ch.configureBlocking(false) 设置 Channel 是非阻塞模式。

创建服务端 Channel 的过程我们已经讲完了,简单总结下其中几个重要的步骤:
- ReflectiveChannelFactory 通过反射创建 NioServerSocketChannel 实例;
- 创建 JDK 底层的 ServerSocketChannel;
- 为 Channel 创建 id、unsafe、pipeline 三个重要的成员变量;
- 设置 Channel 为非阻塞模式。
初始化服务端 Channel
回到 ServerBootstrap 的 initAndRegister() 方法,继续跟进用于初始化服务端 Channel 的 init() 方法源码:
init方法
初始化通道
@Override
void init(Channel channel) {
    setChannelOptions(channel, newOptionsArray(), logger);// 设置 Socket 参数
    setAttributes(channel, newAttributesArray());// 保存用户自定义属性

    ChannelPipeline p = channel.pipeline();

    final EventLoopGroup currentChildGroup = childGroup;
    final ChannelHandler currentChildHandler = childHandler;
    final Entry<ChannelOption<?>, Object>[] currentChildOptions = newOptionsArray(childOptions);
    final Entry<AttributeKey<?>, Object>[] currentChildAttrs = newAttributesArray(childAttrs);

    p.addLast(new ChannelInitializer<Channel>() {
        @Override
        public void initChannel(final Channel ch) {
            final ChannelPipeline pipeline = ch.pipeline();
            ChannelHandler handler = config.handler();
            if (handler != null) {
                pipeline.addLast(handler);
            }

            ch.eventLoop().execute(new Runnable() {
                @Override
                public void run() {
                    pipeline.addLast(new ServerBootstrapAcceptor(
                            ch, currentChildGroup, currentChildHandler, currentChildOptions, currentChildAttrs));
                }
            });
        }
    });
}
init() 方法的源码比较长,我们依然拆解成两个部分来看:
第一步,设置 Socket 参数以及用户自定义属性。在创建服务端 Channel 时,Channel 的配置参数保存在 NioServerSocketChannelConfig 中,在初始化 Channel 的过程中,Netty 会将这些参数设置到 JDK 底层的 Socket 上,并把用户自定义的属性绑定在 Channel 上。
第二步,添加特殊的 Handler 处理器。首先 ServerBootstrap 为 Pipeline 添加了一个 ChannelInitializer,ChannelInitializer 是实现了 ChannelHandler 接口的匿名类,其中 ChannelInitializer 实现的 initChannel() 方法用于添加 ServerSocketChannel 对应的 Handler。然后 Netty 通过异步 task 的方式又向 Pipeline 一个处理器 ServerBootstrapAcceptor,从 ServerBootstrapAcceptor 的命名可以看出,这是一个连接接入器,专门用于接收新的连接,然后把事件分发给 EventLoop 执行,在这里我们先不做展开。此时服务端的 pipeline 内部结构又发生了变化,如下图所示。
为什么需要 ChannelInitializer 处理器呢?ServerBootstrapAcceptor 的注册过程为什么又需要封装成异步 task 呢?因为我们在初始化时,还没有将 Channel 注册到 Selector 对象上,所以还无法注册 Accept 事件到 Selector 上,所以事先添加了 ChannelInitializer 处理器,等待 Channel 注册完成后,再向 Pipeline 中添加 ServerBootstrapAcceptor 处理器。
服务端 Channel 初始化的过程已经结束了。整体流程比较简单,主要是设置 Socket 参数以及用户自定义属性,并向 Pipeline 中添加了两个特殊的处理器。
我们知道 ChannelPipeline 分为入站 ChannelInboundHandler 和出站 ChannelOutboundHandler 两种处理器,它们都会被 ChannelHandlerContext 封装,不管是哪种处理器,最终都是通过双向链表连接。
addLast(new ChannelInitializer<Channel>() {}方法
在管道的倒数第二个位置上添加ChannelInitializer
 1 public final ChannelPipeline addLast(ChannelHandler... handlers) {
 2         return addLast(null, handlers);
 3     }
 4
 5 public final ChannelPipeline addLast(EventExecutorGroup executor, ChannelHandler... handlers) {
 6         ObjectUtil.checkNotNull(handlers, "handlers");
 7
 8         for (ChannelHandler h: handlers) {
 9             if (h == null) {
10                 break;
11             }
12             addLast(executor, null, h);
13         }
14
15         return this;
16     }
那么 ChannelPipeline 在添加 Handler 时是如何区分 Inbound 和 Outbound 类型的呢?我们一起跟进 ch.pipeline().addLast() 方法源码,定位到核心代码如下。
 1 @Override
 2 public final ChannelPipeline addLast(EventExecutorGroup group, String name, ChannelHandler handler) {
 3     final AbstractChannelHandlerContext newCtx;
 4     synchronized (this) {
 5         checkMultiplicity(handler);// 1. 检查是否重复添加 Handler
 6
 7         newCtx = newContext(group, filterName(name, handler), handler);// 2. 创建新的 DefaultChannelHandlerContext 节点
 8
 9         addLast0(newCtx);// 3. 添加新的 DefaultChannelHandlerContext 节点到 ChannelPipeline10
11         // If the registered is false it means that the channel was not registered on an eventLoop yet.
12         // In this case we add the context to the pipeline and add a task that will call
13         // ChannelHandler.handlerAdded(...) once the channel is registered.
14         if (!registered) { //registered初始化为false,只有执行了callHandlerAddedForAllHandlers才为true,只会执行一次
15             newCtx.setAddPending(); //修改handler状态,使用了AtomicIntegerFieldUpdater
16             callHandlerCallbackLater(newCtx, true);//暂时放入一个单链表中后面执行
17             return this;
18         }
19
20         EventExecutor executor = newCtx.executor();
21         if (!executor.inEventLoop()) {
22             callHandlerAddedInEventLoop(newCtx, executor);
23             return this;
24         }
25     }
26     callHandlerAdded0(newCtx);
27     return this;
28 }
addLast() 主要做了以下四件事:
- 检查是否重复添加 Handler。
- 创建新的 DefaultChannelHandlerContext 节点。
- 添加新的 DefaultChannelHandlerContext 节点到 ChannelPipeline。
- 回调用户方法。
前三个步骤通过 synchronized 加锁完成的,为了防止多线程并发操作 ChannelPipeline 底层双向链表。
首先在添加 Handler 时,ChannelPipeline 会检查该 Handler 有没有被添加过。如果一个非线程安全的 Handler 被添加到 ChannelPipeline 中,那么当多线程访问时会造成线程安全问题。Netty 具体检查重复性的逻辑由 checkMultiplicity() 方法实现:
private static void checkMultiplicity(ChannelHandler handler) {
    if (handler instanceof ChannelHandlerAdapter) {
        ChannelHandlerAdapter h = (ChannelHandlerAdapter) handler;
        if (!h.isSharable() && h.added) {
            throw new ChannelPipelineException(
                    h.getClass().getName() +
                    " is not a @Sharable handler, so can't be added or removed multiple times.");
        }
        h.added = true;
    }
}
用户自定义实现的处理一般都继承于 ChannelHandlerAdapter,ChannelHandlerAdapter 中使用 added 变量标识该 Handler 是否被添加过。如果当前添加的 Handler 是非共享且已被添加过,那么就会抛出异常,否则将当前 Handler 标记为已添加。
h.isSharable() 用于判断 Handler 是否是共享的,所谓共享就是这个 Handler 可以被重复添加到不同的 ChannelPipeline 中,共享的 Handler 必须要确保是线程安全的。如果我们想实现一个共享的 Handler,只需要在 Handler 中添加 @Sharable 注解即可,如下所示:
@ChannelHandler.Sharable
public class ServerHandler extends ChannelInboundHandlerAdapter {}
创建新的 DefaultChannelHandlerContext 节点。在执行 newContext() 方法之前,会通过 filterName() 为 Handler 创建一个唯一的名称,一起先看下 Netty 生成名称的策略是怎样的。
private String filterName(String name, ChannelHandler handler) {
    if (name == null) {
        return generateName(handler);
    }
    checkDuplicateName(name);
    return name;
}

private String generateName(ChannelHandler handler) {
    Map<Class<?>, String> cache = nameCaches.get();
    Class<?> handlerType = handler.getClass();
    String name = cache.get(handlerType);
    if (name == null) {
        name = generateName0(handlerType);
        cache.put(handlerType, name);
    }
    if (context0(name) != null) {
        String baseName = name.substring(0, name.length() - 1);
        for (int i = 1;; i ++) {
            String newName = baseName + i;
            if (context0(newName) == null) {
                name = newName;
                break;
            }
        }
    }
    return name;
}

private static String generateName0(Class<?> handlerType) {
    return StringUtil.simpleClassName(handlerType) + "#0";
}
Netty 会使用 FastThreadLocal 缓存 Handler 和名称的映射关系,在为 Handler 生成默认名称的之前,会先从缓存中查找是否已经存在,如果不存在,会调用 generateName0() 方法生成默认名称后,并加入缓存。可以看出 Netty 生成名称的默认规则是 “简单类名#0”,例如 HeadContext 的默认名称为 “DefaultChannelPipeline$HeadContext#0”。
为 Handler 生成完默认名称之后,还会通过 context0() 方法检查生成的名称是否和 ChannelPipeline 已有的名称出现冲突,查重的过程很简单,就是对双向链表进行线性搜索。如果存在冲突现象,Netty 会将名称最后的序列号截取出来,一直递增直至生成不冲突的名称为止,例如 “简单类名#1” “简单类名#2” “简单类名#3” 等等。
接下来回到 newContext() 创建节点的流程。
newContext(group, filterName(name, handler), handler)
创建ChannelHandlerContext,默认DefaultChannelHandlerContext实例,是ChannelHandlerContext的子类,而且会把管道和handler穿进去。
1 private AbstractChannelHandlerContext newContext(EventExecutorGroup group, String name, ChannelHandler handler) {
2         return new DefaultChannelHandlerContext(this, childExecutor(group), name, handler);
3     }
会调用父类的构造方法,即AbstractChannelHandlerContext
    AbstractChannelHandlerContext(DefaultChannelPipeline pipeline, EventExecutor executor,
                                  String name, Class<? extends ChannelHandler> handlerClass) {
        this.name = ObjectUtil.checkNotNull(name, "name");
        this.pipeline = pipeline;
        this.executor = executor;
        this.executionMask = mask(handlerClass);
        // Its ordered if its driven by the EventLoop or the given Executor is an instanceof OrderedEventExecutor.
        ordered = executor == null || executor instanceof OrderedEventExecutor;
    }
AbstractChannelHandlerContext 中有一个 executionMask 属性并不是很好理解,它其实是一种常用的掩码运算操作,看下 mask() 方法是如何生成掩码的呢?
private static int mask0(Class<? extends ChannelHandler> handlerType) {
        int mask = MASK_EXCEPTION_CAUGHT;
        try {
            if (ChannelInboundHandler.class.isAssignableFrom(handlerType)) {
                mask |= MASK_ALL_INBOUND;

                if (isSkippable(handlerType, "channelRegistered", ChannelHandlerContext.class)) {
                    mask &= ~MASK_CHANNEL_REGISTERED;
                }
                if (isSkippable(handlerType, "channelUnregistered", ChannelHandlerContext.class)) {
                    mask &= ~MASK_CHANNEL_UNREGISTERED;
                }
                if (isSkippable(handlerType, "channelActive", ChannelHandlerContext.class)) {
                    mask &= ~MASK_CHANNEL_ACTIVE;
                }
                if (isSkippable(handlerType, "channelInactive", ChannelHandlerContext.class)) {
                    mask &= ~MASK_CHANNEL_INACTIVE;
                }
                if (isSkippable(handlerType, "channelRead", ChannelHandlerContext.class, Object.class)) {
                    mask &= ~MASK_CHANNEL_READ;
                }
                if (isSkippable(handlerType, "channelReadComplete", ChannelHandlerContext.class)) {
                    mask &= ~MASK_CHANNEL_READ_COMPLETE;
                }
                if (isSkippable(handlerType, "channelWritabilityChanged", ChannelHandlerContext.class)) {
                    mask &= ~MASK_CHANNEL_WRITABILITY_CHANGED;
                }
                if (isSkippable(handlerType, "userEventTriggered", ChannelHandlerContext.class, Object.class)) {
                    mask &= ~MASK_USER_EVENT_TRIGGERED;
                }
            }

            if (ChannelOutboundHandler.class.isAssignableFrom(handlerType)) {
                mask |= MASK_ALL_OUTBOUND;

                if (isSkippable(handlerType, "bind", ChannelHandlerContext.class,
                        SocketAddress.class, ChannelPromise.class)) {
                    mask &= ~MASK_BIND;
                }
                if (isSkippable(handlerType, "connect", ChannelHandlerContext.class, SocketAddress.class,
                        SocketAddress.class, ChannelPromise.class)) {
                    mask &= ~MASK_CONNECT;
                }
                if (isSkippable(handlerType, "disconnect", ChannelHandlerContext.class, ChannelPromise.class)) {
                    mask &= ~MASK_DISCONNECT;
                }
                if (isSkippable(handlerType, "close", ChannelHandlerContext.class, ChannelPromise.class)) {
                    mask &= ~MASK_CLOSE;
                }
                if (isSkippable(handlerType, "deregister", ChannelHandlerContext.class, ChannelPromise.class)) {
                    mask &= ~MASK_DEREGISTER;
                }
                if (isSkippable(handlerType, "read", ChannelHandlerContext.class)) {
                    mask &= ~MASK_READ;
                }
                if (isSkippable(handlerType, "write", ChannelHandlerContext.class,
                        Object.class, ChannelPromise.class)) {
                    mask &= ~MASK_WRITE;
                }
                if (isSkippable(handlerType, "flush", ChannelHandlerContext.class)) {
                    mask &= ~MASK_FLUSH;
                }
            }

            if (isSkippable(handlerType, "exceptionCaught", ChannelHandlerContext.class, Throwable.class)) {
                mask &= ~MASK_EXCEPTION_CAUGHT;
            }
        } catch (Exception e) {
            // Should never reach here.
            PlatformDependent.throwException(e);
        }

        return mask;
    }
Netty 中分别有多种 Inbound 事件和 Outbound 事件,如 Inbound 事件有 channelRegistered、channelActive、channelRead 等等。Netty 会判断 Handler 的类型是否是 ChannelInboundHandler 的实例,如果是会把所有 Inbound 事件先置为 1,然后排除 Handler 不感兴趣的方法。同理,Handler 类型如果是 ChannelOutboundHandler,也是这么实现的。
那么如何排除 Handler 不感兴趣的事件呢?Handler 对应事件的方法上如果有 @Skip 注解,Netty 认为该事件是需要排除的。大部分情况下,用户自定义实现的 Handler 只需要关心个别事件,那么剩余不关心的方法都需要加上 @Skip 注解吗?Netty 其实已经在 ChannelHandlerAdapter 中默认都添加好了,所以用户如果继承了 ChannelHandlerAdapter,默认没有重写的方法都是加上 @Skip 的,只有用户重写的方法才是 Handler 关心的事件。
回到 addLast() 的主流程,接着需要将新创建的 DefaultChannelHandlerContext 节点添加到 ChannelPipeline 中,跟进 addLast0() 方法的源码。
不是增加到尾部的addLast0
吧前面创建的ChannelHandlerContext加到里面,处理器被通道处理器上下文包裹了,添加的过程为把新的结点插入到倒数第二个位置。
1 private void addLast0(AbstractChannelHandlerContext newCtx) {
2         AbstractChannelHandlerContext prev = tail.prev;
3         newCtx.prev = prev;
4         newCtx.next = tail;
5         prev.next = newCtx;
6         tail.prev = newCtx;
7     }
addLast0() 非常简单,就是向 ChannelPipeline 中双向链表的尾部插入新的节点,其中 HeadContext 和 TailContext 一直是链表的头和尾,新的节点被插入到 HeadContext 和 TailContext 之间。
callHandlerCallbackLater(newCtx, true)方法: 构造pipeline任务链
 1 private void callHandlerCallbackLater(AbstractChannelHandlerContext ctx, boolean added) {
 2     assert !registered;
 3
 4     PendingHandlerCallback task = added ? new PendingHandlerAddedTask(ctx) : new PendingHandlerRemovedTask(ctx);
 5     PendingHandlerCallback pending = pendingHandlerCallbackHead; //默认为null
 6     if (pending == null) {
 7         pendingHandlerCallbackHead = task;
 8     } else {
 9         // Find the tail of the linked-list.
10         while (pending.next != null) {
11             pending = pending.next;
12         }
13         pending.next = task;
14     }
15 }
最后,添加完节点后,就到了回调用户方法,定位到callHandlerAdded0() 的核心源码:
    private void callHandlerAdded0(final AbstractChannelHandlerContext ctx) {
        try {
            ctx.callHandlerAdded();
        } catch (Throwable t) {
            boolean removed = false;
            try {
                atomicRemoveFromHandlerList(ctx);
                ctx.callHandlerRemoved();
                removed = true;
            } catch (Throwable t2) {
                if (logger.isWarnEnabled()) {
                    logger.warn("Failed to remove a handler: " + ctx.name(), t2);
                }
            }

            if (removed) {
                fireExceptionCaught(new ChannelPipelineException(
                        ctx.handler().getClass().getName() +
                        ".handlerAdded() has thrown an exception; removed.", t));
            } else {
                fireExceptionCaught(new ChannelPipelineException(
                        ctx.handler().getClass().getName() +
                        ".handlerAdded() has thrown an exception; also failed to remove.", t));
            }
        }
    }
AbstractChannelHandlerContext#callHandlerAdded
    final void callHandlerAdded() throws Exception {
        // We must call setAddComplete before calling handlerAdded. Otherwise if the handlerAdded method generates
        // any pipeline events ctx.handler() will miss them because the state will not allow it.
        if (setAddComplete()) {
            handler().handlerAdded(this);
        }
    }
final boolean setAddComplete() {
    for (;;) {
        int oldState = handlerState;
        if (oldState == REMOVE_COMPLETE) {
            return false;
        }
        // Ensure we never update when the handlerState is REMOVE_COMPLETE already.
        // oldState is usually ADD_PENDING but can also be REMOVE_COMPLETE when an EventExecutor is used that is not
        // exposing ordering guarantees.
        if (HANDLER_STATE_UPDATER.compareAndSet(this, oldState, ADD_COMPLETE)) {
            return true;
        }
    }
}
Netty 会通过 CAS 修改节点的状态直至 REMOVE_COMPLETE 或者 ADD_COMPLETE,如果修改节点为 ADD_COMPLETE 状态,表示节点已经添加成功,然后会回调用户 Handler 中实现的 handlerAdded() 方法。
至此,Pipeline 添加 Handler 的实现原理我们已经讲完了。
initChannel(final Channel ch)方法
 1 public void initChannel(final Channel ch) {
 2                 final ChannelPipeline pipeline = ch.pipeline();
 3                 ChannelHandler handler = config.handler();
 4                 if (handler != null) {
 5                     pipeline.addLast(handler);
 6                 }
 7
 8                 ch.eventLoop().execute(new Runnable() {
 9                     @Override
10                     public void run() {
11                         pipeline.addLast(new ServerBootstrapAcceptor(
12                                 ch, currentChildGroup, currentChildHandler, currentChildOptions, currentChildAttrs));
13                     }
14                 });
15             }
开启一个循环吧ServerBootstrapAcceptor加入通道,这个就是我们说的连接接收器Acceptor。
