vue项目中使用echarts组件
按照这里的操作
https://github.com/ecomfe/vue-echarts/blob/master/README.zh_CN.md
安装 echarts
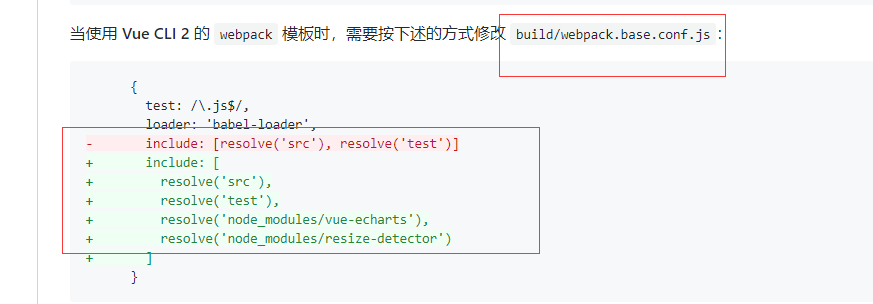
修改


// The Vue build version to load with the `import` command
// (runtime-only or standalone) has been set in webpack.base.conf with an alias.
import Vue from 'vue'
import App from './App'
import router from './router'
import ECharts from 'vue-echarts' // 在 webpack 环境下指向 components/ECharts.vue

// 手动引入 ECharts 各模块来减小打包体积
import 'echarts/lib/chart/bar'
import 'echarts/lib/component/tooltip'
import 'echarts-gl'
// 注册组件后即可使用
Vue.component('v-chart', ECharts)
Vue.config.productionTip = false

/* eslint-disable no-new */
new Vue({
  el: '#app',
  router,
  components: { App },
  template: '<App/>'
})
结合 这里的例子,它是用js链接
https://echarts.apache.org/zh/tutorial.html#5%20%E5%88%86%E9%92%9F%E4%B8%8A%E6%89%8B%20ECharts
代码有点不一样
页面代码
<template>
   <div>
       <v-chart :options="options" style="width: 600px;height:400px;"></v-chart>

   </div>
</template>
<script>
export default {
  data () {
    return {
      options: {
          title: {
                text: 'ECharts 入门示例'
            },
            tooltip: {},
            legend: {
                data:['销量']
            },
            xAxis: {
                data: ["衬衫","羊毛衫","雪纺衫","裤子","高跟鞋","袜子"]
            },
            yAxis: {},
            series: [{
                name: '销量',
                type: 'bar',
                data: [5, 20, 36, 10, 10, 20]
            }]
      }
    }
  }
}
</script>

<style>

</style>
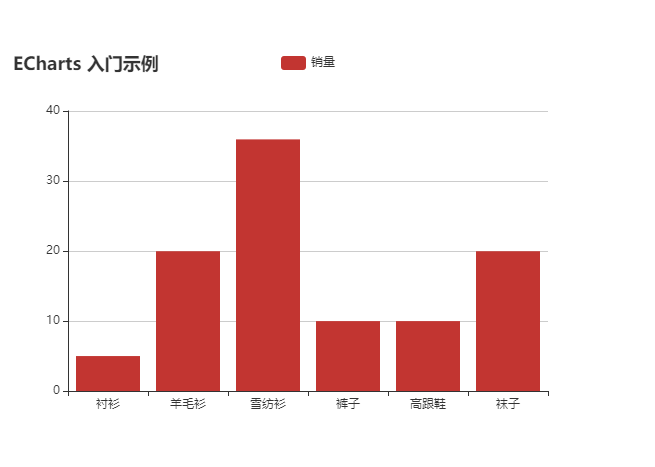
效果

例子2
<template>
   <div>
       <v-chart :options="options" style="width: 600px;height:400px;"></v-chart>

   </div>
</template>
<script>
export default {
  data () {
    return {
      options: {
         series: {
                type: 'pie',
                data: [
                    {name: 'A', value: 1212},
                    {name: 'B', value: 2323},
                    {name: 'C', value: 1919}
                ]
            }
      }
    }
  }
}
</script>

<style>

</style>
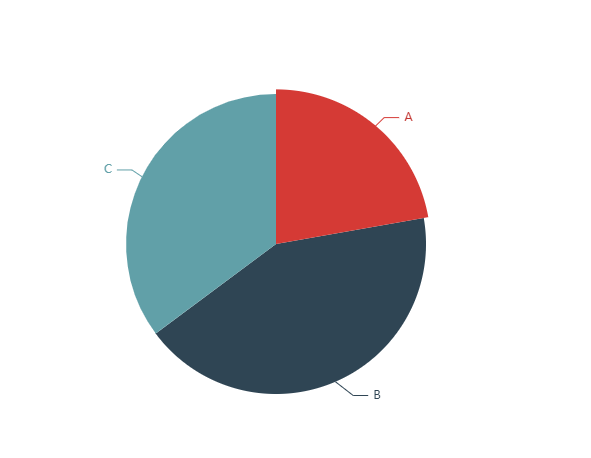
效果图


【推荐】国内首个AI IDE,深度理解中文开发场景,立即下载体验Trae
【推荐】编程新体验,更懂你的AI,立即体验豆包MarsCode编程助手
【推荐】抖音旗下AI助手豆包,你的智能百科全书,全免费不限次数
【推荐】轻量又高性能的 SSH 工具 IShell:AI 加持,快人一步
· go语言实现终端里的倒计时
· 如何编写易于单元测试的代码
· 10年+ .NET Coder 心语,封装的思维:从隐藏、稳定开始理解其本质意义
· .NET Core 中如何实现缓存的预热?
· 从 HTTP 原因短语缺失研究 HTTP/2 和 HTTP/3 的设计差异
· 周边上新:园子的第一款马克杯温暖上架
· Open-Sora 2.0 重磅开源!
· 分享 3 个 .NET 开源的文件压缩处理库,助力快速实现文件压缩解压功能!
· Ollama——大语言模型本地部署的极速利器
· DeepSeek如何颠覆传统软件测试?测试工程师会被淘汰吗?