silverlight3.0 实现3D 效果
也许 silverght中最吸引人的就是他的 3D 效果了..
今天就来带大家初体验一下3D的效果
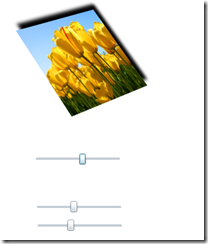
效果图如下
几个Slider 控件用来调节 图像 X Y Z 的坐标.
代码如下:
代码
<Grid x:Name="LayoutRoot" Background="White">
        <Image  HorizontalAlignment="Left" Margin="75,35,0,0" VerticalAlignment="Top" Width="168" Source="Tulips.jpg" Height="166" Stretch="Fill">
            <Image.Effect>
                <DropShadowEffect Color="Black" BlurRadius="10" Direction="50" ShadowDepth="15"/>
            </Image.Effect>
            <Image.Projection>
                <PlaneProjection x:Name="Prots"></PlaneProjection>
            </Image.Projection>
        </Image>
        <Slider HorizontalAlignment="Left" Margin="79,0,0,209" Width="146" VerticalAlignment="Bottom" Maximum="180" Minimum="-180" Value="{Binding RotationX,Mode=TwoWay,ElementName=Prots}"/>
        <Slider HorizontalAlignment="Left" Margin="80,0,0,179" Width="146" VerticalAlignment="Bottom" Maximum="180" Minimum="-180" Value="{Binding RotationY,Mode=TwoWay,ElementName=Prots}"/>
        <Slider Margin="77,223,0,239" HorizontalAlignment="Left" Width="146" Maximum="180" Minimum="-180" Value="{Binding RotationZ,Mode=TwoWay,ElementName=Prots}" d:LayoutOverrides="Height"/>
    </Grid>
Projection属性就是设置 3D效果的了. 还一个重要属性是
Element –to-Element Binding
使用格式如下
{Binding 属性名,Mode=绑定模式,ElementName=绑定元素}
配合Slider可以动态改变 图像的3D 坐标.
太阳每一天都是新的..充实自己…


