
第一阶段考试:实战Linux系统日常管理
1. 【项目名称】
实战Linux系统日常管理
【项目说明】
1.安装部署rhel系统,组建RAID磁盘阵列。
2.安装nginx 通过脚本编写 nginx服务服务启动脚本
【项目考核技能点】
1、安装部署rhel系统,网络设置。
2、shell脚本的基本用法
3、 nginx的安装
4、整个方案中要包括:系统的安装,磁盘分区格式化,shell脚本的应用等相关内容。
项目环境可以参考如下:
1.安装两台rhel主机
对应主机名与IP :xuegod63.cn 192.168.1.63
xuegod64.cn 192.168.1.64
2.组建RAID0,RAID1,RAID5,RAID10.磁盘阵列。
3.安装nginx。
4.编辑shell脚本,实现nginx自动启动
实战Linux系统日常管理
#############################################################
1.安装两台rhel主机
对应主机名与IP :xuegod63.cn 192.168.1.63
xuegod64.cn 192.168.1.64
第一步:
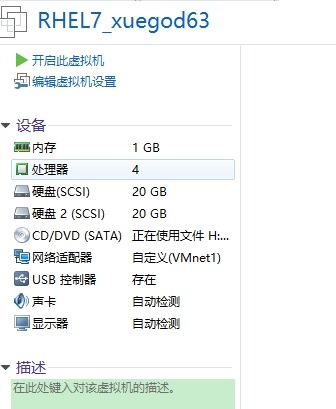
打开vmware软件,新建两台虚拟机分别为RHEL7_xuegod63、RHEL7_xuegod64。1G内存,4核心,移除打印机,其他均使用默认设置
最后指定光驱挂载rhel7.2镜像,先后开始安装操作系统(也可以安装好一个以后,复制并重命名)。

选择第一项直接安装RHEL7.2操作系统,设置如下:
1、键盘和语言选择:English(US),时区:上海
2、关闭SECURITY POLICY
3、设置软件源
4、设置安装带gui的服务器,并选择安装开发工具,
5、设置磁盘分区为:/boot 500M、swap 2G、/ 10G
6、关闭KDump
7、在网络设置中,修改主机名为xuegod63.cn,并开启网卡
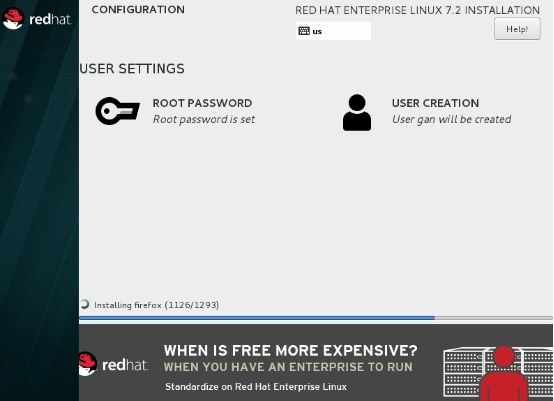
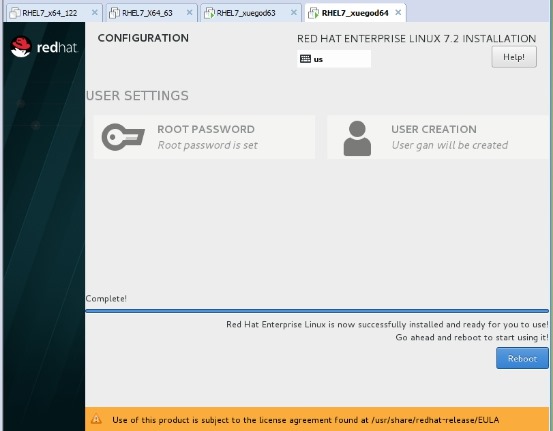
开始安装,这时需要设置root密码,和创建一个用户!

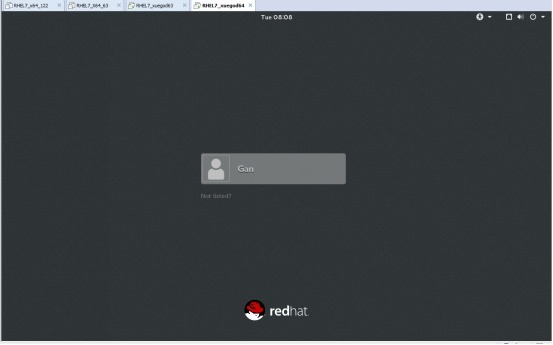
安装完成以后,如下图:(然后重启,并进入系统)


使用root用户登录系统后,开始部署RHEL7系统实验环境如下:
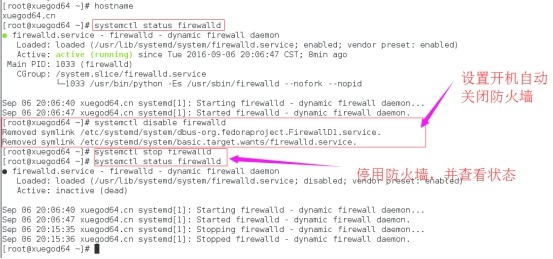
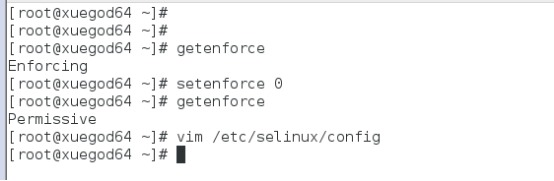
1、关闭防火墙,并设置开机自动关闭

2、关闭selinux,并设置其开机自动关闭


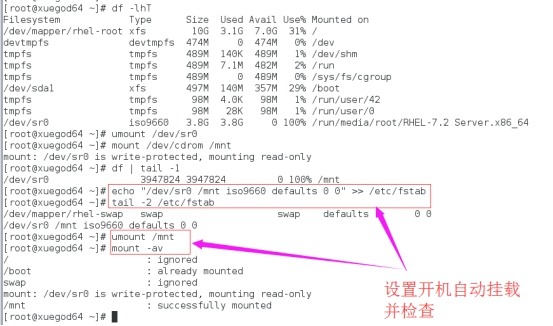
3、挂载光驱到/mnt,并设置自动开机挂载
在vmware中设置光驱开机自动连接

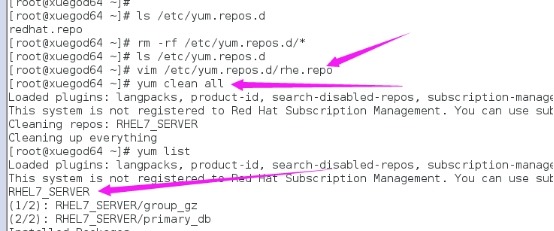
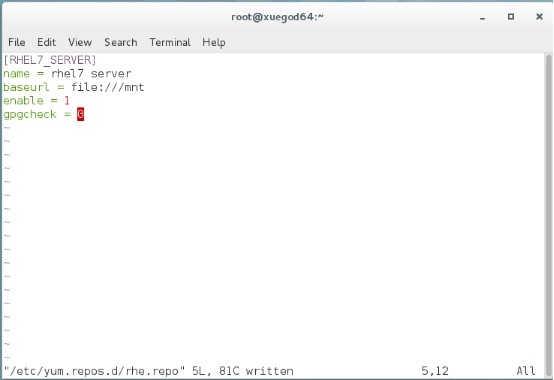
4、设置yum源


5、使用特定虚拟网络模式,设置虚拟机网络
ip分别为192.168.1.63、192.168.1.64
设置虚拟机网络模式为特定虚拟网络模式
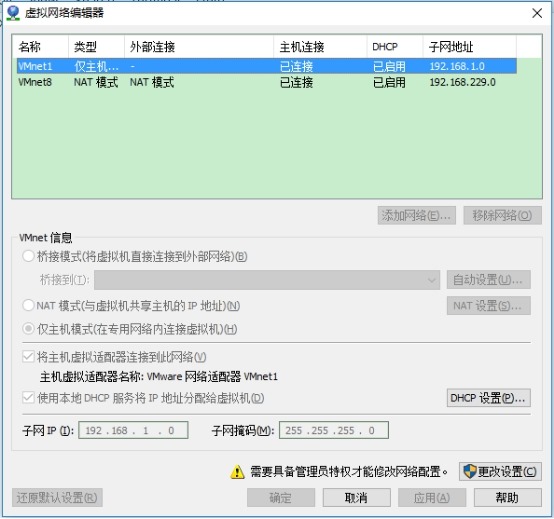
查看本机IP地址网段是否与将要设置的网段冲突
在vmware中,设置本机vmnet1网卡如下图:

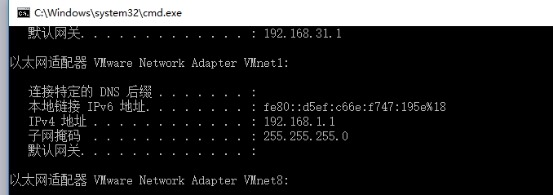
并在cmd.exe中查看设置是否生效

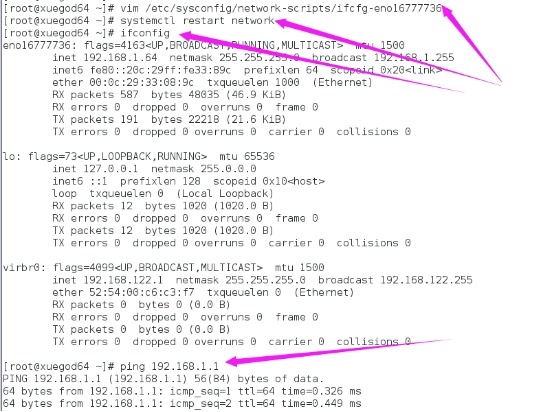
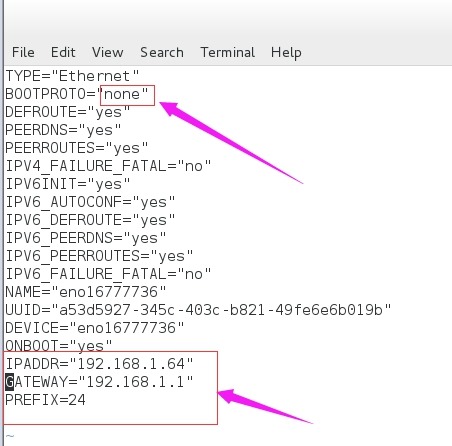
在RHEL7系统中,设置如下:


重新启动,再次登录后,检查如下图:

Ok,保存快照即可!
另一台虚拟机依照上面同样如此设置。
###########################################################################################################################################################################
2.组建RAID0,RAID1,RAID5,RAID10.磁盘阵列。
(在xuegod63.cn主机中实现)
为方便起见,只对虚拟机添加一块磁盘,通过分区实现磁盘整理搭建

开机,并保存快照(RAID)
通过xshell远程连接
第一步:组建RAID0磁盘阵列
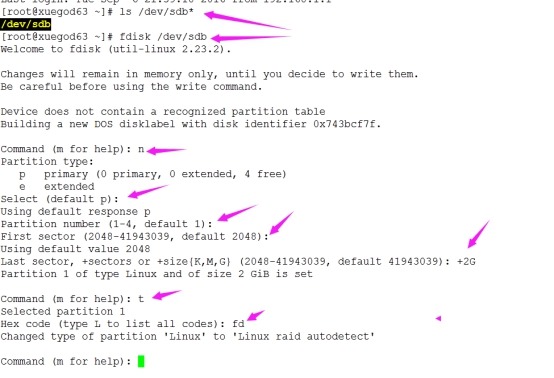
1、对磁盘进行分区(分两个2G的即可)
[root@xuegod63 ~]# ls /dev/sdb*
/dev/sdb
[root@xuegod63 ~]# fdisk /dev/sdb
Welcome to fdisk (util-linux 2.23.2).
Changes will remain in memory only, until you decide to write them.
Be careful before using the write command.
Device does not contain a recognized partition table
Building a new DOS disklabel with disk identifier 0x743bcf7f.
Command (m for help): n
Partition type:
p primary (0 primary, 0 extended, 4 free)
e extended
Select (default p):
Using default response p
Partition number (1-4, default 1):
First sector (2048-41943039, default 2048):
Using default value 2048
Last sector, +sectors or +size{K,M,G} (2048-41943039, default 41943039): +2G
Partition 1 of type Linux and of size 2 GiB is set
Command (m for help): t
Selected partition 1
Hex code (type L to list all codes): fd
Changed type of partition 'Linux' to 'Linux raid autodetect'
Command (m for help): n
Partition type:
p primary (1 primary, 0 extended, 3 free)
e extended
Select (default p):
Using default response p
Partition number (2-4, default 2):
First sector (4196352-41943039, default 4196352):
Using default value 4196352
Last sector, +sectors or +size{K,M,G} (4196352-41943039, default 41943039): +2G
Partition 2 of type Linux and of size 2 GiB is set
Command (m for help): t
Partition number (1,2, default 2): 2
Hex code (type L to list all codes): fd
Changed type of partition 'Linux' to 'Linux raid autodetect'
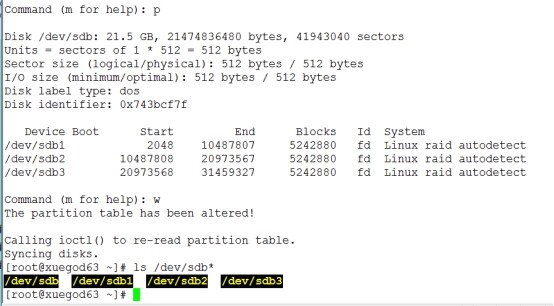
Command (m for help): p
Disk /dev/sdb: 21.5 GB, 21474836480 bytes, 41943040 sectors
Units = sectors of 1 * 512 = 512 bytes
Sector size (logical/physical): 512 bytes / 512 bytes
I/O size (minimum/optimal): 512 bytes / 512 bytes
Disk label type: dos
Disk identifier: 0x743bcf7f
Device Boot Start End Blocks Id System
/dev/sdb1 2048 4196351 2097152 fd Linux raid autodetect
/dev/sdb2 4196352 8390655 2097152 fd Linux raid autodetect
Command (m for help): w
The partition table has been altered!
Calling ioctl() to re-read partition table.
Syncing disks.
[root@xuegod63 ~]# ls /dev/sdb*
[root@xuegod63 ~]# mdadm -E /dev/sdb[1-2]
[root@xuegod63 ~]# mdadm -C /dev/md0 -n 2 -l 0 /dev/sdb[1-2]
[root@xuegod63 ~]# mdadm -E /dev/sdb[1-2]


2、组建RAID0磁盘阵列:

3、格式化/dev/md1磁盘
[root@xuegod63 ~]# mkfs.xfs /dev/md0

4、挂载并设置开机自动挂载
[root@xuegod63 ~]# mkdir /raid
[root@xuegod63 ~]# mount /dev/md0 /raid
[root@xuegod63 ~]# df -hT | grep /raid
[root@xuegod63 ~]#
[root@xuegod63 ~]# echo "/dev/md0 /raid xfs defaults 0 0" >>/etc/fstab
[root@xuegod63 ~]# tail -1 /etc/fstab
/dev/md0 /raid xfs defaults 0 0
[root@xuegod63 ~]# umount /raid
[root@xuegod63 ~]# mount -av

6、保存磁盘阵列配置信息
[root@xuegod63 ~]# mdadm -Dvs > /etc/mdadm.conf
[root@xuegod63 ~]# cat !$

5、测试

第二步:组建RAID1磁盘阵列
1、恢复快照,分区格式化如图:(两个5G分区)

2、创建RAID1磁盘阵列
[root@xuegod63 ~]# mdadm -C /dev/md1 -n 2 -l 1 /dev/sdb[1-2]
mdadm: Note: this array has metadata at the start and
may not be suitable as a boot device. If you plan to
store '/boot' on this device please ensure that
your boot-loader understands md/v1.x metadata, or use
--metadata=0.90
Continue creating array? yes
mdadm: Defaulting to version 1.2 metadata
mdadm: array /dev/md1 started.
[root@xuegod63 ~]#
3、保存配置信息
[root@xuegod63 ~]# mdadm -Dvs >> /etc/mdadm.conf

4、格式化磁盘分区、并设置自动开机挂载
[root@xuegod63 ~]# mkfs.xfs /dev/md1
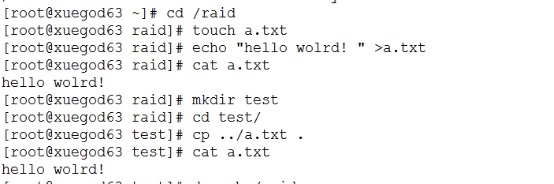
[root@xuegod63 ~]# ls /raid
[root@xuegod63 ~]# echo "/dev/md1 /raid xfs defaults 0 0" >>/etc/fstab
[root@xuegod63 ~]# tail -1 !$
[root@xuegod63 ~]# mount -av


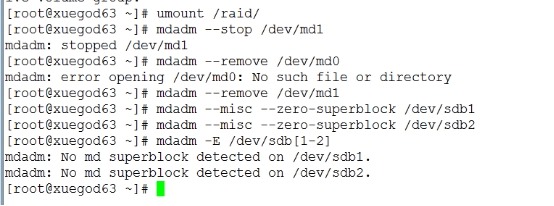
5、删除磁盘阵列RAID1
[root@xuegod63 ~]# umount /raid/
[root@xuegod63 ~]# mdadm --stop /dev/md1
[root@xuegod63 ~]# mdadm --remove /dev/md1
[root@xuegod63 ~]# mdadm --misc --zero-superblock /dev/sdb1
[root@xuegod63 ~]# mdadm --misc --zero-superblock /dev/sdb2
[root@xuegod63 ~]# mdadm -E /dev/sdb[1-2]

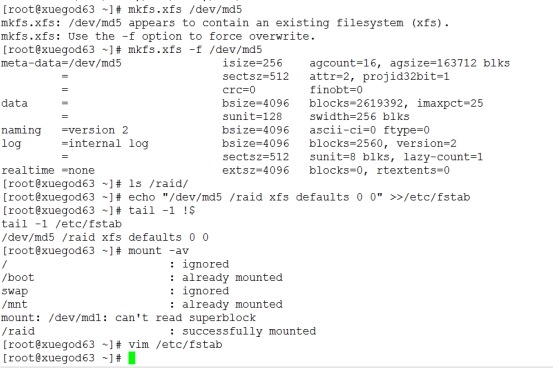
第三步:组建RAID5磁盘阵列
1、恢复快照,分区格式化如图:(三个5G分区)(没有使用热备盘-x)

2、创建磁盘阵列RAID5


3、保存配置信息
[root@xuegod63 ~]# mdadm -Dvs >/etc/mdadm.conf

4、格式化磁盘分区、并设置自动开机挂载
[root@xuegod63 ~]# mkfs.xfs /dev/md5
[root@xuegod63 ~]# ls /raid/
[root@xuegod63 ~]# echo "/dev/md5 /raid xfs defaults 0 0" >>/etc/fstab
[root@xuegod63 ~]# tail -1 !$
[root@xuegod63 ~]# mount -av

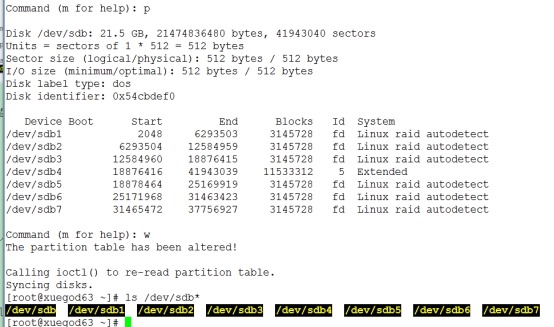
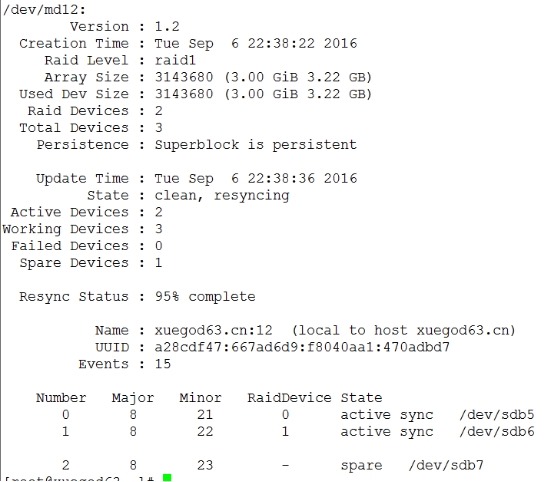
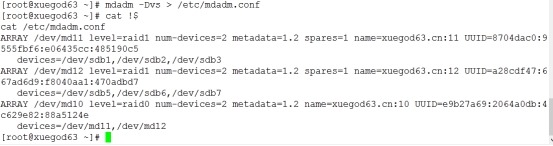
第四步:组建RAID10磁盘阵列
1、恢复快照,分区格式化如图:(六个3G分区)(使用两个热备盘-x)

2、创建两个raid1磁盘阵列
[root@xuegod63 ~]# mdadm -E /dev/sdb[1-7]
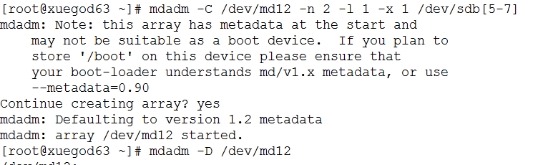
[root@xuegod63 ~]# mdadm -C /dev/md11 -n 2 -l 1 -x 1 /dev/sdb[1-3]
[root@xuegod63 ~]# mdadm -D /dev/md11
[root@xuegod63 ~]# mdadm -C /dev/md12 -n 2 -l 1 -x 1 /dev/sdb[5-7]
[root@xuegod63 ~]# mdadm -D /dev/md12


3、使用raid1创建一个raid0磁盘阵列
[root@xuegod63 ~]# mdadm -E /dev/md1*
[root@xuegod63 ~]# mdadm -C /dev/md10 -n 2 -l 0 /dev/md1[1-2]
[root@xuegod63 ~]# mdadm -D /dev/md10

4、保存配置信息
[root@xuegod63 ~]# mdadm -Dvs > /etc/mdadm.conf

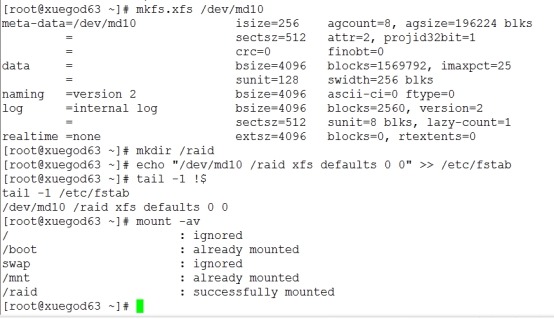
5、格式化,并设置开机自动挂载
[root@xuegod63 ~]# mkfs.xfs /dev/md10
[root@xuegod63 ~]# mkdir /raid
[root@xuegod63 ~]# tail -1 !$
[root@xuegod63 ~]# mount -av

###########################################################################################################################################################################
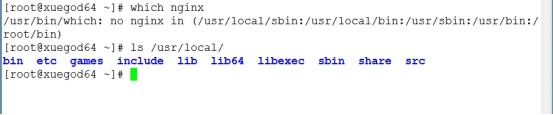
3.安装nginx。
(在xuegod64.cn主机中实现)
开启虚拟机,通过xshell远程连接
1、查看nginx服务是否已安装

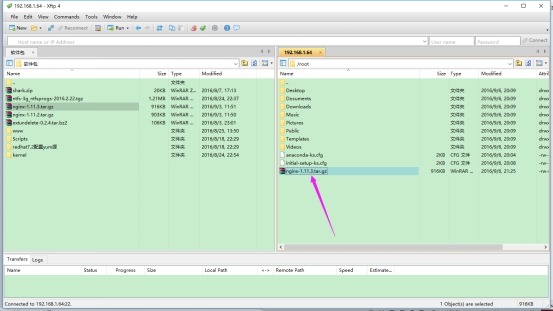
2、从nginx官网下载nginx源码包,并通过xftp上传nginx源码包到虚拟机中

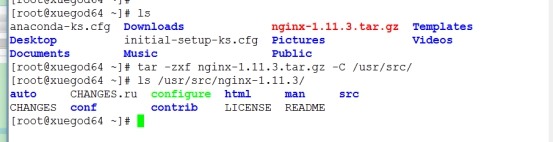
3、解压源码包到指定目录
[root@xuegod64 ~]# tar -zxf nginx-1.11.3.tar.gz -C /usr/src/

4、创建nginx用户

5、配置nginx
[root@xuegod64 nginx-1.11.3]# ./configure --prefix=/usr/local/nginx --user=nginx --group=nginx
这是发现报错,是因为少安装了依赖包pcre-devel、zlib-devel


[root@xuegod64 nginx-1.11.3]# rpm -q pcre-devel
[root@xuegod64 nginx-1.11.3]# rpm -q zlib-devel
[root@xuegod64 nginx-1.11.3]# rpm -ivh /mnt/Packages/pcre-devel-8.32-15.el7.x86_64.rpm
[root@xuegod64 nginx-1.11.3]# rpm -ivh /mnt/Packages/zlib-devel-1.2.7-15.el7.x86_64.rpm


安装依赖关系完成后,继续配置,然后使用echo $?查看是否配置成功!

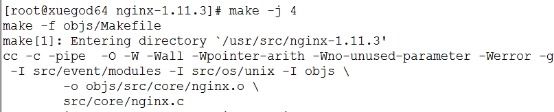
6、编译并安装
[root@xuegod64 nginx-1.11.3]# make -j 4
[root@xuegod64 nginx-1.11.3]# make install


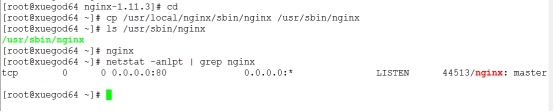
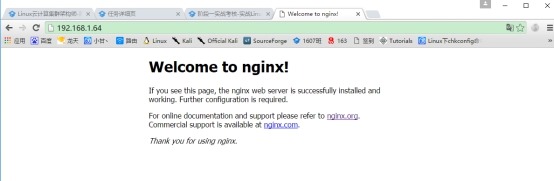
7、优化,并启动nginx服务,查看服务时候安装成功
[root@xuegod64 ~]# cp /usr/local/nginx/sbin/nginx /usr/sbin/nginx
[root@xuegod64 ~]# ls /usr/sbin/nginx
[root@xuegod64 ~]# nginx
[root@xuegod64 ~]# netstat -anlpt | grep nginx


Ok,在自己的主机中查看到如上图情况即表示配置nginx成功了!!!
################################################################
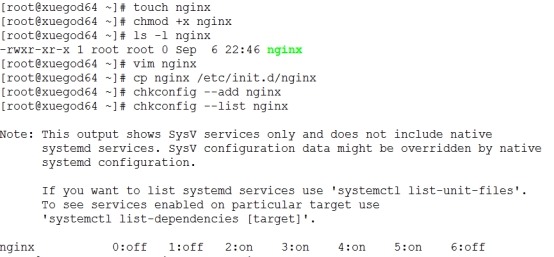
4.编辑shell脚本,实现nginx自动启动
操作如下:
[root@xuegod64 ~]# touch nginx
[root@xuegod64 ~]# chmod +x nginx
[root@xuegod64 ~]# ls -l nginx
[root@xuegod64 ~]# vim nginx
[root@xuegod64 ~]# cp nginx /etc/init.d/nginx
[root@xuegod64 ~]# chkconfig --add nginx
[root@xuegod64 ~]# chkconfig --list nginx


脚本代码如下:
#!/bin/bash
#chkconfig: 2345 80 80
#description: nginx Server Scripts
nginx="/usr/local/nginx/sbin/nginx"
case $1 in
start)
netstat -anlpt | grep nginx
if [ $? -eq 0 ]
then
echo "Nginx Server is already started!"
else
echo "Nginx Server ready to start!"
$nginx
if [ $? -eq 0 ]
then echo "Nginx Server start success!"
else echo "Nginx Server start fail!"
fi
fi
;;
stop)
netstat -anlpt | grep nginx
if [ $? -eq 0 ]
then
echo "Nginx Server ready to stop!"
$nginx -s stop
if [ $? -eq 0 ]
then echo "Nginx Server stop success!"
else echo "Nginx Server stop fail!"
fi
else
echo "Nginx Server is already stop!"
fi
;;
restart)
$nginx -s reload
if [ $? -eq 0 ]
then
echo "Nginx Server restart success !"
else
echo "Nginx Server restart failed!"
fi
;;
status)
netstat -anlpt | grep nginx
if [ $? -eq 0 ]
then
echo "Nginx Server is running!"
else
echo "Nginx Server is not running!"
fi
;;
*)
echo "Error , Please enter \'services {start | stop | restart | status } nginx\'"
;;
esac

 浙公网安备 33010602011771号