Spring学习(一)idea中创建第一个Spring项目
1、前言
Spring框架是一个开放源代码的J2EE应用程序框架,由Rod Johnson发起,是针对bean的生命周期进行管理的轻量级容器(lightweight container)。 Spring解决了开发者在J2EE开发中遇到的许多常见的问题,提供了功能强大IOC、AOP及Web MVC等功能。Spring可以单独应用于构筑应用程序,也可以和Struts、Webwork、Tapestry等众多Web框架组合使用,并且可以与 Swing等桌面应用程序AP组合。因此, Spring不仅仅能应用于JEE应用程序之中,也可以应用于桌面应用程序以及小应用程序之中。Spring框架主要由七部分组成,分别是 Spring Core、 Spring AOP、 Spring ORM、 Spring DAO、Spring Context、 Spring Web和 Spring Web MVC。
2、创建Spring项目之前的准备
1、Maven
通过Maven项目管理工具、我们能在idea中更快的创建一个Spring项目、相关的jar包只需在pom.xml中添加依赖即可全部导入。
2、idea2019.6商业版
相关下载不过多赘述。
3、新建一个简单的Spring项目


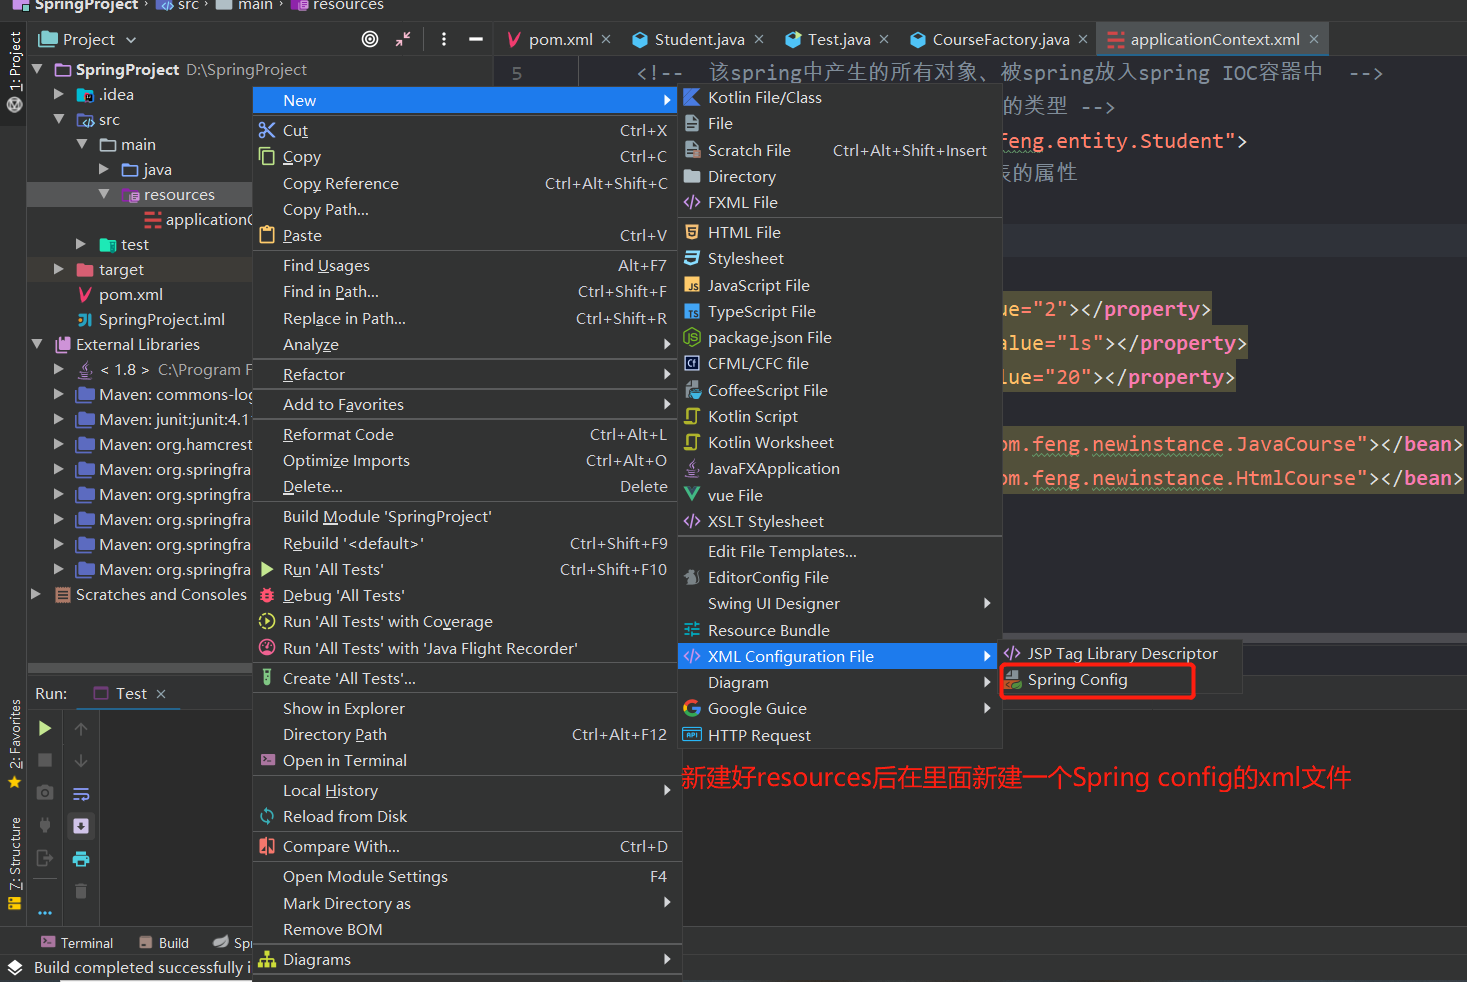
pom.xml添加依赖
默认是没有spring相关依赖的、我们需要修改pom.xml、让idea 导入相关的依赖。
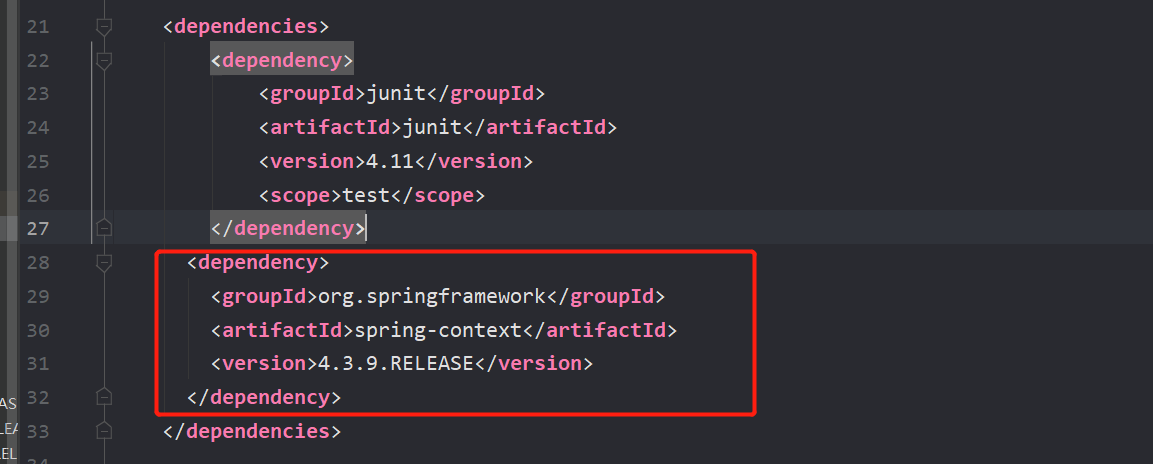
      <dependency>
        <groupId>org.springframework</groupId>
        <artifactId>spring-context</artifactId>
        <version>4.3.9.RELEASE</version>
      </dependency>
在pom.xml中加入这么一段话、所有spring需要的依赖即导入进来了、可以在下面看到。注意idea提示的时候点击import changes

4、进行IOC测试
IOC是什么呢?控制反转(Inversion of Control,缩写为IoC),是面向对象编程中的一种设计原则,可以用来减低计算机代码之间的耦合度。其中最常见的方式叫做依赖注入(Dependency Injection,简称DI),还有一种方式叫“依赖查找”(Dependency Lookup)。通过控制反转,对象在被创建的时候,由一个调控系统内所有对象的外界实体将其所依赖的对象的引用传递给它。也可以说,依赖被注入到对象中。Spring框架的核心就是IOC、通过IOC原则、代码之间的耦合性大大地降低、许多繁杂的对象创建被省去、效率大大提高。
1、新建一个实体类Student
package com.feng.entity;

import com.feng.factory.CourseFactory;
import com.feng.newinstance.HtmlCourse;
import com.feng.newinstance.ICourse;
import com.feng.newinstance.JavaCourse;
import org.springframework.context.ApplicationContext;
import org.springframework.context.support.ClassPathXmlApplicationContext;

public class Student {
    private int stuNo;
    private String stuName;
    private int stuAge;

    public int getStuNo() {
        return stuNo;
    }

    public void setStuNo(int stuNo) {
        this.stuNo = stuNo;
    }

    public String getStuName() {
        return stuName;
    }

    public void setStuName(String stuName) {
        this.stuName = stuName;
    }

    public int getStuAge() {
        return stuAge;
    }

    public void setStuAge(int stuAge) {
        this.stuAge = stuAge;
    }

    @Override
    public String toString() {
        return "Student{" +
                "stuNo=" + stuNo +
                ", stuName='" + stuName + '\'' +
                ", stuAge=" + stuAge +
                '}';
    }
}
2、在applicationContext.xml中配置bean
<?xml version="1.0" encoding="UTF-8"?>
<beans xmlns="http://www.springframework.org/schema/beans"
       xmlns:xsi="http://www.w3.org/2001/XMLSchema-instance"
       xsi:schemaLocation="http://www.springframework.org/schema/beans http://www.springframework.org/schema/beans/spring-beans.xsd">
    <!--  该spring中产生的所有对象、被spring放入spring IOC容器中  -->
    <!-- id:唯一标识符、class:标识符的类型 -->
    <bean id="student" class="com.feng.entity.Student">
        <!-- property: 该class所代表的属性
             name:  属性名
             value: 属性值
        -->
        <property name="stuNo" value="2"></property>
        <property name="stuName" value="ls"></property>
        <property name="stuAge" value="20"></property>
    </bean>
</beans>
3、在测试类中进行测试
package com.feng.test;
import com.feng.entity.Student;
import org.springframework.context.ApplicationContext;
import org.springframework.context.support.ClassPathXmlApplicationContext;

public class Test {

    public static void main(String[] args) {
        //Spring 上下文对象:context
        ApplicationContext context = new ClassPathXmlApplicationContext("applicationContext.xml");
        // 执行从springIOC容器中获取一个id为student的对象
        Student student =(Student) context.getBean("student");
        System.out.println(student);
    }
}
输出如下:

5、总结
可以发现、SpringIOC容器帮助我们更加轻松的获取对象的属性和值、在这之前、我们只需要在application.xml中配置即可、从原来的new对象、变成现在从IOC容器中直接去取对象、这就是IOC的本质、也有一种说法叫做DI原则即依赖注入(Dependency Injection,简称DI)。即将对象注入到bean中、在从bean中去取就可以了。如果项目很大、这种方式免去了对象多次的赋值、减少代码耦合性、大大地提高了开发效率。

 浙公网安备 33010602011771号