jemalloc+lua+nginx自动化构建
概述
nginx在同一操作系统上编译构建好的是可以直接分发的(主要是依赖gcc的版本)
Download:
特点:
- jemalloc(优化对内存的分配管理)
- lua (支持lua脚本)
- nginx-v1.22.0
- modules(支持session/upstream_check)
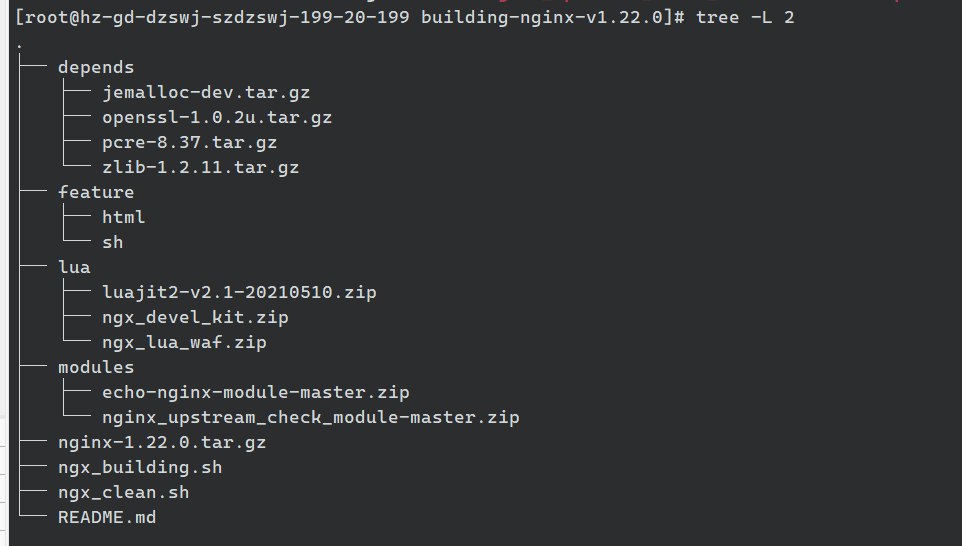
部署包结构
编译脚本
#!/bin/sh
set -e

## define
basedir=/servyou/nginx
release_bin=${1:-nginx-v1.22.0-bin-c7.tar.gz}

## requirement
yum install -y gcc gcc-c++ make patch unzip -q

## unzip
cd depends
ls *.tar.gz |xargs -n1 tar zxf
cd -

cd lua
ls *.zip |xargs -n1 unzip
cd -

cd modules
ls *.zip |xargs -n1 unzip
cd -

ls *.tar.gz |xargs -n1 tar zxf

## building jemalloc && lua

#jemalloc
cd depends/jemalloc*
./autogen.sh
./configure -q
make -s -j2  && make -s install_bin install_include install_lib
cd -

#lua
cd lua/luajit*
make -s -j2 && make -s install
cd -

#add ld
echo "/usr/local/lib" > /etc/ld.so.conf.d/local.conf
ldconfig

export LUAJIT_LIB=/usr/local/lib
export LUAJIT_INC=/usr/local/include/luajit-2.1

## build nginx
cd nginx*
./configure --prefix=$basedir \
--with-http_ssl_module --with-http_realip_module --with-http_stub_status_module --with-stream --with-ld-opt="-ljemalloc" \
--add-module=./modules/nginx-goodies-nginx-sticky-module \
--add-module=../modules/nginx_upstream_check_module-master \
--add-module=../modules/echo-nginx-module-master \
--add-module=./modules/ngx_http_lua_module \
--add-module=../lua/ngx_devel_kit \
--with-pcre=../depends/pcre-8.37 \
--with-zlib=../depends/zlib-1.2.11 \
--with-openssl=../depends/openssl-1.0.2u

make -s && make -s install

#copy feature
rm -rf $basedir/html
cp -a ../feature/* $basedir/
cd -

## release
cd $basedir
cp -a /usr/local/lib  .
cd ..

tar zcf $release_bin nginx/
echo "building successful!!! $(ls $(dirname $basedir))"

#echo '/servyou/nginx/lib' > /etc/ld.so.conf.d/ngx_local.conf
#ldconfig
清理编译
#!/bin/sh

## define
ts=$(date +%F-%T) #2022-08-03-00:45:41

## lib/include
cd /usr/local
mv lib{,_$ts}
mv include{,_$ts}
cd -

## suffix tar.gz | zip
cd depends
ls -F |egrep /$ |xargs rm -rf
cd -

cd lua
ls -F |egrep /$ |xargs rm -rf
cd -

cd modules
ls -F |egrep /$ |xargs rm -rf
cd -

ngx_dir=$(ls |grep "nginx"  |egrep -v "tar.gz$")
rm -rf $ngx_dir

echo "clean successful!!!"
使用注意
使用
tar zxf building-nginx-v1.22.0.tar.gz && cd building-nginx*

//编译
sh ngx_building.sh
默认构建成果$1 = nginx-v1.22.0-bin-c7.tar.gz

sh ngx_building.sh nginx-v1.22.0-bin-c6.tar.gz

sh ngx_clean.sh  //清理后在次编译
注意: 编译好的二进制发行版本跟系统存在依赖关系,核心就是gcc的支持版本
- c6就是centos6的发型版本
- c7就是centos7的发型版本
如何使用构建好的二进制成果
echo '/servyou/nginx/lib' > /etc/ld.so.conf.d/ngx_local.conf
ldconfig

./sbinx/nginx -t //测试是否可以运行

如果不是默认的prefix则可以指定 -p
./sbinx/nginx -p /opt/nginx  -t

 浙公网安备 33010602011771号