
仿牛客网第一章
挺久没写过博客,最近把在做的项目整理一下发上来
部分内容参考自 https://blog.csdn.net/weixin_44406146
一、技术架构
- Spring Boot
- Spring、Spring MVC、MyBatis
- Redis、Kafka、Elasticsearch
- Spring Security、Spring Actuator
说明:
1.SpringBoot是Spring的简化
2.SpringMVC用于处理浏览器的请求
3.MyBatis用来访问数据库
4.Redis用作缓存
5.Kafka用作消息队列
6.Elasticsearch用作全文搜索
7.Spring Security可以管理系统权限
8.Spring Actuator用作系统上线后的状态监控
二、环境搭建
1.Apache Maven:可以帮助我们构建项目、管理项目中的jar包
安装且配置环境变量后使用命令mvn -version检查如下图:
 maven常用命令:
mvn compile : 编译maven项目,会出现target目录
mvn clean   : 删除编译后的内容,target目录会被删除
mvn test    :执行test中的方法,会首先编译test类
2.IDE:IntelliJ IDEA
3.快速构建springboot项目:Spring Initializer
4.Spring boot的核心作用:起步依赖,自动配置,端点监控
随时记:
server.port=80  //设置访问端口号
server.servlet.context-path=/community  //设置默认路径
三、Spring入门
1.Spring Framework
- Spring Core : IoC、AOP
- Spring Data Access : Transactions、Spring MyBatis
- Web Servlet : Spring MVC
- Integration : Email、Scheduling、AMQP、Security
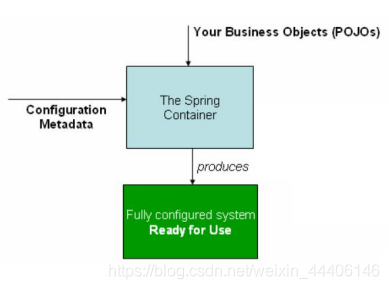
2.Spring IoC
- Inversion of Control - 控制反转,是一种面向对象编程的设计思想。
- Dependency Injection - 依赖注入,是IoC思想的实现方式。
- IoC Container - IoC容器,是实现依赖注入的关键,本质上是一个工厂。
3.Ioc展示
此类其实是一个配置类
package com.hsw.community;
import org.springframework.boot.SpringApplication;
import org.springframework.boot.autoconfigure.SpringBootApplication;
@SpringBootApplication
public class CommunityApplication {
    public static void main(String[] args) {
        SpringApplication.run(CommunityApplication.class, args);
    }
}
如何使用spring容器?
@SpringBootTest
@ContextConfiguration(classes = CommunityApplication.class)  //使用配置类
//实现ApplicationContaxtAware接口并实现相应方法即可从参数中获取ApplicationContext
class CommunityApplicationTests implements ApplicationContextAware {
    private ApplicationContext applicationContext;
    @Override
    public void setApplicationContext(ApplicationContext applicationContext) throws BeansException {
        this.applicationContext = applicationContext;
    }
    @Test
    public void testApplication(){
        System.out.println(applicationContext);
        //常用方法
        applicationContext.getBean(Dao.class);
        applicationContext.getBean("mybatisDao",Dao.class);
    }
}
随时记
/**使用场景比如我们有Dao接口下有两个实现类hibernateDao和mybatisDao
*我们用applicationContext获取bean时希望获取mybatisDao则加入此注解即可
*/
@Primary
@Repority("mybatisDao")  //自定义bean的名字
@PostConstruct  //在构造器之后调用
@PreDestroy  //销毁之前调用
@Scope("prototype")  //spring默认的bean都是单例的加此注解会在每次getBean方法调用时实例化对象
在配置类中配置要使用的bean(很笨拙的方法)
@Configuration
public class AlphaConfig {
    @Bean
    public SimpleDateFormat simpleDateFormat(){
        return new SimpleDateFormat("yyyy-MM-dd");
    }
}
随时记
@bean  //bean的名称就是方法名如上simpleDateFormat
@Autowired  //依赖注入,获取bean
@Qualifier("xxx")  //把名字为xxx的bean注入,一般和Autowired一起使用
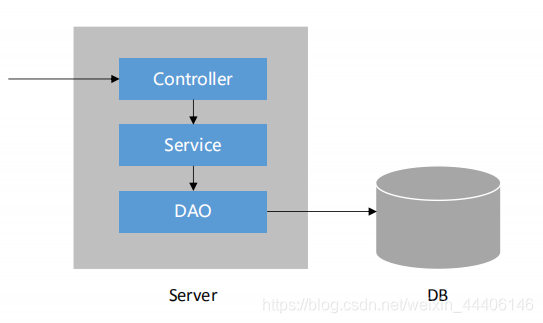
四、SpringMVC入门
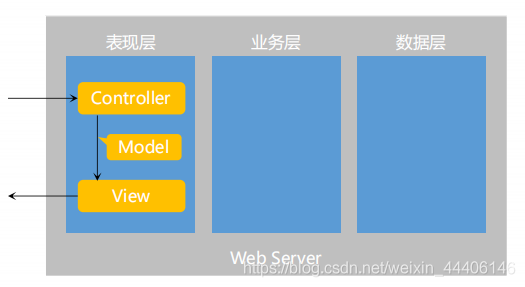
Spring MVC
- 三层架构 - 表现层、业务层、数据访问层
- MVC
- Model:模型层
- View:视图层
- Controller:控制层
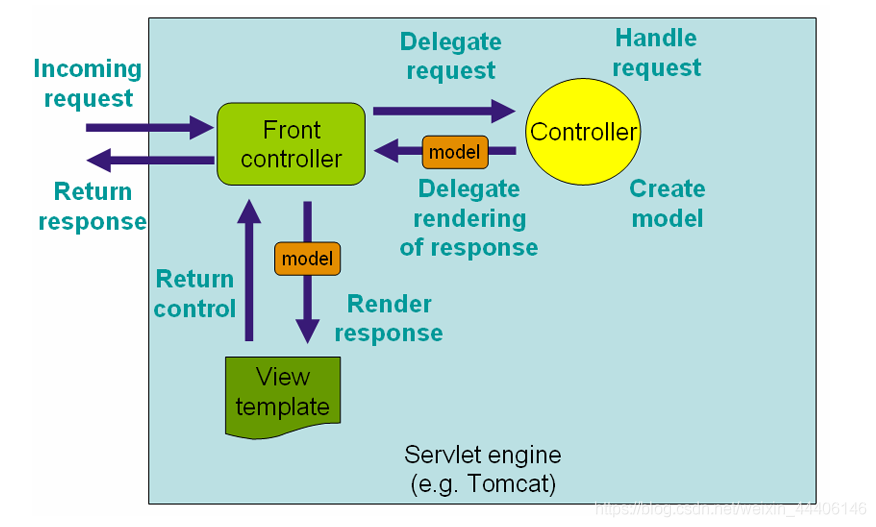
- 核心组件 - 前端控制器:DispatcherServlet
 DispatcherServlet工作流程
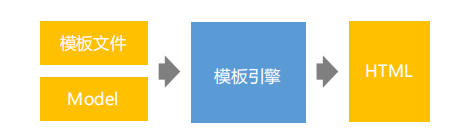
Thymeleaf
- 模板引擎
- 生成动态的HTML。
- Thymeleaf
- 倡导自然模板,即以HTML文件为模板。
- 常用语法
- 标准表达式、判断与循环、模板的布局。
- 标准表达式、判断与循环、模板的布局。
随时记
spring.thymeleaf.cache=false  //开发中关闭thymeleaf的缓存,上线后开启
//Thymeleaf配置类,实际配置过程就是给某个bean设置属性
@EnableConfigurationProperties(ThymeleafProperties.class)
public class ThymeleafAutoConfiguration
@ConfigurationProperties(prefix = "spring.thymeleaf")
public class ThymeleafProperties {
简单举几个例子
1.mvc
@Controller
@RequestMapping("/demo")
public class AlphaController {
    @RequestMapping("/test")
    public void demo(HttpServletRequest request, HttpServletResponse response){
        System.out.println(request.getContextPath());
        System.out.println(request.getMethod());
        Enumeration<String> headerNames = request.getHeaderNames();
        while(headerNames.hasMoreElements()){
            String name = headerNames.nextElement();
            String value = request.getHeader(name);
            System.out.println("header:"+name+"  的值是->"+value);
        }
        response.setContentType("text/html;charset=utf-8");
        try(PrintWriter writer = response.getWriter()) {
            writer.write("我会变强的");
        } catch (IOException e) {
            e.printStackTrace();
        }
    }
}
2.快速获取request中的参数
@RequestMapping(path = "/testRequestParam",method = RequestMethod.GET)
@ResponseBody
//  /testRequestParam?i=10&j=100
public String testRequestParam(
    @RequestParam(name = "i",required = false,defaultValue = "1") int i,
    @RequestParam(name = "j",required = false,defaultValue = "100")int j){
    System.out.println(i);
    System.out.println(j);
    return "hello world";
    }
3.快速获取路径中的值
@RequestMapping(path = "/testPathVariable/{id}",method = RequestMethod.GET)
@ResponseBody
//  /testPathVariable/123
public String testPathVariable(@PathVariable("id") int id){
    System.out.println(id);  //123
    return "hello world";
}
随时记:
@RequestParam  //经过DispatcherServlet处理后会从request对象中获取参数
@PathVariable("xxx")  //快速获取路径中的值如上所示
4.表单中数据的获取
<form method="post" action="/demo/testPost">
        <p>
            名字:<input name="name" type="text" >
        </p>
        <p>
            年龄:<input name="age" type="text">
        </p>
        <p>
            <input type="submit" value="submit">
        </p>
    </form>
@RequestMapping(path = "/testPost",method = RequestMethod.POST)
@ResponseBody
public String testPost(String name,int age){
    System.out.println(name);
    System.out.println(age);
    return "hello world";
}
随时记:
直接让方法参数名和表单中定义的名字相等即可获取
5.填充模板数据
@RequestMapping(path = "/teacher",method = RequestMethod.GET)
    public ModelAndView testThymeleaf(){
        ModelAndView mv = new ModelAndView();
        mv.addObject("name","狂徒张三");
        mv.addObject("age","100");
        mv.setViewName("teacher.html");
        return mv;
    }
teacher.html位于templates下
<!DOCTYPE html>
<html lang="en"  xmlns:th="http://www.thymeleaf.org">
<head>
    <meta charset="UTF-8">
    <title>Title</title>
</head>
<body>
    <p th:text="${name}"></p>
    <p th:text="${age}"></p>
</body>
</html>
简化controller中的方式
@RequestMapping(path = "/teacher",method = RequestMethod.GET)
    public String testThymeleaf(Model model){
        model.addAttribute("name","电棍");
        model.addAttribute("age","1000");
        return "teacher.html";
    }
6.相应json数据(用于异步请求,java对象->json->js对象)
@RequestMapping(path = "/testJson",method = RequestMethod.GET)
@ResponseBody
public Map<String,Object> testJson(){
    Map<String,Object> map = new HashMap<>();
    map.put("name","猪猪侠");
    map.put("age",19);
    return map;
}
五、MyBatis入门
MyBatis
- 核心组件
- SqlSessionFactory:用于创建SqlSession的工厂类。
- SqlSession:MyBatis的核心组件,用于向数据库执行SQL。
- 主配置文件:XML配置文件,可以对MyBatis的底层行为做出详细的配置。
- Mapper接口:就是DAO接口,在MyBatis中习惯性的称之为Mapper。
- Mapper映射器:用于编写SQL,并将SQL和实体类映射的组件,采用XML、注解均可实现。
- 示例
- 使用MyBatis对用户表进行CRUD操作。
<dependency>
            <groupId>mysql</groupId>
            <artifactId>mysql-connector-java</artifactId>
            <version>5.1.47</version>
        </dependency>
        <dependency>
            <groupId>org.mybatis.spring.boot</groupId>
            <artifactId>mybatis-spring-boot-starter</artifactId>
            <version>2.0.1</version>
        </dependency>
添加配置
# DataSourceProperties
spring.datasource.driver-class-name=com.mysql.jdbc.Driver
spring.datasource.url=jdbc:mysql://localhost:3306/community?characterEncoding=utf-8&useSSL=false&serverTimezone=Hongkong
spring.datasource.username=root
spring.datasource.password=123456
spring.datasource.type=com.zaxxer.hikari.HikariDataSource
spring.datasource.hikari.maximum-pool-size=15
spring.datasource.hikari.minimum-idle=5
spring.datasource.hikari.idle-timeout=30000
# MybatisProperties
#resources目录下新建一个mapper目录存放xml文件
mybatis.mapper-locations=classpath:mapper/*.xml
mybatis.type-aliases-package=com.hsw.community.entity
#启动自动设置主键
mybatis.configuration.useGeneratedKeys=true
#下划线命名方式和驼峰命名方式匹配 如:header_url==headerUrl
mybatis.configuration.mapUnderscoreToCamelCase=true
创建entity包并创建User类
import java.util.Date;
public class User {
    private int id;
    private String username;
    private String password;
    private String salt;
    private String email;
    private int type;
    private int status;
    private String activationCode;
    private String headerUrl;
    private Date createTime;
在dao包下创建UserMapper接口
@Mapper
@Repository
public interface UserMapper {
    User selectById(int id);
    User selectByName(String username);
    User selectByEmail(String email);
    int insertUser(User user);
    int updateStatus(int id, int status);
    int updateHeader(int id, String headerUrl);
    int updatePassword(int id, String password);
}
在mapper文件夹下建立user-mapper.xml文件
<?xml version="1.0" encoding="UTF-8" ?>
<!DOCTYPE mapper
        PUBLIC "-//mybatis.org//DTD Mapper 3.0//EN"
        "http://mybatis.org/dtd/mybatis-3-mapper.dtd">
<mapper namespace="com.hsw.community.dao.UserMapper">
    <sql id="insertFields">
        username, password, salt, email, type, status, activation_code, header_url, create_time
    </sql>
    <sql id="selectFields">
        id, username, password, salt, email, type, status, activation_code, header_url, create_time
    </sql>
    <select id="selectById" resultType="User">
        select <include refid="selectFields"></include>
        from user
        where id = #{id}
    </select>
    <select id="selectByName" resultType="User">
        select <include refid="selectFields"></include>
        from user
        where username = #{username}
    </select>
    <select id="selectByEmail" resultType="User">
        select <include refid="selectFields"></include>
        from user
        where email = #{email}
    </select>
	<!--如果所用参数时bean需要用parameterType表示出来
        keyProperty的值写的是bean中对应表中主键名称,用于插入数据后把主键写回bean中
    -->
    <insert id="insertUser" parameterType="User" keyProperty="id">
        insert into user (<include refid="insertFields"></include>)
        values(#{username}, #{password}, #{salt}, #{email}, #{type}, #{status}, #{activationCode}, #{headerUrl}, #{createTime})
    </insert>
    <update id="updateStatus">
        update user set status = #{status} where id = #{id}
    </update>
    <update id="updateHeader">
        update user set header_url = #{headerUrl} where id = #{id}
    </update>
    <update id="updatePassword">
        update user set password = #{password} where id = #{id}
    </update>
</mapper>
测试一波
@SpringBootTest
@ContextConfiguration(classes = CommunityApplication.class)
public class MapperTest {
    @Autowired
    private UserMapper userMapper;
    @Test
    public void testSelectUser(){
        User user = userMapper.selectById(101);
        System.out.println(user);
    }
}
遇到的问题:
最初在UserMapper 接口上只是用了@Mapper注解也能跑但是idea总是提示找不到bean
单独加@Repository其实也能跑
这里把两个都写上去了其实没必要
随时记:
因为mapper.xml文件中的sql语句写错很难被发现,为了排错可以设置日志级别为debug便于调错
#logger
logging.level.com.hsw.community=debug
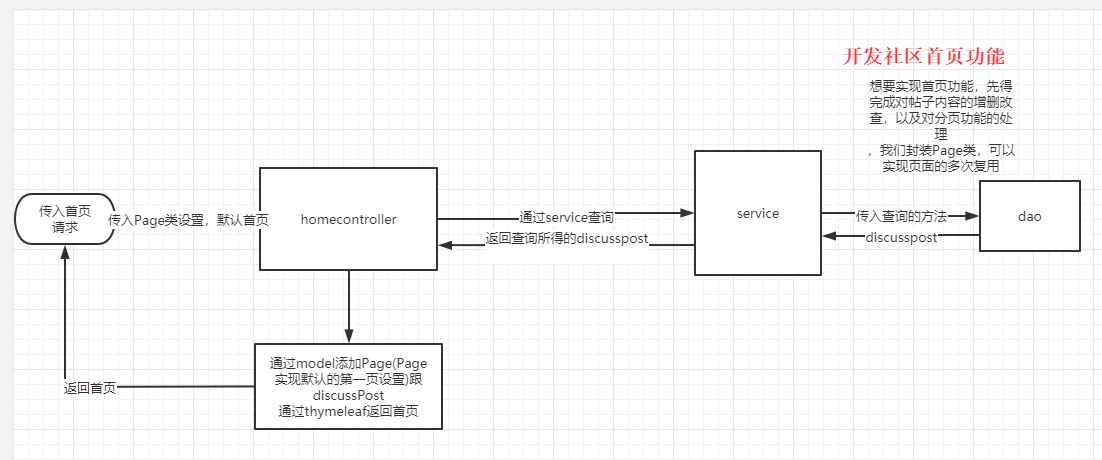
六、开发社区首页
开发流程
- 1次请求的执行过程
- 分步实现
- 开发社区首页,显示前10个帖子
- 开发分页组件,分页显示所有的帖子
社区首页
- 开发社区首页,显示前10个帖子
- 创建实体类
- 写对应dao
- 写对应xml
- 创建service,因为在首页得到的DiscussPost并不携带userid,所以需要创建DiscusspostService和UserService来实现首页展示10个帖子的功能
- 写controller,将查询到的数据注入到model中
- 修改index.html
- 开发分页组件,分页显示所有的帖子
- 创建page类,在Page中设置当前页码,显示上限,数据总数,查询路径
- 在开发社区首页的controller方法中,第一次访问自动注入page,page会自动注入到model中,然后我们让前端在跳转页面的时候在参数上添加页数,我们的SpringMVC会自动注入Page页面
- index.html首页中修改分页组件
1.创建实体类
public class DiscussPost {
    private int id;
    private int userId;
    private String title;
    private String content;
    //0-普通; 1-置顶;
    private int type;
    //0-正常; 1-精华; 2-拉黑;
    private int status;
    private Date createTime;
    private int commentCount;
    private double score;
}
2.写对应dao
@Repository
public interface DiscussPostMapper {
    /**
     * @param userId 考虑查看我的帖子的情况下设置动态sql,看mapper就知道了
     * @param offset
     * @param limit
     * @return
     */
    List<DiscussPost> selectDiscussPosts(int userId,int offset,int limit);
    //如果需要动态拼接条件(<if>里使用)并且这个方法有且只有一个参数需要用@Param起别名
    //@Param用于给参数取别名
    int selectDiscussPostRows(@Param("userId") int userId);
}
3.mapper目录下写个discusspost-mapper.xml
<?xml version="1.0" encoding="UTF-8" ?>
<!DOCTYPE mapper
        PUBLIC "-//mybatis.org//DTD Mapper 3.0//EN"
        "http://mybatis.org/dtd/mybatis-3-mapper.dtd">
<mapper namespace="com.hsw.community.dao.DiscussPostMapper">
    <sql id="selectFields">
        id, user_id, title, content, type, status, create_time, comment_count, score
    </sql>
    <select id="selectDiscussPosts" resultType="DiscussPost">
        select <include refid="selectFields"></include>
        from discuss_post
        where status != 2
        <if test="userId!=0">
            and user_id = #{userId}
        </if>
        order by type desc, create_time desc
        limit #{offset}, #{limit}
    </select>
    <select id="selectDiscussPostRows" resultType="int">
        select count(id)
        from discuss_post
        where status != 2
        <if test="userId!=0">
            and user_id = #{userId}
        </if>
    </select>
</mapper>
4.创建DiscussPostService类和UserService类
@Service
public class DiscussPostService {
    @Autowired
    private DiscussPostMapper discussPostMapper;
    public List<DiscussPost> findDiscussPosts(int userId,int offset,int limit){
        return discussPostMapper.selectDiscussPosts(userId,offset,limit);
    }
    public int findDiscussPostRows(int userId){
        return discussPostMapper.selectDiscussPostRows(userId);
    }
}
@Service
public class UserService {
    @Autowired
    private UserMapper userMapper;
    //因为上边只有userId根据此方法可得到userName
    public User findUserById(int id){
        return userMapper.selectById(id);
    }
}
5.复制静态资源和模板

6.写HomeController
package com.hongna.community.entity;

/**
 * 封装分页相关的信息.
 */
public class Page {

    // 当前页码
    private int current = 1;
    // 显示上限
    private int limit = 10;
    // 数据总数(用于计算总页数)
    private int rows;
    // 查询路径(用于复用分页链接)
    private String path;

    public int getCurrent() {
        return current;
    }

    public void setCurrent(int current) {
        if (current >= 1) {
            this.current = current;
        }
    }

    public int getLimit() {
        return limit;
    }

    public void setLimit(int limit) {
        if (limit >= 1 && limit <= 100) {
            this.limit = limit;
        }
    }

    public int getRows() {
        return rows;
    }

    public void setRows(int rows) {
        if (rows >= 0) {
            this.rows = rows;
        }
    }

    public String getPath() {
        return path;
    }

    public void setPath(String path) {
        this.path = path;
    }

    /**
     * 获取当前页的起始行
     *
     * @return
     */
    public int getOffset() {
        // current * limit - limit
        return (current - 1) * limit;
    }

    /**
     * 获取总页数
     *
     * @return
     */
    public int getTotal() {
        // rows / limit [+1]
        if (rows % limit == 0) {
            return rows / limit;
        } else {
            return rows / limit + 1;
        }
    }

    /**
     * 获取起始页码
     *
     * @return
     */
    public int getFrom() {
        int from = current - 2;
        return from < 1 ? 1 : from;
    }

    /**
     * 获取结束页码
     *
     * @return
     */
    public int getTo() {
        int to = current + 2;
        int total = getTotal();
        return to > total ? total : to;
    }

}
package com.hsw.community.controller;
import com.hsw.community.entity.DiscussPost;
import com.hsw.community.entity.Page;
import com.hsw.community.entity.User;
import com.hsw.community.service.DiscussPostService;
import com.hsw.community.service.UserService;
import org.springframework.beans.factory.annotation.Autowired;
import org.springframework.stereotype.Controller;
import org.springframework.ui.Model;
import org.springframework.web.bind.annotation.PathVariable;
import org.springframework.web.bind.annotation.RequestMapping;
import org.springframework.web.bind.annotation.RequestMethod;
import java.util.ArrayList;
import java.util.HashMap;
import java.util.List;
import java.util.Map;
@Controller
public class HomeController {
    @Autowired
    private DiscussPostService discussPostService;
    @Autowired
    private UserService userService;
    @RequestMapping(path="/index",method = RequestMethod.GET)
    //方法调用之前SpringMVC会自动实例化Model和Page,并将Page注入到Model中
    //所以可以直接访问page对象
    //若是路径中带有参数如index?current=2  current的值会自动封装进page中
    public String getIndexPage(Model model,Page page){
        page.setRows(discussPostService.findDiscussPostRows(0));
        page.setPath("/index");
        List<DiscussPost> list = discussPostService.findDiscussPosts(0, page.getOffset(), page.getLimit());
        List<Map<String,Object>> discussPosts = new ArrayList<>();
        if(list!=null){
            for (DiscussPost post:
                 list) {
                Map<String,Object> map = new HashMap<>();
                map.put("post",post);
                User user = userService.findUserById(post.getUserId());
                map.put("user",user);
                discussPosts.add(map);
            }
        }
        model.addAttribute("discussPosts",discussPosts);
        //model.addAttribute("page",page);
        return "/index";
    }
}
7.完成index.html
渲染页面中的帖子
<!-- 帖子列表 -->
<ul class="list-unstyled">
<li class="media pb-3 pt-3 mb-3 border-bottom" th:each="map:${discussPosts}">
<a href="site/profile.html">
<img th:src="${map.user.headerUrl}" class="mr-4 rounded-circle" alt="用户头像" style="width:50px;height:50px;">
</a>
<div class="media-body">
<h6 class="mt-0 mb-3">
<!--href="#" 链接到当前页面顶部-->
<a href="#" th:utext="${map.post.title}">备战春招,面试刷题跟他复习,一个月全搞定!</a>
<span class="badge badge-secondary bg-primary" th:if="${map.post.type==1}">置顶</span>
<span class="badge badge-secondary bg-danger" th:if="${map.post.status==1}">精华</span>
</h6>
<div class="text-muted font-size-12">
<!--utext可以显示转义字符 比如<显示为:< -->
<!--#dates #代表引用内置工具-->
<u class="mr-3" th:utext="${map.user.username}">寒江雪</u> 发布于 <b th:text="${#dates.format(map.post.createTime,'yyyy-MM-dd HH:mm:ss')}">2019-04-15 15:32:18</b>
<ul class="d-inline float-right">
<li class="d-inline ml-2">赞 11</li>
<li class="d-inline ml-2">|</li>
<li class="d-inline ml-2">回帖 7</li>
</ul>
</div>
</div>
</li>
</ul>
<!--分页 -->
<nav class="mt-5" th:if="${page.rows>0}">
<ul class="pagination justify-content-center">
<li class="page-item">
<!--/index?current=1-->
<a class="page-link" th:href="@{${page.path}(current=1)}">首页</a>
</li>
<!-- | |表名有静态的值也有变量 class=xxx disabled 即表示不可点 -->
<li th:class="|page-item ${page.current==1?'disabled':''}|">
<a class="page-link" th:href="@{${page.path}(current=${page.current-1})}">上一页</a></li>
<li th:class="|page-item ${i==page.current?'active':''}|" th:each="i:${#numbers.sequence(page.from,page.to)}">
<a class="page-link" th:href="@{${page.path}(current=${i})}" th:text="${i}">1</a>
</li>
<li th:class="|page-item ${page.current==page.total?'disabled':''}|">
<a class="page-link" th:href="@{${page.path}(current=${page.current+1})}">下一页</a>
</li>
<li class="page-item">
<a class="page-link" th:href="@{${page.path}(current=${page.total})}">末页</a>
</li>
</ul>
</nav>
</div>
</div>
七、项目调试技巧
- 响应状态码的含义
- 服务端断点调试技巧
- 客户端断点调试技巧
- 设置日志级别,并将日志输出到不同的终端
1.响应状态码的含义
1XX:指临时性的响应,需要执行者继续操作即可解决的状态码
2XX:指已经成功地处理了请求,用户可以正常的打开了这个页面。
3XX:进行重定向相关操作
4XX:客户端的错误
5XX:服务器端的错误
详细介绍:点此
一些常用状态码的总结
- 301:被请求的资源已永久移动到新位置,并且将来任何对此资源的引用都应该使用本响应返回的若干个 URI 之一。如果可能,拥有链接编辑功能的客户端应当自动把请求的地址修改为从服务器反馈回来的地址。除非额外指定,否则这个响应也是可缓存的。
- 302:请求的资源现在临时从不同的 URI 响应请求。由于这样的重定向是临时的,客户端应当继续向原有地址发送以后的请求。只有在Cache-Control或Expires中进行了指定的情况下,这个响应才是可缓存的。
- 404:请求失败,请求所希望得到的资源未被在服务器上发现。
- 500:服务器遇到了不知道如何处理的情况。
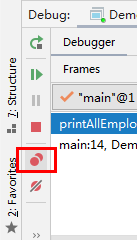
2.服务端断点调试技巧
- 打断点
- 以debug模式启动服务器
- F8逐行执行,F7进入所调用的方法内部
- F9程序继续执行直到遇到下一个断点,如果没有断点了那么程序会执行完毕
- 管理断点的功能,如下图可以快速去除所有断点
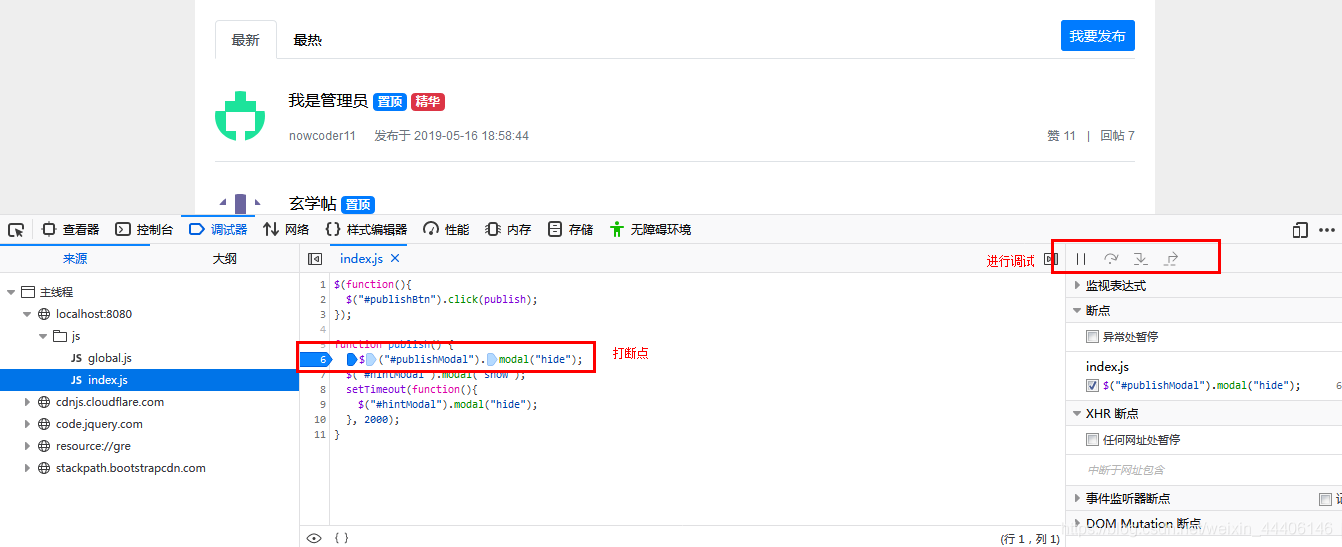
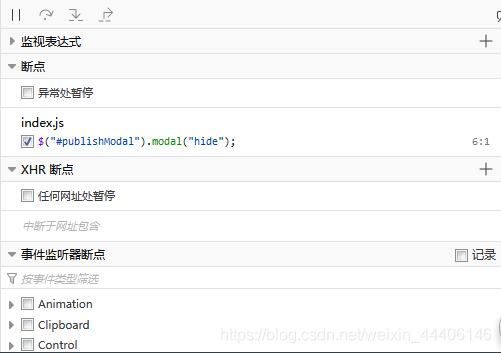
3.客户端断点调试技巧
- 打断点
- 调试
主要用于调试js,如下图
4.设置日志级别,并将日志输出到不同的终端
springboot默认日志logback:官网
package org.slf4j;
public interface Logger {
  //我们可以在配置文件中启动不同的级别,则其以上级别日志可以显示低级别日志不会显示。
  // Printing methods:
  public void trace(String message);
  public void debug(String message);
  public void info(String message);
  public void warn(String message);
  public void error(String message);
}
写个测试类
package com.hsw.community;
import org.junit.jupiter.api.Test;
import org.slf4j.Logger;
import org.slf4j.LoggerFactory;
import org.springframework.boot.test.context.SpringBootTest;
import org.springframework.test.context.ContextConfiguration;
@SpringBootTest
@ContextConfiguration(classes = CommunityApplication.class)
public class LoggerTest {
    private static final Logger logger = LoggerFactory.getLogger(LoggerTest.class);
    @Test
    public void testLogger1(){
        System.out.println(logger.getName());
        logger.trace("hello trace");
        //程序调试日志
        logger.debug("hello debug");
        //普通级别日志
        logger.info("hello info");
        logger.warn("hello warn");
        //错误日志
        logger.error("hello log");
    }
}
添加配置文件
# logger
logging.level.com.hsw.community=debug
输出结果
com.hsw.community.LoggerTest
2020-05-04 15:25:59.505 DEBUG 2644 --- [           main] com.hsw.community.LoggerTest             : hello debug
2020-05-04 15:25:59.505  INFO 2644 --- [           main] com.hsw.community.LoggerTest             : hello info
2020-05-04 15:25:59.505  WARN 2644 --- [           main] com.hsw.community.LoggerTest             : hello warn
2020-05-04 15:25:59.505 ERROR 2644 --- [           main] com.hsw.community.LoggerTest             : hello log
更改配置文件
logging.level.com.hsw.community=warn
在此运行测试类查看输出结果
com.hsw.community.LoggerTest
2020-05-04 15:28:54.515  WARN 9020 --- [           main] com.hsw.community.LoggerTest             : hello warn
2020-05-04 15:28:54.515 ERROR 9020 --- [           main] com.hsw.community.LoggerTest             : hello log
日志输出到文件中的配置
#文件都是以log结尾
logging.file.name=d:work.log
注意:这么搞有个问题,不同级别日志混杂不易查看且文件庞大。
解决方法:使用配置文件配置(放到resource目录下)
<?xml version="1.0" encoding="UTF-8"?>
<configuration>
    <!--项目名-->
    <contextName>community</contextName>
    <!--日志存放目录-->
    <property name="LOG_PATH" value="D:/work/data"/>
    <!--子目录,一般通过项目名加以区分-->
    <property name="APPDIR" value="community"/>
    <!-- error file -->
    <appender name="FILE_ERROR" class="ch.qos.logback.core.rolling.RollingFileAppender">
        <!--文件名-->
        <file>${LOG_PATH}/${APPDIR}/log_error.log</file>
        <!--存不下了建立新的文件的策略是什么-->
        <rollingPolicy class="ch.qos.logback.core.rolling.TimeBasedRollingPolicy">
            <fileNamePattern>${LOG_PATH}/${APPDIR}/error/log-error-%d{yyyy-MM-dd}.%i.log</fileNamePattern>
            <timeBasedFileNamingAndTriggeringPolicy class="ch.qos.logback.core.rolling.SizeAndTimeBasedFNATP">
                <maxFileSize>5MB</maxFileSize>
            </timeBasedFileNamingAndTriggeringPolicy>
            <!--最长存多久-->
            <maxHistory>30</maxHistory>
        </rollingPolicy>
        <!--追加还是覆盖-->
        <append>true</append>
        <encoder class="ch.qos.logback.classic.encoder.PatternLayoutEncoder">
            <!--文件格式: 日期 级别 线程 打印日志所属类 文件多少行 具体消息-->
            <pattern>%d %level [%thread] %logger{10} [%file:%line] %msg%n</pattern>
            <!--字符集-->
            <charset>utf-8</charset>
        </encoder>
        <filter class="ch.qos.logback.classic.filter.LevelFilter">
            <!--记录哪个级别的日志-->
            <level>error</level>
            <onMatch>ACCEPT</onMatch>
            <onMismatch>DENY</onMismatch>
        </filter>
    </appender>
    <!-- warn file -->
    <appender name="FILE_WARN" class="ch.qos.logback.core.rolling.RollingFileAppender">
        <file>${LOG_PATH}/${APPDIR}/log_warn.log</file>
        <rollingPolicy class="ch.qos.logback.core.rolling.TimeBasedRollingPolicy">
            <fileNamePattern>${LOG_PATH}/${APPDIR}/warn/log-warn-%d{yyyy-MM-dd}.%i.log</fileNamePattern>
            <timeBasedFileNamingAndTriggeringPolicy class="ch.qos.logback.core.rolling.SizeAndTimeBasedFNATP">
                <maxFileSize>5MB</maxFileSize>
            </timeBasedFileNamingAndTriggeringPolicy>
            <maxHistory>30</maxHistory>
        </rollingPolicy>
        <append>true</append>
        <encoder class="ch.qos.logback.classic.encoder.PatternLayoutEncoder">
            <pattern>%d %level [%thread] %logger{10} [%file:%line] %msg%n</pattern>
            <charset>utf-8</charset>
        </encoder>
        <filter class="ch.qos.logback.classic.filter.LevelFilter">
            <level>warn</level>
            <onMatch>ACCEPT</onMatch>
            <onMismatch>DENY</onMismatch>
        </filter>
    </appender>
    <!-- info file -->
    <appender name="FILE_INFO" class="ch.qos.logback.core.rolling.RollingFileAppender">
        <file>${LOG_PATH}/${APPDIR}/log_info.log</file>
        <rollingPolicy class="ch.qos.logback.core.rolling.TimeBasedRollingPolicy">
            <fileNamePattern>${LOG_PATH}/${APPDIR}/info/log-info-%d{yyyy-MM-dd}.%i.log</fileNamePattern>
            <timeBasedFileNamingAndTriggeringPolicy class="ch.qos.logback.core.rolling.SizeAndTimeBasedFNATP">
                <maxFileSize>5MB</maxFileSize>
            </timeBasedFileNamingAndTriggeringPolicy>
            <maxHistory>30</maxHistory>
        </rollingPolicy>
        <append>true</append>
        <encoder class="ch.qos.logback.classic.encoder.PatternLayoutEncoder">
            <pattern>%d %level [%thread] %logger{10} [%file:%line] %msg%n</pattern>
            <charset>utf-8</charset>
        </encoder>
        <filter class="ch.qos.logback.classic.filter.LevelFilter">
            <level>info</level>
            <onMatch>ACCEPT</onMatch>
            <onMismatch>DENY</onMismatch>
        </filter>
    </appender>
    <!-- console -->
    <appender name="STDOUT" class="ch.qos.logback.core.ConsoleAppender">
        <encoder>
            <pattern>%d %level [%thread] %logger{10} [%file:%line] %msg%n</pattern>
            <charset>utf-8</charset>
        </encoder>
        <filter class="ch.qos.logback.classic.filter.ThresholdFilter">
            <level>debug</level>
        </filter>
    </appender>
    <logger name="com.hsw.community" level="debug"/>
    <root level="info">
        <appender-ref ref="FILE_ERROR"/>
        <appender-ref ref="FILE_WARN"/>
        <appender-ref ref="FILE_INFO"/>
        <appender-ref ref="STDOUT"/>
    </root>
</configuration>
八、版本控制
- 认识Git
- Git的简介
- Git的安装和配置
- Git常用命令
- 将代码提交到本地仓库
- 将代码上传至远程仓库
- IDEA集成Git
$ git config --global user.name "hsw"
$ git config --global user.email hsw@hust.com
• 1
• 2
2.把代码放进本地代码库
- 找到目标代码文件夹,右键gitbash Here
- $ git init
Initialized empty Git repository in I:/ideaworkspace/test/.git/
本地文件出现隐藏文件夹

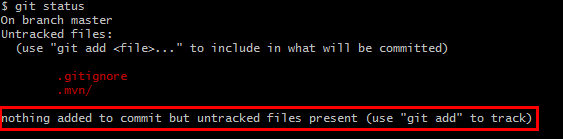
- git status 查看状态
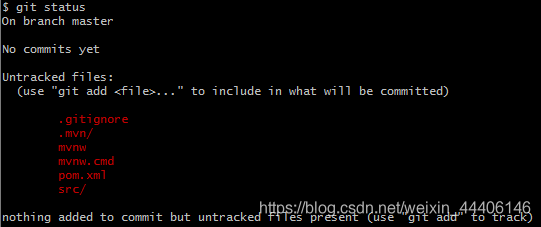
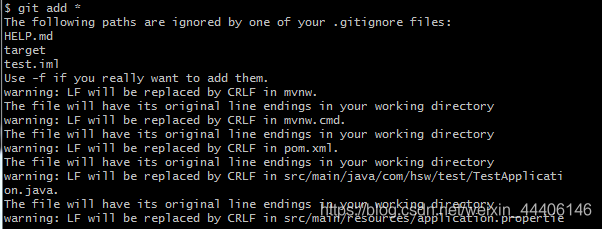
- 添加所有文件 git add *
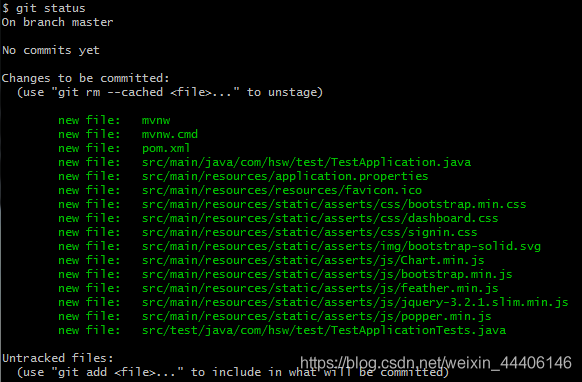
- git status 查看状态(绿了只是加到了本地仓库中,但未提交)
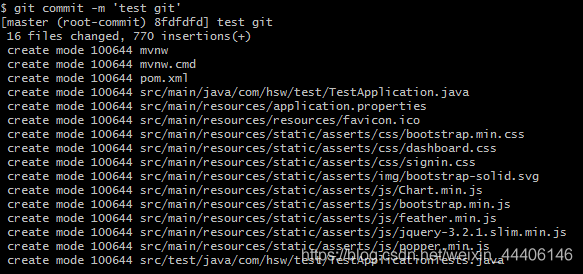
 - git commit -m ‘test git’ (-m是指备注)
- git status 查看状态
- 修改代码(加了一个注释)后查看状态 git status
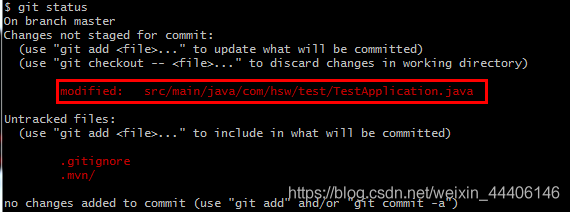
- 然后可以git add,git commit提交修改的代码
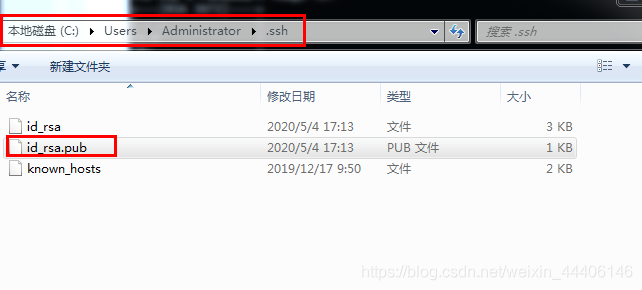
3.上传至远程仓库之生成密钥 $ ssh-keygen -t rsa -C “邮箱地址”
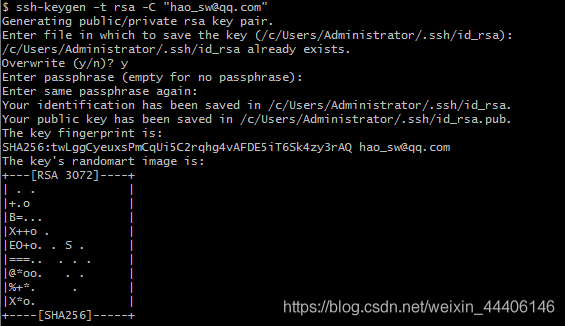
- 复制密钥
- 远程仓库使用牛客网

- 创建项目
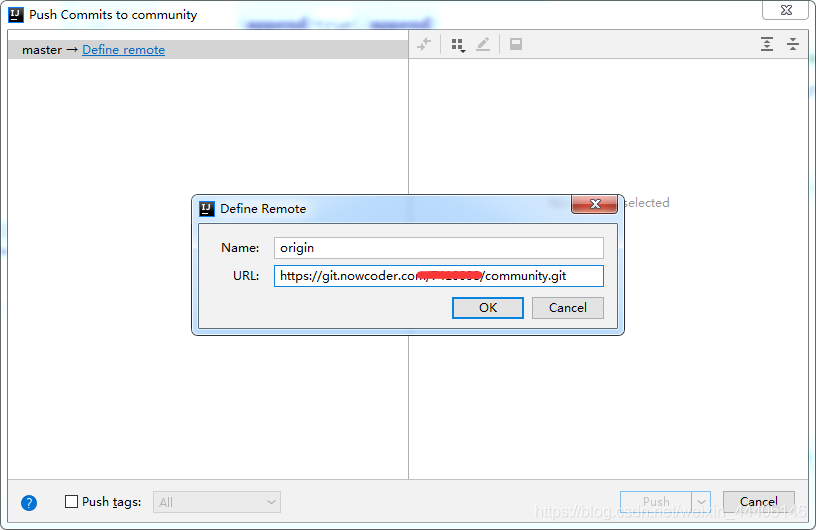
 - 本地关联远程仓库,起别名
$ git remote add 仓库名 仓库地址
• 1

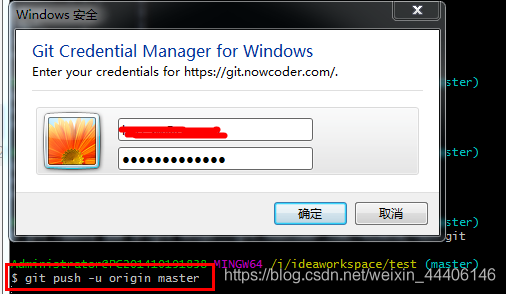
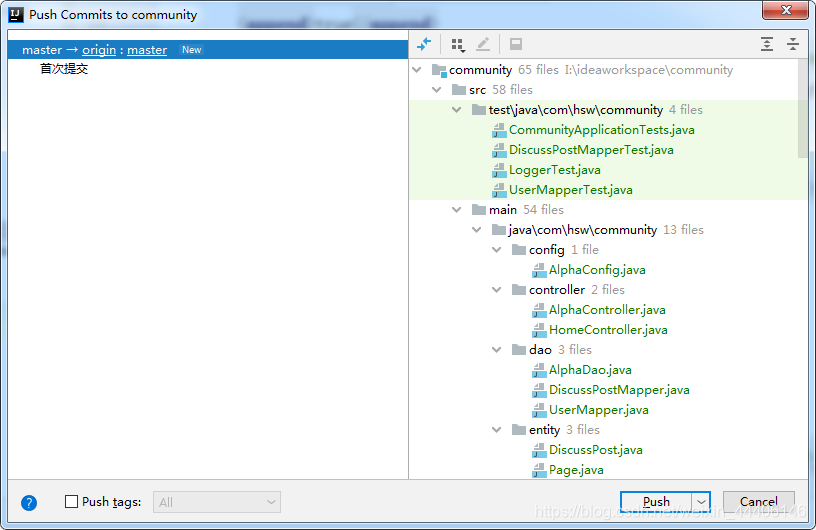
- 上传至远程仓库
$ git push -u 仓库名 分支名
• 1
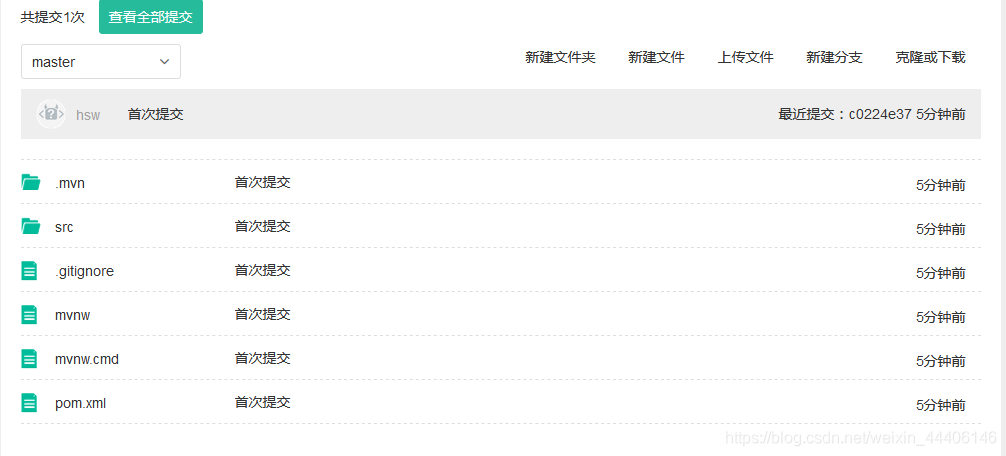
 - 传完之后
 - 远程仓库内容克隆到本地
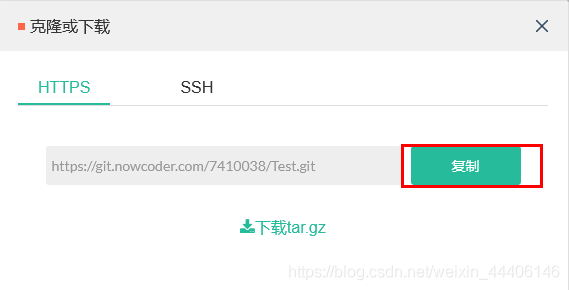
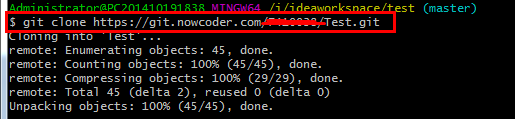
输入命令
$ git clone https://git.nowcoder.com/xxx/xxxx.git
• 1
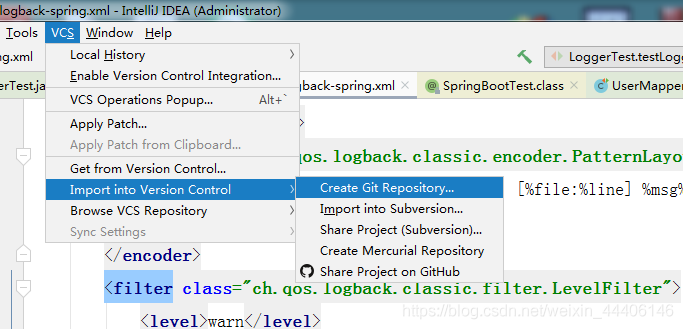
4.idea集成git
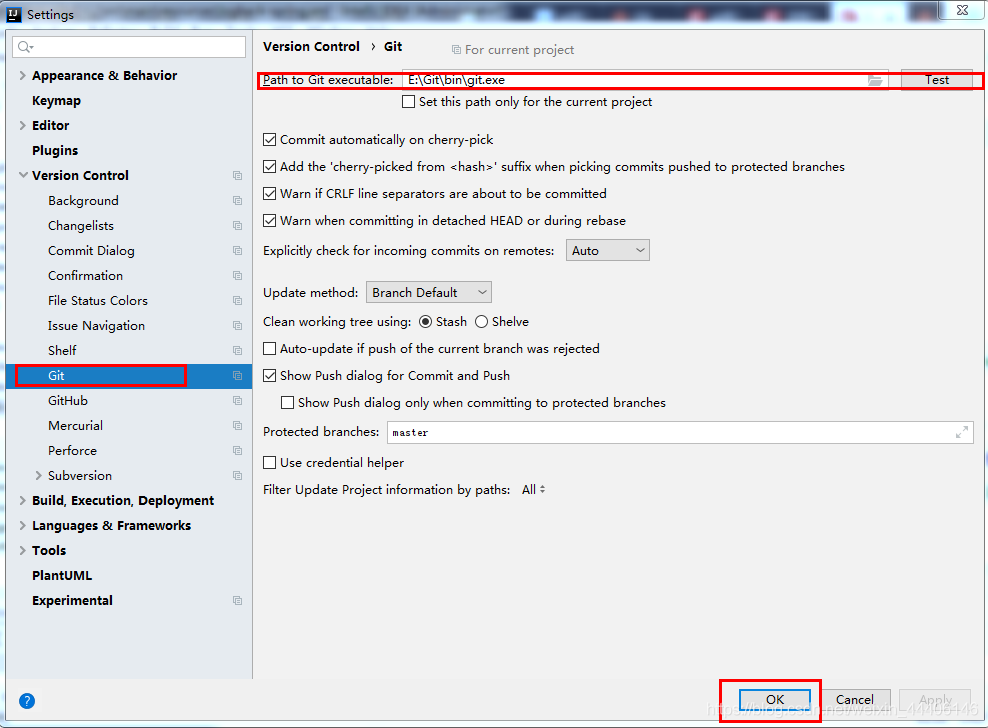 - 创建本地仓库(相当于执行init和add)
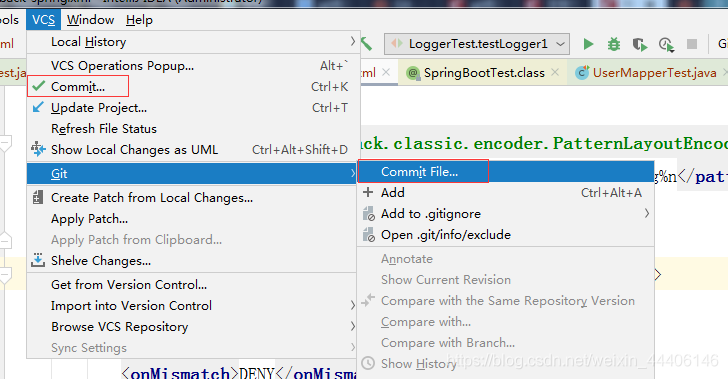
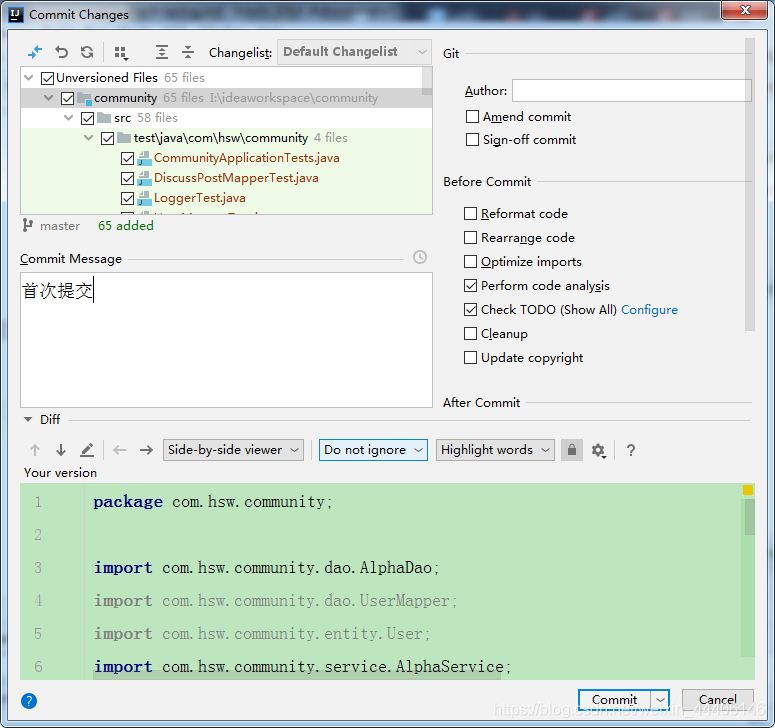
- 提交本地仓库
- 上传远程仓库
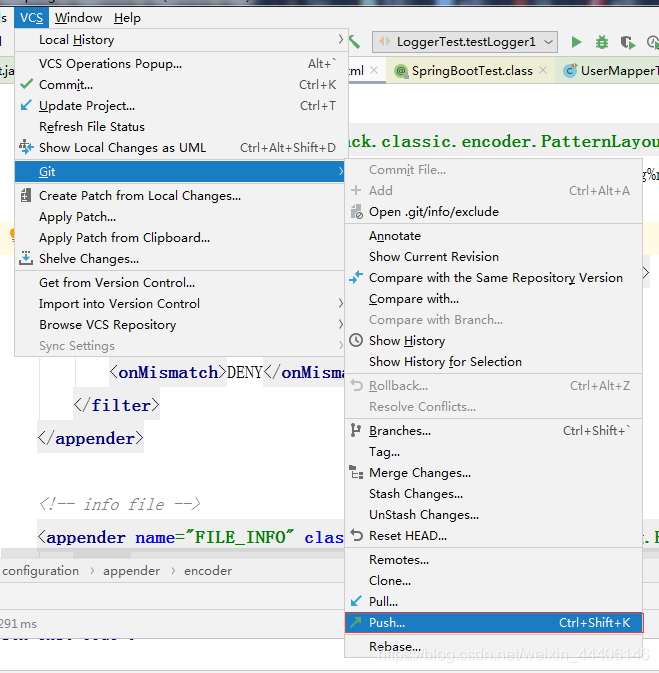
- 上传成功

 浙公网安备 33010602011771号