Django之用户认证系统分析
Django自带一个用户认证系统,这个系统处理用户账户、组、权限和基于cookie的会话,下面将通过分析django源码的方式仔对该系统进行详细分析
1. 用户模型
在django.contrib.auth.models.py包中定义了class User(AbstractUser)类
(1)User模型字段
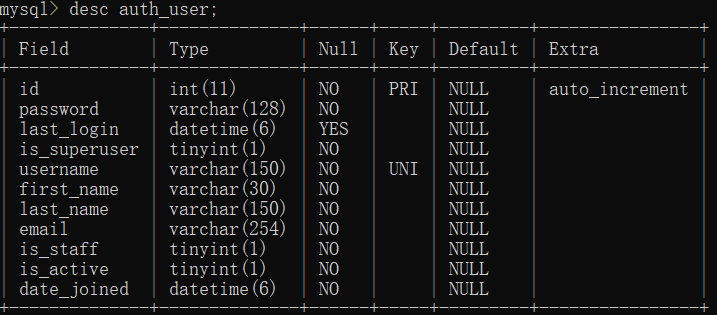
我在django中使用的是MySql,通过auth_user表查看User字段,当然大家也可以直接通过源码查看

下面依次对各字段进行说明:
id:用户ID,主键,auto_increment
password:密码(哈希值,元数据),Django 不储存原始密码,原始密码可以是任意长度的,包含任何字符
last_login:缺省情况下设置为用户最后一次登录的日期时间
is_superuser:布尔值,指明用户拥有所有权限(包括显式赋予和非显式赋予的)
username:用户名,必选项,只能是字母数字(字母、数字和下划线),Changed in Django 1.2: 用户名现在可以包含 @ 、 + 、 . 和 - 字符
first_name:可选项
last_name:可选项
email:可选项,电子邮件地址
is_staff:布尔值,指明这个用户是否可以进入管理站点
is_active:指明这个用户是否是活动的,建议把这个标记设置为False来代替删除用户账户,这样就不会影响指向用户的外键。
注意:登录验证时不会检查is_active标志,也就是说这个属性不控制用户是否可以登录,因此,如果在登录时需要检查is_active 标志,需要你在自己的登录视图中 实现。但是用于 login() 视图的 AuthenticationForm 函数会执行这个 检查,因此应当在 Django 站点中进行认证并执行 has_perm() 之类的权限检查方法,所有那些方法或函数 对于不活动的用户都会返回 False 。
date_joined:缺省情况下设置为用户账户创建的日期时间
(2)User方法
使用django的shell查看User方法

下面选取主要的方法进行说明:
1)is_anonymous
总是返回False,这是一个区别User和AnonymousUser的方法,通常你会更喜欢用is_authenticated方法

2)is_authenticated

总是返回True,这是一个测试用户是否经过验证的方法,这并不表示任何权限,也不测试用户是否是活动的,这只是验证用户是否合法。
3) get_full_name()
返回first_name加上last_name,中间加一个空格
4)set_password(raw_password)
根据原始字符串设置用户密码,要注意密码的哈希算法。不保存 User 对象
5) check_password(raw_password)

6)get_group_permissions(obj=None)
通过用户的组返回用户的一套权限字符串,如果有 obj 参数,则只返回这个特定对象的组权限
7)get_all_permissions(obj=None)
通过用户的组和用户权限返回用户的一套权限字符串,如果有 obj 参数,则只返回这个特定对象的组权限
8)has_perm(perm, obj=None)
如果用户有特定的权限则返回 True ,这里的 perm 的格式为 " label>. codename>",如果用户是不活动的,这个方法总是返回 False,如果有 obj 参数,这个方法不会检查模型的权限,只会检查这个特定对象的 权限
9)has_perms(perm_list, obj=None)
如果用户有列表中每个特定的权限则返回 True ,这里的 perm 的格式为" label>. codename>" 。如果用户是不活动的,这个方法 总是返回 False
10)has_module_perms(package_name)
如果用户在给定的包( Django 应用标签)中有任何一个权限则返回 True 。如果用户是不活动的,这个方法总是返回 False
11)email_user(subject, message, from_email=None)
发送一个电子邮件给用户。如果 from_email 为 None ,则 使用 DEFAULT_FROM_EMAIL
2. 用户登录
Django在django.contrib.auth模块中提供了两个函数:authenticate和login,在django.contrib.auth.views包中的LoginView类也完美的展示了authenticate和login两个函数的使用方法,下面先通过源码分析LoginView类中对这两个函数的使用,再仔细介绍这两个函数的实现。
(1)LoginView类实现
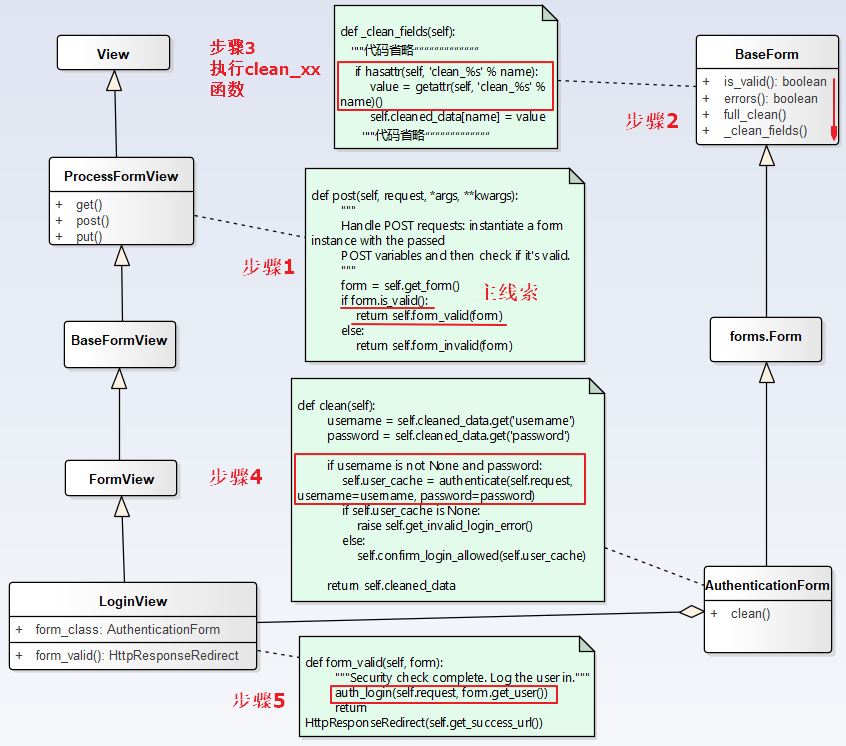
先上张图:

从上图很清楚的说明了用户登录流程:
1)通过AuthenticationForm基类BaseForm的is_valid函数验证表单信息的合法性,通过clean_xx方法实现,我们会再clean函数中发现使用了authenticate函数
2)通过LoginView的form_valid函数调用auth_login函数(就是django.contrib.auth中的login)实现用户登录
(2)authenticate函数
authenticate() 用于验证指定用户的用户名和 密码。
这个函数有两个关键字参数, username 和 password ,如果密码与 用户匹配则返回一个 User 对象,否则返回 None
函数源码:

def authenticate(request=None, **credentials):
    """
    If the given credentials are valid, return a User object.
    """
    for backend, backend_path in _get_backends(return_tuples=True):
        try:
            inspect.getcallargs(backend.authenticate, request, **credentials)
        except TypeError:
            # This backend doesn't accept these credentials as arguments. Try the next one.
            continue
        try:
            user = backend.authenticate(request, **credentials)
        except PermissionDenied:
            # This backend says to stop in our tracks - this user should not be allowed in at all.
            break
        if user is None:
            continue
        # Annotate the user object with the path of the backend.
        user.backend = backend_path
        return user

    # The credentials supplied are invalid to all backends, fire signal
    user_login_failed.send(sender=__name__, credentials=_clean_credentials(credentials), request=request)
(3)login函数
login() 用于在视图中登录用户,它带有一个 HttpRequest 对象和一个 User 对象,并使用 Django 的会话框架在会话中保存用户 的 ID
函数源码:

def login(request, user, backend=None):
    """
    Persist a user id and a backend in the request. This way a user doesn't
    have to reauthenticate on every request. Note that data set during
    the anonymous session is retained when the user logs in.
    """
    session_auth_hash = ''
    if user is None:
        user = request.user
    if hasattr(user, 'get_session_auth_hash'):
        session_auth_hash = user.get_session_auth_hash()

    if SESSION_KEY in request.session:
        if _get_user_session_key(request) != user.pk or (
                session_auth_hash and
                not constant_time_compare(request.session.get(HASH_SESSION_KEY, ''), session_auth_hash)):
            # To avoid reusing another user's session, create a new, empty
            # session if the existing session corresponds to a different
            # authenticated user.
            request.session.flush()
    else:
        request.session.cycle_key()

    try:
        backend = backend or user.backend
    except AttributeError:
        backends = _get_backends(return_tuples=True)
        if len(backends) == 1:
            _, backend = backends[0]
        else:
            raise ValueError(
                'You have multiple authentication backends configured and '
                'therefore must provide the `backend` argument or set the '
                '`backend` attribute on the user.'
            )
    else:
        if not isinstance(backend, str):
            raise TypeError('backend must be a dotted import path string (got %r).' % backend)

    request.session[SESSION_KEY] = user._meta.pk.value_to_string(user)
    request.session[BACKEND_SESSION_KEY] = backend
    request.session[HASH_SESSION_KEY] = session_auth_hash
    if hasattr(request, 'user'):
        request.user = user
    rotate_token(request)
    user_logged_in.send(sender=user.__class__, request=request, user=user)
(4)authenticate和login函数使用示例
from django.contrib.auth import authenticate, login

def my_view(request):
    username = request.POST['username']
    password = request.POST['password']
    user = authenticate(username=username, password=password)
    if user is not None:
        if user.is_active:
            login(request, user)
            # 重定向到一个登录成功页面。
        else:
            # 返回一个“帐户已禁用”错误信息。
    else:
        # 返回一个“非法用户名或密码”错误信息。
当你手动登录一个用户时, 必须 在调用 login() 之前调用 authenticate() 。在成功验证用户后,authenticate() 会在 User 上设置一个空属性,这个信息在以后登录过程中要用到。
3. 登录要求装饰器
(1)login_required函数原型
def login_required(function=None, redirect_field_name=REDIRECT_FIELD_NAME, login_url=None):
    """
    Decorator for views that checks that the user is logged in, redirecting
    to the log-in page if necessary.
    """
    actual_decorator = user_passes_test(
        lambda u: u.is_authenticated,
        login_url=login_url,
        redirect_field_name=redirect_field_name
    )
    if function:
        return actual_decorator(function)
    return actual_decorator
(2)login_required()函数实现以下功能
(a)如果用户没有登录,那么就重定向到settings.LOGIN_URL,并且在查询字符串中传递当前绝对路径,例如:http://localhost:8000/account/login/?next=/blog/,/blog/为当前访问页面
(b)如果用户已经登录,则正常的执行视图,视图代码认为用户已经登录
(3)login_required()函数参数说明
(a)缺省情况下,成功登陆后重定向的路径是保存在next参数中,如果想换另外一个名称,可以使用第二个参数redirect_field_name,如果将redirect_field_name=‘nextlink’,之前的链接会变成http://localhost:8000/account/login/?nextlink=/blog/,注意,如果你提供了一个值给 redirect_field_name ,那么你最好也同样自定义 你的登录模板。因为保存重定向路径的模板环境变量会使用redirect_field_name 作为关键值,而不使用缺省的 "next"
(b)login_url参数,可选,默认为settings.LOGIN_URL
(4)示例
@login_required(redirect_field_name='nextlink')
def blog_title(request):
    blogs = BlogModel.objects.all()
    return render(request, 'titles.html', {'blogs':blogs})
4. 用户登出
在视图中可以使用 django.contrib.auth.logout() 来登出通过 django.contrib.auth.login() 登录的用户。它带有一个 HttpRequest 对象,没有返回值
from django.contrib.auth import logout
def logout_view(request):
    logout(request)
    return redirect('/account/login/') #重定向到另一页面
当调用 logout() 时,当前请求的会话数据会清空。 这是为了防止另一个用户使用同一个浏览器登录时会使用到前一个用户的会话数据。 如果要在用户登出后在会话中储存一些数据,那么得在 django.contrib.auth.logout() 之后储存。注意当用户没有登录时,调用 logout() 函数不会引发任何错误。
5. 修改密码
(1)django提供了python manage.py changepassword *username* 命令修改用户密码,如果给定了用户名,这个命令会提示你输入两次密码。 当两次输入的密码相同时,该用户的新密码会立即生效。如果没有给定用户,这个命令会 尝试改变与当前用户名匹配的用户的密码
(2)使用set_password() 方法和 check_password() 函数用于设置和检查密码,函数位于django.contrib.auth.base_user.py包中
from django.contrib.auth.models import User
u = User.objects.get(username='john')
u.set_password('new password')
u.save()
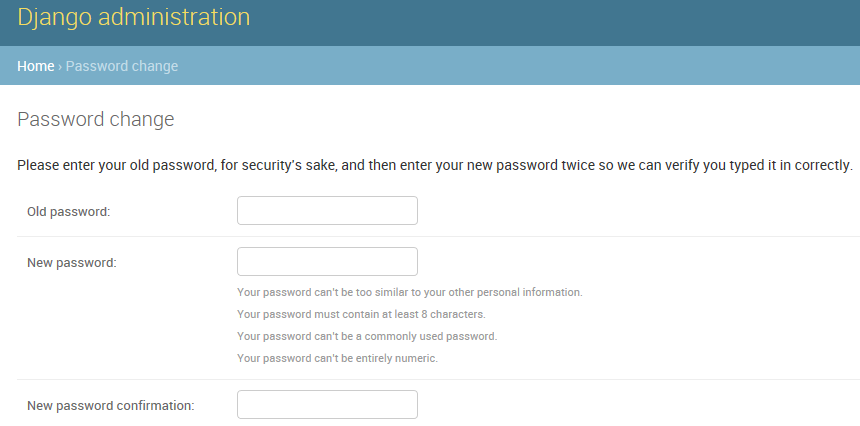
(3)Django提供了PasswordChangeView类实现重置密码,类位于django.contrib.auth.views包中
下面演示如何使用PasswordChangeView类重置密码:
a. 设置URL
from django.conf.urls import url
from django.contrib.auth import views as auth_views
urlpatterns = [
    url(r'password_change/', auth_views.PasswordChangeView.as_view(), name='password_change'),
    url(r'password_change/done/', auth_views.PasswordChangeDoneView.as_view(), name='password_change_done'),
]
b. 设置LOGIN_URL = '/account/login/',若不设置会使用global_settings.py中设置的LOGIN_URL = '/accounts/login/'
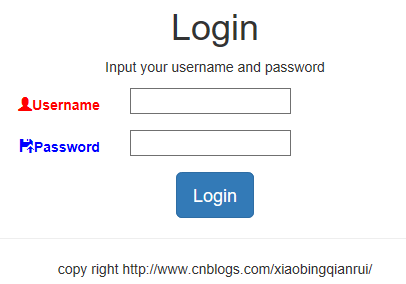
c. 测试,由于我使用的当前应用为account,启动浏览器输入localhost:8000/account/password_change/由于未登录,会转换到登录界面,会变成登录链接http://localhost:8000/account/login/?next=/account/password_change/

登录后,再重置密码http://localhost:8000/account/password_change/

参考博客:http://blog.chinaunix.net/uid-21633169-id-4352928.html


【推荐】编程新体验,更懂你的AI,立即体验豆包MarsCode编程助手
【推荐】凌霞软件回馈社区,博客园 & 1Panel & Halo 联合会员上线
【推荐】抖音旗下AI助手豆包,你的智能百科全书,全免费不限次数
【推荐】轻量又高性能的 SSH 工具 IShell:AI 加持,快人一步
· 深入理解 Mybatis 分库分表执行原理
· 如何打造一个高并发系统?
· .NET Core GC压缩(compact_phase)底层原理浅谈
· 现代计算机视觉入门之:什么是图片特征编码
· .NET 9 new features-C#13新的锁类型和语义
· Spring AI + Ollama 实现 deepseek-r1 的API服务和调用
· 《HelloGitHub》第 106 期
· 数据库服务器 SQL Server 版本升级公告
· 深入理解Mybatis分库分表执行原理
· 使用 Dify + LLM 构建精确任务处理应用