python之常用模块
一、模块的定义
1.1 什么是模块
常见的场景:一个模块就是一个包含了python定义和声明的文件,文件名就是模块名字加上.py的后缀
但其实import加载的模块分为四个通用类别:
- 使用python编写的代码(.py文件)
- 已被便以为共享库或DLL的C或C++扩展
- 包好一组模块的包
- 使用C编写并链接到python解释器的内置模块
1.2 为何要使用模块
如果你退出python解释器然后重新进入,那么你之前定义的函数或者变量豆浆丢失,因此我们通常将程序学到文件中一边永久保存下来,需要时就通过python test.py方式去执行,此时test.py被称为脚本script。
随着程序的发展,功能越来越多,为了方便管理,我们通常将程序分成一个个的文件,这样做程序的结构更清晰,方便管理。这时我们不仅仅可以把这些文件当做脚本去执行,还可以把他们当做模块来导入到其他的模块中,实现了功能的重复利用
二、常用模块
1. collections模块
在内置数据类型(dict,list,set,tuple)的基础上,collection模块还提供了几个额外的数据类型:Counter,Deque,defaultdict,namedtuple和OrderdDict等。
- namedtuple:生成可以使用名字来访问元素内容的tuple
- deque:双端队列,可以快速的从另外一侧追加和推出对象
- Counter:计数器,主要用来计数
- OrderdDict:有序字典
- defaultdict:带有默认值的字典
1.1 namedtuple
我们知道tuple可以代表不变集合,例如 ,一个点的二维坐标就可以表示成:
p = (1,2)
但是,看到(1,2),很难看出这个tuple是用来表示一个坐标的
这时,namedtuple就派上用场了:
from collections import namedtuple
Point = namedtuple('Point',['x','y'])
p = Point(1,2)
print (p.x)
类似的,如果要用坐标和半径表示一个圆,也可以用namedtuple定义:
#namedtuple('名称', [属性list]):
Circle = namedtuple('Circle', ['x', 'y', 'r'])
1.2 deque
使用list存储数据时,按索引访问元素很快,但是插入和删除元素就很慢了,因为list是线性存储,数据量大的时候,插入和删除的效率很低。
deque是为了高效实现插入和删除操作的双向列表,适合于队列和栈:
from collections import deque
q = deque(['a', 'b', 'c'])
q.append('x')
q.appendleft('y')
print(q)
#deque(['y', 'a', 'b', 'c', 'x'])
deque除了实现list的append()和pop()外,还支持appendleft()和popleft(),这样就可以非常高效的往头部添加或删除元素。
1.3 OrderdDict
使用dict时,key是无序的。在对dict做迭代时,我们无法雀东key的顺序
如果要保持key的顺序,可以用OrderdDict:
from collections import OrderedDict
d = dict([('a', 1), ('b', 2), ('c', 3)])
print(d) # dict的Key是无序的
# {'a': 1, 'c': 3, 'b': 2}
od = OrderedDict([('a', 1), ('b', 2), ('c', 3)])
print(od) # OrderedDict的Key是有序的
# OrderedDict([('a', 1), ('b', 2), ('c', 3)
注意,OrderdDict的key会按照插入的顺序排列,不是key本身排序:
od = OrderedDict()
od['z'] = 1
od['y'] = 2
od['x'] = 3
print(od.keys()) # 按照插入的Key的顺序返回
# ['z', 'y', 'x']
1.4 defautdict
有如下值集合[11,22,33,44,55,66,77,88,99,90...],将所有大于66的值保存至字典的第一个key中,将小于66的值保存至第二个key的值中。


 1 values = [11, 22, 33,44,55,66,77,88,99,90]
 2
 3 my_dict = {}
 4
 5 for value in  values:
 6     if value>66:
 7         if my_dict.has_key('k1'):
 8             my_dict['k1'].append(value)
 9         else:
10             my_dict['k1'] = [value]
11     else:
12         if my_dict.has_key('k2'):
13             my_dict['k2'].append(value)
14         else:
15             my_dict['k2'] = [value]
16
17 原生字典解决方法
 1 from collections import defaultdict
 2
 3 values = [11, 22, 33,44,55,66,77,88,99,90]
 4
 5 my_dict = defaultdict(list)
 6
 7 for value in  values:
 8     if value>66:
 9         my_dict['k1'].append(value)
10     else:
11         my_dict['k2'].append(value)
12
13 defaultdict字典解决方法
使用dict时,如果引用的key不存在,就会跑出keyError,如果希望key不存在时,返回一个默认值,就可以用defautdict:
1 from collections import defaultdict
2 dd = defaultdict(lambda: 'N/A')
3 dd['key1'] = 'abc'
4 print(dd['key1'] )# key1存在
5 'abc'
6 print(dd['key2']) # key2不存在,返回默认值
7 'N/A'
1.5 Counter
Counter类的目的是用来跟踪值出现的次数,他是一个无序的容器类型,以字典的键值对形式存储,其中元素作为key,其计数作为value,计数值可以使任意的Interger(包括0和负数)。Counter类和其他语言的bags或multisets很相似
from collections import Counter
c = Counter('abcdeabcdabcaba')
print (c)
输出:Counter({'a': 5, 'b': 4, 'c': 3, 'd': 2, 'e': 1})
2. 时间模块
2.1 和时间有关系的我们就要用到时间模块。在使用模块之前,应该首先导入这个模块。
#常用方法
1.time.sleep(secs)
(线程)推迟指定的时间运行。单位为秒。
2.time.time()
获取当前时间戳
2.2 表示时间的三种方式
在python中,通常有这三种方式来表示时间: 时间戳, 元组(struct_time)、格式化的时间字符串:
- 时间戳(timestamp):通常来说,时间戳表示的是从1970年1月1日00:00:00开始按秒计算的偏移量,我们运行'type(time.time())',返回的是float类型
- 格式化的时间字符串(Format String):‘1999-12-06’
![]() View Code
View Code1 %y 两位数的年份表示(00-99) 2 %Y 四位数的年份表示(000-9999) 3 %m 月份(01-12) 4 %d 月内中的一天(0-31) 5 %H 24小时制小时数(0-23) 6 %I 12小时制小时数(01-12) 7 %M 分钟数(00=59) 8 %S 秒(00-59) 9 %a 本地简化星期名称 10 %A 本地完整星期名称 11 %b 本地简化的月份名称 12 %B 本地完整的月份名称 13 %c 本地相应的日期表示和时间表示 14 %j 年内的一天(001-366) 15 %p 本地A.M.或P.M.的等价符 16 %U 一年中的星期数(00-53)星期天为星期的开始 17 %w 星期(0-6),星期天为星期的开始 18 %W 一年中的星期数(00-53)星期一为星期的开始 19 %x 本地相应的日期表示 20 %X 本地相应的时间表示 21 %Z 当前时区的名称 22 %% %号本身 23 24 python中时间日期格式化符号:
- 元组(struct_time) :struct_time元组共有9个元素:(年,月,日,时,分,秒,一年中第几周,一年中第几天等)
首先,我们先导入time 模块,来认识一下python中表示时间的几种格式
import time
#时间戳
print(time.time())
#时间字符串
print(time.strftime("%Y-%m-%d %X"))
print(time.strftime("%Y-%m-%d %H-%M-%S"))
#时间元组:localtime将一个时间戳转换为当前时区的struct_time
print(time.localtime())
小结:时间戳是计算机能够识别的时间;时间字符串是人能够看懂的时间;元组则是用来操作时间的
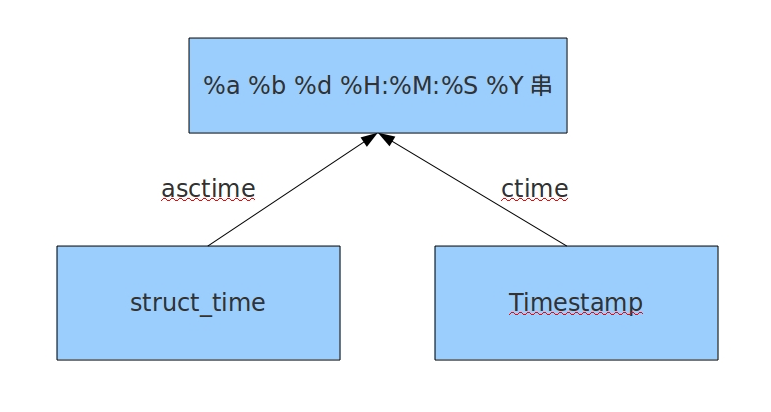
几种格式之间的转换
 1 # 结构化时间 --> 格式化时间
 2 # ftime = time.strftime('%Y-%m-%d %H:%M:%S',stime)
 3 # print(ftime)
 4 #
 5 # s_time= time.strptime('2065-01-24 13:20:00','%Y-%m-%d %H:%M:%S')
 6 # print(s_time)
 7
 8 # print(time.asctime(time.localtime(3000000000)))
 9
10 # print(time.ctime(3000000000))
11
12 #发布信息的时候记录一个时间戳
13 #用现在的时间和之前的时间戳做计算
14 # 现在的时间戳 - 之前的时间戳  = 时间戳的差
15 # 时间戳的差 转换成 结构化时间
16 # 结构化时间 - 1970-1-1 0:0:0
17
18 # 结构化时间 = time.strptime('2018-2-28 22:29:30','%Y-%m-%d %H:%M:%S')
19 # 结构化时间2 = time.strptime('2018-3-1 10:28:02','%Y-%m-%d %H:%M:%S')
20 # 时间戳时间 = time.mktime(结构化时间)
21 # 时间戳时间2 = time.mktime(结构化时间2)
22 #
23 # 时间戳时间的差 = 时间戳时间2 - 时间戳时间
24 # print(时间戳时间的差)
25 #
26 # 结构化时间差 = time.gmtime(时间戳时间的差)
27 #
28 # print(结构化时间差.tm_year-1970,结构化时间差.tm_mon - 1,
29 #       结构化时间差.tm_mday-1,结构化时间差.tm_hour - 0,
30 # 结构化时间差.tm_min-0,结构化时间差.tm_sec-0)
3. random模块
 1 import random
 2 # print(random.choice([1,'23',[4,5]]))
 3 # print(random.sample([1,'23',[4,5]],2))
 4
 5 # 排序 10000
 6 # item = [1,3,5,7,9]
 7 # random.shuffle(item)
 8 # print(item)
 9 # 随机验证码 数字+字母
10 # import random
11 # num_alpha_lst = []
12 # for i in range(10):
13 #     num_alpha_lst.append(i)
14 # for i in range(65,91):
15 #     num_alpha_lst.append(chr(i))
16 # code = ''
17 # for i in range(6):
18 #     c = random.choice(num_alpha_lst)
19 #     code += str(c)
20 # print(code)
21 # [num,alpha]  10+26 = 36*6*
22 # sample # 6
23 # choice # 1
 1 # 先从数字中选一个数
 2 # 再从字母中选一个字母
 3 # 从这个数字和字母中随机选一个
 4 import random
 5 def v_code():
 6     code = ''
 7     for i in range(5):
 8         num=random.randint(0,9)
 9         alf=chr(random.randint(65,90))
10         add=random.choice([num,alf])
11         code="".join([code,str(add)])
12     return code
13 print(v_code())
4. os模块
os模块是与操作系统交互的一个接口
 1 '''
 2 os.getcwd() 获取当前工作目录,即当前python脚本工作的目录路径
 3 os.chdir("dirname")  改变当前脚本工作目录;相当于shell下cd
 4 os.curdir  返回当前目录: ('.')
 5 os.pardir  获取当前目录的父目录字符串名:('..')
 6 os.makedirs('dirname1/dirname2')    可生成多层递归目录
 7 os.removedirs('dirname1')    若目录为空,则删除,并递归到上一级目录,如若也为空,则删除,依此类推
 8 os.mkdir('dirname')    生成单级目录;相当于shell中mkdir dirname
 9 os.rmdir('dirname')    删除单级空目录,若目录不为空则无法删除,报错;相当于shell中rmdir dirname
10 os.listdir('dirname')    列出指定目录下的所有文件和子目录,包括隐藏文件,并以列表方式打印
11 os.remove()  删除一个文件
12 os.rename("oldname","newname")  重命名文件/目录
13 os.stat('path/filename')  获取文件/目录信息
14 os.sep    输出操作系统特定的路径分隔符,win下为"\\",Linux下为"/"
15 os.linesep    输出当前平台使用的行终止符,win下为"\t\n",Linux下为"\n"
16 os.pathsep    输出用于分割文件路径的字符串 win下为;,Linux下为:
17 os.name    输出字符串指示当前使用平台。win->'nt'; Linux->'posix'
18 os.system("bash command")  运行shell命令,直接显示
19 os.popen("bash command).read()  运行shell命令,获取执行结果
20 os.environ  获取系统环境变量
21
22
23 os.path
24 os.path.abspath(path) 返回path规范化的绝对路径 os.path.split(path) 将path分割成目录和文件名二元组返回 os.path.dirname(path) 返回path的目录。其实就是os.path.split(path)的第一个元素 os.path.basename(path) 返回path最后的文件名。如何path以/或\结尾,那么就会返回空值。
25                         即os.path.split(path)的第二个元素
26 os.path.exists(path)  如果path存在,返回True;如果path不存在,返回False
27 os.path.isabs(path)  如果path是绝对路径,返回True
28 os.path.isfile(path)  如果path是一个存在的文件,返回True。否则返回False
29 os.path.isdir(path)  如果path是一个存在的目录,则返回True。否则返回False
30 os.path.join(path1[, path2[, ...]])  将多个路径组合后返回,第一个绝对路径之前的参数将被忽略
31 os.path.getatime(path)  返回path所指向的文件或者目录的最后访问时间
32 os.path.getmtime(path)  返回path所指向的文件或者目录的最后修改时间
33 os.path.getsize(path) 返回path的大小
34 '''
注意:os.stat('path/filename') 获取文件/目录信息 的结构说明
 1 stat 结构:
 2
 3 st_mode: inode 保护模式
 4 st_ino: inode 节点号。
 5 st_dev: inode 驻留的设备。
 6 st_nlink: inode 的链接数。
 7 st_uid: 所有者的用户ID。
 8 st_gid: 所有者的组ID。
 9 st_size: 普通文件以字节为单位的大小;包含等待某些特殊文件的数据。
10 st_atime: 上次访问的时间。
11 st_mtime: 最后一次修改的时间。
12 st_ctime: 由操作系统报告的"ctime"。在某些系统上(如Unix)是最新的元数据更改的时间,在其它系统上(如Windows)是创建时间(详细信息参见平台的文档)。
5. sys模块
sys模块是与python解释器交互的一个接口
sys.argv           命令行参数List,第一个元素是程序本身路径
sys.exit(n)        退出程序,正常退出时exit(0),错误退出sys.exit(1)
sys.version        获取Python解释程序的版本信息
sys.path           返回模块的搜索路径,初始化时使用PYTHONPATH环境变量的值
sys.platform       返回操作系统平台名称
1 import sys
2 try:
3     sys.exit(1)
4 except SystemExit as e:
5     print(e)
6.序列化模块
6.1将原本的字典、列表等内容转换成一个字符串的过程就叫做序列化
 1 比如,我们在python代码中计算的一个数据需要给另外一段程序使用,那我们怎么给?
 2 现在我们能想到的方法就是存在文件里,然后另一个python程序再从文件里读出来。
 3 但是我们都知道,对于文件来说是没有字典这个概念的,所以我们只能将数据转换成字典放到文件中。
 4 你一定会问,将字典转换成一个字符串很简单,就是str(dic)就可以办到了,为什么我们还要学习序列化模块呢?
 5 没错序列化的过程就是从dic 变成str(dic)的过程。现在你可以通过str(dic),将一个名为dic的字典转换成一个字符串,
 6 但是你要怎么把一个字符串转换成字典呢?
 7 聪明的你肯定想到了eval(),如果我们将一个字符串类型的字典str_dic传给eval,就会得到一个返回的字典类型了。
 8 eval()函数十分强大,但是eval是做什么的?e官方demo解释为:将字符串str当成有效的表达式来求值并返回计算结果。
 9 BUT!强大的函数有代价。安全性是其最大的缺点。
10 想象一下,如果我们从文件中读出的不是一个数据结构,而是一句"删除文件"类似的破坏性语句,那么后果实在不堪设设想。
11 而使用eval就要担这个风险。
12 所以,我们并不推荐用eval方法来进行反序列化操作(将str转换成python中的数据结构)
13
14 为什么要有序列化模块
6.2 序列化的目的。
- 以某种存储形式使自定义对象持久化
- 将对象从一个地方传递到另一个地方
- 使程序更具维护性
7. json&pickle模块
7.1 json模块提供了四个功能: dumps,dump,loads,load
 1 import json
 2 dic = {'k1':'v1','k2':'v2','k3':'v3'}
 3 str_dic = json.dumps(dic)  #序列化:将一个字典转换成一个字符串
 4 print(type(str_dic),str_dic)  #<class 'str'> {"k3": "v3", "k1": "v1", "k2": "v2"}
 5 #注意,json转换完的字符串类型的字典中的字符串是由""表示的
 6
 7 dic2 = json.loads(str_dic)  #反序列化:将一个字符串格式的字典转换成一个字典
 8 #注意,要用json的loads功能处理的字符串类型的字典中的字符串必须由""表示
 9 print(type(dic2),dic2)  #<class 'dict'> {'k1': 'v1', 'k2': 'v2', 'k3': 'v3'}
10
11
12 list_dic = [1,['a','b','c'],3,{'k1':'v1','k2':'v2'}]
13 str_dic = json.dumps(list_dic) #也可以处理嵌套的数据类型
14 print(type(str_dic),str_dic) #<class 'str'> [1, ["a", "b", "c"], 3, {"k1": "v1", "k2": "v2"}]
15 list_dic2 = json.loads(str_dic)
16 print(type(list_dic2),list_dic2) #<class 'list'> [1, ['a', 'b', 'c'], 3, {'k1': 'v1', 'k2': 'v2'}]
1 import json
2 f = open('json_file','w')
3 dic = {'k1':'v1','k2':'v2','k3':'v3'}
4 json.dump(dic,f)  #dump方法接收一个文件句柄,直接将字典转换成json字符串写入文件
5 f.close()
6
7 f = open('json_file')
8 dic2 = json.load(f)  #load方法接收一个文件句柄,直接将文件中的json字符串转换成数据结构返回
9 f.close()
1 import json
2 f = open('file','w')
3 json.dump({'国籍':'中国'},f)
4 ret = json.dumps({'国籍':'中国'})
5 f.write(ret+'\n')
6 json.dump({'国籍':'美国'},f,ensure_ascii=False)
7 ret = json.dumps({'国籍':'美国'},ensure_ascii=False)
8 f.write(ret+'\n')
9 f.close()
 1 Serialize obj to a JSON formatted str.(字符串表示的json对象)
 2 Skipkeys:默认值是False,如果dict的keys内的数据不是python的基本类型(str,unicode,int,long,float,bool,None),设置为False时,就会报TypeError的错误。此时设置成True,则会跳过这类key
 3 ensure_ascii:,当它为True的时候,所有非ASCII码字符显示为\uXXXX序列,只需在dump时将ensure_ascii设置为False即可,此时存入json的中文即可正常显示。)
 4 If check_circular is false, then the circular reference check for container types will be skipped and a circular reference will result in an OverflowError (or worse).
 5 If allow_nan is false, then it will be a ValueError to serialize out of range float values (nan, inf, -inf) in strict compliance of the JSON specification, instead of using the JavaScript equivalents (NaN, Infinity, -Infinity).
 6 indent:应该是一个非负的整型,如果是0就是顶格分行显示,如果为空就是一行最紧凑显示,否则会换行且按照indent的数值显示前面的空白分行显示,这样打印出来的json数据也叫pretty-printed json
 7 separators:分隔符,实际上是(item_separator, dict_separator)的一个元组,默认的就是(‘,’,’:’);这表示dictionary内keys之间用“,”隔开,而KEY和value之间用“:”隔开。
 8 default(obj) is a function that should return a serializable version of obj or raise TypeError. The default simply raises TypeError.
 9 sort_keys:将数据根据keys的值进行排序。
10 To use a custom JSONEncoder subclass (e.g. one that overrides the .default() method to serialize additional types), specify it with the cls kwarg; otherwise JSONEncoder is used.
1 import json
2 data = {'username':['李华','二愣子'],'sex':'male','age':16}
3 json_dic2 = json.dumps(data,sort_keys=True,indent=2,separators=(',',':'),ensure_ascii=False)
4 print(json_dic2)
7.2 pickle模块提供了四个功能: dumps,dump(序列化,存),loads(反序列化,读),load(不仅可以序列化列表,字典...可以把python中的任意的数据类型序列化)
 1 import pickle
 2 dic = {'k1':'v1','k2':'v2','k3':'v3'}
 3 str_dic = pickle.dumps(dic)
 4 print(str_dic)  #一串二进制内容
 5
 6 dic2 = pickle.loads(str_dic)
 7 print(dic2)    #字典
 8
 9 import time
10 struct_time  = time.localtime(1000000000)
11 print(struct_time)
12 f = open('pickle_file','wb')
13 pickle.dump(struct_time,f)
14 f.close()
15
16 f = open('pickle_file','rb')
17 struct_time2 = pickle.load(f)
18 print(struct_time2.tm_year)
7.3 json&pickle模块是用于序列化的两个模块
- json,用于字符串和python数据类型之间进行转换
- pickle,用于python特有的类型和python的数据类型之间进行转换
8. shelve模块
shelve也是python提供给我们的序列化工具,比pickle用起来更简单一些。
shelve只提供给我们一个open方法,是用key来访问的,使用起来和字典类似。
 1 import shelve
 2 f = shelve.open('shelve_file')
 3 f['key'] = {'int':10, 'float':9.5, 'string':'Sample data'}  #直接对文件句柄操作,就可以存入数据
 4 f.close()
 5
 6 import shelve
 7 f1 = shelve.open('shelve_file')
 8 existing = f1['key']  #取出数据的时候也只需要直接用key获取即可,但是如果key不存在会报错
 9 f1.close()
10 print(existing)
这个模块有个限制,它不支持多个应用同一时间往同一个DB进行写操作。所以当我们知道我们的应用如果只进行读操作,我们可以让shelve通过只读方式打开DB
1 import shelve
2 f = shelve.open('shelve_file', flag='r')
3 existing = f['key']
4 f.close()
5 print(existing)
由于shelve在默认情况下是不会记录待持久化对象的任何修改的,所以我们在shelve.open()时候需要修改默认参数,否则对象的修改不会保存。
 1 import shelve
 2 f1 = shelve.open('shelve_file')
 3 print(f1['key'])
 4 f1['key']['new_value'] = 'this was not here before'
 5 f1.close()
 6
 7 f2 = shelve.open('shelve_file', writeback=True)
 8 print(f2['key'])
 9 f2['key']['new_value'] = 'this was not here before'
10 f2.close()
writeback方式有优点也有缺点。优点是减少了我们出错的概率,并且让对象的持久化对用户更加的透明了;但这种方式并不是所有的情况下都需要,首先,使用writeback以后,shelf在open()的时候会增加额外的内存消耗,并且当DB在close()的时候会将缓存中的每一个对象都写入到DB,这也会带来额外的等待时间。因为shelve没有办法知道缓存中哪些对象修改了,哪些对象没有修改,因此所有的对象都会被写入。writeback方式有优点也有缺点。优点是减少了我们出错的概率,并且让对象的持久化对用户更加的透明了;但这种方式并不是所有的情况下都需要,首先,使用writeback以后,shelf在open()的时候会增加额外的内存消耗,并且当DB在close()的时候会将缓存中的每一个对象都写入到DB,这也会带来额外的等待时间。因为shelve没有办法知道缓存中哪些对象修改了,哪些对象没有修改,因此所有的对象都会被写入。
9. re模块
9.1 正则表达式在线测试工具: http://tool.chinaz.com/regex/
字符: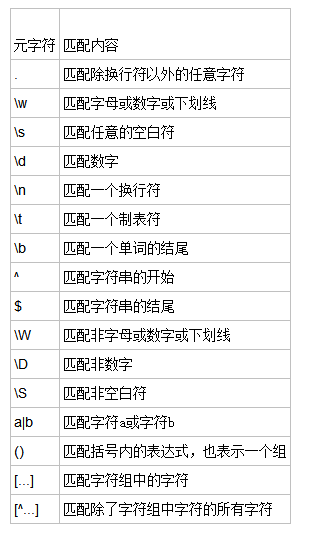
量词: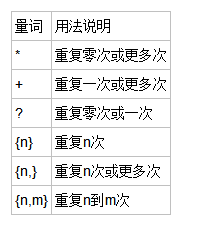
.^$: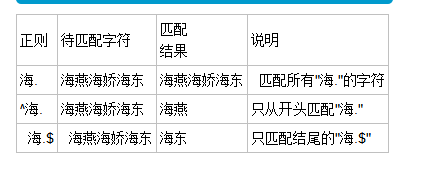
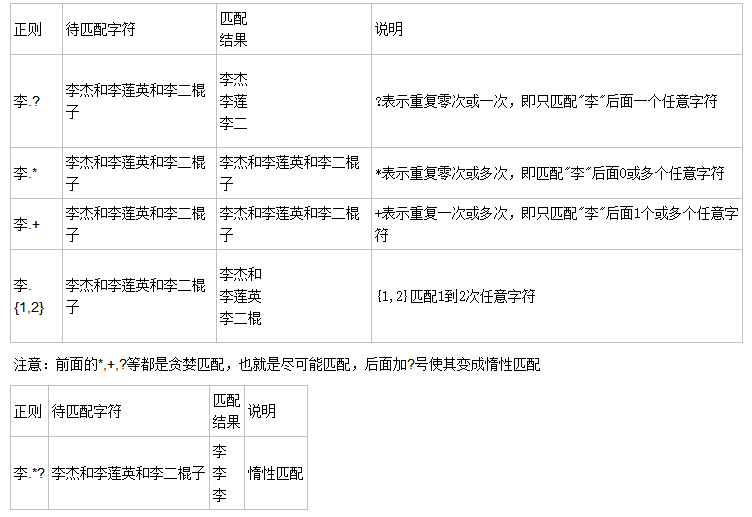
*+?{}:
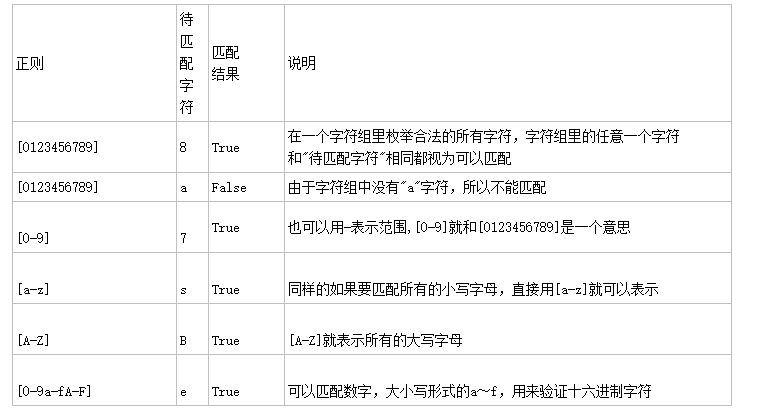
字符集[] [^]: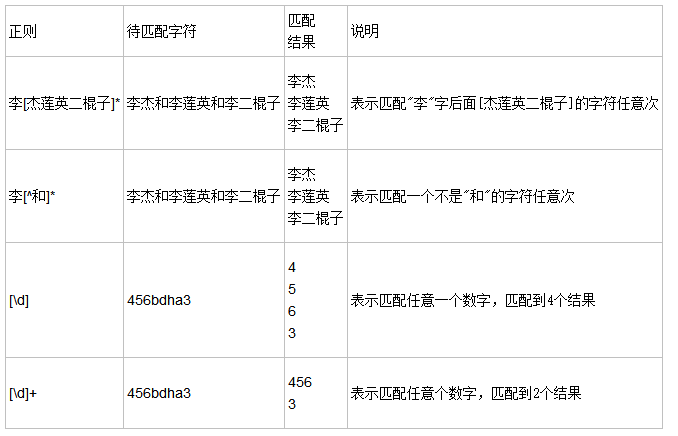
分组()与 或 | [^]: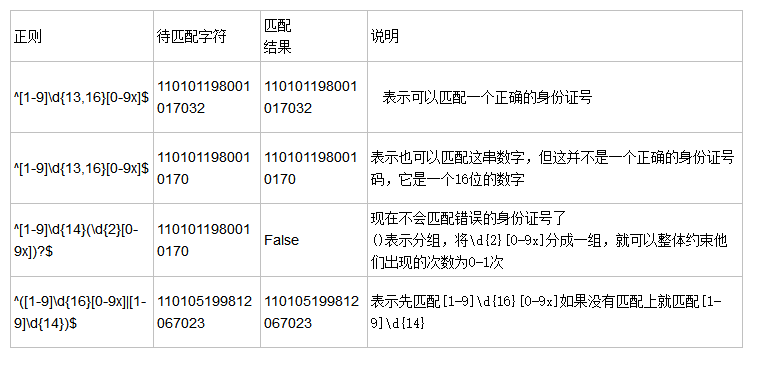
转义符\ :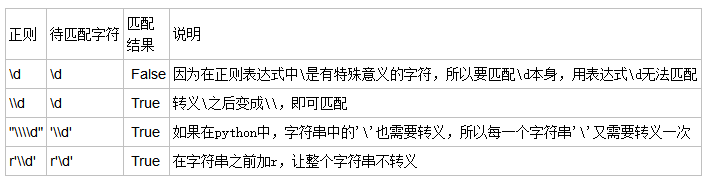
贪婪匹配: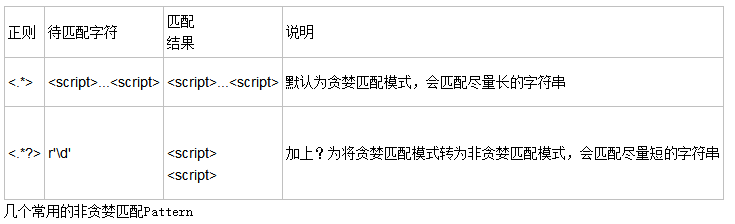
9.2 re模块 常用方法
 1 import re
 2
 3 ret = re.findall('a', 'eva egon yuan')  # 返回所有满足匹配条件的结果,放在列表里
 4 print(ret) #结果 : ['a', 'a']
 5
 6 ret = re.search('a', 'eva egon yuan').group()
 7 print(ret) #结果 : 'a'
 8 # 函数会在字符串内查找模式匹配,只到找到第一个匹配然后返回一个包含匹配信息的对象,该对象可以
 9 # 通过调用group()方法得到匹配的字符串,如果字符串没有匹配,则返回None。
10
11 ret = re.match('a', 'abc').group()  # 同search,不过尽在字符串开始处进行匹配
12 print(ret)
13 #结果 : 'a'
14
15 ret = re.split('[ab]', 'abcd')  # 先按'a'分割得到''和'bcd',在对''和'bcd'分别按'b'分割
16 print(ret)  # ['', '', 'cd']
17
18 ret = re.sub('\d', 'H', 'eva3egon4yuan4', 1)#将数字替换成'H',参数1表示只替换1个
19 print(ret) #evaHegon4yuan4
20
21 ret = re.subn('\d', 'H', 'eva3egon4yuan4')#将数字替换成'H',返回元组(替换的结果,替换了多少次)
22 print(ret)
23
24 obj = re.compile('\d{3}')  #将正则表达式编译成为一个 正则表达式对象,规则要匹配的是3个数字
25 ret = obj.search('abc123eeee') #正则表达式对象调用search,参数为待匹配的字符串
26 print(ret.group())  #结果 : 123
27
28 import re
29 ret = re.finditer('\d', 'ds3sy4784a')   #finditer返回一个存放匹配结果的迭代器
30 print(ret)  # <callable_iterator object at 0x10195f940>
31 print(next(ret).group())  #查看第一个结果
32 print(next(ret).group())  #查看第二个结果
33 print([i.group() for i in ret])  #查看剩余的左右结果
注意:
1.findall 优先级查询
1 import re
2
3 ret = re.findall('www.(baidu|oldboy).com', 'www.oldboy.com')
4 print(ret)  # ['oldboy']     这是因为findall会优先把匹配结果组里内容返回,如果想要匹配结果,取消权限即可
5
6 ret = re.findall('www.(?:baidu|oldboy).com', 'www.oldboy.com')
7 print(ret)  # ['www.oldboy.com']
2.spilt优先级查询
1 ret=re.split("\d+","eva3egon4yuan")
2 print(ret) #结果 : ['eva', 'egon', 'yuan']
3
4 ret=re.split("(\d+)","eva3egon4yuan")
5 print(ret) #结果 : ['eva', '3', 'egon', '4', 'yuan']
6
7 #在匹配部分加上()之后所切出的结果是不同的,
8 #没有()的没有保留所匹配的项,但是有()的却能够保留了匹配的项,
9 #这个在某些需要保留匹配部分的使用过程是非常重要的。
9.3 练习
1. 匹配标签
 1 import re
 2
 3
 4 ret = re.search("<(?P<tag_name>\w+)>\w+</(?P=tag_name)>","<h1>hello</h1>")
 5 #还可以在分组中利用?<name>的形式给分组起名字
 6 #获取的匹配结果可以直接用group('名字')拿到对应的值
 7 print(ret.group('tag_name'))  #结果 :h1
 8 print(ret.group())  #结果 :<h1>hello</h1>
 9
10 ret = re.search(r"<(\w+)>\w+</\1>","<h1>hello</h1>")
11 #如果不给组起名字,也可以用\序号来找到对应的组,表示要找的内容和前面的组内容一致
12 #获取的匹配结果可以直接用group(序号)拿到对应的值
13 print(ret.group(1))
14 print(ret.group())  #结果 :<h1>hello</h1>
2.匹配整数
1 import re
2
3 ret=re.findall(r"\d+","1-2*(60+(-40.35/5)-(-4*3))")
4 print(ret) #['1', '2', '60', '40', '35', '5', '4', '3']
5 ret=re.findall(r"-?\d+\.\d*|(-?\d+)","1-2*(60+(-40.35/5)-(-4*3))")
6 print(ret) #['1', '-2', '60', '', '5', '-4', '3']
7 ret.remove("")
8 print(ret) #['1', '-2', '60', '5', '-4', '3']
3.数字匹配
1、 匹配一段文本中的每行的邮箱
      http://blog.csdn.net/make164492212/article/details/51656638

2、 匹配一段文本中的每行的时间字符串,比如:‘1990-07-12’;

   分别取出1年的12个月(^(0?[1-9]|1[0-2])$)、
   一个月的31天:^((0?[1-9])|((1|2)[0-9])|30|31)$

3、 匹配qq号。(腾讯QQ号从10000开始)  [1,9][0,9]{4,}

4、 匹配一个浮点数。       ^(-?\d+)(\.\d+)?$   或者  -?\d+\.?\d*

5、 匹配汉字。             ^[\u4e00-\u9fa5]{0,}$

6、 匹配出所有整数
4.爬虫练习
 1 import requests
 2
 3 import re
 4 import json
 5
 6 def getPage(url):
 7
 8     response=requests.get(url)
 9     return response.text
10
11 def parsePage(s):
12
13     com=re.compile('<div class="item">.*?<div class="pic">.*?<em .*?>(?P<id>\d+).*?<span class="title">(?P<title>.*?)</span>'
14                    '.*?<span class="rating_num" .*?>(?P<rating_num>.*?)</span>.*?<span>(?P<comment_num>.*?)评价</span>',re.S)
15
16     ret=com.finditer(s)
17     for i in ret:
18         yield {
19             "id":i.group("id"),
20             "title":i.group("title"),
21             "rating_num":i.group("rating_num"),
22             "comment_num":i.group("comment_num"),
23         }
24
25 def main(num):
26
27     url='https://movie.douban.com/top250?start=%s&filter='%num
28     response_html=getPage(url)
29     ret=parsePage(response_html)
30     print(ret)
31     f=open("move_info7","a",encoding="utf8")
32
33     for obj in ret:
34         print(obj)
35         data=json.dumps(obj,ensure_ascii=False)
36         f.write(data+"\n")
37
38 if __name__ == '__main__':
39     count=0
40     for i in range(10):
41         main(count)
42         count+=25
 1 import re
 2 import json
 3 from urllib.request import urlopen
 4
 5 def getPage(url):
 6     response = urlopen(url)
 7     return response.read().decode('utf-8')
 8
 9 def parsePage(s):
10     com = re.compile(
11         '<div class="item">.*?<div class="pic">.*?<em .*?>(?P<id>\d+).*?<span class="title">(?P<title>.*?)</span>'
12         '.*?<span class="rating_num" .*?>(?P<rating_num>.*?)</span>.*?<span>(?P<comment_num>.*?)评价</span>', re.S)
13
14     ret = com.finditer(s)
15     for i in ret:
16         yield {
17             "id": i.group("id"),
18             "title": i.group("title"),
19             "rating_num": i.group("rating_num"),
20             "comment_num": i.group("comment_num"),
21         }
22
23
24 def main(num):
25     url = 'https://movie.douban.com/top250?start=%s&filter=' % num
26     response_html = getPage(url)
27     ret = parsePage(response_html)
28     print(ret)
29     f = open("move_info7", "a", encoding="utf8")
30
31     for obj in ret:
32         print(obj)
33         data = str(obj)
34         f.write(data + "\n")
35
36 count = 0
37 for i in range(10):
38     main(count)
39     count += 25
1 flags有很多可选值:
2
3 re.I(IGNORECASE)忽略大小写,括号内是完整的写法
4 re.M(MULTILINE)多行模式,改变^和$的行为
5 re.S(DOTALL)点可以匹配任意字符,包括换行符
6 re.L(LOCALE)做本地化识别的匹配,表示特殊字符集 \w, \W, \b, \B, \s, \S 依赖于当前环境,不推荐使用
7 re.U(UNICODE) 使用\w \W \s \S \d \D使用取决于unicode定义的字符属性。在python3中默认使用该flag
8 re.X(VERBOSE)冗长模式,该模式下pattern字符串可以是多行的,忽略空白字符,并可以添加注释
三、常用模块二
1. hashlib 模块
 1 # 摘要算法
 2 # a = alex3714   ===摘要==>   174692740812ab238919
 3 # alex3714   ===摘要==> 174692740812ab238919
 4
 5 # 登录  md5  sha
 6     # 密码不能使用明文存储
 7     # 密文存储 摘要算法
 8 # 校验文件一致性   md5
 9     # 网络的上传下载
10     # 保证多台机器状态的一致
11
12 import hashlib
13 # md5_obj = hashlib.md5()
14 # # md5算法的对象
15 # md5_obj.update(b'alex3714')  # 使用md5摘要算法对'alex3714'进行摘要
16 # res = md5_obj.hexdigest()   # 获取摘要之后的结果
17 # print(res,type(res))  #aee949757a2e698417463d47acac93df    32位
18
19 # user = input('user : ')
20 # passwd = input('passwd : ')
21 # md5_obj = hashlib.md5()
22 # md5_obj.update(passwd.encode('utf-8'))
23 # passwd = md5_obj.hexdigest()
24 # if user == 'alex' and passwd == 'aee949757a2e698417463d47acac93df':
25 #     print('登陆成功')
26
27 # md5_obj = hashlib.sha1()
28 # # md5算法的对象
29 # md5_obj.update(b'alex3714')  # 使用md5摘要算法对'alex3714'进行摘要
30 # res = md5_obj.hexdigest()   # 获取摘要之后的结果
31 # print(res)  #8a003668a9c990f15148f9e4046e1410781533b6  40
32
33 # 相同的字符串使用相同的算法 在任何时候 得到的结果都是一致的
34
35
36 # 全世界的md5算法都是一样的
37 # 123456  111111
38 # md5_obj = hashlib.md5()
39 # md5算法的对象
40 # md5_obj.update(b'123456')  # 使用md5摘要算法对'alex3714'进行摘要
41 # res = md5_obj.hexdigest()   # 获取摘要之后的结果
42 # print(res,type(res))  #aee949757a2e698417463d47acac93df    32位
43 # 123456 e10adc3949ba59abbe56e057f20f883e
44 # 撞库
45
46 # 加盐
47 md5_obj = hashlib.md5('盐'.encode('utf-8'))
48 # # md5算法的对象
49 md5_obj.update(b'alex3714')  # 使用md5摘要算法对'alex3714'进行摘要
50 res = md5_obj.hexdigest()   # 获取摘要之后的结果
51 print(res,type(res))
52 #aee949757a2e698417463d47acac93df    32位
53 #0e249b9c16ea1d840ce700587cada978
54
55 # 动态加盐  _ 校园管理系统
56 # username = 'alex'   # alex alex3714
57 #                     # egon egon5068
58 # md5_obj = hashlib.md5(username.encode('utf-8')+'盐'.encode('utf-8'))
59 # md5_obj.update(b'alex3714')
60 # res = md5_obj.hexdigest()
61 # print(res)
62
63 # 校验文件一致性
64 # with open('userinfo','rb') as f:
65 #     md5_obj = hashlib.md5()
66 #     md5_obj.update(f.read())
67 #     res = md5_obj.hexdigest()
68 #     print(res)
69 #
70 # with open('userinfo','rb') as f:
71 #     md5_obj = hashlib.md5()
72 #     for line in f:
73 #         md5_obj.update(line)   # update操作可以在hexdigest之前执行多次
74 #                                # 分次对一个长字符串进行摘要
75 #     res = md5_obj.hexdigest()  # 结果是对整个长字符串的摘要结果
76 #     print(res)
77
78 #56fc9aa78c2dd71d547988b24bec198a
79
80 # md5_obj = hashlib.md5()
81 # md5_obj.update(b'aaabbb')
82 # res = md5_obj.hexdigest()
83 # print(res)  #6547436690a26a399603a7096e876a2d
84 #
85 # md5_obj = hashlib.md5()
86 # md5_obj.update(b'aa')
87 # md5_obj.update(b'abbb')
88 # res = md5_obj.hexdigest()
89 # print(res)  #6547436690a26a399603a7096e876a2d
2.configparse模块
 1 # .py  里面的所有值 都不需要进行转换或者处理 直接当做变量使用
 2        #通用性不高
 3 # 文本格式 key = value
 4         # 都要进行文件处理 _ 通用
 5 # ini
 6 # [北京校区]     # section
 7 # 课程 = python,linux   # option
 8 # python讲师 = egon,yuanhao,nezha,boss_gold
 9 # linux讲师 = 李导,何首乌
10 # [上海校区]
11 # 课程 = go,linux
12 # python讲师 = egon
13 # linux讲师 = 李导,何首乌
14
15 # import configparser
16 # config = configparser.ConfigParser()
17 # # config 是一个操作配置文件的对象
18 # config["DEFAULT"] = {'ServerAliveInterval': '45',
19 #                       'Compression': 'yes',
20 #                      'CompressionLevel': '9',
21 #                      'ForwardX11':'yes'
22 #                      }
23 # config['bitbucket.org'] = {'User':'hg'}
24 # config['topsecret.server.com'] = {'Host Port':'50022',
25 #                                   'ForwardX11':'no'}
26 # with open('example.ini', 'w') as configfile:
27 #    config.write(configfile)
28
29 import configparser
30
31 config = configparser.ConfigParser()
32 # print(config.sections())     #  []
33 config.read('example.ini')
34 # print(config.sections())        #   ['bitbucket.org', 'topsecret.server.com']
35 #
36 # print('bytebong.com' in config) # False
37 # print('bitbucket.org' in config) # True
38 # print(config['bitbucket.org']["user"])  # hg
39 # print(config['DEFAULT']['Compression']) #yes
40 # print(config['topsecret.server.com']['ForwardX11'])  #no
41 #
42 # print(config['bitbucket.org'])          #<Section: bitbucket.org>
43 #
44 # for key in config['bitbucket.org']:     # 注意,有default会默认default的键
45 #     print(key)
46 #
47 # print(config.options('bitbucket.org'))  # 同for循环,找到'bitbucket.org'下所有键
48 # print(config.items('bitbucket.org'))    #找到'bitbucket.org'下所有键值对
49 # print(config.get('bitbucket.org','compression')) # yes       get方法Section下的key对应的value
50
51 #
52 # import configparser
53 # config = configparser.ConfigParser()
54 # config.read('example.ini')
55 # config.add_section('yuan')
56 # config.remove_section('bitbucket.org')
57 # config.remove_option('topsecret.server.com',"forwardx11")
58 # config.set('topsecret.server.com','k1','11111')
59 # config.set('yuan','k2','22222')
60 # config.write(open('example.ini', "w"))
3.logging模块
 1 # logging
 2 # 操作日志的模块
 3 # 什么叫日志
 4     # 给用户看的
 5         # 用户的重要行为
 6             # 登录 涉及安全
 7             # 账单 钱
 8     # 给开发和运维和测试人员看的
 9         # 自测   logging.debug('一些中间结果')
10         # 测试   1++++++1
11         # 运维
12     # 记录
13         # 打印在屏幕上
14         # 写入文件里
15     # logging的优势
16         # 格式更加规范
17         # 等级更加鲜明
18
19 # 简单的配置用法
20 # import logging
21 # logging.basicConfig(level=logging.ERROR,  #
22 #                     format='%(asctime)s %(filename)s[line:%(lineno)d] %(levelname)s %(message)s',
23 #                     datefmt='%a, %d %b %Y %H:%M:%S',
24 #                     filename='test.log',
25 #                     filemode='a')
26 # logging.debug('debug message')  # 调试
27 # logging.info('info message')    # 信息
28 # logging.warning('warning message')  # 警告
29 # logging.error('error message')      # 错误
30 # logging.critical('critical message')  # 严重错误
31
32 # 使用logger对象的用法
33 import logging
34 # 首先创建一个logger对象
35 logger = logging.getLogger()
36
37 #创建一个格式
38 fmt = logging.Formatter('%(asctime)s - %(name)s - %(levelname)s - %(message)s')
39
40 # 创建一个 文件句柄 控制向哪个文件中输出 用什么格式
41 fh = logging.FileHandler('test3.log',encoding='utf-8')
42 fh.setFormatter(fmt)
43
44 # 创建一个 屏幕句柄 控制向屏幕输出 用什么格式
45 sh = logging.StreamHandler()
46 sh.setFormatter(fmt)
47
48 # 将logger对象和文件句柄,屏幕句柄绑在一起
49 logger.addHandler(fh)
50 logger.addHandler(sh)
51 logger.setLevel(logging.DEBUG)     # 首先必须要整体对logger进行设置
52 sh.setLevel(logging.INFO)
53 fh.setLevel(logging.WARNING)
54 logger.debug('logger debug message')
55 logger.info('logger info message')
56 logger.warning('logger warning message')
57 logger.error('logger error message')
58 logger.critical('logger critical message')

 浙公网安备 33010602011771号