mybatis源码解析之环境准备
概述
对于mybatis而言,大家一定都不陌生,我相信很多同学都跟我一样,用起来非常的熟练,但是其内部的实现原理呢,不太清楚,经常面试的时候,面试官问及这方面的知识,都只能尴尬的回答不知道,或者不清楚,接下来的一段时间,我会慢慢的记录一些我读源码的一些过程,和大家一起学习。
sql准备
要操作数据库,当然还得是先建表,sql如下:
CREATE TABLE `news` (
  `id` bigint(100) NOT NULL AUTO_INCREMENT,
  `title` varchar(1000) DEFAULT NULL,
  `url` varchar(1000) DEFAULT NULL,
  `hash` varchar(1000) DEFAULT NULL,
  `publish_time` varchar(50) DEFAULT NULL,
  `news_type` varchar(50) DEFAULT NULL,
  `from_name` varchar(50) DEFAULT NULL,
  PRIMARY KEY (`id`)
) ENGINE=InnoDB AUTO_INCREMENT=538 DEFAULT CHARSET=utf8
当然,这表建的不一定规范,这些不重要。
其他代码准备
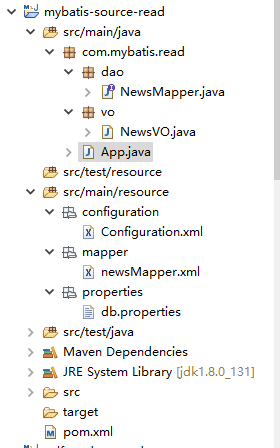
我们新建一个mybatis-source-read的工程,其目录结构如下图:

一次来介绍下:
porm.xml
添加mybatis,mysql驱动依赖
		<dependency>
			<groupId>org.mybatis</groupId>
			<artifactId>mybatis</artifactId>
			<version>3.4.4</version>
		</dependency>

		<!-- MySQL 连接驱动依赖 -->
		<dependency>
			<groupId>mysql</groupId>
			<artifactId>mysql-connector-java</artifactId>
			<version>5.1.39</version>
		</dependency>
实体类NewsVO
package com.mybatis.read.vo;

public class NewsVO {

	private int id;

	private String title;

	private String url;

	private String hash;

	private String publishTime;

	private String newsType;

	private String fromName;


	@Override
	public String toString() {
		return "NewsVO [id=" + id + ", title=" + title + ", url=" + url + ", hash=" + hash + ", publishTime="
				+ publishTime + ", newsType=" + newsType + ", fromName=" + fromName + "]";
	}

	public int getId() {
		return id;
	}

	public void setId(int id) {
		this.id = id;
	}

	public String getTitle() {
		return title;
	}

	public void setTitle(String title) {
		this.title = title;
	}

	public String getUrl() {
		return url;
	}

	public void setUrl(String url) {
		this.url = url;
	}

	public String getHash() {
		return hash;
	}

	public void setHash(String hash) {
		this.hash = hash;
	}

	public String getPublishTime() {
		return publishTime;
	}

	public void setPublishTime(String publishTime) {
		this.publishTime = publishTime;
	}

	public String getNewsType() {
		return newsType;
	}

	public void setNewsType(String newsType) {
		this.newsType = newsType;
	}

	public String getFromName() {
		return fromName;
	}

	public void setFromName(String fromName) {
		this.fromName = fromName;
	}
}
数据库访问层dao:
package com.mybatis.read.dao;

import com.mybatis.read.vo.NewsVO;

public interface NewsMapper {
	public NewsVO getNews(int id);
}
这边只写了一个查询,后续再做补充
mybatis配置文件Configuration.xml
<?xml version="1.0" encoding="UTF-8" ?>
<!DOCTYPE configuration PUBLIC "-//mybatis.org//DTD Config 3.0//EN"
"http://mybatis.org/dtd/mybatis-3-config.dtd">

<configuration>

	<properties resource="properties/db.properties" />

	<settings>
		<setting name="cacheEnabled" value="true" />
		<setting name="lazyLoadingEnabled" value="true" />
		<setting name="useGeneratedKeys" value="true" />
	</settings>

	<typeAliases>
		<typeAlias alias="NewsVO" type="com.mybatis.read.vo.NewsVO" />
	</typeAliases>

	<environments default="development">
		<environment id="development">
			<transactionManager type="JDBC" />
			<dataSource type="POOLED">
				<property name="driver" value="${driveClass}" />
				<property name="url" value="${url}" />
				<property name="username" value="${userName}" />
				<property name="password" value="${password}" />
			</dataSource>
		</environment>
	</environments>

	<mappers>
		<mapper resource="mapper/newsMapper.xml" />
	</mappers>

</configuration>
操作数据库的sql,newsMapper.xml
<?xml version="1.0" encoding="UTF-8"?>
<!DOCTYPE mapper PUBLIC "-//mybatis.org//DTD Mapper 3.0//EN"
"http://mybatis.org/dtd/mybatis-3-mapper.dtd">
<mapper namespace="com.mybatis.read.dao.NewsMapper">
	<resultMap type="com.mybatis.read.vo.NewsVO" id="baseResultMap">
		<id column="id" jdbcType="BIGINT" property="id" />
		<result column="title" jdbcType="VARCHAR" property="title" />
		<result column="url" jdbcType="VARCHAR" property="url" />
		<result column="hash" jdbcType="VARCHAR" property="hash" />
		<result column="publish_time" jdbcType="VARCHAR" property="publishTime" />
		<result column="news_type" jdbcType="VARCHAR" property="newsType" />
		<result column="from_name" jdbcType="VARCHAR" property="fromName" />
	</resultMap>

	<select id="getNews" resultMap="baseResultMap">
		select * from news where id=#{id}
	</select>
</mapper>
启动函数main:
package com.mybatis.read;

import java.io.IOException;
import java.io.InputStream;

import org.apache.ibatis.io.Resources;
import org.apache.ibatis.session.SqlSession;
import org.apache.ibatis.session.SqlSessionFactory;
import org.apache.ibatis.session.SqlSessionFactoryBuilder;

import com.mybatis.read.dao.NewsMapper;
import com.mybatis.read.vo.NewsVO;

public class App {
	public static void main(String[] args) {
		try {
			InputStream inputStream = Resources.getResourceAsStream("configuration/Configuration.xml");
			SqlSessionFactory sqlSessionFactory = new SqlSessionFactoryBuilder().build(inputStream);
			SqlSession session = sqlSessionFactory.openSession();
			//写法一
			//NewsVO newsVo = session.selectOne("com.mybatis.read.dao.NewsMapper.getNews", 40);
			//写法二
			NewsMapper newsMapper = session.getMapper(NewsMapper.class);
			NewsVO newsVo = newsMapper.getNews(40);
			System.out.println(newsVo.toString());
		} catch (IOException e) {
			e.printStackTrace();
		}
	}
}
运行下,结果如下:
Sat Dec 08 21:45:00 CST 2018 WARN: Establishing SSL connection without server's identity verification is not recommended. According to MySQL 5.5.45+, 5.6.26+ and 5.7.6+ requirements SSL connection must be established by default if explicit option isn't set. For compliance with existing applications not using SSL the verifyServerCertificate property is set to 'false'. You need either to explicitly disable SSL by setting useSSL=false, or set useSSL=true and provide truststore for server certificate verification.
NewsVO [id=40, title=利刃出鞘 英超史上最伟大的30位前锋盘点(上篇), url=https://www.fourfourtwo.com/features/ranked-30-best-strikers-premier-league-history, hash=-2589400655418950890, publishTime=2018-12-06 16:44:33, newsType=zuqiu, fromName=fourfourtwo]
那么基本的环境准备就完成了,接下来,要做的就是一步一步的跟进去,探究下它的相关执行流程和原理。
=================================================================
Easier said than done.


