.NET Core API 网关Ocelot
是一个用.NET Core实现并且开源的API网关。路由、请求聚合、认证、鉴权、限流熔断、负载均衡等功能外,还可以集成Consul做服务发现,集成Polly做服务治理等,并内置了负载均衡器与Service Fabric、Butterfly Tracing集成。
二、工作流程
2.1、基本集成
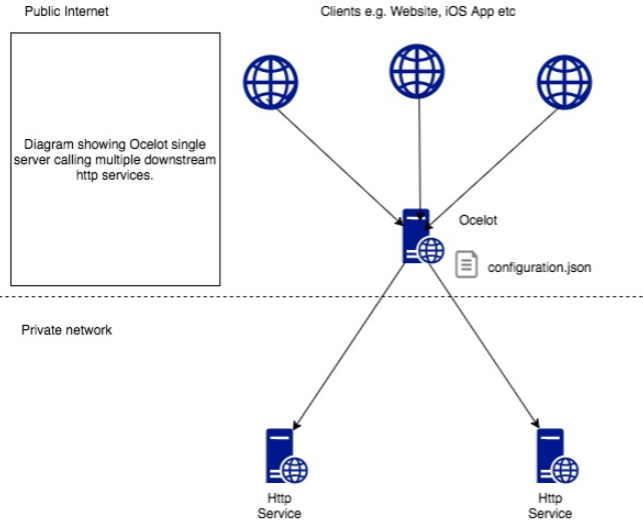
根据Configuration.json 中配置内容,把接受所有的客户端请求。路由到对应的下游服务器进行处理,再将请求结果返回。而这个上下游请求的对应关系也被称之为路由。
2.2、集成IdentityServer
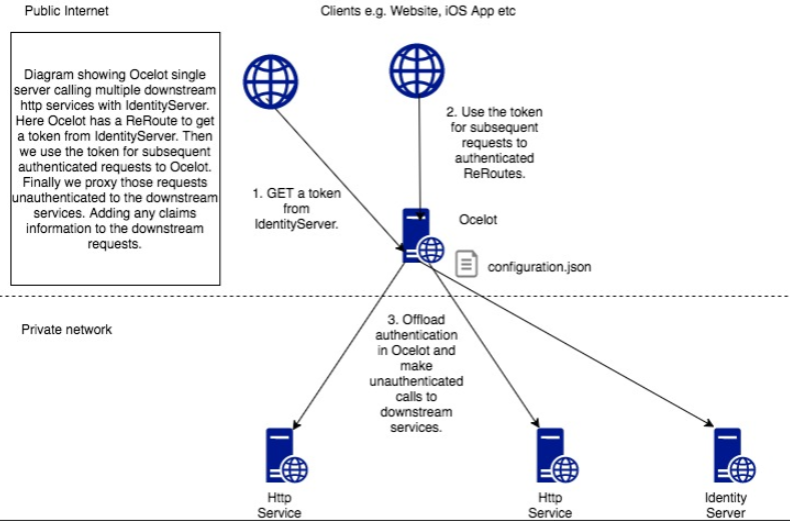
当我们涉及到授权认证的时候,我们可以跟Identity Server进行结合。当网关需要请求认证信息的时候会与identityServer服务器进行交互来完成。
2.3、网关集群配置
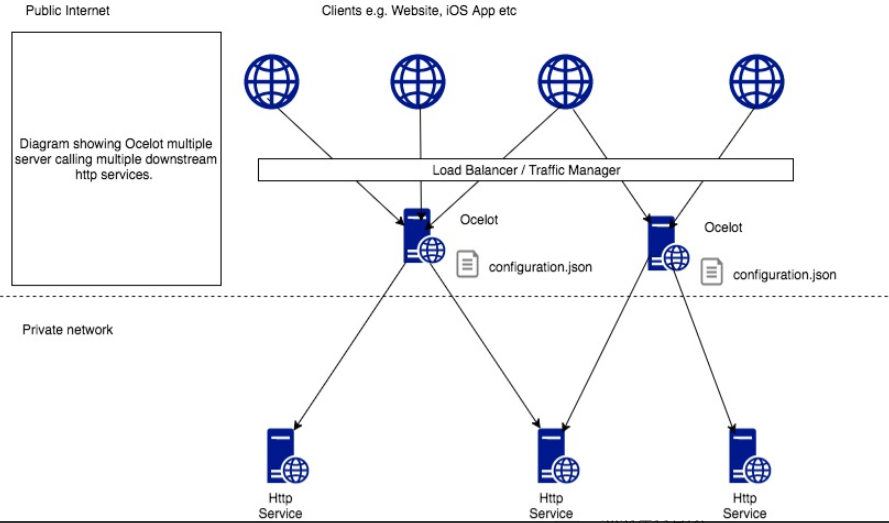
乐意部署多台Ocelot网关。当然这个时候再多台网关前,你需要一台负载均衡器。
2.4、Consul服务发现
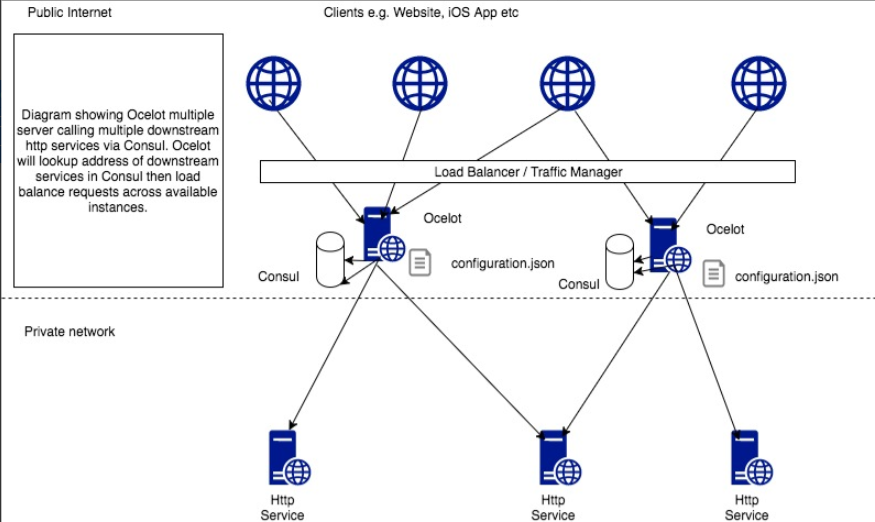
在Ocelot已经支持简单的负载功能,当下游服务存在多个结点的时候,Ocelot能够承担起负载均衡的作用。但是没提供健康检查,服务的注册也只能通过手动在配置文件里面添加完成。这不够灵活并且在一定程度下会有风险。这个时候我们就可以用Consul来做服务发现,它能与Ocelot完美结合。
2.5、结合ServiceFabric
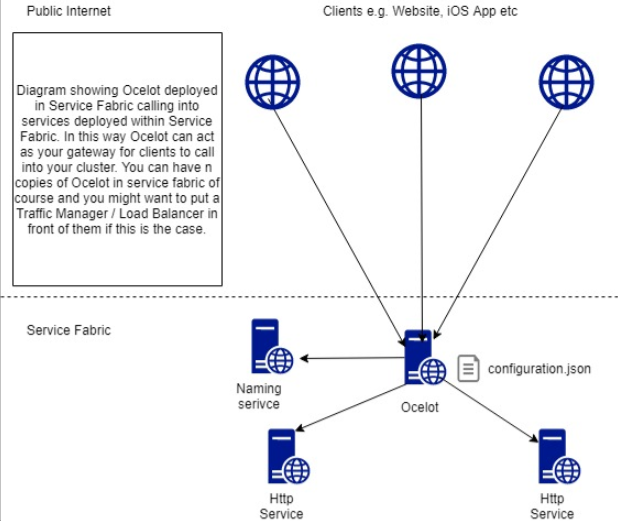
三、项目
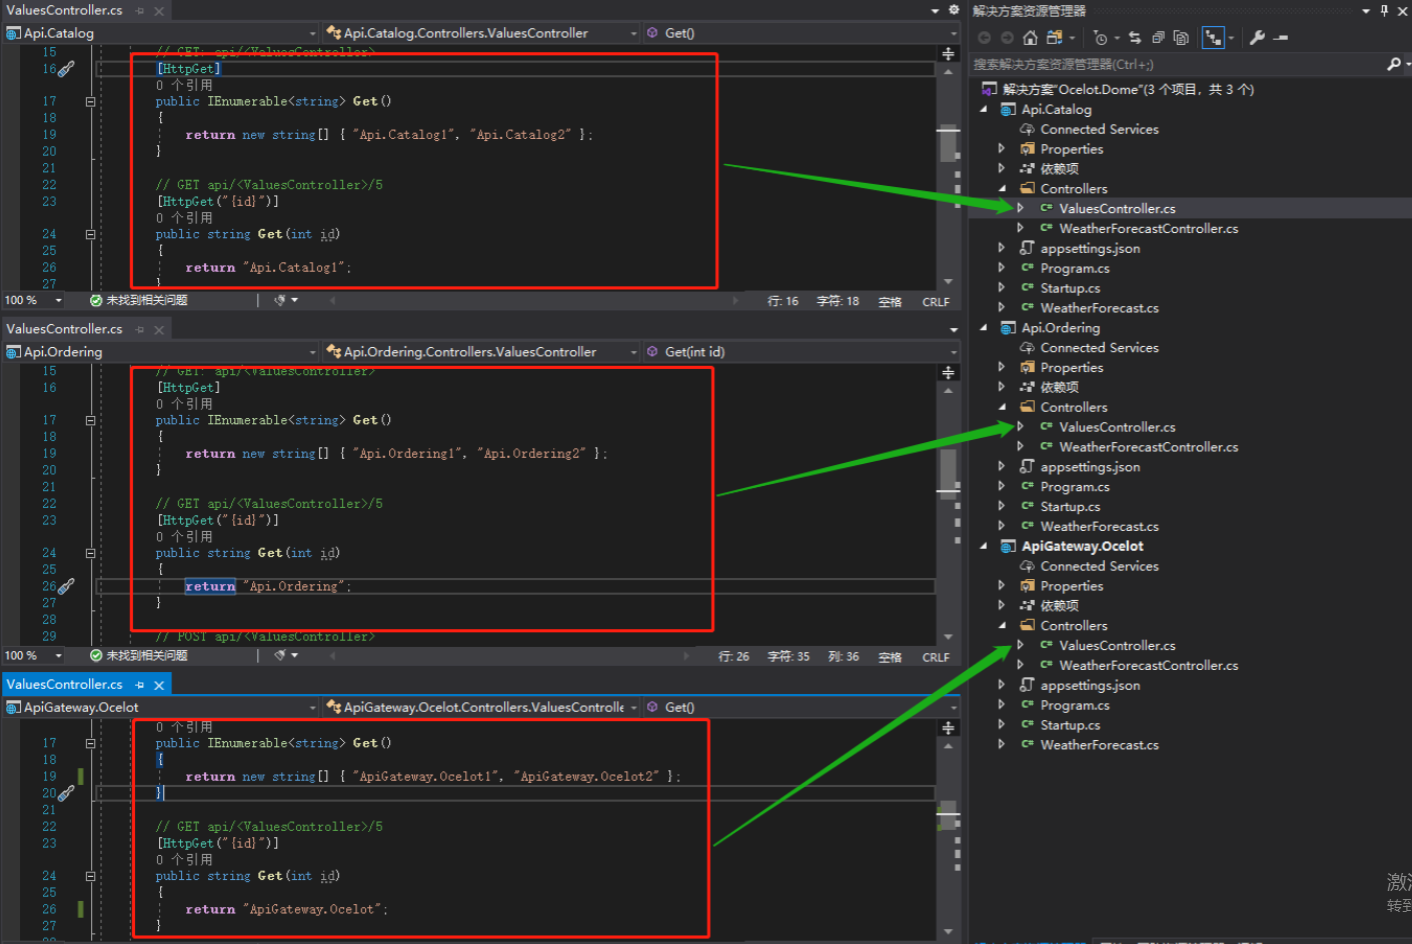
新建3个webapi:目录api(Api.Catalog)、订单api(Api.Ordering)、Ocelot网关(ApiGateway.Ocelot);并为每个WebApi项目添加Values控制器(ValuesController),用于区分最终调用效果。
Ocelot使用
1、添加Ocelot包依赖:
接下来使用Nuget包管理工具为ApiGateway.Ocelot项目添加Ocelot包引用:
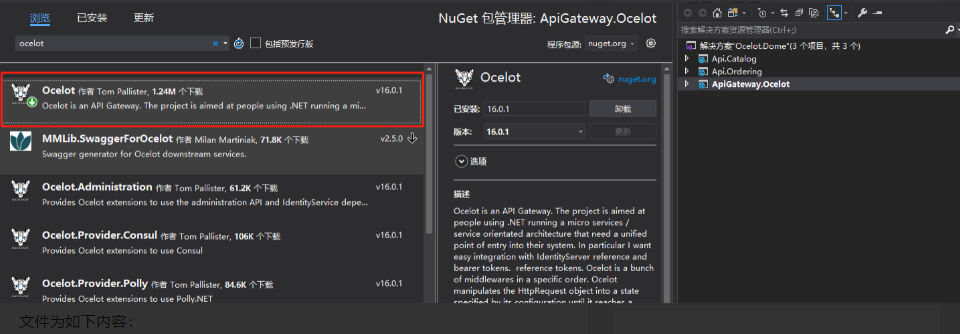
这足以版本,18版本以上的不兼容.net core 3.1,可以选择较低版本的。
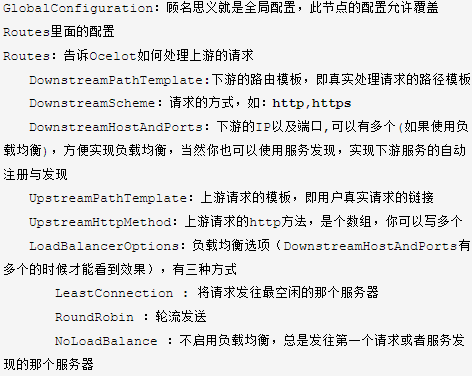
2、添加Ocelot配置文件:【重点】
向ApiGateWay.Ocelot项目添加一个Ocelot.json配置文件,并修改配置文件为如下内容。

{
  "ReRoutes": [
    {
      "DownstreamPathTemplate": "/api/{everything}",
      "DownstreamScheme": "http",
      "DownstreamHostAndPorts": [
        {
          "Host": "localhost",
          "Port": 1001
        },
        {
          "Host": "localhost",
          "Port": 1002
        }
      ],
      "UpstreamPathTemplate": "/{everything}",
      "UpstreamHttpMethod": [ "Get", "Post" ],
      "LoadBalancerOptions": {
        "Type": "RoundRobin"
      },
      "AuthenticationOptions": {
        "AuthenticationProviderKey": "OcelotKey",
        "AllowedScopes": []
      }
    }
  ],
  "Aggregates": [],
  "GlobalConfiguration": {
    "RequestIdKey": null,
    "ServiceDiscoveryProvider": {
      "Host": "localhost",
      "Port": 8500,
      "Type": "Consul",
      "Token": null,
      "ConfigurationKey": null
    },
    "RateLimitOptions": {
      "ClientIdHeader": "ClientId",
      "QuotaExceededMessage": null,
      "RateLimitCounterPrefix": "ocelot",
      "DisableRateLimitHeaders": false,
      "HttpStatusCode": 429
    },
    "QoSOptions": {
      "ExceptionsAllowedBeforeBreaking": 0,
      "DurationOfBreak": 0,
      "TimeoutValue": 0
    },
    "BaseUrl": null,
    "LoadBalancerOptions": {
      "Type": "LeastConnection",
      "Key": null,
      "Expiry": 0
    },
    "DownstreamScheme": "http",
    "HttpHandlerOptions": {
      "AllowAutoRedirect": false,
      "UseCookieContainer": false,
      "UseTracing": false
    }
  }
}
完整配置可以查看:官方文档
3、启用Ocelot中间件
3.1、在ApiGateway.Ocelot项目中的Program.cs中加载ocelot.json的配置文件,如下所示:


.ConfigureAppConfiguration((hostingContext,config) => {
                    config.SetBasePath(hostingContext.HostingEnvironment.ContentRootPath)
                          .AddJsonFile("appsettings.json", true, true)
                          .AddJsonFile($"appsettings.{hostingContext.HostingEnvironment.EnvironmentName}.json", true, true)
                          .AddJsonFile("ocelot.json")
                          .AddEnvironmentVariables();
                })
3.2、接下来在Startup.cs文件中注册服务
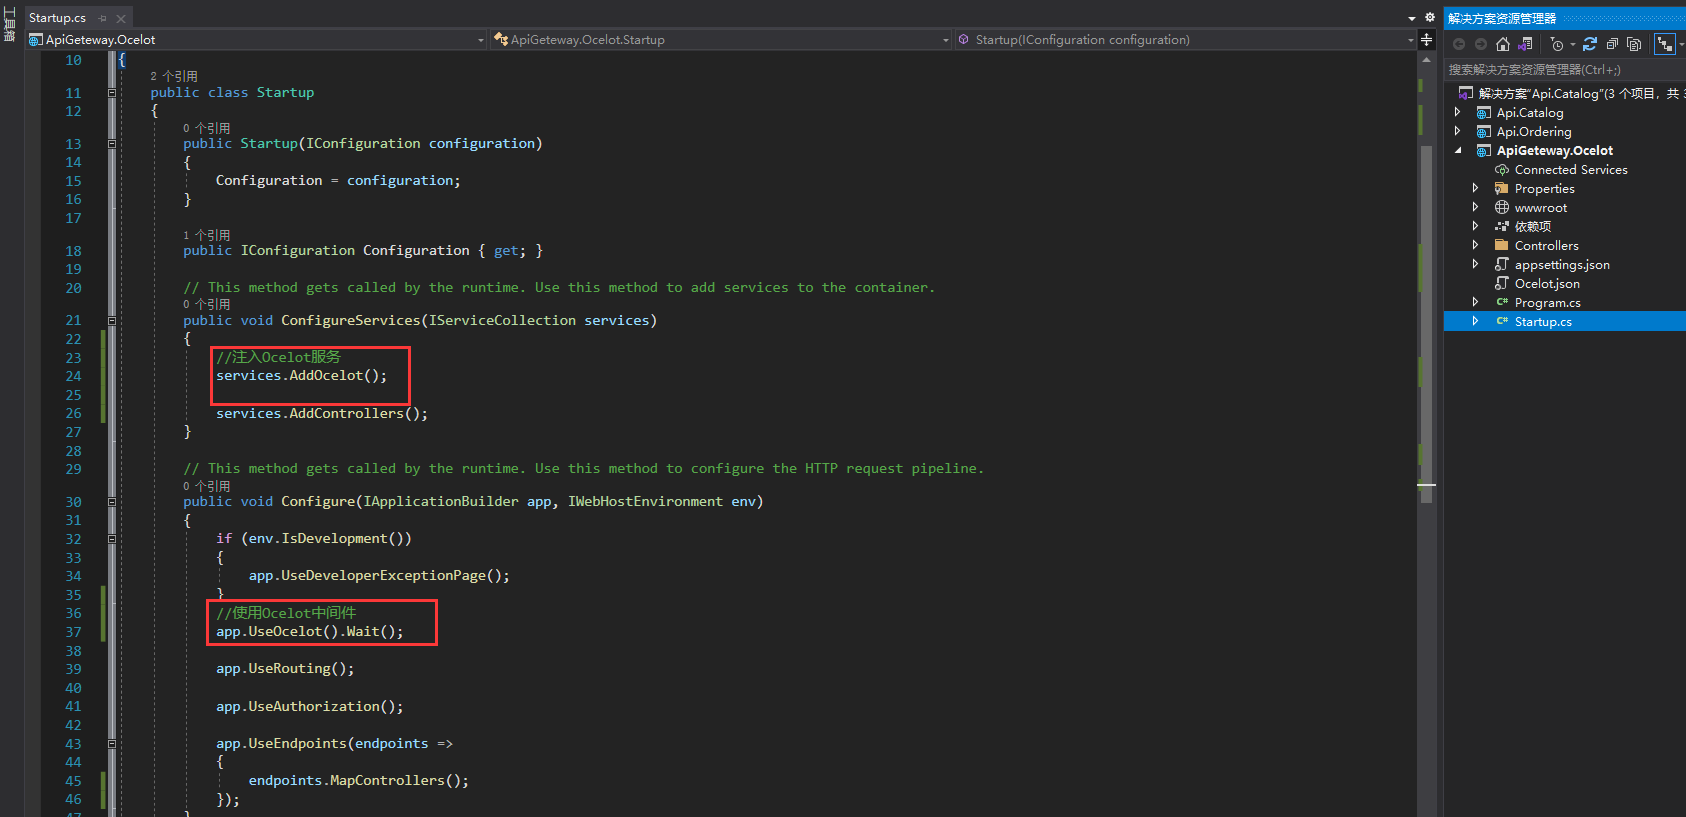
3.3、
把目录api(Api.Catalog)、订单api(Api.Ordering)、Ocelot网关(ApiGateway.Ocelot)分别设置启动设置为:http://localhost:5332、http://localhost:5331、http://localhost:5330。
到此Ocelot基本使用完成,接下来验证下效果:


负载均衡效果,针对每次请求:


【推荐】国内首个AI IDE,深度理解中文开发场景,立即下载体验Trae
【推荐】编程新体验,更懂你的AI,立即体验豆包MarsCode编程助手
【推荐】抖音旗下AI助手豆包,你的智能百科全书,全免费不限次数
【推荐】轻量又高性能的 SSH 工具 IShell:AI 加持,快人一步
· DeepSeek 开源周回顾「GitHub 热点速览」
· 物流快递公司核心技术能力-地址解析分单基础技术分享
· .NET 10首个预览版发布:重大改进与新特性概览!
· AI与.NET技术实操系列(二):开始使用ML.NET
· 单线程的Redis速度为什么快?