python 全栈开发,Day137(爬虫系列之第4章-scrapy框架)
一、scrapy框架简介
1. 介绍
Scrapy一个开源和协作的框架,其最初是为了页面抓取 (更确切来说, 网络抓取 )所设计的,使用它可以以快速、简单、可扩展的方式从网站中提取所需的数据。但目前Scrapy的用途十分广泛,可用于如数据挖掘、监测和自动化测试等领域,也可以应用在获取API所返回的数据(例如 Amazon Associates Web Services ) 或者通用的网络爬虫。Scrapy 是基于twisted框架开发而来,twisted是一个流行的事件驱动的python网络框架。因此Scrapy使用了一种非阻塞(又名异步)的代码来实现并发。
它是爬虫界最知名的框架。就好比web框架中的django
Scrapy之所以能实现异步,得益于twisted框架
twisted有事件队列,哪一个事件有活动,就会执行!
整体架构大致如下:
蓝条部分,表示中间件!
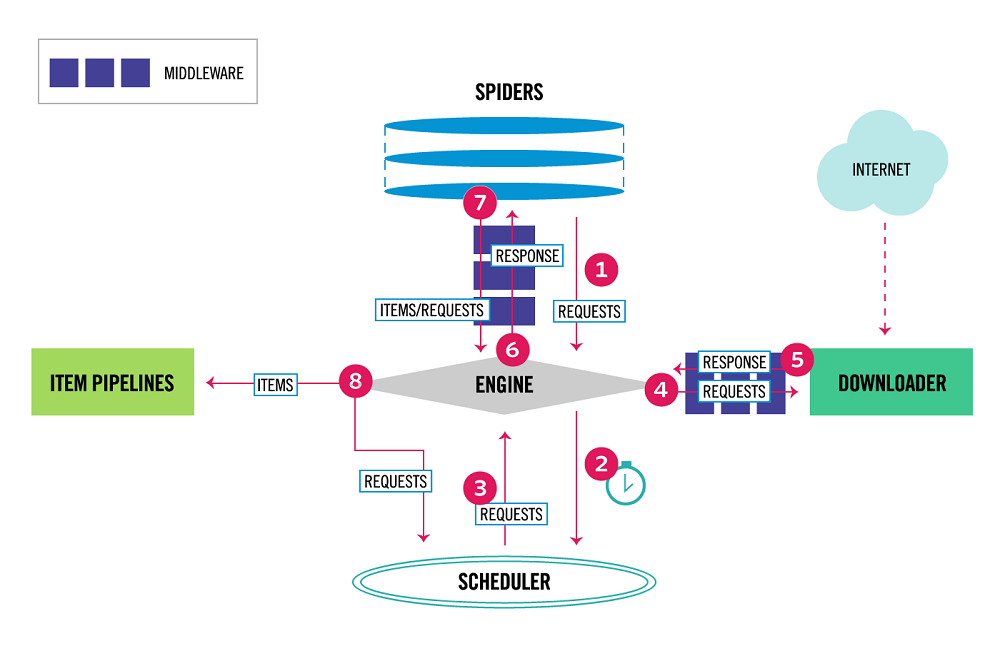
可以将SPIDERS,SCHEDULER,DOWNLOADER,ITEM PIPELINE理解为4个人。
它们不直接通讯,都是通过ENGINE来完成通讯的!

'''
Components:

1、引擎(EGINE)
引擎负责控制系统所有组件之间的数据流,并在某些动作发生时触发事件。有关详细信息,请参见上面的数据流部分。

2、调度器(SCHEDULER)
用来接受引擎发过来的请求, 压入队列中, 并在引擎再次请求的时候返回. 可以想像成一个URL的优先级队列, 由它来决定下一个要抓取的网址是什么, 同时去除重复的网址

3、下载器(DOWLOADER)
用于下载网页内容, 并将网页内容返回给EGINE,下载器是建立在twisted这个高效的异步模型上的

4、爬虫(SPIDERS)
SPIDERS是开发人员自定义的类,用来解析responses,并且提取items,或者发送新的请求

5、项目管道(ITEM PIPLINES)
在items被提取后负责处理它们,主要包括清理、验证、持久化(比如存到数据库)等操作
下载器中间件(Downloader Middlewares)位于Scrapy引擎和下载器之间,主要用来处理从EGINE传到DOWLOADER的请求request,已经从DOWNLOADER传到EGINE的响应response,
你可用该中间件做以下几件事:
    (1) process a request just before it is sent to the Downloader (i.e. right before Scrapy sends the request to the website);
    (2) change received response before passing it to a spider;
    (3) send a new Request instead of passing received response to a spider;
    (4) pass response to a spider without fetching a web page;
    (5) silently drop some requests.

6、爬虫中间件(Spider Middlewares)
位于EGINE和SPIDERS之间,主要工作是处理SPIDERS的输入(即responses)和输出(即requests)
'''
在调度器中,可以设置将重复的网址去重。如果爬取失败,需要再次爬取,那么就不能去重。
所以要不要去重,取决于项目需求而定。
如果访问5个url,当有一个url卡住了。那么它就会切换到队列中其他的url。因为它是异步请求,这里就可以高效利用CPU
2. scrapy 的工作流程
之前学习的 爬虫的基本流程

那么 scrapy是如何帮助我们抓取数据的呢?

3. 数据流
Scrapy中的数据流由执行引擎控制,其过程如下:
1.引擎打开一个网站(open adomain),找到处理该网站的Spider并向该spider请求第一个要爬取的URL(s)。
2.引擎从Spider中获取到第一个要爬取的URL并在调度器(Scheduler)以Request调度。
3.引擎向调度器请求下一个要爬取的URL。
4.调度器返回下一个要爬取的URL给引擎,引擎将URL通过下载中间件(请求(request)方向)转发给下载器(Downloader)。
5.一旦页面下载完毕,下载器生成一个该页面的Response,并将其通过下载中间件(返回(response)方向)发送给引擎。
6.引擎从下载器中接收到Response并通过Spider中间件(输入方向)发送给Spider处理。
7.Spider处理Response并返回爬取到的Item及(跟进的)新的Request给引擎。
8.引擎将(Spider返回的)爬取到的Item给ItemPipeline,将(Spider返回的)Request给调度器。
9.(从第二步)重复直到调度器中没有更多地request,引擎关闭该网站。
上面的内容,参考链接:
https://blog.csdn.net/xun527/article/details/78450789
每访问一个url,就会经历上面列举的9个步骤,它是一个反复过程。
如果访问失败,可以再次请求访问!
spiders包含了爬取和解析这2步。
为什么要有中间件?
请求一个网页,有几十个cookie,每一次发送,都得带上cookie,很麻烦。
比如使用代理,需要换IP访问。封锁一个,换一个!
加上代理访问,需要使用中间件!那么无论任何请求,都可以带上cookie。
item就是解析好的数据
2. 安装
Windows平台
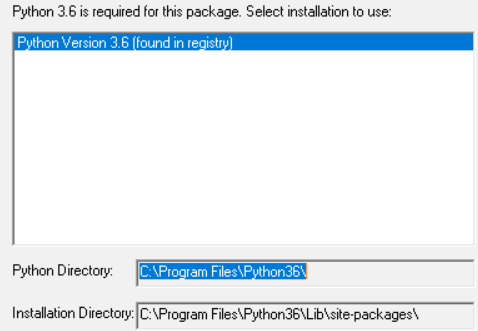
windows平台安装比较难搞,它不像linux一样,一条命令就搞定了!很多人学习scrapy,光安装就卡了半天。
为了不让 学习如痴如醉的你放弃scrapy,这里列举出详细的安装过程!
先说明一下安装环境。使用的是windows 10 家庭版,64位操作系统。已经安装好了Python 3.6
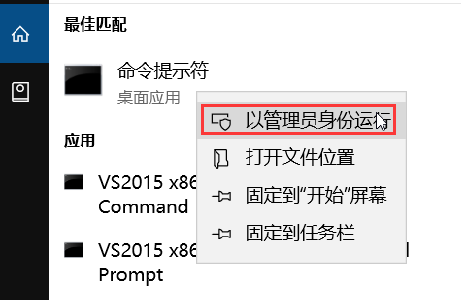
搜索cmd,必须使用管理员身份运行
安装 wheel
C:\Windows\system32>pip3 install wheel
安装 lxml
C:\Windows\system32>pip3 install lxml
安装 pyopenssl
C:\Windows\system32>pip3 install pyopenssl
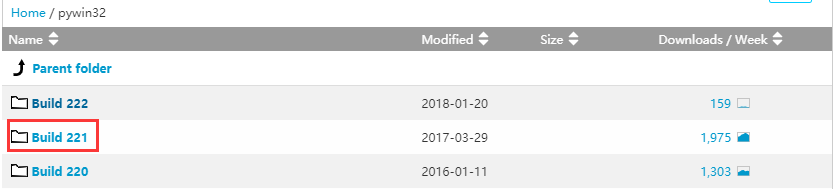
安装 pywin32
打开网址:
https://sourceforge.net/projects/pywin32/files/pywin32/
点击 Build 221
下载pywin32-221.win-amd64-py3.6.exe

直接运行
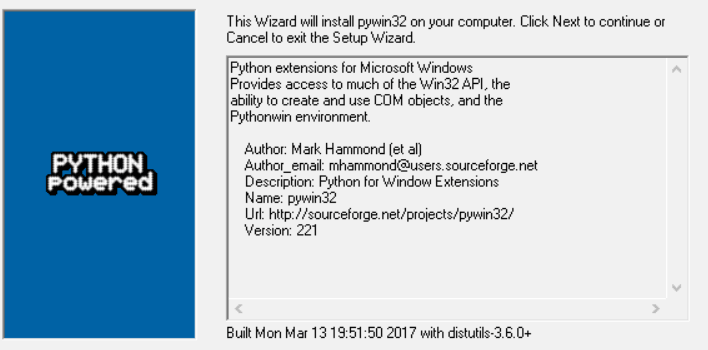
点击下一步
点击下一步

最后就可以安装完成了!
安装 twisted
打开网页
https://pypi.org/project/Twisted/#files
这里不要下载,为什么呢?看文件名,它只支持Python 2.7。但我的是Python 3.6啊!

打开另外一个网页:
https://github.com/zerodhatech/python-wheels
下载文件 Twisted-17.9.0-cp36-cp36m-win_amd64.whl
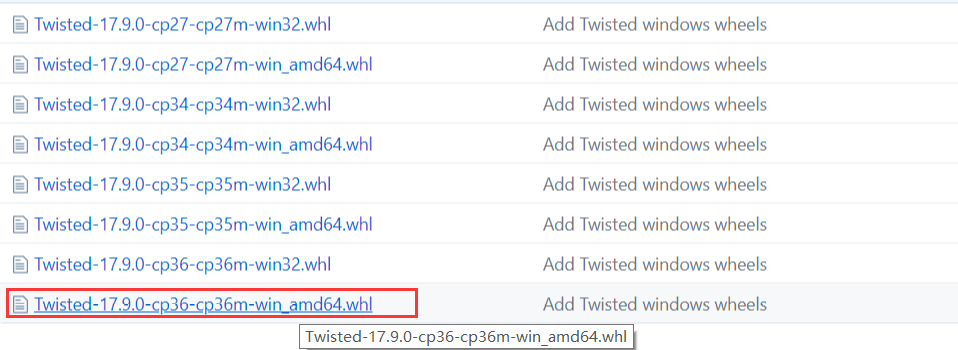
点击下载

点击文件属性,复制路径

安装
C:\Windows\system32>pip3 install C:\Users\vr\Downloads\Twisted-17.9.0-cp36-cp36m-win_amd64.whl
安装 scrapy
C:\Windows\system32>pip3 install scrapy
到这里,scrapy就安装完成了!
Linux平台
Linux平台安装比较简单,一条命令就可以搞定了
pip3 install scrapy
3. 命令行工具
1. 查看帮助
scrapy -h
scrapy <command> -h
2. 两种命令
有两种命令:其中Project-only必须切到项目文件夹下才能执行,而Global的命令则不需要
Global commands
startproject #创建项目
genspider    #创建爬虫程序
settings     #如果是在项目目录下,则得到的是该项目的配置
runspider    #运行一个独立的python文件,不必创建项目
shell        #scrapy shell url地址  在交互式调试,如选择器规则正确与否
fetch        #独立于程单纯地爬取一个页面,可以拿到请求头
view         #下载完毕后直接弹出浏览器,以此可以分辨出哪些数据是ajax请求
version      #scrapy version 查看scrapy的版本,scrapy version -v查看scrapy依赖库的版本
Project-only commands
crawl        #运行爬虫,必须创建项目才行,确保配置文件中ROBOTSTXT_OBEY = False
check        #检测项目中有无语法错误
list         #列出项目中所包含的爬虫名
edit         #编辑器,一般不用
parse        #scrapy parse url地址 --callback 回调函数  #以此可以验证我们的回调函数是否正确
bench        #scrapy bentch压力测试
举例:
创建一个爬虫项目DianShang
C:\Users\xiao>e:
E:\>cd E:\python_script\爬虫\day3
E:\python_script\爬虫\day3>scrapy startproject DianShang
生成一个爬虫程序。注意:左边的jd表示模块名,右边的jd.com表示要访问的url。
一个项目还可以访问多个url
E:\python_script\爬虫\day3>cd DianShang
E:\python_script\爬虫\day3\DianShang>scrapy genspider jd jd.com
注意:项目名和爬虫程序名不能重复!
运行scrapy项目。注意:这里指定的模块名必须和上面一致!
E:\python_script\爬虫\day3\DianShang>scrapy crawl jd
一个项目,也可以启动多个模块
主要用到命令,就是上面演示的3个!
1 scrapy startproject DianShang   # 创建爬虫项目
2 scrapy genspider jd jd.com      # 生成一个爬虫程序
3 scrapy crawl jd                 # 运行scrapy项目
3. 官网链接
https://docs.scrapy.org/en/latest/topics/commands.html
4. 目录结构
project_name/
    scrapy.cfg              #  项目的主配置信息,用来部署scrapy时使用
    project_name/           #  爬虫项目名称
       __init__.py
       items.py            #  数据存储模板,用于结构化数据,如:Django的Model
       pipelines.py        #  数据持久化
       settings.py         #  用户级配置文件
       spiders/            #  爬虫程序的目录
           __init__.py
           爬虫1.py        # 爬虫程序1
           爬虫2.py
           爬虫3.py
文件说明:
- scrapy.cfg 项目的主配置信息,用来部署scrapy时使用,爬虫相关的配置信息在settings.py文件中。
- items.py 设置数据存储模板,用于结构化数据,如:Django的Model
- pipelines 数据处理行为,如:一般结构化的数据持久化
- settings.py 配置文件,如:递归的层数、并发数,延迟下载等。强调:配置文件的选项必须大写否则视为无效,正确写法USER_AGENT='xxxx'
- spiders 爬虫目录,如:创建文件,编写爬虫规则
注意:
1、一般创建爬虫文件时,以网站域名命名
2、默认只能在终端执行命令,为了更便捷操作:
#在项目根目录下新建:entrypoint.py
from scrapy.cmdline import execute
execute(['scrapy', 'crawl', 'xiaohua'])
框架基础:spider类,选择器
举例:
上面已经创建好了DianShang项目,修改settings.py,将下面的配置改为False
ROBOTSTXT_OBEY = False
这是配置是否遵循robots协议,一般情况下,是不遵循的。为啥呢?你要真的遵循的话,还怎么爬呀!
涉及到金融,影响国家安全,影响社会和谐稳定...的信息,切莫爬取,否则后果不堪设想!
每次使用命令行运行 scrapy crawl jd 太麻烦了。
在项目根目录新建一个文件 bin.py。注意,它和scrapy.cfg是同级的!
#在项目根目录下新建:bin.py
from scrapy.cmdline import execute
# 最后一个参数是:爬虫程序名
execute(['scrapy', 'crawl', 'jd'])
直接执行bin.py,就可以启动爬虫程序了!
执行之后,会输出一段红色字符串。注意:它不是报错!
也可以关闭掉,修改 bin.py
#在项目根目录下新建:bin.py
from scrapy.cmdline import execute
# 第三个参数是:爬虫程序名
execute(['scrapy', 'crawl', 'jd','--nolog'])
再次执行,就不会输出了!
二、Spider类
Spiders是定义如何抓取某个站点(或一组站点)的类,包括如何执行爬行(即跟随链接)以及如何从其页面中提取结构化数据(即抓取项目)。换句话说,Spiders是您为特定站点(或者在某些情况下,一组站点)爬网和解析页面定义自定义行为的地方。
1、 生成初始的Requests来爬取第一个URLS,并且标识一个回调函数
     第一个请求定义在start_requests()方法内默认从start_urls列表中获得url地址来生成Request请求,
     默认的回调函数是parse方法。回调函数在下载完成返回response时自动触发

2、 在回调函数中,解析response并且返回值
     返回值可以4种:
          包含解析数据的字典
          Item对象
          新的Request对象(新的Requests也需要指定一个回调函数)
          或者是可迭代对象(包含Items或Request)

3、在回调函数中解析页面内容
   通常使用Scrapy自带的Selectors,但很明显你也可以使用Beutifulsoup,lxml或其他你爱用啥用啥。

4、最后,针对返回的Items对象将会被持久化到数据库
   通过Item Pipeline组件存到数据库:https://docs.scrapy.org/en/latest/topics/item-pipeline.html#topics-item-pipeline)
   或者导出到不同的文件(通过Feed exports:https://docs.scrapy.org/en/latest/topics/feed-exports.html#topics-feed-exports)
举例:
打开DianShang项目,修改DianShang-->spiders-->jd.py
# -*- coding: utf-8 -*-
import scrapy


class JdSpider(scrapy.Spider):
    name = 'jd'
    allowed_domains = ['jd.com']
    start_urls = ['http://jd.com/']

    def parse(self, response):
        print(response,type(response))
执行bin.py,输出如下:
<200 https://www.jd.com/> <class 'scrapy.http.response.html.HtmlResponse'>
start_requests
使用Ctrl+鼠标左键,点击这一段代码中的Spider,查看源代码
class JdSpider(scrapy.Spider):
查看start_requests方法,看最后2行代码。
def start_requests(self):
    cls = self.__class__
    if method_is_overridden(cls, Spider, 'make_requests_from_url'):
        warnings.warn(
            "Spider.make_requests_from_url method is deprecated; it "
            "won't be called in future Scrapy releases. Please "
            "override Spider.start_requests method instead (see %s.%s)." % (
                cls.__module__, cls.__name__
            ),
        )
        for url in self.start_urls:
            yield self.make_requests_from_url(url)
    else:
        for url in self.start_urls:
            yield Request(url, dont_filter=True)
它执行了for循环,self.start_urls就是在JdSpider类中定义的start_urls变量,它是一个列表!
如果列表为空,不会执行yield
最后使用生成器返回了一个Request对象
再查看Request源码
class Request(object_ref):

    def __init__(self, url, callback=None, method='GET', headers=None, body=None,
                 cookies=None, meta=None, encoding='utf-8', priority=0,
                 dont_filter=False, errback=None, flags=None):

        self._encoding = encoding  # this one has to be set first
        self.method = str(method).upper()
        self._set_url(url)
        self._set_body(body)
        assert isinstance(priority, int), "Request priority not an integer: %r" % priority
        self.priority = priority

        if callback is not None and not callable(callback):
            raise TypeError('callback must be a callable, got %s' % type(callback).__name__)
        if errback is not None and not callable(errback):
            raise TypeError('errback must be a callable, got %s' % type(errback).__name__)
        assert callback or not errback, "Cannot use errback without a callback"
        self.callback = callback
        self.errback = errback

        self.cookies = cookies or {}
        self.headers = Headers(headers or {}, encoding=encoding)
        self.dont_filter = dont_filter

        self._meta = dict(meta) if meta else None
        self.flags = [] if flags is None else list(flags)
参数解释:
url(string)- 此请求的网址callback(callable)- 将使用此请求的响应(一旦下载)作为其第一个参数调用的函数。有关更多信息,请参阅下面的将附加数据传递给回调函数。如果请求没有指定回调,parse()将使用spider的 方法。请注意,如果在处理期间引发异常,则会调用errback。method(string)- 此请求的HTTP方法。默认为'GET'。meta(dict)- 属性的初始值Request.meta。如果给定,在此参数中传递的dict将被浅复制。body(str或unicode)- 请求体。如果unicode传递了a,那么它被编码为 str使用传递的编码(默认为utf-8)。如果 body没有给出,则存储一个空字符串。不管这个参数的类型,存储的最终值将是一个str(不会是unicode或None)。headers(dict)- 这个请求的头。dict值可以是字符串(对于单值标头)或列表(对于多值标头)。如果 None作为值传递,则不会发送HTTP头。-
cookie(dict或list)- 请求cookie。
encoding(string)- 此请求的编码(默认为'utf-8')。此编码将用于对URL进行百分比编码,并将正文转换为str(如果给定unicode)。priority(int)- 此请求的优先级(默认为0)。调度器使用优先级来定义用于处理请求的顺序。具有较高优先级值的请求将较早执行。允许负值以指示相对低优先级。dont_filter(boolean)- 表示此请求不应由调度程序过滤。当您想要多次执行相同的请求时忽略重复过滤器时使用。小心使用它,或者你会进入爬行循环。默认为False。-
errback(callable)- 如果在处理请求时引发任何异常,将调用的函数。这包括失败的404 HTTP错误等页面。它接收一个Twisted Failure实例作为第一个参数。有关更多信息,请参阅使用errbacks在请求处理中捕获异常。
- flags(list) - 是一个包含属性初始值的 Request
.flags列表。如果给定,列表将被浅复制。
关于参数的更多信息,请参考链接:
https://blog.csdn.net/weixin_37947156/article/details/74974208
一般情况下,要自己定义start_requests方法。为什么呢?因为它不一定能够访问目标网站。
比如访问 https://github.com/ 要获取我的个人信息。直接用GET请求,不带任何信息,是获取不到的。必须登录才行!
举例:
进入DianShang项目,修改 DianShang-->spiders-->jd.py,增加start_requests方法


# -*- coding: utf-8 -*-
import scrapy
from scrapy import Request  # 导入模块

class JdSpider(scrapy.Spider):
    name = 'jd'
    allowed_domains = ['jd.com']
    # start_urls = ['http://jd.com/']  # 占时没有用了

    def start_requests(self):
        r1 = Request(url="http://jd.com/")
        yield r1  # 务必使用yield 返回

    def parse(self, response):
        print(response,type(response))
重新执行bin.py,Pycharm输出如下:
<200 https://www.jd.com/> <class 'scrapy.http.response.html.HtmlResponse'>
注意:推荐使用yield返回,这样可以节省内存。它最后还是会调用for循环!
start_requests方法,虽然没有写callback参数,指定回调函数。它默认的回调函数就是parse
start_requests执行之后,并没有发送请求。它只是一个返回一个Request对象,放到一个请求列表中。由twisted进行异步请求!如果得到了响应信息,则调用parse函数!
上面的parse函数,还没有写return。所以它不会走架构图中的7,8步骤
三、选择器
为了解释如何使用选择器,我们将使用Scrapy shell(提供交互式测试)和Scrapy文档服务器中的示例页面,
这是它的HTML代码:
<html>
 <head>
  <base href='http://example.com/' />
  <title>Example website</title>
 </head>
 <body>
  <div id='images'>
   <a href='image1.html'>Name: My image 1 <br /><img src='image1_thumb.jpg' /></a>
   <a href='image2.html'>Name: My image 2 <br /><img src='image2_thumb.jpg' /></a>
   <a href='image3.html'>Name: My image 3 <br /><img src='image3_thumb.jpg' /></a>
   <a href='image4.html'>Name: My image 4 <br /><img src='image4_thumb.jpg' /></a>
   <a href='image5.html'>Name: My image 5 <br /><img src='image5_thumb.jpg' /></a>
  </div>
 </body>
</html>
首先,让我们打开shell:
scrapy shell https://doc.scrapy.org/en/latest/_static/selectors-sample1.html
然后,在shell加载之后,您将获得响应作为response shell变量,并在response.selector属性中附加选择器。
让我们构建一个XPath来选择title标签内的文本:
>>> response.selector.xpath('//title/text()')
[<Selector xpath='//title/text()' data='Example website'>]
使用XPath和CSS查询响应非常常见,响应包括两个便捷快捷方式:response.xpath()和response.css():
>>> response.xpath('//title/text()')
[<Selector xpath='//title/text()' data='Example website'>]
>>> response.css('title::text')
[<Selector xpath='descendant-or-self::title/text()' data='Example website'>]
正如你所看到的,.xpath()并且.css()方法返回一个 SelectorList实例,这是新的选择列表。此API可用于快速选择嵌套数据:
>>> response.css('img').xpath('@src').extract()
['image1_thumb.jpg', 'image2_thumb.jpg', 'image3_thumb.jpg', 'image4_thumb.jpg', 'image5_thumb.jpg']
要实际提取文本数据,必须调用selector .extract() 方法,如下所示:
>>> response.xpath('//title/text()').extract()
['Example website']
如果只想提取第一个匹配的元素,可以调用选择器 .extract_first()
>>> response.xpath('//div[@id="images"]/a/text()').extract_first()
'Name: My image 1 '
现在我们将获得基本URL和一些图像链接:
>>> response.xpath('//base/@href').extract()
['http://example.com/']
>>>
>>> response.css('base::attr(href)').extract()
['http://example.com/']
>>>
>>> response.xpath('//a[contains(@href, "image")]/@href').extract()
['image1.html', 'image2.html', 'image3.html', 'image4.html', 'image5.html']
>>>
>>> response.css('a[href*=image]::attr(href)').extract()
['image1.html', 'image2.html', 'image3.html', 'image4.html', 'image5.html']
>>>
>>> response.xpath('//a[contains(@href, "image")]/img/@src').extract()
['image1_thumb.jpg', 'image2_thumb.jpg', 'image3_thumb.jpg', 'image4_thumb.jpg', 'image5_thumb.jpg']
>>>
>>> response.css('a[href*=image] img::attr(src)').extract()
['image1_thumb.jpg', 'image2_thumb.jpg', 'image3_thumb.jpg', 'image4_thumb.jpg', 'image5_thumb.jpg']
>>>
四、DupeFilter(去重)
默认使用方式:
DUPEFILTER_CLASS = 'scrapy.dupefilter.RFPDupeFilter'
Request(...,dont_filter=False) ,如果dont_filter=True则告诉Scrapy这个URL不参与去重。
源码解析:
from scrapy.core.scheduler import Scheduler
见Scheduler下的enqueue_request方法:self.df.request_seen(request)
自定义去重规则:
from scrapy.dupefilter import RFPDupeFilter,看源码,仿照BaseDupeFilter

#步骤一:在项目目录下自定义去重文件dup.py
class UrlFilter(object):
    def __init__(self):
        self.visited = set() #或者放到数据库

    @classmethod
    def from_settings(cls, settings):
        return cls()

    def request_seen(self, request):
        if request.url in self.visited:
            return True
        self.visited.add(request.url)

    def open(self):  # can return deferred
        pass

    def close(self, reason):  # can return a deferred
        pass

    def log(self, request, spider):  # log that a request has been filtered
        pass
五、Item(项目)
抓取的主要目标是从非结构化源(通常是网页)中提取结构化数据。Scrapy蜘蛛可以像Python一样返回提取的数据。虽然方便和熟悉,但P很容易在字段名称中输入拼写错误或返回不一致的数据,尤其是在具有许多蜘蛛的较大项目中。
为了定义通用输出数据格式,Scrapy提供了Item类。 Item对象是用于收集抓取数据的简单容器。它们提供类似字典的 API,并具有用于声明其可用字段的方便语法。
1. 声明项目
使用简单的类定义语法和Field 对象声明项。这是一个例子:
import scrapy

class Product(scrapy.Item):
name = scrapy.Field()
price = scrapy.Field()
stock = scrapy.Field()
last_updated = scrapy.Field(serializer=str)
注意那些熟悉Django的人会注意到Scrapy Items被宣告类似于Django Models,除了Scrapy Items更简单,因为没有不同字段类型的概念。
2. 项目字段
Field对象用于指定每个字段的元数据。例如,last_updated上面示例中说明的字段的序列化函数。
您可以为每个字段指定任何类型的元数据。Field对象接受的值没有限制。出于同样的原因,没有所有可用元数据键的参考列表。
Field对象中定义的每个键可以由不同的组件使用,只有那些组件知道它。您也可以根据Field自己的需要定义和使用项目中的任何其他键。
Field对象的主要目标是提供一种在一个地方定义所有字段元数据的方法。通常,行为取决于每个字段的那些组件使用某些字段键来配置该行为。
3. 使用项目
以下是使用上面声明的Product项目对项目执行的常见任务的一些示例 。您会注意到API与dict API非常相似。
创建项目
>>> product = Product(name='Desktop PC', price=1000)
>>> print product
Product(name='Desktop PC', price=1000)
获取字段值
>>> product['name']
Desktop PC
>>> product.get('name')
Desktop PC

>>> product['price']
1000

>>> product['last_updated']
Traceback (most recent call last):
...
KeyError: 'last_updated'

>>> product.get('last_updated', 'not set')
not set

>>> product['lala'] # getting unknown field
Traceback (most recent call last):
...
KeyError: 'lala'

>>> product.get('lala', 'unknown field')
'unknown field'

>>> 'name' in product # is name field populated?
True

>>> 'last_updated' in product # is last_updated populated?
False

>>> 'last_updated' in product.fields # is last_updated a declared field?
True

>>> 'lala' in product.fields # is lala a declared field?
False
设定字段值
>>> product['last_updated'] = 'today'
>>> product['last_updated']
today

>>> product['lala'] = 'test' # setting unknown field
Traceback (most recent call last):
...
KeyError: 'Product does not support field: lala'
访问所有填充值
要访问所有填充值,只需使用典型的dict API:

>>> product.keys()
['price', 'name']

>>> product.items()
[('price', 1000), ('name', 'Desktop PC')]
其他常见任务
复制项目:

>>> product2 = Product(product)
>>> print product2
Product(name='Desktop PC', price=1000)

>>> product3 = product2.copy()
>>> print product3
Product(name='Desktop PC', price=1000)
从项目创建dicts:

>>> dict(product) # create a dict from all populated values
{'price': 1000, 'name': 'Desktop PC'}
从dicts创建项目:

>>> Product({'name': 'Laptop PC', 'price': 1500})
Product(price=1500, name='Laptop PC')

>>> Product({'name': 'Laptop PC', 'lala': 1500}) # warning: unknown field in dict
Traceback (most recent call last):
...
KeyError: 'Product does not support field: lala'
4. 扩展项目
您可以通过声明原始Item的子类来扩展Items(以添加更多字段或更改某些字段的某些元数据)。
例如:
class DiscountedProduct(Product):
      discount_percent = scrapy.Field(serializer=str)
      discount_expiration_date = scrapy.Field()
六、Item PipeLine
在一个项目被蜘蛛抓取之后,它被发送到项目管道,该项目管道通过顺序执行的几个组件处理它。
每个项目管道组件(有时简称为“项目管道”)是一个实现简单方法的Python类。他们收到一个项目并对其执行操作,同时决定该项目是否应该继续通过管道或被丢弃并且不再处理。
项目管道的典型用途是:
- cleansing HTML data
- validating scraped data (checking that the items contain certain fields)
- checking for duplicates (and dropping them)
- storing the scraped item in a database
1. 编写自己的项目管道
每个项管道组件都是一个必须实现以下方法的Python类:

process_item(self,项目,蜘蛛)
为每个项目管道组件调用此方法。process_item()

必须要么:返回带数据的dict,返回一个Item (或任何后代类)对象,返回Twisted Deferred或引发 DropItem异常。丢弃的项目不再由其他管道组件处理。

此外,他们还可以实现以下方法:

open_spider(self,蜘蛛)
打开蜘蛛时会调用此方法。

close_spider(self,蜘蛛)
当蜘蛛关闭时调用此方法。

from_crawler(cls,crawler )
如果存在,则调用此类方法以从a创建管道实例Crawler。它必须返回管道的新实例。Crawler对象提供对所有Scrapy核心组件的访问,
如设置和信号; 它是管道访问它们并将其功能挂钩到Scrapy的一种方式。
2. 项目管道示例
(1) 价格验证和丢弃物品没有价格
让我们看看下面的假设管道,它调整 price那些不包含增值税(price_excludes_vat属性)的项目的属性,并删除那些不包含价格的项目:
from scrapy.exceptions import DropItem

class PricePipeline(object):

    vat_factor = 1.15

    def process_item(self, item, spider):
        if item['price']:
            if item['price_excludes_vat']:
                item['price'] = item['price'] * self.vat_factor
            return item
        else:
            raise DropItem("Missing price in %s" % item)
(2) 将项目写入JSON文件
以下管道将所有已删除的项目(来自所有蜘蛛)存储到一个items.jl文件中,每行包含一个以JSON格式序列化的项目:
import json

class JsonWriterPipeline(object):

    def open_spider(self, spider):
        self.file = open('items.jl', 'w')

    def close_spider(self, spider):
        self.file.close()

    def process_item(self, item, spider):
        line = json.dumps(dict(item)) + "\n"
        self.file.write(line)
        return item
注意JsonWriterPipeline的目的只是介绍如何编写项目管道。如果您确实要将所有已删除的项目存储到JSON文件中,则应使用Feed导出。
(3) 将项目写入数据库
在这个例子中,我们将使用pymongo将项目写入MongoDB。MongoDB地址和数据库名称在Scrapy设置中指定; MongoDB集合以item类命名。
这个例子的要点是展示如何使用from_crawler() 方法以及如何正确地清理资源:
import pymongo

class MongoPipeline(object):

    collection_name = 'scrapy_items'

    def __init__(self, mongo_uri, mongo_db):
        self.mongo_uri = mongo_uri
        self.mongo_db = mongo_db

    @classmethod
    def from_crawler(cls, crawler):
        return cls(
            mongo_uri=crawler.settings.get('MONGO_URI'),
            mongo_db=crawler.settings.get('MONGO_DATABASE', 'items')
        )

    def open_spider(self, spider):
        self.client = pymongo.MongoClient(self.mongo_uri)
        self.db = self.client[self.mongo_db]

    def close_spider(self, spider):
        self.client.close()

    def process_item(self, item, spider):
        self.db[self.collection_name].insert_one(dict(item))
        return item
(4) 重复过滤
一个过滤器,用于查找重复项目,并删除已处理的项目。假设我们的项目具有唯一ID,但我们的蜘蛛会返回具有相同ID的多个项目:
from scrapy.exceptions import DropItem

class DuplicatesPipeline(object):

    def __init__(self):
        self.ids_seen = set()

    def process_item(self, item, spider):
        if item['id'] in self.ids_seen:
            raise DropItem("Duplicate item found: %s" % item)
        else:
            self.ids_seen.add(item['id'])
            return item
3. 激活项目管道组件
要激活Item Pipeline组件,必须将其类添加到 ITEM_PIPELINES设置中,如下例所示:
ITEM_PIPELINES = {
    'myproject.pipelines.PricePipeline': 300,
    'myproject.pipelines.JsonWriterPipeline': 800,
}
您在此设置中为类分配的整数值决定了它们运行的顺序:项目从较低值到较高值类进行。习惯上在0-1000范围内定义这些数字。
pymongo操作,请参考链接:
https://www.cnblogs.com/yuanchenqi/articles/9602847.html
本文参考链接:
https://www.cnblogs.com/yuanchenqi/articles/9509793.html
七、爬取亚马逊
新建一个爬虫程序
scrapy genspider amazon amazon.cn
修改 DianShang-->spiders-->amazon.py,打印响应信息
# -*- coding: utf-8 -*-
import scrapy
from scrapy import Request  # 导入模块

class AmazonSpider(scrapy.Spider):
    name = 'amazon'
    allowed_domains = ['amazon.cn']
    # start_urls = ['http://amazon.cn/']

    def start_requests(self):
        r1 = Request(url="http://amazon.cn/")
        yield r1

    def parse(self, response):
        print(response.text)
修改bin.py
#在项目根目录下新建:bin.py
from scrapy.cmdline import execute
# 第三个参数是:爬虫程序名
execute(['scrapy', 'crawl', 'amazon'])
执行bin.py,发现有一个503错误
2018-10-01 14:47:19 [scrapy.core.engine] DEBUG: Crawled (503) <GET https://www.amazon.cn/> (referer: None)
说明,被亚马逊给拦截了!怎么办呢?加1个请求头
修改 DianShang-->spiders-->amazon.py
# -*- coding: utf-8 -*-
import scrapy
from scrapy import Request  # 导入模块

class AmazonSpider(scrapy.Spider):
    name = 'amazon'
    allowed_domains = ['amazon.cn']
    # start_urls = ['http://amazon.cn/']
    # 自定义配置,注意:变量名必须是custom_settings
    custom_settings = {
        'REQUEST_HEADERS': {
            'User-Agent': 'Mozilla/5.0 (Windows NT 6.1; WOW64) AppleWebKit/537.36 (KHTML, like Gecko) Chrome/62.0.3202.75 Safari/537.36',
        }
    }

    def start_requests(self):
        r1 = Request(url="http://amazon.cn/",headers=self.settings.get('REQUEST_HEADERS'),)
        yield r1

    def parse(self, response):
        print(response.text)
再次运行bin.py,发现拿到了网页html
<!doctype html><html class="a-no-js" data-19ax5a9jf="dingo">
...
</html>
先来搜索ipone x,跳转页面如下:
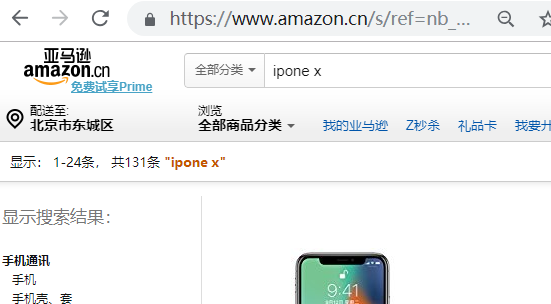
在地址栏中的url太长了,它真正的地址应该是
https://www.amazon.cn/s/ref=nb_sb_ss_i_3_6?field-keywords=iphone+x
修改 DianShang-->spiders-->amazon.py,更改url
# -*- coding: utf-8 -*-
import scrapy
from scrapy import Request  # 导入模块

class AmazonSpider(scrapy.Spider):
    name = 'amazon'
    allowed_domains = ['amazon.cn']
    # start_urls = ['http://amazon.cn/']
    # 自定义配置,注意:变量名必须是custom_settings
    custom_settings = {
        'REQUEST_HEADERS': {
            'User-Agent': 'Mozilla/5.0 (Windows NT 6.1; WOW64) AppleWebKit/537.36 (KHTML, like Gecko) Chrome/62.0.3202.75 Safari/537.36',
        }
    }

    def start_requests(self):
        r1 = Request(url="https://www.amazon.cn/s/ref=nb_sb_ss_i_3_6?field-keywords=iphone+x",headers=self.settings.get('REQUEST_HEADERS'),)
        yield r1

    def parse(self, response):
        print(response.text)
修改bin.py,关闭日志
#在项目根目录下新建:bin.py
from scrapy.cmdline import execute
# 第三个参数是:爬虫程序名
execute(['scrapy', 'crawl', 'amazon',"--nolog"])
再次运行bin.py,输出一段html
先来看搜索到ipone x的页面。我们需要爬取 ipone x的名称,价格,配送方式。
但是这个页面并没有配送方式,点击一个具体的商品。
删掉url后面多余参数,地址如下:
https://www.amazon.cn/dp/B075LGPY95
效果如下:

可以发现,这个页面,我们所需要的3个信息全有。那么直接访问这地址获取就可以了!
获取商品详情链接
第一步,应该先获取所有商品的详情链接。
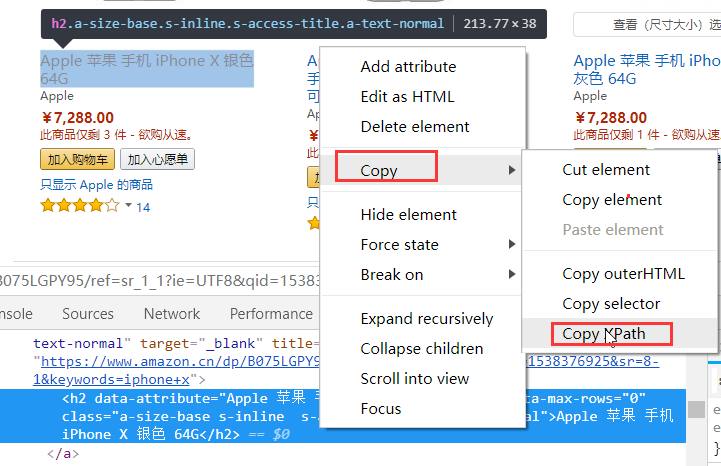
看搜索到ipone x的页面,比如第一个商品,它有很多可以点击的地方。比如图片,标题,价格等等。都可以链接到商品详情页!
这里我只选择 标题部分,来获取商品的详情链接!
先copy Xpath规则
修改 DianShang-->spiders-->amazon.py,使用xpath规则解析
# -*- coding: utf-8 -*-
import scrapy
from scrapy import Request  # 导入模块

class AmazonSpider(scrapy.Spider):
    name = 'amazon'
    allowed_domains = ['amazon.cn']
    # start_urls = ['http://amazon.cn/']
    # 自定义配置,注意:变量名必须是custom_settings
    custom_settings = {
        'REQUEST_HEADERS': {
            'User-Agent': 'Mozilla/5.0 (Windows NT 6.1; WOW64) AppleWebKit/537.36 (KHTML, like Gecko) Chrome/62.0.3202.75 Safari/537.36',
        }
    }

    def start_requests(self):
        r1 = Request(url="https://www.amazon.cn/s/ref=nb_sb_ss_i_3_6?field-keywords=iphone+x",headers=self.settings.get('REQUEST_HEADERS'),)
        yield r1

    def parse(self, response):
        # 商品详细链接
        detail_urls = response.xpath('//*[@id="result_0"]/div/div[3]/div[1]/a/h2').extract()
        print(detail_urls)
执行bin.py,输出如下:
['<h2 data-attribute="Apple 苹果 手机 iPhone X 银色 64G" data-max-rows="0" class="a-size-base s-inline s-access-title a-text-normal">Apple 苹果 手机 iPhone X 银色 64G</h2>']
商品名都拿到了,获取href属性使用@href就可以了
修改 DianShang-->spiders-->amazon.py
# -*- coding: utf-8 -*-
import scrapy
from scrapy import Request  # 导入模块

class AmazonSpider(scrapy.Spider):
    name = 'amazon'
    allowed_domains = ['amazon.cn']
    # start_urls = ['http://amazon.cn/']
    # 自定义配置,注意:变量名必须是custom_settings
    custom_settings = {
        'REQUEST_HEADERS': {
            'User-Agent': 'Mozilla/5.0 (Windows NT 6.1; WOW64) AppleWebKit/537.36 (KHTML, like Gecko) Chrome/62.0.3202.75 Safari/537.36',
        }
    }

    def start_requests(self):
        r1 = Request(url="https://www.amazon.cn/s/ref=nb_sb_ss_i_3_6?field-keywords=iphone+x",headers=self.settings.get('REQUEST_HEADERS'),)
        yield r1

    def parse(self, response):
        # 商品详细链接
        detail_urls = response.xpath('//*[@id="result_0"]/div/div[3]/div[1]/a/@href').extract()
        print(detail_urls)
执行bin.py,输出如下:
['https://www.amazon.cn/dp/B075LGPY95']
这只是获取一个商品,获取整页的商品呢?
先来找规律,每一个商品都是一个li标签。并且还有一个id属性为result_数字。
可以发现,id属性的前缀都是result_ 。那么使用xpath的模拟匹配就可以了!

修改 DianShang-->spiders-->amazon.py,使用模糊匹配
# -*- coding: utf-8 -*-
import scrapy
from scrapy import Request  # 导入模块

class AmazonSpider(scrapy.Spider):
    name = 'amazon'
    allowed_domains = ['amazon.cn']
    # start_urls = ['http://amazon.cn/']
    # 自定义配置,注意:变量名必须是custom_settings
    custom_settings = {
        'REQUEST_HEADERS': {
            'User-Agent': 'Mozilla/5.0 (Windows NT 6.1; WOW64) AppleWebKit/537.36 (KHTML, like Gecko) Chrome/62.0.3202.75 Safari/537.36',
        }
    }

    def start_requests(self):
        r1 = Request(url="https://www.amazon.cn/s/ref=nb_sb_ss_i_3_6?field-keywords=iphone+x",headers=self.settings.get('REQUEST_HEADERS'),)
        yield r1

    def parse(self, response):
        # 商品详细链接
        detail_urls = response.xpath('//li[contains(@id,"result_")]/div/div[3]/div[1]/a/@href').extract()
        print(detail_urls)
再次执行bin.py,输出了一堆链接,效果如下:
['https://www.amazon.cn/dp/B075LGPY95', 'https://www.amazon.cn/dp/B0763KX27G', ...]
随便点击一个,就是商品详情链接。那么如何让scrapy去访问这些链接呢?
注意:只要parse函数返回一个Request对象,那么就会放到异步请求列表里面,由twisted发送异步请求!
修改 DianShang-->spiders-->amazon.py,yield Request对象
# -*- coding: utf-8 -*-
import scrapy
from scrapy import Request  # 导入模块

class AmazonSpider(scrapy.Spider):
    name = 'amazon'
    allowed_domains = ['amazon.cn']
    # start_urls = ['http://amazon.cn/']
    # 自定义配置,注意:变量名必须是custom_settings
    custom_settings = {
        'REQUEST_HEADERS': {
            'User-Agent': 'Mozilla/5.0 (Windows NT 6.1; WOW64) AppleWebKit/537.36 (KHTML, like Gecko) Chrome/62.0.3202.75 Safari/537.36',
        }
    }

    def start_requests(self):
        r1 = Request(url="https://www.amazon.cn/s/ref=nb_sb_ss_i_3_6?field-keywords=iphone+x",
                     headers=self.settings.get('REQUEST_HEADERS'),)
        yield r1

    def parse(self, response):
        # 商品详细链接
        detail_urls = response.xpath('//li[contains(@id,"result_")]/div/div[3]/div[1]/a/@href').extract()
        # print(detail_urls)
        for url in detail_urls:
            yield Request(url=url,
                          headers=self.settings.get('REQUEST_HEADERS'),  # 请求头
                          callback=self.parse_detail,  # 回调函数
                          dont_filter=True  # 不去重
                          )

    def parse_detail(self, response):  # 获取商品详细信息
        print(response.text)
执行bin.py,输出一堆字符串。那些都是商品详情页的信息!
获取商品名
先来获取商品的名字

修改 DianShang-->spiders-->amazon.py,修改parse_detail,增加XPath规则
# -*- coding: utf-8 -*-
import scrapy
from scrapy import Request  # 导入模块

class AmazonSpider(scrapy.Spider):
    name = 'amazon'
    allowed_domains = ['amazon.cn']
    # start_urls = ['http://amazon.cn/']
    # 自定义配置,注意:变量名必须是custom_settings
    custom_settings = {
        'REQUEST_HEADERS': {
            'User-Agent': 'Mozilla/5.0 (Windows NT 6.1; WOW64) AppleWebKit/537.36 (KHTML, like Gecko) Chrome/62.0.3202.75 Safari/537.36',
        }
    }

    def start_requests(self):
        r1 = Request(url="https://www.amazon.cn/s/ref=nb_sb_ss_i_3_6?field-keywords=iphone+x",
                     headers=self.settings.get('REQUEST_HEADERS'),)
        yield r1

    def parse(self, response):
        # 商品详细链接
        detail_urls = response.xpath('//li[contains(@id,"result_")]/div/div[3]/div[1]/a/@href').extract()
        # print(detail_urls)
        for url in detail_urls:
            yield Request(url=url,
                          headers=self.settings.get('REQUEST_HEADERS'),  # 请求头
                          callback=self.parse_detail,  # 回调函数
                          dont_filter=True  # 不去重
                          )

    def parse_detail(self, response):  # 获取商品详细信息
        # 商品名
        name = response.xpath('//*[@id="productTitle"]/text()').extract()
        print(name)
执行输出:
\n Apple 苹果 手机 iPhone X 深空灰色 64G\n
发现它有很多换行符,怎么去除呢?使用strip
# -*- coding: utf-8 -*-
import scrapy
from scrapy import Request  # 导入模块

class AmazonSpider(scrapy.Spider):
    name = 'amazon'
    allowed_domains = ['amazon.cn']
    # start_urls = ['http://amazon.cn/']
    # 自定义配置,注意:变量名必须是custom_settings
    custom_settings = {
        'REQUEST_HEADERS': {
            'User-Agent': 'Mozilla/5.0 (Windows NT 6.1; WOW64) AppleWebKit/537.36 (KHTML, like Gecko) Chrome/62.0.3202.75 Safari/537.36',
        }
    }

    def start_requests(self):
        r1 = Request(url="https://www.amazon.cn/s/ref=nb_sb_ss_i_3_6?field-keywords=iphone+x",
                     headers=self.settings.get('REQUEST_HEADERS'),)
        yield r1

    def parse(self, response):
        # 商品详细链接
        detail_urls = response.xpath('//li[contains(@id,"result_")]/div/div[3]/div[1]/a/@href').extract()
        # print(detail_urls)
        for url in detail_urls:
            yield Request(url=url,
                          headers=self.settings.get('REQUEST_HEADERS'),  # 请求头
                          callback=self.parse_detail,  # 回调函数
                          dont_filter=True  # 不去重
                          )

    def parse_detail(self, response):  # 获取商品详细信息
        # 商品名
        name = response.xpath('//*[@id="productTitle"]/text()').extract()
        if name:
            name = name.strip()

        print(name)
执行bin.py,发现输出为空!
修改bin.py,去除关闭日志
#在项目根目录下新建:bin.py
from scrapy.cmdline import execute
# 第三个参数是:爬虫程序名
execute(['scrapy', 'crawl', 'amazon'])
再次执行,发现有一个错误
AttributeError: 'list' object has no attribute 'strip'
哦,原来name是一个list对象。那么使用extract就不合适了,修改为extract_first。匹配第一个结果!
修改 DianShang-->spiders-->amazon.py,修改parse_detail,使用extract_first
# -*- coding: utf-8 -*-
import scrapy
from scrapy import Request  # 导入模块

class AmazonSpider(scrapy.Spider):
    name = 'amazon'
    allowed_domains = ['amazon.cn']
    # start_urls = ['http://amazon.cn/']
    # 自定义配置,注意:变量名必须是custom_settings
    custom_settings = {
        'REQUEST_HEADERS': {
            'User-Agent': 'Mozilla/5.0 (Windows NT 6.1; WOW64) AppleWebKit/537.36 (KHTML, like Gecko) Chrome/62.0.3202.75 Safari/537.36',
        }
    }

    def start_requests(self):
        r1 = Request(url="https://www.amazon.cn/s/ref=nb_sb_ss_i_3_6?field-keywords=iphone+x",
                     headers=self.settings.get('REQUEST_HEADERS'),)
        yield r1

    def parse(self, response):
        # 商品详细链接
        detail_urls = response.xpath('//li[contains(@id,"result_")]/div/div[3]/div[1]/a/@href').extract()
        # print(detail_urls)
        for url in detail_urls:
            yield Request(url=url,
                          headers=self.settings.get('REQUEST_HEADERS'),  # 请求头
                          callback=self.parse_detail,  # 回调函数
                          dont_filter=True  # 不去重
                          )

    def parse_detail(self, response):  # 获取商品详细信息
        # 商品名,获取第一个结果
        name = response.xpath('//*[@id="productTitle"]/text()').extract_first()
        if name:
            name = name.strip()

        print(name)
再次执行,输出:
...
Apple 苹果 手机 iPhone X 深空灰色 64G
...
这下就正常了!
获取商品价格
商品价格,和商品名称,也是同样的道理。使用谷歌浏览器直接复制XPath规则,就可以了!
修改 DianShang-->spiders-->amazon.py,修改parse_detail
# -*- coding: utf-8 -*-
import scrapy
from scrapy import Request  # 导入模块

class AmazonSpider(scrapy.Spider):
    name = 'amazon'
    allowed_domains = ['amazon.cn']
    # start_urls = ['http://amazon.cn/']
    # 自定义配置,注意:变量名必须是custom_settings
    custom_settings = {
        'REQUEST_HEADERS': {
            'User-Agent': 'Mozilla/5.0 (Windows NT 6.1; WOW64) AppleWebKit/537.36 (KHTML, like Gecko) Chrome/62.0.3202.75 Safari/537.36',
        }
    }

    def start_requests(self):
        r1 = Request(url="https://www.amazon.cn/s/ref=nb_sb_ss_i_3_6?field-keywords=iphone+x",
                     headers=self.settings.get('REQUEST_HEADERS'),)
        yield r1

    def parse(self, response):
        # 商品详细链接
        detail_urls = response.xpath('//li[contains(@id,"result_")]/div/div[3]/div[1]/a/@href').extract()
        # print(detail_urls)
        for url in detail_urls:
            yield Request(url=url,
                          headers=self.settings.get('REQUEST_HEADERS'),  # 请求头
                          callback=self.parse_detail,  # 回调函数
                          dont_filter=True  # 不去重
                          )

    def parse_detail(self, response):  # 获取商品详细信息
        # 商品名,获取第一个结果
        name = response.xpath('//*[@id="productTitle"]/text()').extract_first()
        if name:
            name = name.strip()

        # 商品价格
        price = response.xpath('//*[@id="priceblock_ourprice"]/text()').extract_first()

        print(name,price)
执行bin.py,输出如下:
...
Apple 苹果 手机 iPhone X 深空灰色 64G ¥7,288.00
...
获取商品配送方式
使用谷歌浏览器直接复制XPath规则
修改 DianShang-->spiders-->amazon.py,修改parse_detail
# -*- coding: utf-8 -*-
import scrapy
from scrapy import Request  # 导入模块

class AmazonSpider(scrapy.Spider):
    name = 'amazon'
    allowed_domains = ['amazon.cn']
    # start_urls = ['http://amazon.cn/']
    # 自定义配置,注意:变量名必须是custom_settings
    custom_settings = {
        'REQUEST_HEADERS': {
            'User-Agent': 'Mozilla/5.0 (Windows NT 6.1; WOW64) AppleWebKit/537.36 (KHTML, like Gecko) Chrome/62.0.3202.75 Safari/537.36',
        }
    }

    def start_requests(self):
        r1 = Request(url="https://www.amazon.cn/s/ref=nb_sb_ss_i_3_6?field-keywords=iphone+x",
                     headers=self.settings.get('REQUEST_HEADERS'),)
        yield r1

    def parse(self, response):
        # 商品详细链接
        detail_urls = response.xpath('//li[contains(@id,"result_")]/div/div[3]/div[1]/a/@href').extract()
        # print(detail_urls)
        for url in detail_urls:
            yield Request(url=url,
                          headers=self.settings.get('REQUEST_HEADERS'),  # 请求头
                          callback=self.parse_detail,  # 回调函数
                          dont_filter=True  # 不去重
                          )

    def parse_detail(self, response):  # 获取商品详细信息
        # 商品名,获取第一个结果
        name = response.xpath('//*[@id="productTitle"]/text()').extract_first()
        if name:
            name = name.strip()

        # 商品价格
        price = response.xpath('//*[@id="priceblock_ourprice"]/text()').extract_first()
        # 配送方式
        delivery = response.xpath('//*[@id="ddmMerchantMessage"]/a/text()').extract_first()
        print(name,price,delivery)
执行bin.py,输出如下:
...
Apple iPhone X 全网通 移动联通电信4G 热销中 (深空灰, 64G) ¥7,288.00 新思维官方旗舰店
X-Doria 461238 Apple iPhone X,14.73 厘米(5.8 英寸)灰色 ¥173.70 了解更多。
...
发现了一个问题,如果是手机壳,比如这个链接:
https://www.amazon.cn/dp/B0787HGXQX
使用Xpath获取时,输出: 了解更多
为什么呢?因为我们获取的是a标签的值!

所以获取时,就是了解更多了!看上面,有一个亚马逊中国,这个才是我们想要的!
在span标签id=ddmMerchantMessage,这标签中,它里面包含了2个标签,分别是b标签和a标签。
那么我们取b标签的text()值,就可以了!
修改 DianShang-->spiders-->amazon.py,修改parse_detail
# -*- coding: utf-8 -*-
import scrapy
from scrapy import Request  # 导入模块

class AmazonSpider(scrapy.Spider):
    name = 'amazon'
    allowed_domains = ['amazon.cn']
    # start_urls = ['http://amazon.cn/']
    # 自定义配置,注意:变量名必须是custom_settings
    custom_settings = {
        'REQUEST_HEADERS': {
            'User-Agent': 'Mozilla/5.0 (Windows NT 6.1; WOW64) AppleWebKit/537.36 (KHTML, like Gecko) Chrome/62.0.3202.75 Safari/537.36',
        }
    }

    def start_requests(self):
        r1 = Request(url="https://www.amazon.cn/s/ref=nb_sb_ss_i_3_6?field-keywords=iphone+x",
                     headers=self.settings.get('REQUEST_HEADERS'),)
        yield r1

    def parse(self, response):
        # 商品详细链接
        detail_urls = response.xpath('//li[contains(@id,"result_")]/div/div[3]/div[1]/a/@href').extract()
        # print(detail_urls)
        for url in detail_urls:
            yield Request(url=url,
                          headers=self.settings.get('REQUEST_HEADERS'),  # 请求头
                          callback=self.parse_detail,  # 回调函数
                          dont_filter=True  # 不去重
                          )

    def parse_detail(self, response):  # 获取商品详细信息
        # 商品名,获取第一个结果
        name = response.xpath('//*[@id="productTitle"]/text()').extract_first()
        if name:
            name = name.strip()

        # 商品价格
        price = response.xpath('//*[@id="priceblock_ourprice"]/text()').extract_first()
        # 配送方式,*[1]表示取第一个标签,也就是b标签
        delivery = response.xpath('//*[@id="ddmMerchantMessage"]/*[1]/text()').extract_first()
        print(name,price,delivery)
执行bin.py,输出如下:
...
hayder iphone X 保护套透明 TPU 超薄电镀防护防撞手机壳适用于苹果 iPhone X 10 ¥149.09 亚马逊美国
Apple iPhone X 移动联通电信4G手机 (256GB, 银色) ¥8,448.00 新思维官方旗舰店
...
发现手机壳的配送方式,也是正确的!
保存到MongoDB
Item
要想将数据保存到MongoDB中,需要使用item
修改 DianShang-->items.py,默认的函数名可以直接更改
# -*- coding: utf-8 -*-

# Define here the models for your scraped items
#
# See documentation in:
# https://doc.scrapy.org/en/latest/topics/items.html

import scrapy


class AmazonItem(scrapy.Item):

    name = scrapy.Field()  # 商品名
    price= scrapy.Field()  # 价格
    delivery=scrapy.Field()  # 配送方式
修改 DianShang-->spiders-->amazon.py,使用item
# -*- coding: utf-8 -*-
import scrapy
from scrapy import Request  # 导入模块
from DianShang.items import AmazonItem  # 导入item

class AmazonSpider(scrapy.Spider):
    name = 'amazon'
    allowed_domains = ['amazon.cn']
    # start_urls = ['http://amazon.cn/']
    # 自定义配置,注意:变量名必须是custom_settings
    custom_settings = {
        'REQUEST_HEADERS': {
            'User-Agent': 'Mozilla/5.0 (Windows NT 6.1; WOW64) AppleWebKit/537.36 (KHTML, like Gecko) Chrome/62.0.3202.75 Safari/537.36',
        }
    }

    def start_requests(self):
        r1 = Request(url="https://www.amazon.cn/s/ref=nb_sb_ss_i_3_6?field-keywords=iphone+x",
                     headers=self.settings.get('REQUEST_HEADERS'),)
        yield r1

    def parse(self, response):
        # 商品详细链接
        detail_urls = response.xpath('//li[contains(@id,"result_")]/div/div[3]/div[1]/a/@href').extract()
        # print(detail_urls)
        for url in detail_urls:
            yield Request(url=url,
                          headers=self.settings.get('REQUEST_HEADERS'),  # 请求头
                          callback=self.parse_detail,  # 回调函数
                          dont_filter=True  # 不去重
                          )

    def parse_detail(self, response):  # 获取商品详细信息
        # 商品名,获取第一个结果
        name = response.xpath('//*[@id="productTitle"]/text()').extract_first()
        if name:
            name = name.strip()

        # 商品价格
        price = response.xpath('//*[@id="priceblock_ourprice"]/text()').extract_first()
        # 配送方式,*[1]表示取第一个标签,也就是b标签
        delivery = response.xpath('//*[@id="ddmMerchantMessage"]/*[1]/text()').extract_first()
        print(name,price,delivery)

        # 生成标准化数据
        item = AmazonItem()  # 执行函数,默认是一个空字典
        # 增加键值对
        item["name"] = name
        item["price"] = price
        item["delivery"] = delivery

        return item  # 必须要返回
Item PipeLine
上面的item只是返回了一个字典,并没有真正存储到MongoDB中。需要PipeLine将数据储存到MongoDB中
修改 DianShang-->pipelines.py。注意:from_crawler,open_spider,close_spider,process_item这4个方法,必须要定义才行!
# -*- coding: utf-8 -*-

# Define your item pipelines here
#
# Don't forget to add your pipeline to the ITEM_PIPELINES setting
# See: https://doc.scrapy.org/en/latest/topics/item-pipeline.html


from pymongo import MongoClient

class MongodbPipeline(object):

    def __init__(self, host, port, db, table):
        self.host = host
        self.port = port
        self.db = db
        self.table = table

    @classmethod
    def from_crawler(cls, crawler):
        """
        Scrapy会先通过getattr判断我们是否自定义了from_crawler,有则调它来完
        成实例化
        """
        HOST = crawler.settings.get('HOST')
        PORT = crawler.settings.get('PORT')
        DB = crawler.settings.get('DB')
        TABLE = crawler.settings.get('TABLE')
        return cls(HOST, PORT, DB, TABLE)

    def open_spider(self, spider):
        """
        爬虫刚启动时执行一次
        """
        # self.client = MongoClient('mongodb://%s:%s@%s:%s' %(self.user,self.pwd,self.host,self.port))
        self.client = MongoClient(host=self.host, port=self.port)

    def close_spider(self, spider):
        """
        爬虫关闭时执行一次
        """
        self.client.close()

    def process_item(self, item, spider):
        # 操作并进行持久化
        d = dict(item)
        if all(d.values()):
            self.client[self.db][self.table].insert(d)
            print("添加成功一条")
open_spider,close_spider这2个方法,只会执行一次。
process_item呢?就不一定了。有多少次请求,就执行多少次!每次会插入一条记录
修改 DianShang\settings.py,增加MongoDB连接信息。
最后一行增加以下信息:
# MongoDB连接信息
HOST="127.0.0.1"
PORT=27017
DB="amazon"  # 数据库名
TABLE="goods"  # 表名
再修改 DianShang\settings.py,开启MongoDB的PipeLine
这里的300,表示优先级
ITEM_PIPELINES = {
    'DianShang.pipelines.MongodbPipeline': 300,
}
注意:由于在pipelines.py中,定义的是MongodbPipeline。所以配置文件这里,必须要一一匹配,否则报错:
raise NameError("Module '%s' doesn't define any object named '%s'" % (module, name))
先启动MongoDB,打开cmd窗口,输入命令
C:\Users\xiao>mongod
如果输出:
[thread1] waiting for connections on port 27017
则表示启动成功了!
Pipeline是不会帮你自动创建数据库的,所以需要手动创建。
进入数据库,创建数据库amazon
C:\Users\xiao>mongo

> use amazon
switched to db amazon
>
重新运行 bin.py,输出:
...
Apple 苹果 手机 iPhone X 深空灰色 64G ¥7,288.00 新思维官方旗舰店
添加成功一条
...
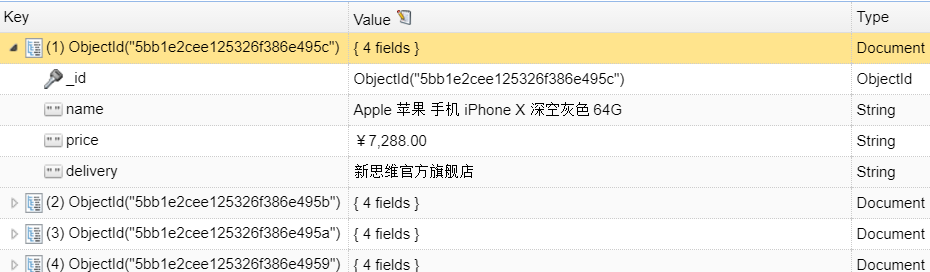
使用 MongoDB客户端打开表goods,效果如下:


【推荐】国内首个AI IDE,深度理解中文开发场景,立即下载体验Trae
【推荐】编程新体验,更懂你的AI,立即体验豆包MarsCode编程助手
【推荐】抖音旗下AI助手豆包,你的智能百科全书,全免费不限次数
【推荐】轻量又高性能的 SSH 工具 IShell:AI 加持,快人一步
· 开发者必知的日志记录最佳实践
· SQL Server 2025 AI相关能力初探
· Linux系列:如何用 C#调用 C方法造成内存泄露
· AI与.NET技术实操系列(二):开始使用ML.NET
· 记一次.NET内存居高不下排查解决与启示
· Manus重磅发布:全球首款通用AI代理技术深度解析与实战指南
· 被坑几百块钱后,我竟然真的恢复了删除的微信聊天记录!
· 没有Manus邀请码?试试免邀请码的MGX或者开源的OpenManus吧
· 园子的第一款AI主题卫衣上架——"HELLO! HOW CAN I ASSIST YOU TODAY
· 【自荐】一款简洁、开源的在线白板工具 Drawnix