Selenium&Chrome实战:动态爬取51job招聘信息
一、概述
Selenium自动化测试工具,可模拟用户输入,选择,提交。
爬虫实现的功能:
- 输入python,选择地点:上海,北京 ---->就去爬取上海,北京2个城市python招聘信息
- 输入会计,选择地址:广州,深圳,杭州---->就去爬取广州,深圳,杭州3个城市会计招聘信息
- 根据输入的不同,动态爬取结果
二、页面分析
输入关键字
selenium怎么模拟用户输入关键字,怎么选择城市,怎么点击搜索按钮?

Selenium模拟用户输入关键字,谷歌浏览器右键输入框,点检查,查看代码

通过selenium的find_element_by_id 找到 id = 'kwdselectid',然后send_keys('关键字')即可模拟用户输入
代码为:
textElement = browser.find_element_by_id('kwdselectid')
textElement.send_keys('python')
选择城市
selenium模拟用户选择城市--- (这个就难了,踩了很多坑)
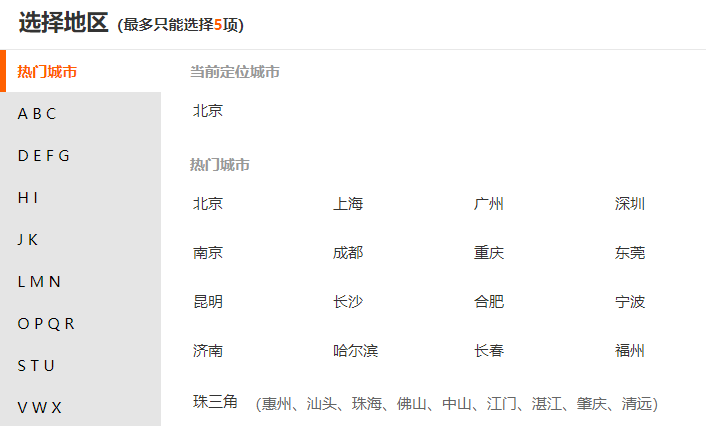
点击城市选择,会弹出一个框

然后选择:北京,上海, 右键检查,查看源代码

可以发现:value的值变成了"北京+上海"
那么是否可以用selenium找到这个标签,更改它的属性值为"北京+上海",可以实现选择城市呢?
答案:不行,因为经过自己的几次尝试,发现真正生效的是下面的"010000,020000",这个是什么?城市编号,也就是说在输入"北京+上海",实际上输入的是:"010000,020000", 那这个城市编号怎么来的,这个就需要去爬取51job弹出城市选择框那个页面了,页面代码里面有城市对应的编号
获取城市编号
getcity.py代码:
from selenium import webdriver
from selenium.webdriver.chrome.options import Options
import json


# 设置selenium使用chrome的无头模式
chrome_options = Options()
chrome_options.add_argument("--headless")
# 在启动浏览器时加入配置
browser = webdriver.Chrome(options=chrome_options)
cookies = browser.get_cookies()
browser.delete_all_cookies()
browser.get('https://www.51job.com/')
browser.implicitly_wait(20)

# 找到城市选择框,并模拟点击
button = browser.find_element_by_xpath("//div[@class='ush top_wrap']//div[@class='el on']/p\
[@class='addbut']//input[@id='work_position_input']").click()

# 选中城市弹出框
browser.current_window_handle

# 定义一个空字典
dic = {}

# 找到城市,和对应的城市编号
find_city_elements = browser.find_elements_by_xpath("//div[@id='work_position_layer']//\
div[@id='work_position_click_center_right_list_000000']//tbody/tr/td")
for element in find_city_elements:
    number = element.find_element_by_xpath("./em").get_attribute("data-value")  # 城市编号
    city = element.find_element_by_xpath("./em").text  # 城市
    # 添加到字典
    dic.setdefault(city, number)
print(dic)
# 写入文件
with open('city.txt', 'w', encoding='utf8') as f:
    f.write(json.dumps(dic, ensure_ascii=False))
browser.quit()
执行输出:
{'北京': '010000', '上海': '020000', '广州': '030200', '深圳': '040000', '武汉': '180200', '西安': '200200', '杭州': '080200', '南京': '070200', '成都': '090200', '重庆': '060000', '东莞': '030800', '大连': '230300', '沈阳': '230200', '苏州': '070300', '昆明': '250200', '长沙': '190200', '合肥': '150200', '宁波': '080300', '郑州': '170200', '天津': '050000', '青岛': '120300', '济南': '120200', '哈尔滨': '220200', '长春': '240200', '福州': '110200'}
通过selenium的find_element_by_xpath 找到城市编号这个input,然后读取city.txt文件,把对应的城市替换为城市编号,在用selenium执行js代码,就可以加载城市了---代码有点长,完整代码写在后面
selenium模拟用户点击搜索
通过selenium的find_element_by_xpath 找到 这个button按钮,然后click() 即可模拟用户点击搜索
代码为:
browser.find_element_by_xpath("//div[@class='ush top_wrap']/button").click()
以上都是模拟用户搜索的行为,下面就是对数据提取规则
先定位总页数:158页

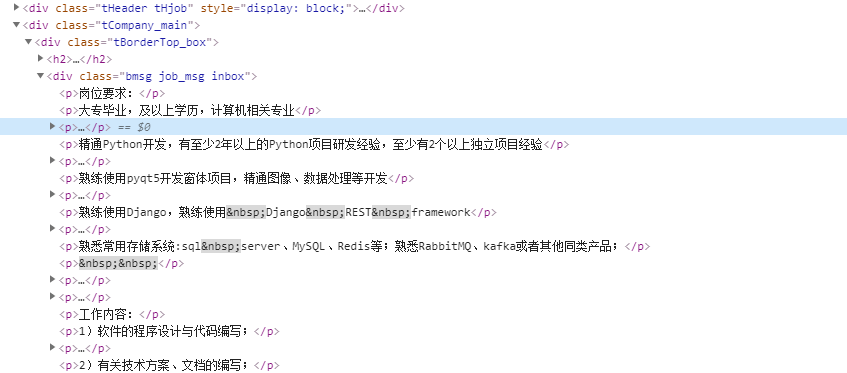
找到每个岗位详细的链接地址:

最后定位需要爬取的数据
岗位名,薪水,公司名,招聘信息,福利待遇,岗位职责,任职要求,上班地点,工作地点 这些数据,总之需要什么数据,就爬什么
需要打开岗位详细的链接,比如:https://jobs.51job.com/shanghai-mhq/118338654.html?s=01&t=0

三、完整代码
代码介绍
新建目录51cto-selenium,结构如下:
./
├── get51Job.py
├── getcity.py
└── mylog.py
文件说明:
getcity.py (首先运行)获取城市编号,会生成一个city.txt文件
mylog.py 日志程序,记录爬取过程中的一些信息
get51Job.py 爬虫主程序,里面包含:
Item类  定义需要获取的数据

GetJobInfo类 主程序类

getBrowser方法     设置selenium使用chrome的无头模式,打开目标网站,返回browser对象

userInput方法        模拟用户输入关键字,选择城市,点击搜索,返回browser对象

getUrl方法               找到所有符合规则的url,返回urls列表

spider方法               提取每个岗位url的详情,返回items

getresponsecontent方法  接收url,打开目标网站,返回html内容

piplines方法            处理所有的数据,保存为51job.txt

getPageNext方法   找到总页数,并获取下个页面的url,保存数据,直到所有页面爬取完毕
getcity.py

# !/usr/bin/python3
# -*- coding: utf-8 -*-

#!/usr/bin/env python
# coding: utf-8
from selenium import webdriver
from selenium.webdriver.chrome.options import Options
import json


# 设置selenium使用chrome的无头模式
chrome_options = Options()
chrome_options.add_argument("--headless")
# 在启动浏览器时加入配置
browser = webdriver.Chrome(options=chrome_options)
cookies = browser.get_cookies()
browser.delete_all_cookies()
browser.get('https://www.51job.com/')
browser.implicitly_wait(20)

# 找到城市选择框,并模拟点击
button = browser.find_element_by_xpath("//div[@class='ush top_wrap']//div[@class='el on']/p\
[@class='addbut']//input[@id='work_position_input']").click()

# 选中城市弹出框
browser.current_window_handle

# 定义一个空字典
dic = {}

# 找到城市,和对应的城市编号
find_city_elements = browser.find_elements_by_xpath("//div[@id='work_position_layer']//\
div[@id='work_position_click_center_right_list_000000']//tbody/tr/td")
for element in find_city_elements:
    number = element.find_element_by_xpath("./em").get_attribute("data-value")  # 城市编号
    city = element.find_element_by_xpath("./em").text  # 城市
    # 添加到字典
    dic.setdefault(city, number)
print(dic)
# 写入文件
with open('city.txt', 'w', encoding='utf8') as f:
    f.write(json.dumps(dic, ensure_ascii=False))
browser.quit()
get51Job.py

# !/usr/bin/python3
# -*- coding: utf-8 -*-
from selenium import webdriver
from selenium.webdriver.chrome.options import Options
from mylog import MyLog as mylog
import json
import time
import requests
from lxml import etree


class Item(object):
    job_name = None  # 岗位名
    company_name = None  # 公司名
    work_place = None  # 工作地点
    salary = None  # 薪资
    release_time = None  # 发布时间
    job_recruitment_details = None  # 招聘岗位详细
    job_number_details = None  # 招聘人数详细
    company_treatment_details = None  # 福利待遇详细
    practice_mode = None  # 联系方式


class GetJobInfo(object):
    """
    the all data from 51job.com
    所有数据来自前程无忧招聘网
    """
    def __init__(self):
        self.log = mylog()  # 实例化mylog类,用于记录日志
        self.startUrl = 'https://www.51job.com/'  # 爬取的目标网站
        self.browser = self.getBrowser()  # 设置chrome
        self.browser_input = self.userInput(self.browser)  # 模拟用户输入搜索
        self.getPageNext(self.browser_input)   # 找到下个页面

    def getBrowser(self):
        """
        设置selenium使用chrome的无头模式
        打开目标网站 https://www.51job.com/
        :return: browser
        """
        try:
            # 创建chrome参数对象
            chrome_options = Options()
            # 把chrome设置成无界面模式,不论windows还是linux都可以,自动适配对应参数
            chrome_options.add_argument("--headless")
            # 在启动浏览器时加入配置
            browser = webdriver.Chrome(options=chrome_options)
            # 利用selenium打开网站
            browser.get(self.startUrl)
            # 等待网站js代码加载完毕
            browser.implicitly_wait(20)
        except Exception as e:
            # 记录错误日志
            self.log.error('打开目标网站失败:{},错误代码:{}'.format(self.startUrl, e))
        else:
            # 记录成功日志
            self.log.info('打开目标网站成功:{}'.format(self.startUrl))
            # 返回实例化selenium对象
            return browser

    def userInput(self, browser):
        """
        北京 上海 广州 深圳 武汉 西安 杭州
        南京  成都 重庆 东莞 大连 沈阳 苏州
        昆明 长沙 合肥 宁波 郑州 天津 青岛
        济南 哈尔滨 长春 福州
        只支持以上城市,输入其它则无效
        最多可选5个城市,每个城市用 , 隔开(英文逗号)
        :return:browser
        """
        time.sleep(1)
        # 用户输入关键字搜索
        search_for_jobs = input("请输入职位搜索关键字:")
        # 用户输入城市
        print(self.userInput.__doc__)
        select_city = input("输入城市信息,最多可输入5个,多个城市以逗号隔开:")
        # 找到51job首页上关键字输入框
        textElement = browser.find_element_by_id('kwdselectid')
        # 模拟用户输入关键字
        textElement.send_keys(search_for_jobs)

        # 找到城市选择弹出框,模拟选择"北京,上海,广州,深圳,杭州"
        button = browser.find_element_by_xpath("//div[@class='ush top_wrap']\
        //div[@class='el on']/p[@class='addbut']//input[@id='jobarea']")

        # 打开城市对应编号文件
        with open("city.txt", 'r', encoding='utf8') as f:
            city_number = f.read()
            # 使用json解析文件
            city_number = json.loads(city_number)

        new_list = []
        # 判断是否输入多值
        if len(select_city.split(',')) > 1:
            for i in select_city.split(','):
                if i in city_number.keys():
                    # 把城市替换成对应的城市编号
                    i = city_number.get(i)
                    new_list.append(i)
                    # 把用户输入的城市替换成城市编号
            select_city = ','.join(new_list)
        else:
            for i in select_city.split(','):
                i = city_number.get(i)
                new_list.append(i)
            select_city = ','.join(new_list)

        # 执行js代码
        browser.execute_script("arguments[0].value = '{}';".format(select_city), button)

        # 模拟点击搜索
        browser.find_element_by_xpath("//div[@class='ush top_wrap']/button").click()
        self.log.info("模拟搜索输入成功,获取目标爬取title信息:{}".format(browser.title))
        return browser

    def getPageNext(self, browser):
        # 找到总页数
        str_sumPage = browser.find_element_by_xpath("//div[@class='p_in']/span[@class='td'][1]").text
        sumpage = ''
        for i in str_sumPage:
            if i.isdigit():
                sumpage += i

        # sumpage = 1
        self.log.info("获取总页数:{}".format(sumpage))
        s = 1
        while s <= int(sumpage):
            urls = self.getUrl(self.browser)
            # 获取每个岗位的详情
            self.items = self.spider(urls)
            # 数据下载
            self.pipelines(self.items)
            # 清空urls列表,获取后面的url(去重,防止数据重复爬取)
            urls.clear()
            s += 1
            self.log.info('开始爬取第%d页' % s)
            # 找到下一页的按钮点击
            # NextTag = browser.find_element_by_partial_link_text("下一页").click()
            NextTag = browser.find_element_by_class_name('next').click()
            # 等待加载js代码
            browser.implicitly_wait(20)
            time.sleep(3)
        self.log.info('获取所有岗位成功')
        # browser.quit()

    def getUrl(self, browser):
        # 创建一个空列表,用来存放所有岗位详情的url
        urls = []

        # 创建一个特殊招聘空列表
        job_urls = []

        # 获取所有岗位详情url
        Elements = browser.find_elements_by_xpath("//div[@class='j_joblist']//div[@class='e']")
        for element in Elements:
            try:
                url = element.find_element_by_xpath("./a").get_attribute("href")
                title = element.find_element_by_xpath('./a/p/span[@class="jname at"]').get_attribute('title')
            except Exception as e:
                self.log.error("获取岗位详情失败,错误代码:{}".format(e))
            else:
                # 排除特殊的url,可单独处理
                src_url = url.split('/')[3]
                if src_url == 'sc':
                    job_urls.append(url)
                    self.log.info("获取不符合爬取规则的详情成功:{},添加到job_urls".format(url))
                else:
                    urls.append(url)
                    self.log.info("获取详情成功:{},添加到urls".format(url))

        return urls

    def spider(self, urls):
        # 数据过滤,爬取需要的数据,返回items列表
        items = []
        for url in urls:
            htmlcontent = self.getreponsecontent(url)
            html_xpath = etree.HTML(htmlcontent)
            item = Item()
            # 岗位名
            job_name = html_xpath.xpath("normalize-space(//div[@class='cn']/h1/text())")
            item.job_name = job_name

            # 公司名
            company_name = html_xpath.xpath("normalize-space(//div[@class='cn']\
                        /p[@class='cname']/a/text())")
            item.company_name = company_name
            # 工作地点
            work_place = html_xpath.xpath("normalize-space(//div[@class='cn']\
                        //p[@class='msg ltype']/text())").split('|')[0].strip()
            item.work_place = work_place
            # 薪资
            salary = html_xpath.xpath("normalize-space(//div[@class='cn']/strong/text())")
            item.salary = salary
            # 发布时间
            release_time = html_xpath.xpath("normalize-space(//div[@class='cn']\
                        //p[@class='msg ltype']/text())").split('|')[-1].strip()
            item.release_time = release_time
            # 招聘岗位详细
            job_recruitment_details_tmp = html_xpath.xpath("//div[@class='bmsg job_msg inbox']//text()")
            if not job_recruitment_details_tmp:
                break

            item.job_recruitment_details = ''
            ss = job_recruitment_details_tmp.index("职能类别:")
            ceshi = job_recruitment_details_tmp[:ss - 1]
            for i in ceshi:
                item.job_recruitment_details = item.job_recruitment_details + i.strip() + '\n'
            # 招聘人数详细
            job_number_details_tmp = html_xpath.xpath("normalize-space(//div[@class='cn']\
            //p[@class='msg ltype']/text())").split('|')
            item.job_number_details = ''
            for i in job_number_details_tmp:
                item.job_number_details = item.job_number_details + ' ' + i.strip()
            # 福利待遇详细
            company_treatment_details_tmp = html_xpath.xpath("//div[@class='t1']//text()")
            item.company_treatment_details = ''
            for i in company_treatment_details_tmp:
                item.company_treatment_details = item.company_treatment_details + ' ' + i.strip()
            # 联系方式
            practice_mode_tmp = html_xpath.xpath("//div[@class='bmsg inbox']/p//text()")
            item.practice_mode = ''
            for i in practice_mode_tmp:
                item.practice_mode = item.practice_mode + ' ' + i.strip()
            items.append(item)
        return items

    def getreponsecontent(self, url):
        # 接收url,打开目标网站,返回html
        fakeHeaders = {'User-Agent': 'Mozilla/5.0 (Windows NT 10.0; WOW64) AppleWebKit/537.36 \
        (KHTML, like Gecko) Chrome/67.0.3396.62 Safari/537.36'}
        try:
            response = requests.get(url=url,headers=fakeHeaders)
            # 利用apparent_encoding,自动设置编码
            response.encoding = response.apparent_encoding
            html = response.text
        except Exception as e:
            self.log.error(u'Python 返回 url:{} 数据失败\n错误代码:{}\n'.format(url, e))
        else:
            self.log.info(u'Python 返回 url:{} 数据成功\n'.format(url))
            time.sleep(1)  # 1秒返回一个结果  手动设置延迟防止被封
            return html

    def pipelines(self, items):  # 接收一个items列表
        # 数据下载
        filename = u'51job.txt'
        with open(filename, 'a', encoding='utf-8') as fp:
            for item in items:
                fp.write('job_name:{}\ncompany_name:{}\nwork_place:{}\nsalary:\
                {}\nrelease_time:{}\njob_recruitment_details:{}\njob_number_details:\
                {}\ncompany_treatment_details:\{}\n\
                practice_mode:{}\n\n\n\n' \
                         .format(item.job_name, item.company_name, item.work_place,
                                 item.salary, item.release_time,item.job_recruitment_details,
                                 item.job_number_details, item.company_treatment_details,
                                 item.practice_mode))
                self.log.info(u'岗位{}保存到{}成功'.format(item.job_name, filename))


if __name__ == '__main__':
    st = GetJobInfo()
mylog.py

# !/usr/bin/python3
# -*- coding: utf-8 -*-
import logging
import getpass
import sys


# 定义MyLog类
class MyLog(object):
    def __init__(self):
        self.user = getpass.getuser()  # 获取用户
        self.logger = logging.getLogger(self.user)
        self.logger.setLevel(logging.DEBUG)

        # 日志文件名
        self.logfile = sys.argv[0][0:-3] + '.log'  # 动态获取调用文件的名字
        self.formatter = logging.Formatter('%(asctime)-12s %(levelname)-8s %(message)-12s\r\n')

        # 日志显示到屏幕上并输出到日志文件内
        self.logHand = logging.FileHandler(self.logfile, encoding='utf-8')
        self.logHand.setFormatter(self.formatter)
        self.logHand.setLevel(logging.DEBUG)

        self.logHandSt = logging.StreamHandler()
        self.logHandSt.setFormatter(self.formatter)
        self.logHandSt.setLevel(logging.DEBUG)

        self.logger.addHandler(self.logHand)
        self.logger.addHandler(self.logHandSt)

    # 日志的5个级别对应以下的5个函数
    def debug(self, msg):
        self.logger.debug(msg)

    def info(self, msg):
        self.logger.info(msg)

    def warn(self, msg):
        self.logger.warning(msg)

    def error(self, msg):
        self.logger.error(msg)

    def critical(self, msg):
        self.logger.critical(msg)


if __name__ == '__main__':
    mylog = MyLog()
    mylog.debug(u"I'm debug 中文测试")
    mylog.info(u"I'm info 中文测试")
    mylog.warn(u"I'm warn 中文测试")
    mylog.error(u"I'm error 中文测试")
    mylog.critical(u"I'm critical 中文测试")
运行程序
需要先运行getcity.py,获取城市编号,运行结果如下
{'北京': '010000', '上海': '020000', '广州': '030200', '深圳': '040000', '武汉': '180200', '西安': '200200', '杭州': '080200', '南京': '070200', '成都': '090200', '重庆': '060000', '东莞': '030800', '大连': '230300', '沈阳': '230200', '苏州': '070300', '昆明': '250200', '长沙': '190200', '合肥': '150200', '宁波': '080300', '郑州': '170200', '天津': '050000', '青岛': '120300', '济南': '120200', '哈尔滨': '220200', '长春': '240200', '福州': '110200'}
在运行主程序get51Job.py
关键字输入: python
城市选择:上海
pycharm运行截图:

生成的文件51job.txt截图

根据输入结果的不同,爬取不同的信息,利用selenium可以做到动态爬取
注意:如果遇到51job页面改版,本程序运行会报错。请根据实际情况,修改对应的爬虫规则。


【推荐】国内首个AI IDE,深度理解中文开发场景,立即下载体验Trae
【推荐】编程新体验,更懂你的AI,立即体验豆包MarsCode编程助手
【推荐】抖音旗下AI助手豆包,你的智能百科全书,全免费不限次数
【推荐】轻量又高性能的 SSH 工具 IShell:AI 加持,快人一步
· 开发者必知的日志记录最佳实践
· SQL Server 2025 AI相关能力初探
· Linux系列:如何用 C#调用 C方法造成内存泄露
· AI与.NET技术实操系列(二):开始使用ML.NET
· 记一次.NET内存居高不下排查解决与启示
· Manus重磅发布:全球首款通用AI代理技术深度解析与实战指南
· 被坑几百块钱后,我竟然真的恢复了删除的微信聊天记录!
· 没有Manus邀请码?试试免邀请码的MGX或者开源的OpenManus吧
· 园子的第一款AI主题卫衣上架——"HELLO! HOW CAN I ASSIST YOU TODAY
· 【自荐】一款简洁、开源的在线白板工具 Drawnix