Vue入门到关门之Vue2高级用法
一、在vue项目中使用ref属性
ref 属性是 Vue.js 中用于获取对 DOM 元素或组件实例的引用的属性。通过在普通标签上或组件上添加 ref 属性,我们可以在 JavaScript 代码中使用 this.$refs.xxx 来访问对应的 DOM 元素或组件实例。
- 放在普通标签上,通过 this.$refs.名字---》取到的是dom对象,可以直接操作dom
- 放在组件上,通过该this.$refs.名字---》取到的是组件对象,这样在父组件中,就拿到了子组件对象,对象属性和方法直接用即可
1、放在普通标签上
当 ref 属性放置在普通标签上时,this.$refs.xxx 将返回一个指向该 DOM 元素的引用。我们就可以通过操作该 DOM 元素进行各种 DOM 操作。
在下面的示例中,ref="textInput" 将 textInput 这个引用指向了 <input> 元素。然后,在 focusInput 方法中,通过 this.$refs.textInput 来获取对该输入框的引用,并调用其 focus() 方法,从而使输入框获取焦点。
<template> <div> <!-- 使用 ref 属性来获取对 DOM 元素的引用 --> <input type="text" ref="textInput"> <button @click="focusInput">Focus Input</button> </div> </template> <script> export default { methods: { focusInput() { // 在方法中通过 this.$refs 来访问 ref 引用的 DOM 元素 this.$refs.textInput.focus(); } } } </script>
2、放在子组件上
(1)this.$refs.xxx
当 ref 属性放置在组件上时,this.$refs.xxx 将返回一个对该组件实例的引用。这样在父组件中,我们可以通过 this.$refs.xxx 来拿到子组件的对象,然后访问子组件的属性和方法,实现父子组件之间的通信。
在下面的示例中,<child-component> 组件通过 ref="childComponent" 将子组件的引用指向了 childComponent。然后,在 callChildMethod 方法中,通过 this.$refs.childComponent 来获取对子组件实例的引用,并调用子组件的方法 childMethod()。
<template> <div> <!-- 使用 ref 属性来获取对子组件的引用 --> <child-component ref="childComponent"></child-component> <button @click="callChildMethod">Call Child Method</button> </div> </template> <script> // 导入组件 import ChildComponent from '@/components/ChildComponent.vue'; export default { name:'HomeView', data() { return { name:'xiao' } }, components: { // 注册成局部组件使用 ChildComponent }, methods: { callChildMethod() { // 在方法中通过 this.$refs 来访问 ref 引用的子组件实例 this.$refs.childComponent.childMethod(); } } } </script>
(2)this.$parent.xxx
在子组件中输入this.$parent可以拿到父组件对象,但是官方不推荐使用,因为子组件可能会被多个父组件调用,不是所有父组件中都有相同的数据,有时候获取的数据就会乱掉。
<template> <div> <div class="top"> <button>后退</button> <span @click="handleShow">{{ title }}</span> <button @click="handlelog">前进</button> </div> </div> </template> <script> export default { name: 'child-component', data() { return { title: '首页' } }, methods: { handleShow() { alert('1111') }, handlelog(){ // 在方法中通过 this.$refs 来访问 ref 引用的子组件实例 console.log(this.$parent.name) } } } </script> <style scoped> .top { display: flex; justify-content: space-between; } </style>
二、props属性
1、父传子之自定义属性
通过 props,父组件可以向子组件传递自定义属性,子组件可以通过在 props 中声明该属性来接收传递的值。
假设有一个名为 ParentComponent.vue 的父组件,向子组件 ChildComponent 传递一个名为 message 的数据:
<template> <div> <child-component :message="parentMessage"></child-component> </div> </template> <script> import ChildComponent from '@/components/ChildComponent.vue'; export default { components: { ChildComponent }, data() { return { parentMessage: 'Hello from parent component' } } } </script>
在父组件中,通过在子组件标签上使用 v-bind 或简写 : 来传递数据给子组件。在这个例子中,parentMessage 的值被传递给了子组件的 message props。
2、基本使用
- 在子组件中基本使用 props 的方式是将要传递的属性名作为数组传递给 props。子组件将能够接收到父组件传递过来的对应值。
- 假设有一个名为
ChildComponent.vue的子组件,需要从父组件接收一个名为message的数据:
(1)未指定接收类型
- 父组件传给子组件什么类型的数据,子组件就接收什么样的数据
<template> <div> <p>{{ message }}</p> </div> </template> <script> export default { props: ['message'] } </script>
在上面的示例中,通过在子组件中定义 props 属性,组件就可以接收并使用来自父组件的 message 数据。但是并没有指定了message 的类型为什么类型。
(2)props限制类型
- 例如,在下面的示例中,我们在父组件中给子组件传递的 message 属性是 Boolean 类型
<template> <div> <child-component :msg="true"></child-component> </div> </template> <script> import ChildComponent from './ChildComponent.vue'; export default { components: { ChildComponent } } </script>
- 在子组件中,我们可以通过设置 props 中的值为指定的类型来限制传递属性的类型:
<template> <div> <p>{{ msg }}</p> </div> </template> <script> export default { props: { message: Boolean } } </script>
上述子组件只接受布尔类型的 message 属性,如果父组件传递了其他类型的属性值,Vue.js 会发出一个警告。
(3)限制类型、必填和默认值
- 除了限制类型外,我们还可以通过 required 选项来指定一个属性是否为必填项,并使用 default 选项来指定属性的默认值。
- 例如,在下面的示例中,父组件中我们并没有给子组件传任何东西:
<template> <div> <child-component></child-component> </div> </template> <script> import ChildComponent from './ChildComponent.vue'; export default { components: { ChildComponent } } </script>
- 在子组件中我们限制了传递的 message 属性只能是字符串类型,必须填写,并且默认值为 '老王'
<template> <div> <p>{{ msg }}</p> </div> </template> <script> export default { props: { message: { type: String, required: true, default: '老王' } } } </script>
上述示例中的子组件会默认渲染出 '老王',因为没有父组件给它传递 message 属性。
- 如果父组件传递了 message 属性,则子组件将渲染出传递的值。
- 如果没有传递 message 属性,并且设置了 required: true,Vue.js 会发出一个警告。
三、混入
1、简单介绍
在Vue项目中,混入(mixin)是一种重用Vue组件选项的方式。通过混入,您可以将一组组件选项混入到多个Vue组件中,从而实现代码的复用。
混入的使用就像在python中有很多重复的代码,然后我们将他们写到一个公共模块中,哪里需要就调用。在vue项目中,我们就可以把多个组件共用的配置提取成一个混入对象,比如created,methods,data.....。
举个例子:记录用户查看每个页面所用时间(停留),基本上全局每个页面都要写这两个:
- beforeCreate:启动一个定时器,每隔1s向后端发送一次请求
- destroyd:中销毁定时器
这样我们就可以创建一个js文件,然后放进去,需要的时候直接导入使用就好了
2、如何使用
(1)创建混入对象
首先,您可以新建一个文件夹,再创建一个混入对象,例如 myMixin,其中包含您想要重用的组件选项:
// mixin/myMixin.js const myMixin = { data() { return { count: 0 }, methods: { increment() { this.count++; } } } }; export default myMixin;
在上面的示例中,myMixin 包含了一个 data 对象和一个 increment 方法。
(2)在Vue组件中使用混入
接下来,您可以在需要使用混入的Vue组件中引入并使用这个混入对象:
局部使用
<template> <div> <button @click="increment">点我 Count 加1</button> <p>Count: {{ count }}</p> </div> </template> <script> import myMixin from './myMixin.js'; export default { mixins: [myMixin] // 想使用多个混入可以添加 }; </script>
在这个示例中,我们在Vue组件中通过 mixins 选项引入了 myMixin 对象,这样该组件就可以使用 myMixin 中定义的 data 和 methods。
全局使用
在main.js中书写:
# 使用全局混入 import common from '@/common' Vue.mixin(common) # Vue.mixin(common1) // 使用多个混入
注意:以后再在组件中写 data,methods,新的不会影响,如果跟混入一样的会优先使用当前组件中的数据
四、插件
1、引入
在Vue项目中使用插件是一种扩展 Vue 应用,用于增强Vue的方法。Vue 插件通常为 Vue 实例添加全局功能,或在组件中提供全局方法、指令或者混入。
我们之前也有接触过插件,比如
- vuex
- router
- elemetui
2、自定义插件
插件的本质就是插件可以是一个包含 install 方法的对象,该方法会在 Vue 实例化时被调用。install的第一个参数是Vue,第二个以后的参数是插件使用者传递的数据。
(1)创建插件
新建一个plugins文件夹,然后再创建一个index.js文件,最后在其中编写一个 Vue 插件,在插件中我们可以定义很多东西。
import Vue from "vue"; import axios from "axios"; import hunru from "@/mixin"; export default { install(a,name) { console.log('----------',name) // 1、定义全局变量,放到原型中 // prototype 原型链,类似python中的object,一般定义在原型中的变量,都用 $ 开头,防止污染,因为在对象中可以定义同名属性,这样会发生冲突 // 向Vue的原型中放axios对象,在组件中使用 this.$ajax ----> 拿到的就是 axios 对象 ,直接使用即可 Vue.prototype.$axios = axios // 需要地址的时候直接this.$BASE_URL即可 Vue.prototype.$BASE_URL='http://127.0.0.1:8000/' // 原型上放方法,所有vc和vm都可以用hello Vue.prototype.hello = () => { alert("你好啊"); }; // 2、定义指令 自定义指令 // 在这里面可以定义全局指令:自己写的fbind就跟v-bind一样,获取焦点,使用的话v-fbind就可以了 Vue.directive("fbind", { //指令与元素成功绑定时(一上来) bind(element, binding) { element.value = binding.value; }, //指令所在元素被插入页面时 inserted(element, binding) { element.focus(); }, //指令所在的模板被重新解析时 update(element, binding) { element.value = binding.value; }, }); // 3、使用混入 //定义混入,所有vc和vm上都有name和age Vue.mixin({ data() { return { name: '彭于晏', age: 19, }; }, }); // 4、定义全局组件,在elementui中使用过我们也定义全局组件 Vue.component('') } }
- 在main.js中 使用插件,可以传参数
import myplugins from '@/plugins' Vue.use(myplugins,'xiao') // 这句话,就会执行myplugins中的install方法,并且把vue,参数传入
原型链补充:JS中的原型链(超清晰理解)-CSDN博客
五、插槽使用
作用:让父组件可以向子组件指定位置插入html结构,也是一种组件间通信的方式,适用于 父组件 ===> 子组件。
分类:匿名插槽和具名插槽
1、匿名插槽
- 子组件
<template> <div class="hello"> <button @click="handleClick">组件--点我看控制台</button> <div> <slot></slot> </div> </div> </template>
- 父组件
<HelloWorld> <img src="../assets/img/1.png" alt="" width="200px" height="300px"> </HelloWorld> # 或者写成 # 后面推荐使用下面这种 <HelloWorld> <template> <img src="../assets/img/1.png" alt="" width="200px" height="300px"> </template> </HelloWorld>
2、具名插槽
- 子组件
<template> <div class="hello"> <button @click="handleClick">组件--点我看控制台</button> <div> <slot name='b'></slot> </div> </div> </template>
- 父组件
<HelloWorld> <img src="../assets/img/1.png" alt="" width="200px" height="300px" slot='xiao'> </HelloWorld> # 或者写成 # 后面推荐使用下面这种 <HelloWorld> <template v-slot:b> <img src="../assets/img/1.png" alt="" width="200px" height="300px"> </template> </HelloWorld>
六、客户端存储数据的方式
1、简介
客户端可以存数据的方式一般有三种:
- localstorage:永久生效,除非代码删除或清空浏览器缓存,比如未登录,可以加购物车(迪卡侬官网)
- sessionstorage:当前浏览器生效,只要关闭浏览器,数据就没了
- cookie:一般登录信息放这里,因为有过期时间,一旦过期,就没了
- cookie 需要下载 vue-cookies
cnpm install vue-cookies -S
2、项目中使用
(1)localStorage 和 sessionStorage
使用
sessionStorage与 localStorage 类似,但数据只在当前会话期间有效,关闭浏览器标签页或窗口后将被删除。
- 设置数据: 使用
localStorage/sessionStorage.setItem(key, value)方法可以将数据存储在 localStorage /sessionStorage中。 - 获取数据: 使用
localStorage/sessionStorage.getItem(key)方法可以从 localStorage /sessionStorage中检索数据。 - 删除数据: 使用
localStorage/sessionStorage.removeItem(key)方法可以从 localStorage /sessionStorage中删除特定的数据。
<template> <div class="home"> <h1>首页</h1> <h2>localStorage</h2> <button @click="handleSaveLocalStorage">存储到localStorage</button> <button @click="handleGetLocalStorage">从localStorage取出</button> <button @click="handleDeleteLocalStorage">删除localStorage</button> <h2>sessionStorage使用</h2> <button @click="handleSavesessionStorage">存储到sessionStorage</button> <button @click="handleGetsessionStorage">从sessionStorage取出</button> <button @click="handleDeletesessionStorage">删除sessionStorage</button> <h2>cookie使用</h2> </div> </template> <script> export default { name: 'HomeView', methods: { handleSaveLocalStorage() { localStorage.setItem("name", 'xiao') let user = { name: 'xxx', age: 19 } localStorage.setItem("user", JSON.stringify(user)) // 不要放对象 }, handleGetLocalStorage() { let name = localStorage.getItem("name") let user = localStorage.getItem('user') console.log(name) console.log(user) console.log(typeof user) }, handleDeleteLocalStorage() { localStorage.removeItem('name') localStorage.clear() }, handleSavesessionStorage() { sessionStorage.setItem("name", '彭于晏') }, handleGetsessionStorage() { let name = sessionStorage.getItem('name') console.log(name) }, handleDeletesessionStorage() { sessionStorage.removeItem('name') sessionStorage.clear() }, } } </script>
注意事项
- 数据格式: localStorage 和 sessionStorage 只能存储字符串格式的数据。如果需要存储对象或数组,需要先将其序列化为字符串,然后再存储。
- 容量限制: 浏览器对 localStorage 和 sessionStorage 的容量有限制,通常为 5MB。超过此限制可能会导致存储失败。
- 跨标签页/窗口: localStorage 是跨标签页/窗口共享的,而 sessionStorage 仅在同一标签页/窗口内有效。
(2)cookie
安装 vue-cookie 库
npm install js-cookie
使用
- 设置 Cookie: 使用
Cookies.set(name, value)方法可以设置 Cookie。 - 获取 Cookie: 使用
Cookies.get(name)方法可以获取 Cookie 的值。 - 删除 Cookie: 使用
Cookies.remove(name)方法可以删除 Cookie。
<template> <div class="home"> <h1>首页</h1> <button @click="handleSaveCookie">存储到cookie</button> <button @click="handleGetCookie">从cookie取出</button> <button @click="handleDeleteCookie">删除cookie</button> </div> </template> <script> export default { name: 'HomeView', methods: { handleSaveCookie() { this.$cookies.set('name', 'zzzz', '1h') }, handleGetCookie() { let name = this.$cookies.get('name') console.log(name) }, handleDeleteCookie() { this.$cookies.remove('name') }, } } </script>
注意事项
- 安全性: 在处理用户数据时,要注意保护用户隐私和安全,特别是在存储敏感信息时。
- 跨域限制: Cookie 在跨域情况下受到限制,例如,设置的 Cookie 通常只在与设置它的域名相同的情况下有效。
- 大小限制: 单个 Cookie 的大小通常限制在几 KB 到几 MB 之间,超过限制可能导致存储失败或截断。
七、vuex
1、简单介绍
Vuex 是 Vue.js 的官方状态管理库,用于管理应用中的共享状态。它也是在Vue中实现集中式状态(数据)管理的一个Vue插件,对vue应用中多个组件的共享状态进行集中式的管理(读/写),是一种组件间通信的方式,且适用于任意组件间通信。
总的来说就是实现了一个可以管理数据的地方,可以帮助我们更好地组织和管理 Vue.js 应用中的数据,使得数据流更加清晰和可维护。
vuex 在vue2中会大量使用,但是在vue3中,一般使用的是Pinia 或 vuex。
作用:集中式状态管理,每个组件都有自己的数据,这些数据是放在组件中的下,现在有了状态管理器之后,多个组件可以共同操作这个状态管理器,从而实现了组件间通信,而且这个是跨组件,之前我们都是父子组件之间通信的。
组件间通信的方式有:
-
父子组件间通信
-
自定义属性
-
自定义事件
-
ref属性:this.$refs.名字 拿到组件对象
- 父组件中:this.$refs.名字 拿到子组件对象
- 子组件中:this.$parent 拿到父组件对象
-
-
vuex实现组件间通信不需要关注父子关系
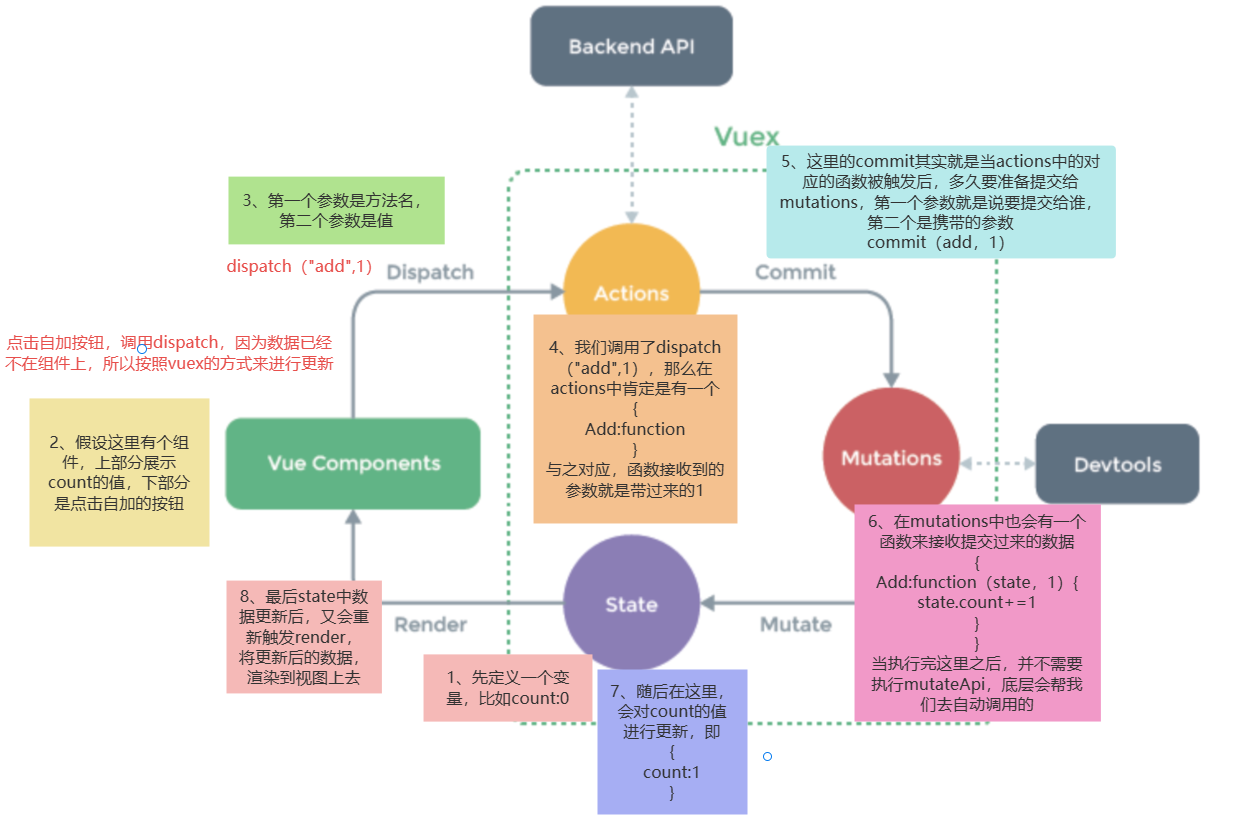
2、vuex原理
- 官网原图
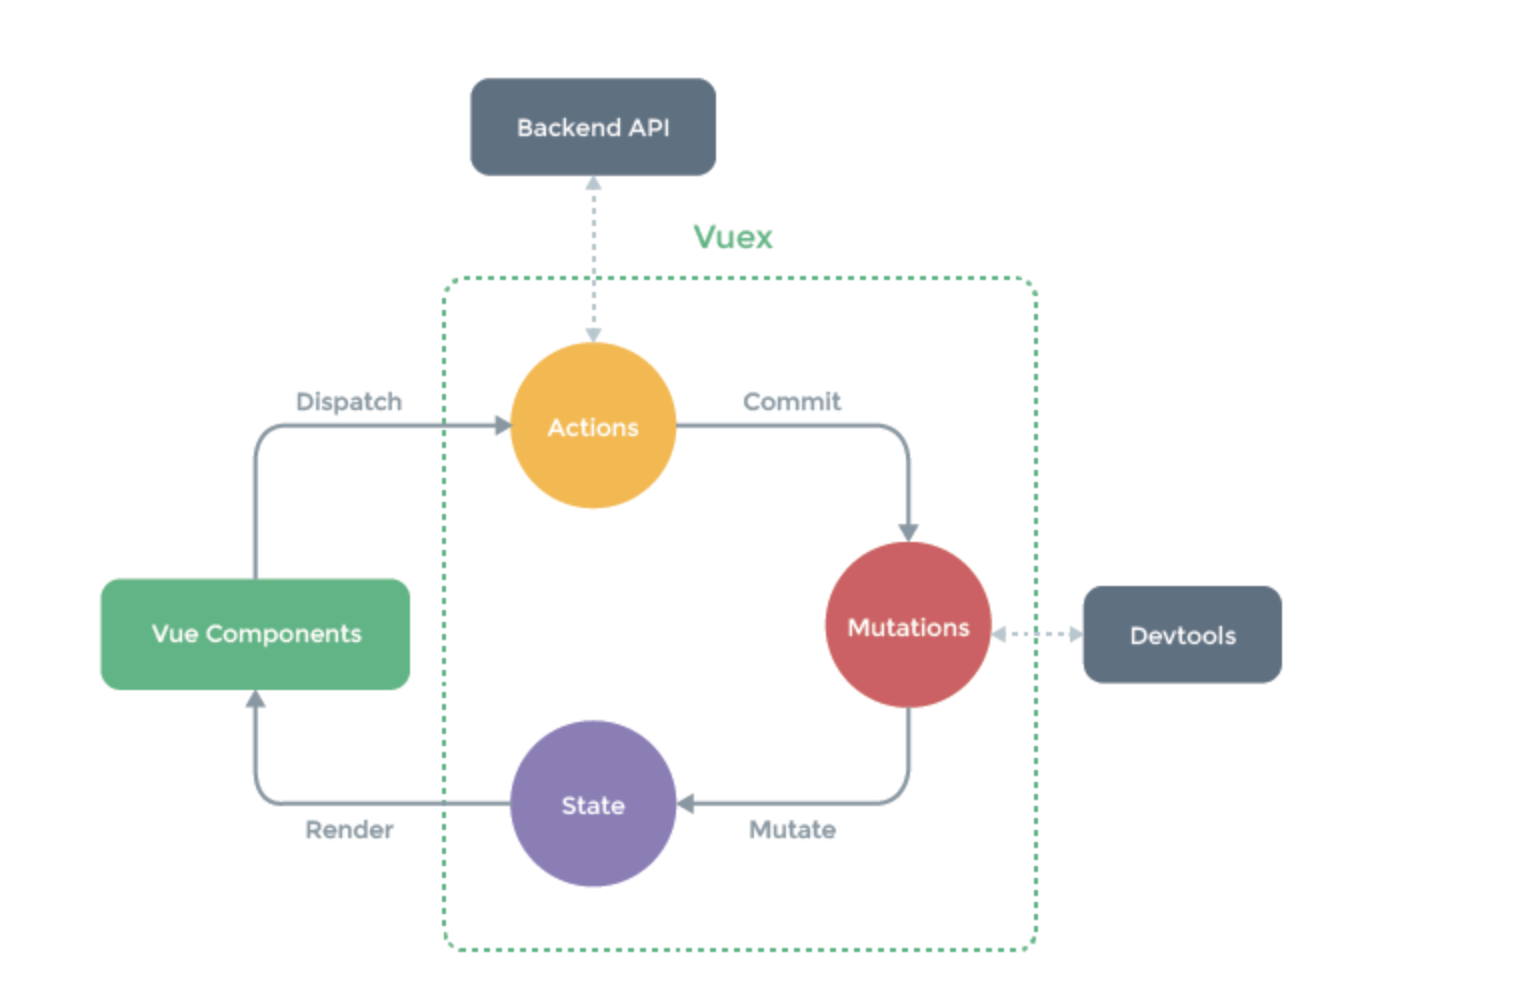
- 流程图解释
3、使用步骤
(1)安装
cnpm instlal vuex -S
(2)搭建vuex环境
- 创建文件:src/store/index.js
//引入Vue核心库 import Vue from 'vue' //引入Vuex import Vuex from 'vuex' //应用Vuex插件 Vue.use(Vuex) export default new Vuex.Store({ state: { }, getters: { }, mutations: { }, actions: { }, modules: { } })
- 在main.js中引入===> 任意组件中都会有this.$store属性,可以直接调用state、getters、commit、dispatch等方法
import store from './store' new Vue({ store, render: h => h(App) }).$mount('#app')
- 在store/index.js定义一些变量
// 1 导入 import Vue from 'vue' import Vuex from 'vuex' // 2 让vue使用插件 Vue.use(Vuex) // 3 导出对象 export default new Vuex.Store({ state: { count: 0 }, getters: {}, mutations: {}, actions: {}, modules: {} })
- 在组件中使用(拿变量)
// js: this.$store.state.count // html中: {{$store.state.count}}
- 修改变量根据vuex原理的流程图有三种方法,下面有示例介绍
// 1.最简单的使用 this.$store.state.count++ // 官网推荐的使用 // 2.通过actions this.$store.dispatch('actions定义的函数名',参数) // 3.通过mutations this.$store.commit('mutations定义的函数名',参数)
- 问题:为什么官方推荐经过 actions和mutations 来修改变量?
- 因为这样可以跟后端交互,可以在中间部分的时候做数据验证
(3)其他参数介绍
- getter介绍
- 可以通过getters获取数据--》对state中的数据,再做处理
- modules介绍
- 分到不同模块中,不同模块有自己的state,actions
- 示例
import Vue from 'vue' import Vuex from 'vuex' Vue.use(Vuex) import moduleA from './a' import moduleB from './b' export default new Vuex.Store({ state: { // 定义一些变量 count: 0 }, getters: { getCount (state) { return state.count+100 } }, mutations: { addOne(state, num) { console.log(state) state.count += num } }, actions: { addCount(store, num) { // 发送ajax请求--》数据库加入购物车--》返回成功---》本地数量再加1 console.log(store) console.log(num) store.commit('addOne', num + 1) // 直接操作 :store.state.count++ //store.dispatch('actions中的方法') } }, modules: { a: moduleA, b: moduleB } })
4、购物车案例
- 父组件HomeView.vue
<template> <div class="home"> <h1>状态管理器---vuex的使用</h1> <ShoppingCard></ShoppingCard> <h2>商品列表</h2> <div class="row"> <div class="col-md-6 col-md-offset-3"> <table class="table table-bordered table-striped" border="1px"> <thead> <tr> <th scope="col">商品id</th> <th scope="col">商品名字</th> <th scope="col">商品价格</th> <th scope="col">操作</th> <th scope="col">详情</th> </tr> </thead> <tbody> <tr v-for="good in goodList"> <td>{{ good.id }}</td> <td>{{ good.name }}</td> <td>{{ good.price }}</td> <td> <button @click="handleAdd">加入购物车</button> </td> <th><span @click="handleClick(good)">查看详情</span></th> </tr> </tbody> </table> </div> </div> </div> </template> <script> import ShoppingCard from "@/components/ShoppingCard" export default { data() { return { goodList: [ {id: 1, name: '键盘', count: 2, price: 133}, {id: 2, name: '鼠标', count: 10, price: 12}, {id: 3, name: '背包', count: 34, price: 34}, {id: 4, name: '冲锋衣', count: 3, price: 67}, {id: 5, name: '显示器', count: 9, price: 89} ], } }, methods: { handleClick(good) { this.$router.push({ path: '/detail', query: good }) }, handleAdd(){ // 1、直接操作,不使用这个方法 // this.$store.state.count++ // 2、通过actions // this.$store.dispatch('addCountAction') // 3、通过mutations this.$store.commit('addCountMutation') } }, components: { ShoppingCard } } </script>
- 父组件DetailView.vue,用来证明vuex能够跨组件通信
<script> import ShoppingCard from "@/components/ShoppingCard" export default { name: "DetailView", components: {ShoppingCard}, data() { return { good: {} } }, created() { this.good = this.$route.query }, methods: { handleAdd() { this.$store.state.count++ } } } </script> <template> <div class="DetailView"> <h1>商品详情</h1> <ShoppingCard></ShoppingCard> <h4>商品id:{{ good.id }}</h4> <h4>商品名字:{{ good.name }}</h4> <h4>商品价格:{{ good.price }}</h4> <button @click="handleAdd">加入购物车</button> </div> </template> <style scoped> </style>
- 子组件ShoppingCard.vue,用来证明vuex实现组件间通信的
<script> import ShoppingCard from "@/components/ShoppingCard" export default { name: "ShoppingCard", data(){ return{ } } } </script> <template> <div class="ShoppingCard"> <span>购物车数量 <strong>{{$store.state.count}}</strong></span> <hr> </div> </template> <style scoped></style>
- store/index.js
// 1.导入 import Vue from 'vue' import Vuex from 'vuex' import router from "@/router"; import App from "@/App.vue"; // 2.让Vue使用插件 Vue.use(Vuex) // 3.导出对象 export default new Vuex.Store({ state: { count: 0 }, getters: {}, mutations: { addCountMutation(state) { state.count++ } }, actions: { addCountAction(context) { // 向后端发送ajax请求,库存如果不够,就alert提示 if (this.state.count >= 10) { alert('库存不足') return } context.commit('addCountMutation') } }, modules: {} })
- main.js导入
import store from './store' new Vue({ store, render: h => h(App) }).$mount('#app')
八、vue-router
1、基本使用
(1)安装
- 如果创建项目,没有安装vue-router,需要这么配置
cnpm install -S vue-router
(2)注册
import Vue from 'vue' import VueRouter from 'vue-router' import HomeView from '../views/HomeView.vue' Vue.use(VueRouter) // 使用插件 const routes = [ { path: '/', name: 'home', component: HomeView }, ] const router = new VueRouter({ mode: 'history', base: process.env.BASE_URL, routes }) export default router
(3)main.js中使用
new Vue({ router, store, render: h => h(App) }).$mount('#app')
(4)其他页面如何使用
- 在使用了vue-router插件后
-html:全局组件: <router-view></router-view> # 显示页面组件 <router-link></router-link> # 路由跳转【相当于a标签】 -js中: this.$router # 路由对象,路由跳转 this.$route # 当前路由对象,跳转携带数据,从这里取出来
(5)具体使用
- 如果想访问某个路径,显示某个组件,可以使用路由
# App.vue中 <div id="app"> <router-view></router-view> </div> # 需要使用router/index.js的routes注册过的路由 # 以后只要配置路由和页面组件的对应关系,在浏览器中访问地址即可
2、路由跳转
(1)html跳转(使用 router-link 标签)
// 写路径 <router-link to="/about"> // 写对象(根据名字或路径跳转) <router-link :to="{name:'about'}"> <router-link :to="{path:'/about3'}"> <button>点我跳转到about--标签跳转</button> </router-link>
(2)js跳转(js控制)
// 写路径 this.$router.push('/about') // 写对象(根据名字或路径跳转) this.$router.push({ name:'about' }) this.$router.push({ path: '/about' })
3、路由跳转高级--携带数据
(1)请求地址中以 ? 形式携带
- 在router-link 组件携带
<router-link to="/about?name=xiao"></router-link> <router-link:to="{name:'about',query:{name:'xxx',age:19}}"></router-link>
- 在另一个页面组件中取(js代码)
this.$route.query
- js跳转,携带数据
this.$router.push('/about?name=xiao&age=19') this.$router.push({name: 'about', query: {name: 'xxx', age: 99}})
- 在另一个页面组件中取
this.$route.query
(2)使用带参数的路径
-
请求地址中携带,例如:/about/数据/
-
在路由配置中,可以定义带参数的路径,通过在路由配置的path中使用
:来定义参数名称。{ path: '/detail/:pk', name: 'detail', component: DetailView }, -
标签跳转
<router-link to="/detail/88"></router-link> <router-link :to="{name:'about',params:{id:66}}"></router-link>
- js跳转
this.$router.push('/about/xxx') this.$router.push({name: 'about', params: {id: 'xxx'}})
- 在路由访问时,可以通过
this.$route.params.pk来获取路径中的参数。this.$route.params.pk
4、路由跳转小结
(1)通过对象跳转路由name形式
- 可以通过传递对象参数的方式来指定跳转到已经在路由中注册过的name(路由别名)
- 写对象to前面要加冒号
: <router-link :to="{name:'about'}">
(2)通过对象跳转路由path形式
- 除了使用name,在to属性中也可以直接指定跳转到的路径
<router-link :to="{path:'/about'}">
(3)对象中可以有query属性
- 跳转时,对象中还可以传递query属性,该属性是一个对象类型,会将其中的key-value对拼接到跳转路径后面
console.log(this.$route.query)<router-link to="/about?name=xiao&age=19">
(4)在另一个页面中取出地址栏中数据
console.log(this.$route.query);
(6)使用带参数的路径
-
在路由配置中,可以定义带参数的路径,通过在路由配置的path中使用
:来定义参数名称。{ path: '/detail/:pk', name: 'detail', component: DetailView }, -
在路由访问时,可以通过
this.$route.params.pk来获取路径中的参数。this.$route.params.pk
(7)路由跳转时使用带参数的路径
- 在进行路由跳转时,也可以使用上述带参数的路径形式
this.$router.push({name: 'detail', params: {pk: 999}})<router-link :to="{name:'detail',params:{pk:88}}">
5、注意区分$route和$router
-
this.$route 是Vue.js中的一个内置对象,代表当前路由的相关信息。
- 它包含了当前页面的路径、参数、查询字符串等信息。
- 通过
this.$route可以获取当前路由对象的各种属性 - 例如
path表示当前路径,params表示传递的参数,query表示查询字符串等。
-
this.$router 是Vue.js中用来进行路由导航的对象。
- 它是通过
new VueRouter()创建的实例,代表整个路由对象。 - 通过
this.$router可以进行页面跳转、切换路由等操作。 - 它提供了一些方法如
push()、replace()、go()等,这些方法可以用于在代码中进行页面跳转或路由切换。
- 它是通过
-
this.$route是当前路由对象,用于获取当前页面的路由信息, -
this.$router是整个路由对象,用于进行页面跳转和路由管理。
6、相关api的使用
-
this.$router.push(path) - 相当于点击路由链接,可以返回到当前路由界面;
-
this.$router.replace(path) - 用新路由替换当前路由,不可以返回到当前路由界面;
-
this.$router.back() - 请求(返回)上一个记录的路由;
-
this.$router.go(-1) - 请求(返回)上一个记录的路由;
-
this.$router.go(1) - 请求下一个记录的路由
7、路由嵌套--多级路由
(1)配置children属性
语法:
{ path : "/父路径", component : 父组件, children : [{ path : "子路径", component : 子组件 }] }
- 需要我们注意的是:子路径不能带 ' / '
- router/index.js
const routes = [ { path: '/backend', name: 'home', component: HomeView, children: [ //通过children配置子级路由 { path: 'index', //此处一定不要写:/news component: IndexView }, { path: 'order', component: OrderView }, { path: 'goods', component: GoodsView } ] }, { path: '/about/:id', name: 'about', component: AboutView } ]
(2)配置跳转路径
语法:
<router-link to="完整路径">内容</router-link>
-
需要注意的是这里的完整路径是从配置路由的第一层路径开始
-
HomeView.vue
<template> <div class="home"> <div class="left"> <router-link to="/backend/index"><p>首页</p></router-link> <router-link to="/backend/order"><p>订单管理</p></router-link> <router-link to="/backend/goods"><p>商品管理</p></router-link> </div> <div class="right"> <router-view></router-view> </div> </div> </template> <script> export default { name: 'HomeView', methods: {} } </script> <style scoped> .home { display: flex; } .left { height: 500px; width: 20%; background-color: aquamarine; } .right { height: 500px; width: 80%; background-color: gray; } </style>
(3)命名路由(可以简化路由的跳转)
{ path:'/demo', component:Demo, children:[ { path:'test', component:Test, children:[ { name:'hello' //给路由命名 path:'welcome', component:Hello, } ] } ] } <!--简化前,需要写完整的路径 --> <router-link to="/demo/test/welcome">跳转</router-link> <!--简化后,直接通过名字跳转 --> <router-link :to="{name:'hello'}">跳转</router-link> <!--简化写法配合传递参数 --> <router-link :to="{ name:'hello', query:{ id:666, title:'你好' } }" >跳转</router-link>
(4)router-link的replace属性
- 作用:控制路由跳转时操作浏览器历史记录的模式
- 浏览器的历史记录有两种写入方式:分别为push和replace,push是追加历史记录,replace是替换当前记录。路由跳转时候默认为push
- 如何开启replace模式:News
8、路由守卫
(1)介绍
路由守卫就是:比如说,当点击商城的购物车的时候,需要判断一下是否登录,如果没有登录,就跳转到登录页面,如果登陆了,就跳转到购物车页面,相当于有一个守卫在安检
(2)分类
路由守卫有三种:
- 全局守卫: beforeEach、 afterEach
- 独享守卫(单个路由里面的钩子): beforeEnter、 beforeLeave
- 组件内守卫:beforeRouteEnter、 beforeRouteUpdate、 beforeRouteLeave
全局守卫
-
beforeEach: 在路由跳转之前执行,可以用于进行全局的访问控制或重定向跳转等操作。
-
afterEach: 在路由跳转完成后执行,可以用于对页面进行一些操作,例如监测页面埋点或修改页面标题等。
每个守卫方法接收三个参数:
-
①to: Route: 即将要进入的目标路由对象(to是一个对象,是将要进入的路由对象,可以用to.path调用路由对象中的属性)
-
②from: Route: 当前导航正要离开的路由
-
③next: Function: 这是一个必须需要调用的方法,执行效果依赖 next 方法的调用参数。
(3)全局路由前置守卫
- 首先先在需要配置路由守卫的地方加上 meta:
{ path: '/', name: 'Home', component: () => import('../views/Home.vue'), meta: { isAuth: true, title:'主页' }, },
- 全局前置路由守卫————初始化的时候被调用、每次路由切换之前被调用
router.beforeEach((to, from, next) => { console.log('前置路由守卫', to, from) if (to.name == 'home' || localStorage.getItem('name')) { next() } else { alert('您没有权限') } })
其他守卫详情请看:Vue路由守卫(通俗易懂)-CSDN博客
9、路由两种工作模式
路由的工作模式一共有两种:hash模式和history模式
我们可以在创建路由对象的时候对路由的工作模式进行配置,默认是hash模式:

(1)hash模式
- 对于一个url来说,什么是hash值? ==>
#及其后面的内容就是hash值。 - hash值不会包含在 HTTP 请求中,即:hash值不会带给服务器
https://192.168.1.1/api/v1/user#login
- 地址中永远带着#号,不美观 。
- 若以后将地址通过第三方手机app分享,若app校验严格,则地址会被标记为不合法。
- 但是兼容性较好。
因为 # 后面的内容不会当做路径传给服务器,有更强的兼容性,不会出现项目部署到服务器上后刷新找不到路径的问题。
(2)history模式
- history模式下的路径什么就是正常访问网站路径
https://192.168.1.1/api/v1/user/login
- 地址干净,美观
- 兼容性和hash模式相比略差。
- 应用部署上线时需要后端人员支持,解决刷新页面服务端404的问题
10、路由懒加载
(1)介绍
路由懒加载是一种将路由组件按需异步加载的方式,只有当路由对应的组件需要使用时,才会动态地加载该组件对应的代码。使用路由懒加载可以优化应用程序的性能。
-
当我们把项目写完过后打包出来的JavaScript包会变得非常大,会影响性能。
-
如果把不同的组件分割成不同的代码块,当路由被访问的时候才加载相应组件,这样就会更加高效。
-
component: ()=> import("组件路径");

注意:我们引入组件的步骤被放到了component配置中,所以不需要再引入组件了。
(2)示例
在Vue Router中使用路由懒加载,我们可以通过使用import()和动态import()两种方式来实现
使用import()方式实现懒加载:
const Home = () => import('./views/Home.vue') const About = () => import('./views/About.vue') const routes = [ { path: '/', component: Home }, { path: '/about', component: About } ] const router = createRouter({ history: createWebHistory(), routes })
使用动态import()方式实现懒加载:
const routes = [ { path: '/', component: () => import('./views/Home.vue') }, { path: '/about', component: () => import('./views/About.vue') } ] const router = createRouter({ history: createWebHashHistory(), routes })


【推荐】国内首个AI IDE,深度理解中文开发场景,立即下载体验Trae
【推荐】编程新体验,更懂你的AI,立即体验豆包MarsCode编程助手
【推荐】抖音旗下AI助手豆包,你的智能百科全书,全免费不限次数
【推荐】轻量又高性能的 SSH 工具 IShell:AI 加持,快人一步
· 震惊!C++程序真的从main开始吗?99%的程序员都答错了
· 【硬核科普】Trae如何「偷看」你的代码?零基础破解AI编程运行原理
· 单元测试从入门到精通
· 上周热点回顾(3.3-3.9)
· winform 绘制太阳,地球,月球 运作规律