python--Scrapy模块的使用
python--Scrapy模块的使用
Scrapy是一个为了爬取网站数据,提取结构性数据而编写的应用框架。 其可以应用在数据挖掘,信息处理或存储历史数据等一系列的程序中。
Scrapy 使用了 Twisted异步网络库来处理网络通讯。整体架构大致如下
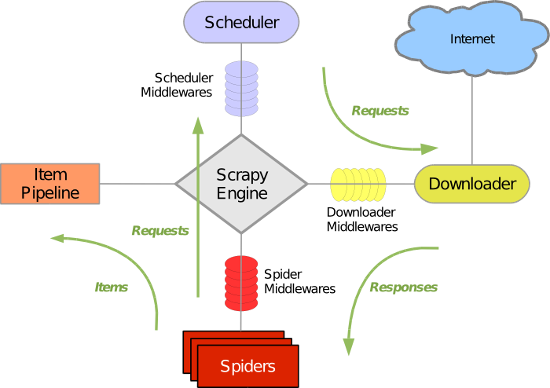
各个组件:
Scrapy引擎:
是框架核心,用来处理调度整个系统的数据流处理
Scheduler调度器:
用来接收引擎发送过来的请求,压入队列中,并在引擎再次请求时返回,就是在我们所要爬取的url全部放入一个优先队列中,由它来决定下一个处理的url是什么,同时他会自动将重复的url去除
注意:我们在创建一个项目时,在spider中会存在一个start_urls = ['http://dig.chouti.com/'],他将是我们的初始url,会在项目启动后被引擎放入调度器中开始处理
Downloader下载器:
用于下载网页内容,并将网页内容返回给蜘蛛(下载器是基于twisted实现)
Item解析器:
设置数据存储模板,用于结构化数据。为下一步的持久化数据做处理,类似于Django中的models,设置存储字段等数据,解析数据
Pipeline项目管道
负责处理爬虫从网页中抽取的实体,主要的功能是持久化实体、验证实体的有效性、清除不需要的信息。当页面被爬虫解析后,将被发送到项目管道,并经过几个特定的次序处理数据。
Downloader Middlewares下载器中间件
位于Scrapy引擎和下载器之间的框架,主要是处理Scrapy引擎与下载器之间的请求及响应。
Spider Middlewares爬虫中间件
介于Scrapy引擎和爬虫之间的框架,主要工作是处理蜘蛛的响应输入和请求输出。
Scheduler Middewares调度中间件
介于Scrapy引擎和调度之间的中间件,从Scrapy引擎发送到调度的请求和响应。
Scrapy运行流程
1.引擎从调度器中取出一个连接URL,用于接下来的抓取
2.引擎将URL封装为一个请求Request传给下载器
3.下载器将资源下载,封装为应答包Response
4.爬虫解析Response
5.解析出实体Item,将实体通过管道解析持久化操作
6.若是解析出URL,将其放入调度器中等待抓取
注意:第一步之前,是先去爬虫start_url中获取初始网址,进行操作
项目创建的基本命令
1.创建项目
|
1
|
scrapy startproject 项目名 |
|
1
|
scrapy startproject scrapyPro |
2.进入项目,创建爬虫
cd 项目名
scrapy genspider 项目列表名 初始url(后面可以修改)
cd scrapyPro
scrapy genspider chouti chouti.com
3.展示爬虫应用列表
scrapy list
chouti
4.运行爬虫应用
scrapy crawl 爬虫应用名称
scrapy crawl chouti --nolog #--nolog不打印日志
项目结构
project_name/
   scrapy.cfg  #项目的主配置文件
   project_name/
       __init__.py
       items.py  #设置数据存储模板,用于结构化数据:类似于Django中models
       pipelines.py  #数据处理行为:如数据的持久化
       settings.py  #配置文件:递归层数,并发数等
       spiders/  #爬虫目录,我们可以创建多个爬虫在此
           __init__.py
           爬虫1.py
           爬虫2.py
           爬虫3.py
简单实例应用(获取抽屉的新闻标题和URL,并将其保存到文件,实现持久化操作)
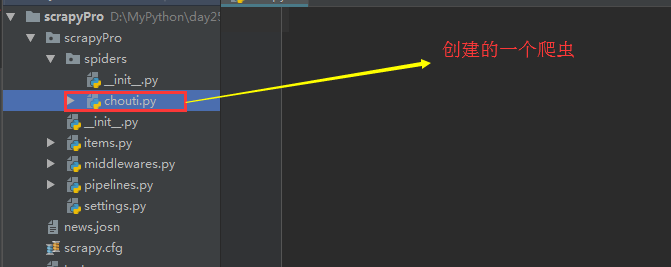
chouti爬虫的编写
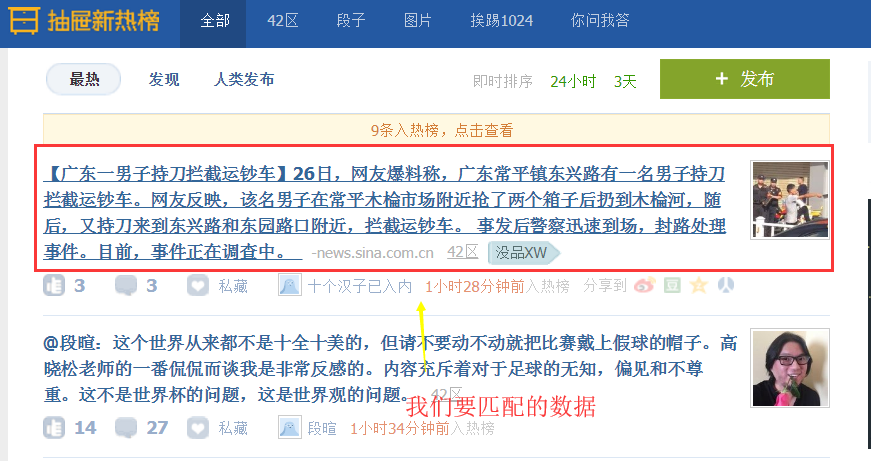
import scrapy,hashlib
from scrapy.selector import Selector,HtmlXPathSelector
from scrapy.http import Request
import sys,io
from ..items import ChoutiItem


sys.stdout=io.TextIOWrapper(sys.stdout.buffer,encoding='gb18030')  #设置原因:在windows下,我们需要在cmd命令行下启动项目,而cmd默认是gbk编码,而py3是utf-8为了保持编码一致,避免乱码,我们需要修改

class ChoutiSpider(scrapy.Spider):
    name = 'chouti'
    allowed_domains = ['chouti.com']  #允许采集的域名
    start_urls = ['http://dig.chouti.com/']  #初始url

    def parse(self, response):  #response.url/text/body/meta含有访问深度
        item_objs = Selector(response=response).xpath("//div[@class='item']//a[@class='show-content color-chag']")  #注意这里过滤class不能只选用一个,必须将全部的class加上
        for item in item_objs:
            title = item.xpath("text()").extract_first().strip()
            href = item.xpath("@href").extract_first()
            #想要将数据持久化,必须在Item中设置数据字段
            item_obj = ChoutiItem(title=title,href=href)
            # 将item对象传递给pipeline
            yield item_obj
items.py文件的编写:设置数据存储模板,之后才能够实现持久化处理
# -*- coding: utf-8 -*-

# Define here the models for your scraped items
#
# See documentation in:
# https://doc.scrapy.org/en/latest/topics/items.html

import scrapy


class ScrapyproItem(scrapy.Item):
    # define the fields for your item here like:
    # name = scrapy.Field()
    pass

class ChoutiItem(scrapy.Item):
    # define the fields for your item here like:
    title = scrapy.Field()
    href = scrapy.Field()
pipeline.py文件编写:实现数据持久化操作
# -*- coding: utf-8 -*-

# Define your item pipelines here
#
# Don't forget to add your pipeline to the ITEM_PIPELINES setting
# See: https://doc.scrapy.org/en/latest/topics/item-pipeline.html


class ScrapyproPipeline(object):
    def process_item(self, item, spider):  #写入文件中去
        tpl = "%s\n%s\n\n"%(item['href'],item['title'])
        with open("news.josn",'a',encoding="utf-8") as fp:  #注意文件编码
            fp.write(tpl)
注意:我们要使使用Item解析实体和pipeline持久化关联,需要修改setting配置文件
ITEM_PIPELINES = {
   'scrapyPro.pipelines.ScrapyproPipeline': 300,  #后面300代表优先级
}
补充:Selector的操作
Selector(response=response).xpath('//a')    #解析当前响应response下的所有子孙a标签
Selector(response=response).xpath('//a[2]')    #获取所有的a标签下的第二个标签
Selector(response=response).xpath('//a[@id="i1"]')  #获取属性id为il的标签  @后面跟属性
Selector(response=response).xpath('//a[@href="link.html"][@id="i1"]')  #多个标签的连续筛选
Selector(response=response).xpath('//a[starts-with(@href, "link")]')  #属性以指定的字符串开头
Selector(response=response).xpath('//a[contains(@href, "link")]')  #属性中包含有指定字符串
Selector(response=response).xpath('//a[re:test(@id, "i\d+")]')  #正则匹配数据
Selector(response=response).xpath('//a[re:test(@id, "i\d+")]/text()')  #获取匹配标签下的文本数据
Selector(response=response).xpath('//a[re:test(@id, "i\d+")]/@href')  #获取匹配标签的属性值
上面获取的都是解析对象,要想获取具体数据(字符串),我们需要使用
Selector(response=response).xpath('/html/body/ul/li/a/@href').extract()  #提取所有的,是个列表
Selector(response=response).xpath('//body/ul/li/a/@href').extract_first()  #提取第一个
注意:'//'代表子孙标签,'/'代表子标签,另外'./'代表当前标签下寻找
简单实例应用:获取抽屉页码
import scrapy,hashlib
from scrapy.selector import Selector,HtmlXPathSelector
from scrapy.http import Request

class ChoutiSpider(scrapy.Spider):
    name = 'chouti'
    allowed_domains = ['chouti.com']
    start_urls = ['http://dig.chouti.com/']
    visited_urls = set()  #用于存放我们获取的url的md5值,而且是集合去重

    def md5(self,url):  #将url转md5
        ha_obj = hashlib.md5()
        ha_obj.update(bytes(url,encoding="utf-8"))
        key = ha_obj.hexdigest()
        return key

    def parse(self, response):
        page_objs = Selector(response=response).xpath("//div[@id='dig_lcpage']//a[@class='ct_pagepa']")  #解析实体
        for page in page_objs:
            href = page.xpath("@href").extract_first()
            ha_href = self.md5(href)
            if ha_href in self.visited_urls:
                pass
            else:
                self.visited_urls.add(ha_href)  #将获取的url添加到集合
                new_url = "https://dig.chouti.com%s"%href
           yield Request(url=new_url,callback=self.parse)  #请求新的url,获取下面的url  对于阻塞操作使用yield切换,实现异步
注意:默认是获取所有的页面100多页,我们可以在setting文件设置解析深度
DEPTH_LIMIT = 1 #深度为1,表示在当前页面向下再次解析一次


这是第二次,只会解析到14页
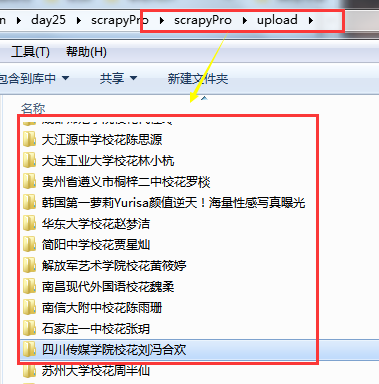
简单实例应用:获取校花网的图片和姓名,按照姓名进行持久化文件归类
xiaohua.py
# -*- coding: utf-8 -*-
import scrapy
import hashlib
from scrapy.http.request import Request
from scrapy.selector import Selector,HtmlXPathSelector
import scrapy.http.response.html
from ..items import XiaohuaItem

class XiaohuaSpider(scrapy.Spider):
    name = 'xiaohua'
    allowed_domains = ['xiaohua.com']
    start_urls = ['http://www.xiaohuar.com/']
    visited_url = set()
    visited_url_img = {}
    visited_url_title = {}

    def md5(self,url):
        hash_obj = hashlib.md5()
        hash_obj.update(bytes(url,encoding="utf-8"))
        return hash_obj.hexdigest()

    def parse(self, response):
        #获取首页中所有的人物的下一级url,过滤掉校草
        xh_a = Selector(response=response).xpath("//ul[@class='twoline']/li")
        for xh in xh_a:
            a_url = xh.xpath("./a[@class='xhpic']/@href").extract_first()
            a_title = xh.xpath("./a/span/text()").extract_first()
            if a_title.find("校草") != -1:
                continue
            if not a_url.startswith("http"):
                a_url = "http://www.xiaohuar.com%s" % a_url
            ha_url = self.md5(a_url)
            if ha_url in self.visited_url:
                pass
            else:
                self.visited_url.add(ha_url)
                self.visited_url_title[ha_url]=a_title

                yield scrapy.Request(url=a_url,callback=self.parse,dont_filter=True)

        #下面是所有人物下一级url中去查找所有照片,注意:部分小照片和大照片的区别在于前面多了small,大照片只取前32位即可
        #/d/file/20171202/small062adbed4692d28b77a45e269d8f19031512203361.jpg   小照片
        #/d/file/20171202/     062adbed4692d28b77a45e269d8f1903.jpg             大照片

        xh_img = Selector(response=response).xpath("//div[@class='post_entry']")
        xh_img_a = xh_img.xpath("./ul//img/@src")

        if len(xh_img) == 0:
            xh_img = Selector(response=response).xpath("//div[@class='photo-Middle']/div")
            if len(xh_img) != 0:
                xh_img = xh_img[1]
            else:
                xh_img = Selector(response=response).xpath("//div[@class='photo-m']/div")[1]
            xh_img_a = xh_img.xpath("./table//img/@src")

        # 上面找到标签,下面开始对标签进行循环,获取所有照片url

        for xh_img_item in xh_img_a:
            xh_img_url = xh_img_item.extract()

            if xh_img_url.find("small"):
                tmp_list = xh_img_url.rsplit("/",1)
                tmp_name_list = tmp_list[1].replace("small","").split(".")
                xh_img_url = "/".join([tmp_list[0],".".join([tmp_name_list[0][:32],tmp_name_list[1]])])
            if not xh_img_url.startswith("http"):
                xh_img_url = "http://www.xiaohuar.com%s" % xh_img_url
            #将所有照片加入字典  url:名字
            self.visited_url_img[xh_img_url] = self.visited_url_title[self.md5(response.url)]

        #若是收集完成,那么两者的长度是一致的,开始进行持久化
        if len(set(self.visited_url_img.values())) == len(self.visited_url) and len(self.visited_url) != 0:
            for xh_url in self.visited_url_img.items():
                item_obj = XiaohuaItem(title=xh_url[1],img_url=xh_url[0])
                yield item_obj
items.py
import scrapy


class XiaohuaItem(scrapy.Item):
    title = scrapy.Field()
    img_url = scrapy.Field()
pipelines.py
import requests,os
class XiaohuaPipeline(object):
    def process_item(self, item, spider):
        '''
        title
        img_url
        '''
        file_path = os.path.join(os.path.dirname(os.path.abspath(__file__)),'upload',item['title'])
        if not os.path.isdir(file_path):
            os.makedirs(file_path)

        response = requests.get(item['img_url'],stream=False)
        with open(os.path.join(file_path,item['img_url'].rsplit("/",1)[1]),"wb") as fp:
            fp.write(response.content)

        return item
settings.py
ITEM_PIPELINES = {
   'scrapyPro.pipelines.ScrapyproPipeline': 300,
   'scrapyPro.pipelines.XiaohuaPipeline': 100,
}
补充:request的回调函数不执行
原因:可能是我在设置allowed_domains允许域名中所设置的域名不是我们所爬取的网站域名
    allowed_domains = ['xiaohua.com']  #域名不对,是xiaohuar.com
    start_urls = ['http://www.xiaohuar.com/']
设置allowed_domains的原因:
因为在网站中可能有外联,我们只是需要去访问该网站,而不是他的外联网站,所以设置allowed_domains是必须的,可以过滤掉外联的网站,要是希望获取外联网站,我们在该列表中添加上即可。
上面出错原因:
我们所爬取的网站时xiaohuar.com,而设置的域名是xiaohua.com所以爬取失败,在request中请求被拒绝
解决方法:(两者)
1.修改allowed_domains(推荐)
allowed_domains = ['xiaohuar.com']
2.在request中设置dont_filter(不对url进行过滤)
yield scrapy.Request(url=a_url,callback=self.parse,dont_filter=True)
推荐使用第一种:
我们可以在自定义类BaseDupeFilter(用于过滤url)中设置去重,数据收集等操作,使用dont_filter可能会有所影响
