如何搭建一个WEB服务器项目(三)—— 实现安卓端联网登录
安卓端调用服务器登录函数进行验证登录
观前提示:本系列文章有关服务器以及后端程序这些概念,我写的全是自己的理解,并不一定正确,希望不要误人子弟。欢迎各位大佬来评论区提出问题或者是指出错误,分享宝贵经验。先谢谢了( ̄▽ ̄)"!
前面两篇算是铺垫了一下后端项目的基本工作流程,本周就讲一下前后端的简单互动——联网登录。
关于这个安卓端的项目,我个人是跟着下面链接里的教程学习的,这个登录功能算是我自己对学到的东西的一个运用,有兴趣的朋友可以去看看原文,是一个网上商城APP的范例:
老规矩,文中主要用到的代码会在相应位置贴出来,话不多说咱们马上进入正题!
客户端的实现:
- XML布局:


 1 <?xml version="1.0" encoding="utf-8"?>
 2 <RelativeLayout xmlns:android="http://schemas.android.com/apk/res/android"
 3     xmlns:app="http://schemas.android.com/apk/res-auto"
 4     xmlns:tools="http://schemas.android.com/tools"
 5     android:layout_width="match_parent"
 6     android:layout_height="match_parent"
 7     tools:context=".LoginActivity">
 8
 9     <TextView
10         android:id="@+id/title"
11         android:layout_width="350dp"
12         android:layout_height="wrap_content"
13         android:layout_marginTop="130dp"
14         android:layout_marginLeft="32dp"
15         android:text="登录"
16         android:textSize="36sp"
17         android:textStyle="bold" />
18
19     <EditText
20         android:id="@+id/username"
21         android:layout_width="350dp"
22         android:layout_height="wrap_content"
23         android:layout_below="@+id/title"
24         android:layout_marginLeft="28dp"
25         android:layout_marginTop="35dp"
26         android:hint="请输入用户名"
27         android:singleLine="true" />
28
29     <EditText
30         android:id="@+id/password"
31         android:layout_width="350dp"
32         android:layout_height="wrap_content"
33         android:layout_below="@+id/username"
34         android:layout_marginLeft="28dp"
35         android:layout_marginTop="20dp"
36         android:hint="请输入密码"
37         android:inputType="textPassword"
38         android:singleLine="true" />
39
40     <Button
41         android:id="@+id/login"
42         android:layout_width="350dp"
43         android:layout_height="wrap_content"
44
45         android:layout_below="@+id/password"
46         android:layout_marginLeft="28dp"
47         android:layout_marginTop="25dp"
48         android:background="#E91E63"
49         android:text="登录"
50         android:textColor="#000000"
51         android:textSize="18sp" />
52
53     <TextView
54         android:id="@+id/modify"
55         android:layout_width="wrap_content"
56         android:layout_height="wrap_content"
57         android:layout_below="@+id/login"
58         android:layout_marginLeft="32dp"
59         android:layout_marginTop="15dp"
60         android:text="修改/忘记密码"
61         android:textColor="#03A9F4" />
62
63     <TextView
64         android:id="@+id/register"
65         android:layout_width="wrap_content"
66         android:layout_height="wrap_content"
67         android:layout_below="@+id/login"
68         android:layout_marginLeft="180dp"
69         android:layout_marginTop="15dp"
70         android:layout_toRightOf="@+id/modify"
71         android:text="注册新用户"
72         android:textColor="#03A9F4" />
73
74 </RelativeLayout>
- Activity代码:
 1 package com.example.dolphin;
 2
 3 import androidx.appcompat.app.AppCompatActivity;
 4
 5 import android.content.Intent;
 6 import android.os.Bundle;
 7 import android.widget.Button;
 8 import android.widget.EditText;
 9 import android.widget.Toast;
10
11 import com.example.dolphin.utils.Constants;
12 import com.zhy.http.okhttp.OkHttpUtils;
13 import com.zhy.http.okhttp.callback.StringCallback;
14
15 import butterknife.BindView;
16 import butterknife.ButterKnife;
17 import okhttp3.Call;
18
19 public class LoginActivity extends AppCompatActivity {
20
21     @BindView(R.id.username)
22     EditText name;
23     @BindView(R.id.password)
24     EditText key;
25     @BindView(R.id.login)
26     Button login;
27
28     @Override
29     protected void onCreate(Bundle savedInstanceState) {
30         super.onCreate(savedInstanceState);
31         setContentView(R.layout.activity_login);
32         ButterKnife.bind(this);
33         login.setOnClickListener(view->
34                 new Thread(()->getDataFromNet()).start()
35         );
36     }
37     private void getDataFromNet() {
38         String url = Constants.LOGIN_URL;
39         OkHttpUtils
40                 .get()
41                 .url(url)
42                 .addParams("name",name.getText().toString())
43                 .addParams("key",key.getText().toString())
44                 .build()
45                 .execute(new StringCallback()
46                 {
47                     /**
48                      * 请求失败的时候回调
49                      * @param call
50                      * @param e
51                      * @param id
52                      */
53                     @Override
54                     public void onError(Call call, Exception e, int id) {
55                         System.out.println("首页请求失败=="+e.getMessage());
56                     }
57                     /**
58                      * 当请求成功的时候回调
59                      * @param response 请求成功数据
60                      * @param id
61                      */
62                     @Override
63                     public void onResponse(String response, int id) {
64                         System.out.println("首页请求成功=="+response);
65                         //解析数据
66                         processData(response);
67                     }
68                 });
69     }
70
71     private void processData(String json) {
72         System.out.println(json);
73         if(json.equals("YES")){
74             Toast.makeText(this,"登陆成功",Toast.LENGTH_SHORT).show();
75             Intent intent = new Intent(this, MainActivity.class);
76             startActivity(intent);
77         }else
78             Toast.makeText(this,"用户名或者密码错误",Toast.LENGTH_SHORT).show();
79     }
80 }
这里用到了鸿洋大神封装好的 okhttp3 以及插件ButterKnife(黄油刀),其主要功能分别如下:
okhttp-utils(目前对以下需求进行了封装):
- 一般的get请求
- 一般的post请求
- 基于Http Post的文件上传(类似表单)
- 文件下载/加载图片
- 发布下载的进度预期
- 支持取消某个请求
- 支持自定义回调
- 支持HEAD,DELETE,PATCH,PUT
- 支持会议的保持
- 支持自签名网站https的访问,提供方法设置下证书就行
如何引入依赖以及详细介绍请移步到这位大神的Github:https://github.com/hongyangAndroid/okhttputils
ButterKnife(黄油刀):
ButterKnife是一个专注于Android系统的View注入框架,以前总是要写很多findViewById来找到View对象,有了ButterKnife可以很轻松的省去这些步骤。是大神JakeWharton的力作,目前使用很广。最重要的一点,使用ButterKnife对性能基本没有损失,因为ButterKnife用到的注解并不是在运行时反射的,而是在编译的时候生成新的class。项目集成起来也是特别方便,使用起来也是特别简单。
使用与配置方法总结见这里:https://www.cnblogs.com/chenxibobo/p/9633086.html
还有就是为了避免每次进行get或者post请求时都会填写很长的url地址,我新建了一个公共类保存这些静态变量,如下图:

同时记得把地址和端口号填写正确,而且确保要访问的服务器正在运行,不然会出现如下错误提示(写在代码里了):

WEB端的实现:
- LoginController(登录控制层)
 1 package dolphin.controller;
 2
 3 import dolphin.service.UserService;
 4 import org.springframework.stereotype.Controller;
 5 import org.springframework.web.bind.annotation.RequestMapping;
 6 import dolphin.utils.Singleton;
 7 import org.springframework.web.bind.annotation.ResponseBody;
 8
 9 import javax.servlet.http.HttpServletRequest;
10
11 /**
12  * 登录控制层
13  * @author 郭小柒w
14  * @date 2020/3/25 21:18
15  */
16 @Controller
17 public class LoginController {
18     private UserService userService = (UserService) Singleton.GetApplicationContext().getBean("UserServiceImpl");
19     /**
20      * @Description :登陆验证
21      * @return :java.lang.String
22     **/
23     @ResponseBody
24     @RequestMapping("/Login")
25     public String check(HttpServletRequest request){
26         //获取请求中的参数,用户名和密码
27         String name = request.getParameter("name");
28         String key = request.getParameter("key");
29         //返回验证结果
30         return userService.isLoginOk(name,key) ? "YES" : "NO";
31     }
32 }
- isLoginOk(登录函数)
1 public boolean isLoginOk(String username, String password){
2         //这里使用了最简单粗暴的方法,获取全部用户信息后再逐个进行对比
3         List<UserEntity> list = getAll();
4         for (UserEntity arr:list) {
5             if(username.equals(arr.getUserName())&&password.equals(arr.getUserKey()))
6                 return true;
7         }
8         return false;
9     }
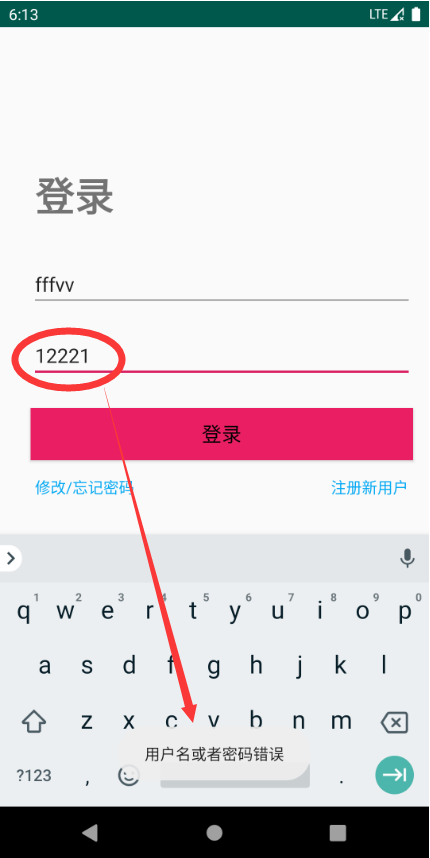
这个登录验证函数是在UserDaoImpl里实现的(具体代码见本系列第二篇),供Service调用,最终由LoginController接受客户端的请求并提供相应功能。这里对于验证结果的返回没有做复杂的处理,只是简单地返回了字符串“YES”或“NO”,供客户端进行判断。运行效果如下(用户名:fffvv,密码:122211,为本系列第二篇中新增的用户):
密码错误示意图
密码正确示意图

好了,至此一个简单的登录模块已经完成了。你也可以尝试使用安卓的SharedPerferences对用户的信息进行保存,避免每次都需要用户登录。本期的介绍到这里也就差不多了。如果你对代码中的某些部分有疑问,欢迎在评论区里指出,我会在空闲时间尽快进行回复。
—————————我———是———分———割———线—————————
废话来啦!
本来是要打算周五正常更新的,不过上午突然接到了个老师的通知,大概内容是我们组马上要对方案设计进行线上答辩了,PPT也要进行改动。想了想这周还有一个计网实验报告没写,最近打卡变捞也想得到提升,就早早把这篇文章赶出来了,本周五的更新就算是提前了吧,昨天真不该毒奶的。。。

