Flume 进阶
Flume 进阶
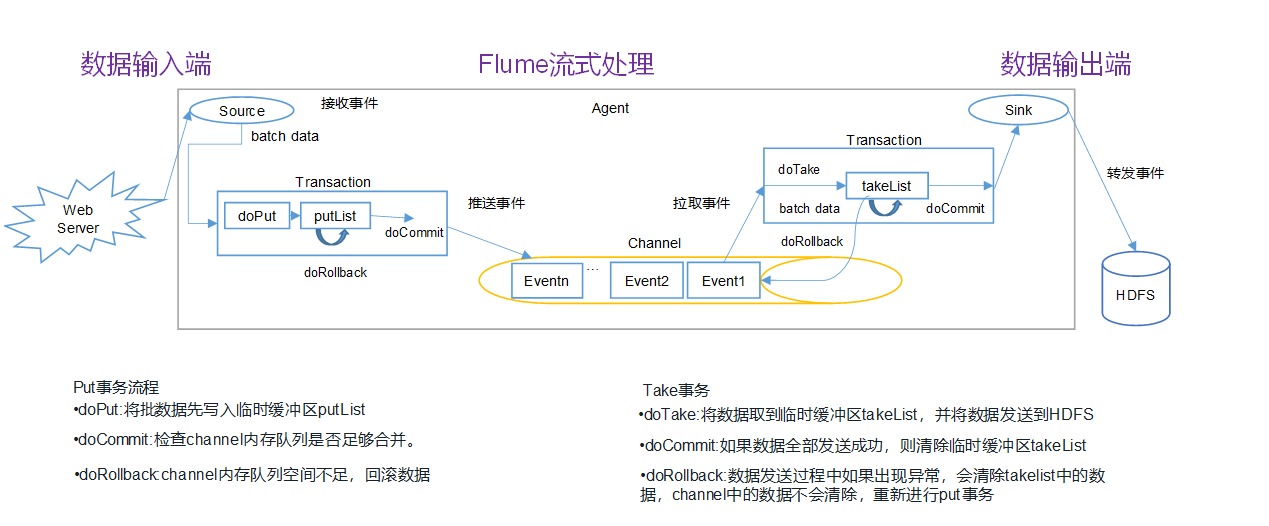
1.Flume事务
数据输入端 : source分为两种:主动拉取:Spooldir Source  Taildir Source  被动推动:Exec source netcat source
put事务阶段:
source 会采集到批量之后才会执行put事务流程,
do commit成功会会把数据提交到channel中,然后pulist中的数据被销毁
如果batch data 超过channel 的数据量 docommit 失败,
执行rollback回滚,putList中的数据被销毁,这时如果source类型为主动拉取时,重新拉取数据 数据不会丢失,
 如果source类型为被动推动时,重新不会拉取数据 数据丢失,所以要合理调整channel的存放数据的大小。
 take事务阶段:
 channel中的数据先进入takelist中,但是channel中还有数据,如果docommit成功的话,把takelist,channel中的数据销毁
  如果docommit失败的话,执行rollback,将takelist的数据销毁,channel中的数据还存在,继续拉取即可。
2.Flume Agent内部原理
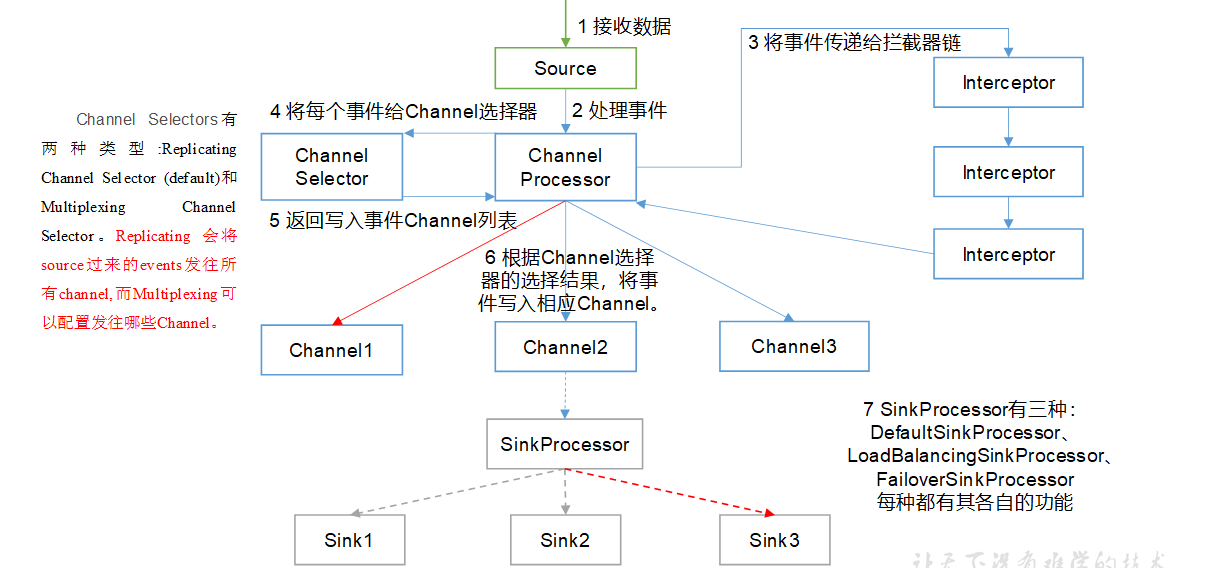
1)ChannelSelector
  ChannelSelector的作用就是选出Event将要被发往哪个Channel。其共有两种类型,分别是Replicating(复制)和Multiplexing(多路复用)。
   ReplicatingSelector会将同一个Event发往所有的Channel,Multiplexing会根据相应的原则,将不同的Event发往不同的Channel。
 2)SinkProcessor
   SinkProcessor共有三种类型,分别是DefaultSinkProcessor、LoadBalancingSinkProcessor和FailoverSinkProcessor
   DefaultSinkProcessor对应的是单个的Sink,LoadBalancingSinkProcessor和FailoverSinkProcessor对应的是Sink Group,LoadBalancingSinkProcessor可以实现负载均衡的功能,
   FailoverSinkProcessor可以错误恢复的功能。故障转移功能
   一个sink只能处理一个channel的数据 多对一
3.Flume拓扑结构
3.1 简单串联
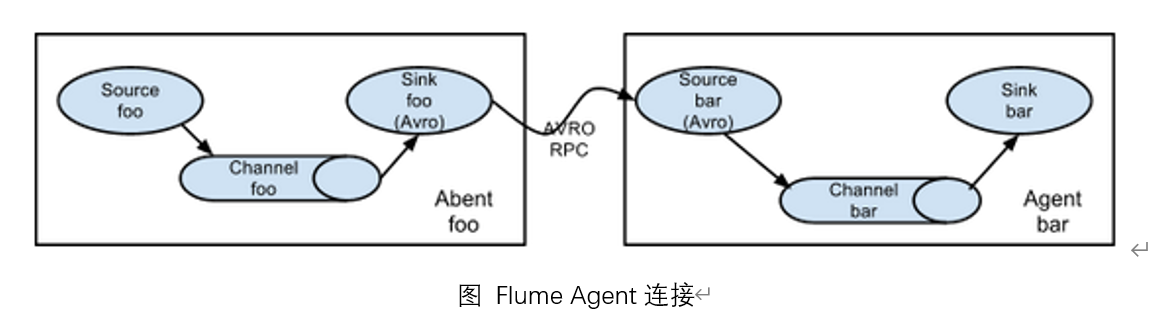
这种模式是将多个flume顺序连接起来了,从最初的source开始到最终sink传送的目的存储系统。此模式不建议桥接过多的flume数量, flume数量过多不仅会影响传输速率,而且一旦传输过程中某个节点flume宕机,会影响整个传输系统。
3.2 复制和多路复用
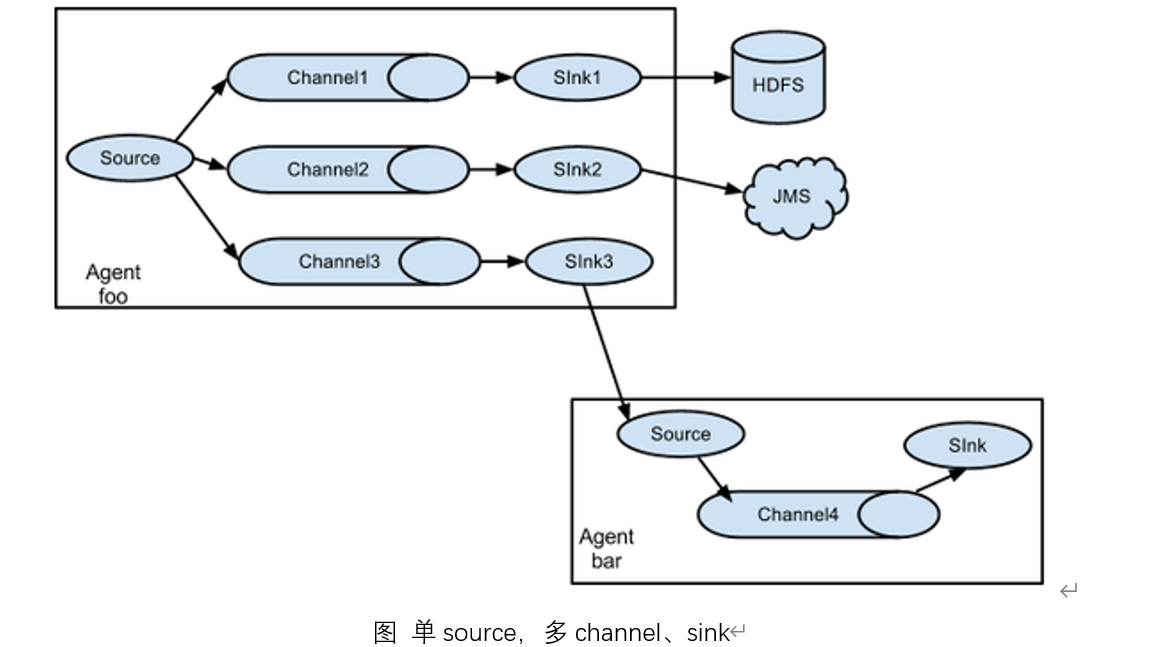
  Flume支持将事件流向一个或者多个目的地。这种模式可以将相同数据复制到多个channel中,或者将不同数据分发到不同的channel中,sink可以选择传送到不同的目的地。
   1)案例需求
     使用Flume-1监控文件变动,Flume-1将变动内容传递给Flume-2,Flume-2负责存储到HDFS。同时Flume-1将变动内容传递给Flume-3,Flume-3负责输出到Local FileSystem。
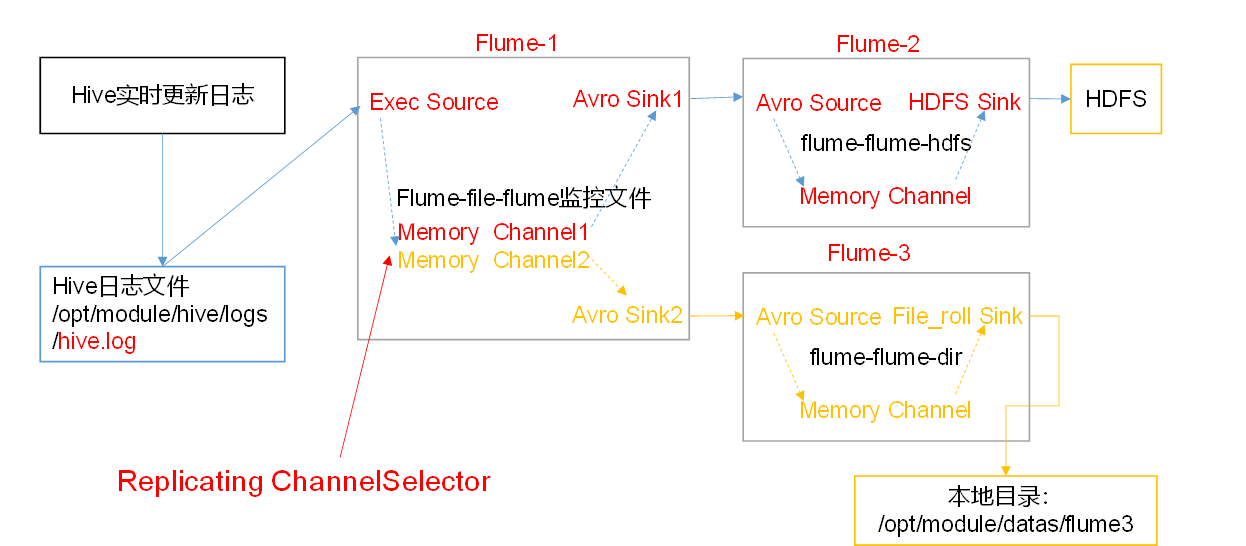
2)在/opt/module/flume/job目录下创建group1文件夹 在group1中创建a1.conf a2.conf a3.conf 文件内容如下
a1.conf
# example.conf: A single-node Flume configuration

# Name the components on this agent
a1.sources = r1
a1.sinks = k1 k2
a1.channels = c1 c2

a1.sources.r1.selector.type = replicating
# Describe/configure the source
a1.sources.r1.type = TAILDIR
a1.sources.r1.positionFile = /opt/module/flume/taildir_position.json
a1.sources.r1.filegroups = f1
a1.sources.r1.filegroups.f1 = /opt/module/hive/logs/hive.log
# Describe the sink avro
a1.sinks.k1.type = avro
a1.sinks.k1.hostname = hadoop103
a1.sinks.k1.port = 4545

a1.sinks.k2.type = avro
a1.sinks.k2.hostname = hadoop104
a1.sinks.k2.port = 4545

# Use a channel which buffers events in memory
a1.channels.c1.type = memory
a1.channels.c1.capacity = 1000
a1.channels.c1.transactionCapacity = 100

a1.channels.c2.type = memory
a1.channels.c2.capacity = 1000
a1.channels.c2.transactionCapacity = 100

# Bind the source and sink to the channel
a1.sources.r1.channels = c1 c2
a1.sinks.k1.channel = c1
a1.sinks.k2.channel = c2
a2.conf 记得事先要开启hdfs
# example.conf: A single-node Flume configuration

# Name the components on this agent
a2.sources = r1
a2.sinks = k1
a2.channels = c1

# Describe/configure the source  bind 监听本地客户端

a2.sources.r1.type = avro
a2.sources.r1.bind = 0.0.0.0
a2.sources.r1.port = 4545
# Describe the sink

a2.sinks.k1.type = hdfs

a2.sinks.k1.hdfs.path = /flume/group1/%y-%m-%d/%H%M
a2.sinks.k1.hdfs.filePrefix = events-%[localhost]
a2.sinks.k1.hdfs.rollInterval = 60
a2.sinks.k1.hdfs.rollSize = 134217728
a2.sinks.k1.hdfs.rollCount = 0
a2.sinks.k1.hdfs.fileType = DataStream
a2.sinks.k1.hdfs.round = true
a2.sinks.k1.hdfs.roundValue = 10
a2.sinks.k1.hdfs.roundUnit = minute
a2.sinks.k1.hdfs.useLocalTimeStamp = true
# Use a channel which buffers events in memory
a2.channels.c1.type = memory
a2.channels.c1.capacity = 1000
a2.channels.c1.transactionCapacity = 100


# Bind the source and sink to the channel
a2.sources.r1.channels = c1
a2.sinks.k1.channel = c1
a3.conf
# example.conf: A single-node Flume configuration

# Name the components on this agent
a3.sources = r1
a3.sinks = k1
a3.channels = c1

# Describe/configure the source bind 监听本地客户端

a3.sources.r1.type = avro
a3.sources.r1.bind = 0.0.0.0
a3.sources.r1.port = 4545
# Describe the sink
a3.sinks.k1.type = file_roll
a3.sinks.k1.sink.directory = /opt/module/flume/a3
# Use a channel which buffers events in memory
a3.channels.c1.type = memory
a3.channels.c1.capacity = 1000
a3.channels.c1.transactionCapacity = 100


# Bind the source and sink to the channel
a3.sources.r1.channels = c1
a3.sinks.k1.channel = c1
    3)开启flume ,先开启后面的 最后开始前面的
      bin/flume-ng agent -n a2 -c conf -f job/group1/a2.conf
      bin/flume-ng agent -n a3 -c conf -f job/group1/a3.conf
      bin/flume-ng agent -n a1 -c conf -f job/group1/a1.conf
    4)观察hdfs 和本地/opt/module/flume/a3上的数据
3.3 负载均衡和故障转移
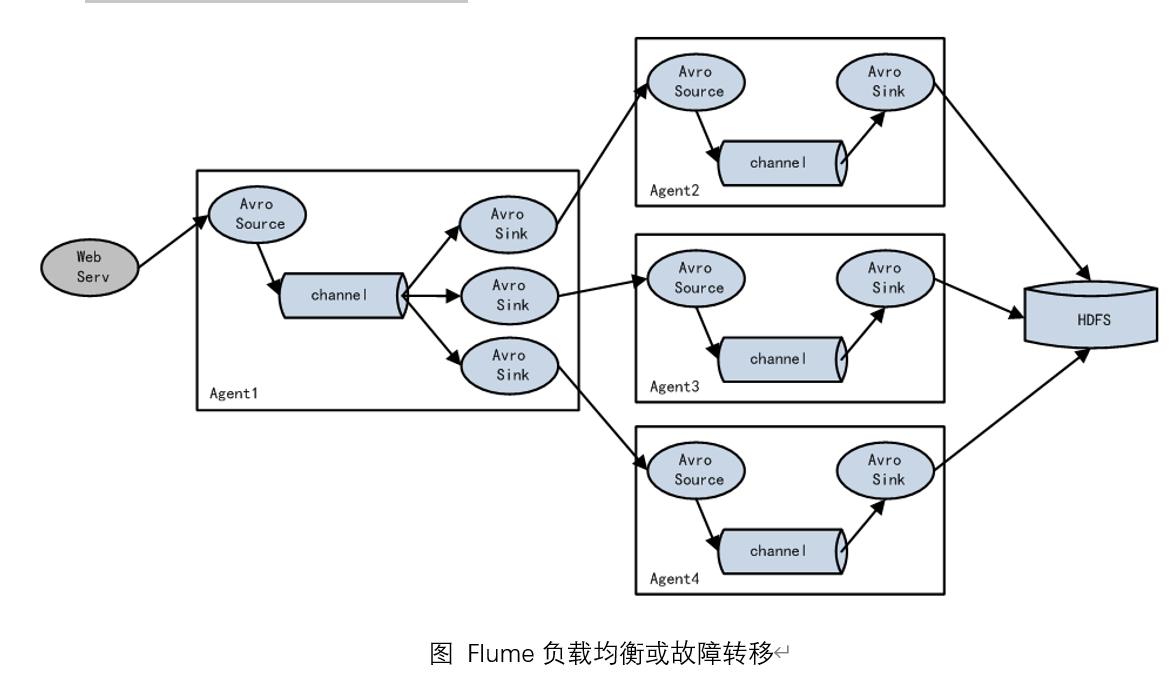
   你可以把多个sink分成一个组, 这时候 Sink组逻辑处理器 可以对这同一个组里的几个sink进行负载均衡或者其中一个sink发生故障后将输出Event的任务转移到其他的sink上
    记得一定要配置sinkgroup

   1)案例需求
     使用Flume1监控一个端口,其sink组中的sink分别对接Flume2和Flume3,采用FailoverSinkProcessor,实现故障转移的功能。
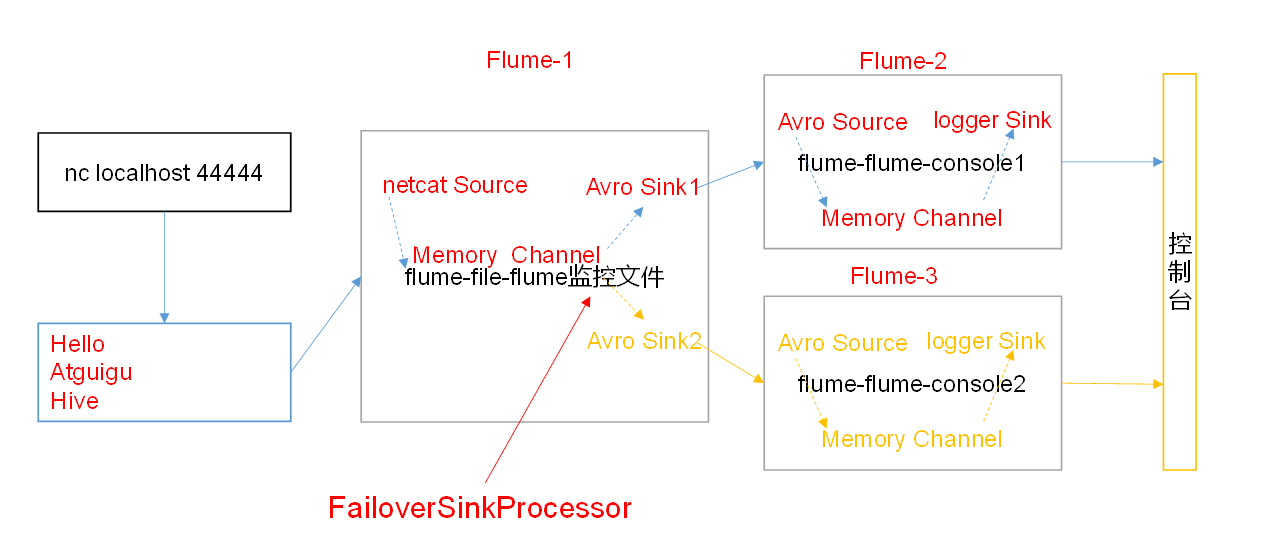
   2)在/opt/module/flume/job目录下创建group2文件夹 ,在创建group2文件夹下 创建flume agent 配置文件 a1.conf a2.conf a3.conf
   a1.conf内容如下:
# example.conf: A single-node Flume configuration

# Name the components on this agent
a1.sources = r1
a1.sinks = k1 k2
a1.channels = c1

a1.sinkgroups = g1
a1.sinkgroups.g1.sinks = k1 k2
a1.sinkgroups.g1.processor.type = failover
a1.sinkgroups.g1.processor.priority.k1 = 5
a1.sinkgroups.g1.processor.priority.k2 = 10
a1.sinkgroups.g1.processor.maxpenalty = 10000

# Describe/configure the source  //0.0.0.0  监控本地 使用hostname的时候 仅限于本机
a1.sources.r1.type = netcat
a1.sources.r1.bind = 0.0.0.0
a1.sources.r1.port = 44444

# Describe the sink
a1.sinks.k1.type = avro
a1.sinks.k1.hostname = hadoop103
a1.sinks.k1.port = 4545

a1.sinks.k2.type = avro
a1.sinks.k2.hostname = hadoop104
a1.sinks.k2.port = 4545
# Use a channel which buffers events in memory
a1.channels.c1.type = memory
a1.channels.c1.capacity = 1000
a1.channels.c1.transactionCapacity = 100

# Bind the source and sink to the channel
a1.sources.r1.channels = c1
a1.sinks.k1.channel = c1
a1.sinks.k2.channel = c1
a2.conf 内容如下
# example.conf: A single-node Flume configuration

# Name the components on this agent
a2.sources = r1
a2.sinks = k1
a2.channels = c1

# Describe/configure the source  bind 监听本地客户端

a2.sources.r1.type = avro
a2.sources.r1.bind = 0.0.0.0
a2.sources.r1.port = 4545
# Describe the sink

a2.sinks.k1.type = logger

# Use a channel which buffers events in memory
a2.channels.c1.type = memory
a2.channels.c1.capacity = 1000
a2.channels.c1.transactionCapacity = 100


# Bind the source and sink to the channel
a2.sources.r1.channels = c1
a2.sinks.k1.channel = c1
a3.conf内容如下
# example.conf: A single-node Flume configuration

# Name the components on this agent
a3.sources = r1
a3.sinks = k1
a3.channels = c1

# Describe/configure the source  bind 监听本地客户端

a3.sources.r1.type = avro
a3.sources.r1.bind = 0.0.0.0
a3.sources.r1.port = 4545
# Describe the sink

a3.sinks.k1.type = logger

# Use a channel which buffers events in memory
a3.channels.c1.type = memory
a3.channels.c1.capacity = 1000
a3.channels.c1.transactionCapacity = 100


# Bind the source and sink to the channel
a3.sources.r1.channels = c1
a3.sinks.k1.channel = c1
       3)写完配置文件之后分发到各个集群中
       4)开启flume 先开启后面的 在开启前面的
        bin/flume-ng agent -n a2 -c conf -f job/group1/a2.conf
        bin/flume-ng agent -n a3 -c conf -f job/group1/a3.conf
        bin/flume-ng agent -n a1 -c conf -f job/group1/a1.conf
       5)nc localhost 44444  然后发送数据
       6)观察hadoop103 hadoop104上的数据变化
         因为a1.sinkgroups.g1.processor.priority.k1 = 5
            a1.sinkgroups.g1.processor.priority.k2 = 10
         所以k2上面的flume 不宕掉的话一直发送数据到k2 上,k2一旦宕掉的话,会发送数据到k1上的flume
3.4 聚合
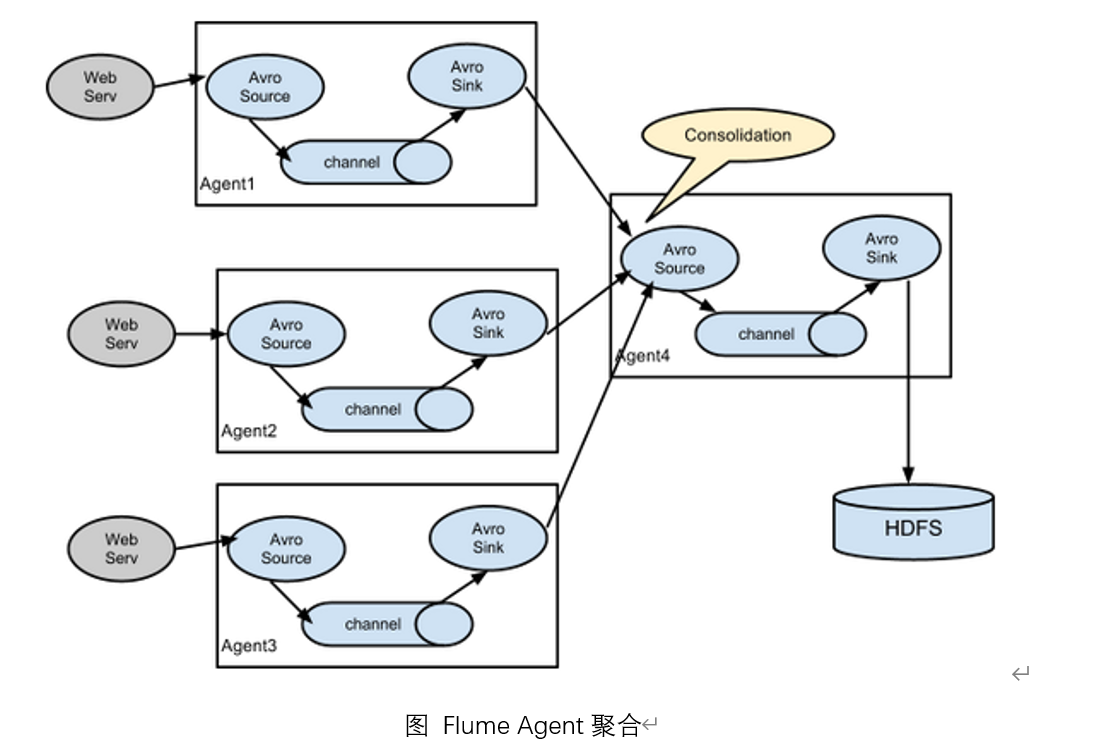
这种模式是我们最常见的,也非常实用,日常web应用通常分布在上百个服务器,大者甚至上千个、上万个服务器。产生的日志,处理起来也非常麻烦。用flume的这种组合方式能很好的解决这一问题,每台服务器部署一个flume采集日志,传送到一个集中收集日志的flume,再由此flume上传到hdfs、hive、hbase等,进行日志分析。
1)案例需求
hadoop102上的Flume-1监控文件/opt/module/hive/logs/hive.log
hadoop103上的Flume-2监控某一个端口的数据流,
Flume-1与Flume-2将数据发送给hadoop104上的Flume-3,Flume-3将最终数据打印到控制台。
2)在/opt/module/flume/job目录下创建group3文件夹 ,在创建group3文件夹下 创建flume agent 配置文件 a1.conf a2.conf a3.conf
a1.conf
# example.conf: A single-node Flume configuration

# Name the components on this agent
a1.sources = r1
a1.sinks = k1
a1.channels = c1

# Describe/configure the source
a1.sources.r1.type = TAILDIR
a1.sources.r1.positionFile = /opt/module/flume/taildir_position.json
a1.sources.r1.filegroups = f1
a1.sources.r1.filegroups.f1 = /opt/module/hive/logs/hive.log

# Describe the sink
a1.sinks.k1.type = avro
a1.sinks.k1.hostname = hadoop104
a1.sinks.k1.port = 4545
# Use a channel which buffers events in memory
a1.channels.c1.type = memory
a1.channels.c1.capacity = 1000
a1.channels.c1.transactionCapacity = 100


# Bind the source and sink to the channel
a1.sources.r1.channels = c1
a1.sinks.k1.channel = c1
a2.conf
# example.conf: A single-node Flume configuration

# Name the components on this agent
a2.sources = r1
a2.sinks = k1
a2.channels = c1

# Describe/configure the source  //0.0.0.0  使用hostname的时候 仅限于本机
a2.sources.r1.type = netcat
a2.sources.r1.bind = 0.0.0.0
a2.sources.r1.port = 44444

# Describe the sink
a2.sinks.k1.type = avro
a2.sinks.k1.hostname = hadoop104
a2.sinks.k1.port = 4545

# Use a channel which buffers events in memory
a2.channels.c1.type = memory
a2.channels.c1.capacity = 1000
a2.channels.c1.transactionCapacity = 100

# Bind the source and sink to the channel
a2.sources.r1.channels = c1
a2.sinks.k1.channel = c1
a3.conf
# example.conf: A single-node Flume configuration

# Name the components on this agent
a3.sources = r1
a3.sinks = k1
a3.channels = c1

# Describe/configure the source  bind 监听本地客户端

a3.sources.r1.type = avro
a3.sources.r1.bind = 0.0.0.0
a3.sources.r1.port = 4545

# Describe the sink

a3.sinks.k1.type = logger
# Use a channel which buffers events in memory
a3.channels.c1.type = memory
a3.channels.c1.capacity = 1000
a3.channels.c1.transactionCapacity = 100


# Bind the source and sink to the channel
a3.sources.r1.channels = c1
a3.sinks.k1.channel = c1
      3)写完配置文件之后分发到各个集群中 (这一点要切记,后期修改后也要分发)
       4)开启flume 先开启后面的 在开启前面的
        bin/flume-ng agent -n a3 -c conf -f job/group1/a3.conf
        bin/flume-ng agent -n a2 -c conf -f job/group1/a2.conf
        bin/flume-ng agent -n a1 -c conf -f job/group1/a1.conf
       5)nc localhost 44444  然后发送数据
       6)观察hadoop103 hadoop104上的数据变化
3.5 自定义Interceptor
   1)需求 我们以端口数据模拟日志,以数字(单个)和字母(单个)模拟不同类型的日志,我们需要自定义interceptor区分数字和字母,将其分别发往不同的分析系统(Channel)。
   2)实现步骤
    (1)创建一个maven项目,并引入以下依赖。
      <dependency>
            <groupId>org.apache.flume</groupId>
            <artifactId>flume-ng-core</artifactId>
            <version>1.9.0</version>
      </dependency>
    (2)定义MyInterceptor类并实现Interceptor接口  最后打包到$flume/lib下
package com.atguigu.flume;

import org.apache.flume.Context;
import org.apache.flume.Event;
import org.apache.flume.interceptor.Interceptor;


import java.nio.charset.StandardCharsets;
import java.util.List;
import java.util.Map;

public class MyInterceptor implements Interceptor {
    public void initialize() {

    }

    public Event intercept(Event event) {
        byte[] body = event.getBody();
        Map<String, String> headers = event.getHeaders();
        //将body编码成string
        String line = new String(body, StandardCharsets.UTF_8);
        //获取第一个字母
        char c = line.charAt(0);


        if ((c >= 'a' && c <= 'z') || (c >= 'A' && c <= 'Z')) {
            //以字母开头
            headers.put("leixing", "zimu");
        } else if (c >= '0' && c <= '9') {
            //以数字开头
            headers.put("leixing", "shuzi");
        } else {
            //其他情况,抛弃不要
            return null;
        }
        return event;
    }

    public List<Event> intercept(List<Event> list) {
        for (Event event : list) {
            intercept(event);
        }
        return list;
    }

    public void close() {

    }
    public static class Builder implements Interceptor.Builder{

        public Interceptor build() {
            return new MyInterceptor();
        }

        public void configure(Context context) {

        }
    }
}
    (3)编辑flume配置文件 在/opt/module/flume/job/group4  a1.conf a2.conf a3.conf
       a1.conf   记住a1.sources.r1.interceptors.i1.type = com.atguigu.flume.MyInterceptor$Builder 最后有个$符
# Name the components on this agent
a1.sources = r1
a1.sinks = k1 k2
a1.channels = c1 c2

# Describe/configure the source
a1.sources.r1.type = netcat
a1.sources.r1.bind = localhost
a1.sources.r1.port = 44444

a1.sources.r1.interceptors = i1
a1.sources.r1.interceptors.i1.type = com.atguigu.flume.MyInterceptor$Builder

a1.sources.r1.selector.type = multiplexing
a1.sources.r1.selector.header = leixing
a1.sources.r1.selector.mapping.zimu = c1
a1.sources.r1.selector.mapping.shuzi = c2
# Describe the sink
a1.sinks.k1.type = avro
a1.sinks.k1.hostname = hadoop103
a1.sinks.k1.port = 4141

a1.sinks.k2.type=avro
a1.sinks.k2.hostname = hadoop104
a1.sinks.k2.port = 4242

# Use a channel which buffers events in memory
a1.channels.c1.type = memory
a1.channels.c1.capacity = 1000
a1.channels.c1.transactionCapacity = 100

# Use a channel which buffers events in memory
a1.channels.c2.type = memory
a1.channels.c2.capacity = 1000
a1.channels.c2.transactionCapacity = 100


# Bind the source and sink to the channel
a1.sources.r1.channels = c1 c2
a1.sinks.k1.channel = c1
a1.sinks.k2.channel = c2
a2.conf
a2.sources = r1
a2.sinks = k1
a2.channels = c1

a2.sources.r1.type = avro
a2.sources.r1.bind = hadoop103
a2.sources.r1.port = 4141

a2.sinks.k1.type = logger

a2.channels.c1.type = memory
a2.channels.c1.capacity = 1000
a2.channels.c1.transactionCapacity = 100

a2.sinks.k1.channel = c1
a2.sources.r1.channels = c1
a3.conf
a3.sources = r1
a3.sinks = k1
a3.channels = c1

a3.sources.r1.type = avro
a3.sources.r1.bind = hadoop104
a3.sources.r1.port = 4242

a3.sinks.k1.type = logger

a3.channels.c1.type = memory
a3.channels.c1.capacity = 1000
a3.channels.c1.transactionCapacity = 100

a3.sinks.k1.channel = c1
a3.sources.r1.channels = c1
       (4)分发文件到各个机器中  然后开启flume
            bin/flume-ng agent -n a3 -c conf -f job/group4/a3.conf
            bin/flume-ng agent -n a2 -c conf -f job/group4/a2.conf
            bin/flume-ng agent -n a1 -c conf -f job/group4/a1.conf
        (5)观察数据的输出状况
3. Kafka Sink(将数据发往多topic)      将包含不同数据的分发的不同topic 中直接利用kafka sink 的特性  a1.sinks.k1.kafka.topic = other   默认分发到other中  其他的只需指定topic

a1.sources = r1
a1.channels = c1
a1.sinks = k1

a1.sources.r1.type = netcat
a1.sources.r1.bind = 0.0.0.0
a1.sources.r1.port = 6666

a1.sources.r1.interceptors = i1
a1.sources.r1.interceptors.i1.type = com.atguigu.flume.interceptor.EventHeaderInterceptor$MyBuilder


a1.channels.c1.type = memory
a1.channels.c1.capacity = 10000
a1.channels.c1.transactionCapacity = 1000

a1.sinks.k1.type = org.apache.flume.sink.kafka.KafkaSink
a1.sinks.k1.kafka.bootstrap.servers = hadoop102:9092,hadoop103:9092,hadoop104:9092
a1.sinks.k1.kafka.topic = other
a1.sinks.k1.kafka.producer.acks = -1
a1.sinks.k1.useFlumeEventFormat = false

a1.sources.r1.channels = c1
a1.sinks.k1.channel = c1

flume-ng agent -c $FLUME_HOME/conf -f $FLUME_HOME/jobs/kafkasink-topics.conf -n a1 -Dflume.root.logger=INFO,console
package com.atguigu.flume;

import org.apache.flume.Context;
import org.apache.flume.Event;
import org.apache.flume.interceptor.Interceptor;

import java.nio.charset.StandardCharsets;
import java.util.List;
import java.util.Map;

public class EventHeaderInterceptor implements Interceptor {
    public void initialize() {

    }

    public Event intercept(Event event) {
        byte[] body = event.getBody();
        Map<String, String> headers = event.getHeaders();
        //将body编码成string
        String line = new String(body, StandardCharsets.UTF_8);
        //判断body中是否含有"atguigu" "shangguigu"
        if(line.contains("atguigu")){
            headers.put("topic","atguigu");
        }else if(line.contains("shangguigu")){
            headers.put("topic","shangguigu");
        }
        return event;
    }

    public List<Event> intercept(List<Event> list) {
        for (Event event : list) {
            intercept(event);
        }
        return list;
    }

    public void close() {

    }
    public static class Builder implements Interceptor.Builder{

        public Interceptor build() {
            return new EventHeaderInterceptor();
        }

        public void configure(Context context) {

        }
    }
}

 浙公网安备 33010602011771号