第三篇:表相关操作
http://www.cnblogs.com/linhaifeng/articles/7232894.html
注意的几点: 1.如果你在cmd中书命令的时候,输入错了就用\c跳出

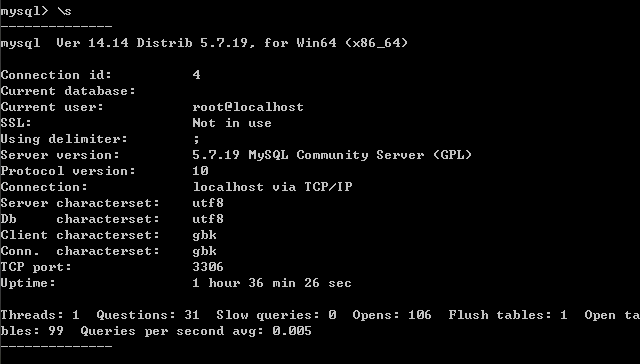
2.\s查看配置信息

一 存储引擎介绍
存储引擎即表类型,mysql根据不同的表类型会有不同的处理机制
详见:http://www.cnblogs.com/linhaifeng/articles/7213670.html
二 表介绍
表相当于文件,表中的一条记录就相当于文件的一行内容,不同的是,表中的一条记录有对应的标题,称为表的字段

id,name,qq,age称为字段,其余的,一行内容称为一条记录
三 创建表
#语法:
create table 表名(
字段名1 类型[(宽度) 约束条件],
字段名2 类型[(宽度) 约束条件],
字段名3 类型[(宽度) 约束条件]
);

#注意:
1. 在同一张表中,字段名是不能相同
2. 宽度和约束条件可选
3. 字段名和类型是必须的

MariaDB [(none)]> create database db1 charset utf8;

MariaDB [(none)]> use db1;

MariaDB [db1]> create table t1(
    -> id int,
    -> name varchar(50),
    -> sex enum('male','female'),
    -> age int(3)
    -> );

MariaDB [db1]> show tables; #查看db1库下所有表名

MariaDB [db1]> desc t1;
+-------+-----------------------+------+-----+---------+-------+
| Field | Type                  | Null | Key | Default | Extra |
+-------+-----------------------+------+-----+---------+-------+
| id    | int(11)               | YES  |     | NULL    |       |
| name  | varchar(50)           | YES  |     | NULL    |       |
| sex   | enum('male','female') | YES  |     | NULL    |       |
| age   | int(3)                | YES  |     | NULL    |       |
+-------+-----------------------+------+-----+---------+-------+

MariaDB [db1]> select id,name,sex,age from t1;
Empty set (0.00 sec)

MariaDB [db1]> select * from t1;
Empty set (0.00 sec)

MariaDB [db1]> select id,name from t1;
Empty set (0.00 sec)

MariaDB [db1]> insert into t1 values
    -> (1,'egon',18,'male'),
    -> (2,'alex',81,'female')
    -> ;
MariaDB [db1]> select * from t1;
+------+------+------+--------+
| id   | name | age  | sex    |
+------+------+------+--------+
|    1 | egon |   18 | male   |
|    2 | alex |   81 | female |
+------+------+------+--------+


MariaDB [db1]> insert into t1(id) values
    -> (3),
    -> (4);
MariaDB [db1]> select * from t1;
+------+------+------+--------+
| id   | name | age  | sex    |
+------+------+------+--------+
|    1 | egon |   18 | male   |
|    2 | alex |   81 | female |
|    3 | NULL | NULL | NULL   |
|    4 | NULL | NULL | NULL   |
+------+------+------+--------+
注意注意注意:表中的最后一个字段不要加逗号
切换到文件夹下:use db1
增:create table t1(id int,name char(10)) engine=innodb;
删:drop table t1;
改:alter table t1 add age int;
    alter table t1 modify name char(12);
查:show tables; #查看所有表
    show create table t1; #查看t1表
    desc t1;#查看表结构

    show create table t1\G; #查看表详细结构,可加\G
    select * from t1; #查看所有的表数据
四 查看表结构
MariaDB [db1]> describe t1; #查看表结构,可简写为desc 表名
+-------+-----------------------+------+-----+---------+-------+
| Field | Type                  | Null | Key | Default | Extra |
+-------+-----------------------+------+-----+---------+-------+
| id    | int(11)               | YES  |     | NULL    |       |
| name  | varchar(50)           | YES  |     | NULL    |       |
| sex   | enum('male','female') | YES  |     | NULL    |       |
| age   | int(3)                | YES  |     | NULL    |       |
+-------+-----------------------+------+-----+---------+-------+


MariaDB [db1]> show create table t1\G; #查看表详细结构,可加\G
五 数据类型
http://www.cnblogs.com/linhaifeng/articles/7233411.html
六 表完整性约束
http://www.cnblogs.com/linhaifeng/articles/7238814.html
七 修改表ALTER TABLE
语法:
1. 修改表名
      ALTER TABLE 表名
                          RENAME 新表名;

2. 增加字段
      ALTER TABLE 表名
                          ADD 字段名  数据类型 [完整性约束条件…],
                          ADD 字段名  数据类型 [完整性约束条件…];
      ALTER TABLE 表名
                          ADD 字段名  数据类型 [完整性约束条件…]  FIRST;
      ALTER TABLE 表名
                          ADD 字段名  数据类型 [完整性约束条件…]  AFTER 字段名;

3. 删除字段
      ALTER TABLE 表名
                          DROP 字段名;

4. 修改字段
      ALTER TABLE 表名
                          MODIFY  字段名 数据类型 [完整性约束条件…];
      ALTER TABLE 表名
                          CHANGE 旧字段名 新字段名 旧数据类型 [完整性约束条件…];
      ALTER TABLE 表名
                          CHANGE 旧字段名 新字段名 新数据类型 [完整性约束条件…];
操作文件的一行行内容(记录)
增:insert into db1.t1 values(1,'haiyan'),(2,'yaling'),(3,'xiaoxiao'); #如果t1不给参数,默认按照位置参数依次传参
删:delete from t1 where id = 2;
    #对于清空记录有两种方式,但是推荐后者
    delete from t1;
    truncate t1; #当数据量比较大的情况下,使用这种方式,删除速度快
改:update t1 set name = 'SB' where id=3;
    update t1 set name= 'SB'  where name = 'xiaoxiao';
    alter table t7 modify id int primary key auto_increment;  修改id为主键并且自增
查:select * from t1; #查看t1里所有的数据
    select name from t1;  #查看t1里所有的name
    select id,name from t1; #查看t1里所有的id,name
自增id的方法
create table t5(id int primary key auto_increment,name char(10));
#create table t4(id int not null unique auto_increment,name char(10));  (不空且是唯一的)#这个和上面的是一回事
insert into xx(name) values ('haiyan1'),
                                ('haiyan2'),
                                ('haiyan3'),
                                ('haiyan4'),
                                ('haiyan5');
示例:
1. 修改存储引擎
mysql> alter table service
    -> engine=innodb;

2. 添加字段
mysql> alter table student10
    -> add name varchar(20) not null,
    -> add age int(3) not null default 22;

mysql> alter table student10
    -> add stu_num varchar(10) not null after name;                //添加name字段之后

mysql> alter table student10
    -> add sex enum('male','female') default 'male' first;          //添加到最前面

3. 删除字段
mysql> alter table student10
    -> drop sex;

mysql> alter table service
    -> drop mac;

4. 修改字段类型modify
mysql> alter table student10
    -> modify age int(3);
mysql> alter table student10
    -> modify id int(11) not null primary key auto_increment;    //修改为主键

5. 增加约束(针对已有的主键增加auto_increment)
mysql> alter table student10 modify id int(11) not null primary key auto_increment;
ERROR 1068 (42000): Multiple primary key defined

mysql> alter table student10 modify id int(11) not null auto_increment;
Query OK, 0 rows affected (0.01 sec)
Records: 0  Duplicates: 0  Warnings: 0

6. 对已经存在的表增加复合主键
mysql> alter table service2
    -> add primary key(host_ip,port);

7. 增加主键
mysql> alter table student1
    -> modify name varchar(10) not null primary key;

8. 增加主键和自动增长
mysql> alter table student1
    -> modify id int not null primary key auto_increment;

9. 删除主键
a. 删除自增约束
mysql> alter table student10 modify id int(11) not null;

b. 删除主键
mysql> alter table student10
    -> drop primary key;
八 复制表
复制表结构+记录 (key不会复制: 主键、外键和索引)
mysql> create table new_service select * from service;

只复制表结构
mysql> select * from service where 1=2;        //条件为假,查不到任何记录
Empty set (0.00 sec)
mysql> create table new1_service select * from service where 1=2;
Query OK, 0 rows affected (0.00 sec)
Records: 0  Duplicates: 0  Warnings: 0

mysql> create table t4 like employees;
create table t7(id int,name char(10));
create table t8 select * from t7;  #拷贝表结果(如果有数据就把数据一起拷贝了)
create table t8 select * from t5 where 1=2; #拷贝表结构,不拷贝表数据(条件为假时,查不到任何记录)
alter table t7 modify id int primary key auto_increment;  修改id为主键并且自增
insert into t7(name) values   ('egon1'),
                              ('egon1'),
                              ('egon1'),
                              ('egon1');
九 删除表
DROP TABLE 表名;
创建账号
8.select user()#查看当前用户
  select * from mysql.user; 查看所有的用户

9.创建账号 identifity
create user 'haiyan'@'localhost' identified by '147852' # 名为haiyan的本机账号
create user 'alex'@'%' identified by '123' #代表只要ip地址能拼通,那么所有的用户都可以远程登录alex
create user 'susan'@'192.168.20.%' identified by '123' #创建远程账号,只要是192.168.20.?开头的ip都可以登录susan
#如果你要远程登录alex的账户,那么客户端得这样登录  :mysql -h192.168.20.97 -ualex -p123
数据库的权限操作
#insert ,select ,update,delete #有这么几个可以设置权限的操作,那么我们先以select为例吧。
分四个级别:
级别1:对所有的库,下的所有的表,下的所有的字段
'''*.*代表所有的库下的所有的表'''
同意select权限开放,开放的是*.*的select权限开放给用户
grant select on *.* to 'zhang'@'localhost' identified by '123';  #让创建用户的时候赋予权限
级别2:对db1库,下的所有的表,下的所有的字段
grant select on db1.* to 'wang'@'localhost' identified by '123';
级别3:对表db1.t1,下的多有字段
grant select on db1.t1 to 'li'@'localhost' identified by '123';
级别4:对表db1.t1,下的id,name,字段
grant select (id ,name)  on db1.t1 to 'zhao'@'localhost' identifitied by '123';
grant select (id ,name),update(name) on db1.t1 to 'zhao'@'localhost' identifitied by '123';
修改完权限后要记得刷新权限
flush privileges;

删除权限:
revoke select on *.* from 'zhang'@'localhost'
revoke select on db1.* from 'wang'@'localhost'
revoke select on db1.t1 from 'li'@'localhost'
revoke select (id ,name),update(name) on db1.t1 from 'zhao'@'localhost'


