Centos7系统安装yum遇到的问题failure: repodata/repomd.xml from base: [Errno 256] No more mirrors to try. http: (中断yum或者换yum源出问题)
2020-07-06 01:10 天心PHP 阅读(12232) 评论(0) 编辑 收藏 举报问题所在
[root@cit-server6-s1-372 yum.repos.d]# yum makecache
Loaded plugins: fastestmirror
base                                                                     | 5.6 kB  00:00:00
http://mirrors.163.com/centos/7/os/x86_64/repodata/repomd.xml: [Errno -1] Error importing repomd.xml for base: Damaged repomd.xml file
Trying other mirror.


 One of the configured repositories failed (CentOS-7 - Base - 163.com),
 and yum doesn't have enough cached data to continue. At this point the only
 safe thing yum can do is fail. There are a few ways to work "fix" this:

     1. Contact the upstream for the repository and get them to fix the problem.

     2. Reconfigure the baseurl/etc. for the repository, to point to a working
        upstream. This is most often useful if you are using a newer
        distribution release than is supported by the repository (and the
        packages for the previous distribution release still work).

     3. Disable the repository, so yum won't use it by default. Yum will then
        just ignore the repository until you permanently enable it again or use
        --enablerepo for temporary usage:

            yum-config-manager --disable base

     4. Configure the failing repository to be skipped, if it is unavailable.
        Note that yum will try to contact the repo. when it runs most commands,
        so will have to try and fail each time (and thus. yum will be be much
        slower). If it is a very temporary problem though, this is often a nice
        compromise:

            yum-config-manager --save --setopt=base.skip_if_unavailable=true

failure: repodata/repomd.xml from base: [Errno 256] No more mirrors to try.
http://mirrors.163.com/centos/7/os/x86_64/repodata/repomd.xml: [Errno -1] Error importing repomd.xml for base: Damaged repomd.xml file
[root@cit-server6-s1-372 yum.repos.d]#
主要问题在于yum源问题。
最直接最暴力的方法
直接备份删除/etc/yum.repo.d/路径下所有repo文件,
然后从另一台正常运行的服务器上,拷贝CentOS-Base.repo内容到/etc/yum.repos.d/目录下,
重命名(可忽略此步骤)文件为centos.repo,然后重新执行yum安装、更新命令,正常可用。
不然参考下面解决办法
下面开始解决问题:
下面这一段参考博客:https://blog.csdn.net/shaoqiufeng/article/details/78785806
1. 查看centos7.2系统本身所安装的yum依赖包
[root@zf-test-web01-4 ~]# rpm -qa|grep yum
yum-plugin-fastestmirror-1.1.31-34.el7.noarch
yum-metadata-parser-1.1.4-10.el7.x86_64
yum-3.4.3-132.el7.centos.0.1.noarch
2. 卸载这些软件包
[root@zf-test-web01-4 ~]# rpm -e yum-plugin-fastestmirror-1.1.31-34.el7.noarch --nodeps
warning: /etc/yum/pluginconf.d/fastestmirror.conf saved as /etc/yum/pluginconf.d/fastestmirror.conf.rpmsave
[root@zf-test-web01-4 ~]# rpm -e yum-metadata-parser-1.1.4-10.el7.x86_64 --nodeps
[root@zf-test-web01-4 ~]# rpm -e yum-3.4.3-132.el7.centos.0.1.noarch --nodeps
[root@zf-test-web01-4 ~]#
3. 进入centos镜像网站找到自己对应系统需要的yum包
查看系统的命令:
[root@zf-test-web01-4 ~]# cat /etc/redhat-release
CentOS Linux release 7.2.1511 (Core)
查看系统的位数:
[root@zf-test-web01-4 ~]# file /bin/ls
/bin/ls: ELF 64-bit LSB executable, x86-64, version 1 (SYSV), dynamically linked (uses shared libs), for GNU/Linux 2.6.32, BuildID[sha1]=aa7ff68f13de25936a098016243ce57c3c982e06, stripped
4.下载yum依赖包
wget http://vault.centos.org/7.2.1511/os/x86_64/Packages/yum-plugin-fastestmirror-1.1.31-34.el7.noarch.rpm
wget http://vault.centos.org/7.2.1511/os/x86_64/Packages/yum-metadata-parser-1.1.4-10.el7.x86_64.rpm
wget http://vault.centos.org/7.2.1511/os/x86_64/Packages/yum-3.4.3-132.el7.centos.0.1.noarch.rpm
5. 安装yum依赖包
[root@zf-test-web01-4 ~]# rpm -ivh yum-*
Preparing... ################################# [100%]
Updating / installing...
1:yum-metadata-parser-1.1.4-10.el7 ################################# [ 33%]
2:yum-plugin-fastestmirror-1.1.31-3################################# [ 67%]
3:yum-3.4.3-132.el7.centos.0.1 ################################# [100%]
[root@zf-test-web01-4 ~]#
6. 更新centos系统的repo文件
(-----------------------------------------------------
http://mirrors.ustc.edu.cn/help/centos.html(这个很有用)
http://mirrors.163.com/.help/centos.html(这个我尝试了,不能正常使用)
这两个网址先写下来,后面要用,很重要!
------------------------------------------------------)
1)首先备份一下,免得误操作 /etc/yum.repos.d/CentOS-Base.repo
http://mirrors.ustc.edu.cn/help/centos.html 现在这个网址用上了,可以说厉害了
什么?中科大校园网址?没错!
[root@zf-test-web01-4 yum.repos.d]# mv /etc/yum.repos.d/CentOS-Base.repo /etc/yum.repos.d/CentOS-Base.repo.backup
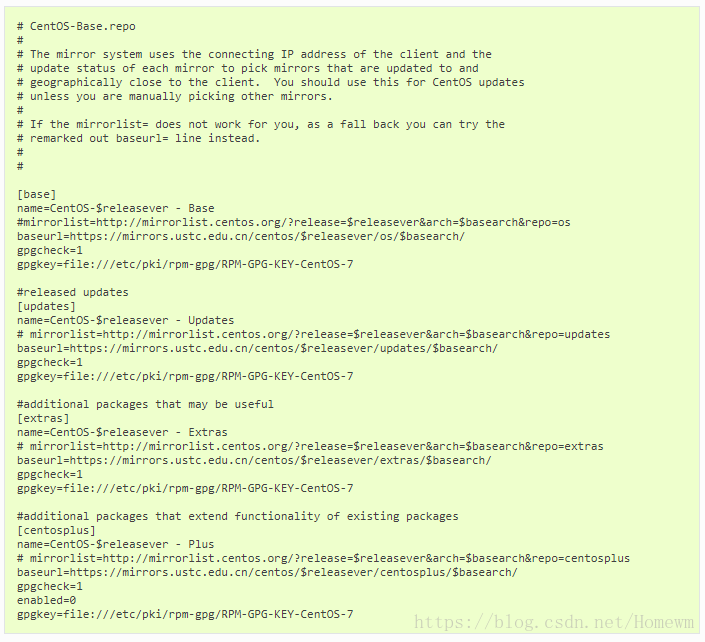
2)选择对应版本的 /etc/yum.repos.d/CentOS-Base.repo文件, 放入/etc/yum.repos.d/ 操作前请做好相应备份
如本人centos版本为7,所以使用版本7的内容。

拷贝上面这些内容,粘贴到yum.repos.d/CentOS-Base.repo里面。
3)运行以下命令生成缓存
[root@zf-test-web01-4 yum.repos.d]# yum clean all
Loaded plugins: fastestmirror
Repodata is over 2 weeks old. Install yum-cron? Or run: yum makecache fast
Cleaning repos: base extras updates
Cleaning up everything
Cleaning up list of fastest mirrors
[root@zf-test-web01-4 yum.repos.d]# yum makecache
Loaded plugins: fastestmirror
base | 3.6 kB 00:00:00
extras | 3.4 kB 00:00:00
updates | 3.4 kB 00:00:00
(1/12): base/7/x86_64/group_gz | 156 kB 00:00:00
(2/12): base/7/x86_64/filelists_db | 6.7 MB 00:00:01
(3/12): extras/7/x86_64/prestodelta | 71 kB 00:00:00
(4/12): extras/7/x86_64/primary_db | 145 kB 00:00:00
(5/12): extras/7/x86_64/filelists_db | 528 kB 00:00:00
(6/12): extras/7/x86_64/other_db | 97 kB 00:00:00
(7/12): updates/7/x86_64/prestodelta | 589 kB 00:00:00
(8/12): base/7/x86_64/primary_db | 5.7 MB 00:00:01
(9/12): base/7/x86_64/other_db | 2.5 MB 00:00:00
(10/12): updates/7/x86_64/primary_db | 4.5 MB 00:00:00
(11/12): updates/7/x86_64/other_db | 490 kB 00:00:00
(12/12): updates/7/x86_64/filelists_db | 2.7 MB 00:00:01
Determining fastest mirrors
Metadata Cache Created
7. 尝试使用yum install vim能否成功安装。
8.如果还有问题就执行以下几个命令:
https://blog.csdn.net/orangleliu/article/details/40588799
参照网上的做法: (一般yum有变更都需要这两个操作)
yum clean all
yum clean metadata
yum update
9.所有的错误基本都ok了,突然感觉牛逼了,有木有?
当然看到有朋友这样留言,解决上面的所有问题。我没有试过这个问题能不能这样解决。这个方法看起来比较简单,遇到同样问题的朋友,可以先尝试这种方法,试试有没有作用。


