SpringBoot-核心依赖说明
spring-boot-dependencies
一般用来放在父项目中,来声明依赖,子项目引入相关依赖而不需要指定版本号,好处就是解决依赖冲突,统一管理依赖版本号
利用pom的继承,一处声明,处处使用。在最顶级的spring-boot-dependencies中,使用dependencyManagement让所有子项目引用一个依赖而不用显式的列出版本号,将结构信息,部署信息,共同的依赖信息放置在统一的位置。dependencyManagement只声明依赖,并不真正引入,因此子项目需要通过dependencies引入相关依赖。
maven依赖
<dependency>
    <groupId>org.springframework.boot</groupId>
    <artifactId>spring-boot-dependencies</artifactId>
    <version>1.5.6.RELEASE</version>
    <type>pom</type>
    <scope>import</scope>
</dependency>
spring-boot-devtools
devtools是spring boot提供的工具。运行打包的应用程序时,开发人员工具会自动禁用。如果你通过java -jar或者其他特殊的类加载器进行启动时,都会被认为是“生产环境的应用”。
将依赖标记为optional可选是一种最佳做法,可以防止将devtools依赖传递到其他模块中。
<dependency>
    <groupId>org.springframework.boot</groupId>
    <artifactId>spring-boot-devtools</artifactId>
    <optional>true</optional>
</dependency>
spring-boot-devtools的作用
1、禁用默认缓存
Spring Boot支持的一些库中默认会使用缓存。虽然缓存在生产中非常有益,但是在开发过程中有可能产生反效果,devtools将默认禁用这些缓存选项
2、自动重启
类路径的文件发生更改时,会触发自动重启,某些资源修改不一定需要触发重启,例如Thymeleaf模板。默认情况下更改/META-INF/maven , /META-INF/resources , /resources , /static , /public或/templates中的资源不会触发重启,但会触发实时重新加载。 如果要自定义这些排除项,可以使用spring.devtools.restart.exclude属性,如果想保留上面的默认排除项,还想增加新的,可以使用spring.devtools.restart.additional-exclude属性
spring-boot-starter-actuator
Actuator提供了很多生产级的特性,比如监控和度量Spring Boot应用程序。这些特性可以通过REST端点、远程shell和JMX获得。
1、介绍
Maven引入依赖
<dependency>
    <!-- It is in order to get app info -->
    <groupId>org.springframework.boot</groupId>
    <artifactId>spring-boot-starter-actuator</artifactId>
</dependency>
应用启动日志会有如下信息,表明获取一些信息的url

下面列出最常用的一些


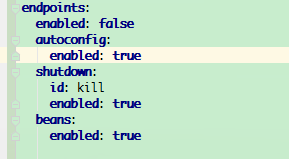
2、Actuator定制化

解释一下上图配置
将端点整体禁用,然后autoconfig、shutdown、beans启用,将shutdown的路径由/shutdown改为/kill
3、保护 Actuator 端点
actuator就是为了查看应用的一些信息,其中不乏一些敏感信息,对这些端点进行保护还是很有必要。
使用Spring Security,下面以/shutdown,/metrics端点为例
① 权限认证
@Override
protected void configure(HttpSecurity http) throws Exception {
 http
 .authorizeRequests()
   .antMatchers("/").access("hasRole('READER')")
   .antMatchers("/shutdown","/metrics").access("hasRole('ADMIN')")
   .antMatchers("/**").permitAll()
 .and()
 .formLogin()
   .loginPage("/login")
   .failureUrl("/login?error=true");
}
要能够访问/shutdown,必须用一个带有admin权限的用户
② 用户身份认证
@Override
protected void configure(AuthenticationManagerBuilder auth) throws Exception {
    auth.userDetailsService(new UserDetailsService() {
        @Override
        public UserDetails loadUserByUsername(String username)
                throws UsernameNotFoundException {
            UserDetails user = readerRepository.findOne(username);
            if (user != null) {
                return user;
            }
            throw new UsernameNotFoundException(
                    "User '" + username + "' not found.");
        }
    })
    .and()
    .inMemoryAuthentication()
    .withUser("admin").password("s3cr3t")
    .roles("ADMIN", "READER");
}
userDetailsService是使用repository来操作数据库查询出对应的用户,inMemoryAuthentication()是往内存中添加一个用户,拥有角色ADMIN、READER。
spring-boot-starter-security
人如其名,是用来保证应用安全的,核心功能授权和认证
默认访问用户密码
如果没有进行额外配置,那么应用启动会生成一串默认密码。用户名为user,密码在日志文件或控制台寻找 Using default security password: 62ccf9ca-9fbe-4993-8566-8468cc33c28c
当然也可以自定义访问用户,在application.yml文件security.user.name,security.user.password制定
还可以通过自定义编写配置类继承WebSecurityConfigurerAdapter类,并在配置类上面加上@Configuration@EnableWebSecurity两个注解,重写 protected void configure(HttpSecurity http) protected void configure(AuthenticationManagerBuilder auth) 两个方法进行授权和认证,可以参考上面两段代码


