NIO浅析(一)
一:NIO与IO的区别
1.NIO面对的是缓冲区,IO面对的是流
2.NIO是非阻塞的,IO是阻塞的
3.NIO中引入了选择器
二:既然NIO面对的是缓冲区,那就先来了解缓冲区
1.NIO中Buffer负责存储,Buffer底层采用的是数组,可以存储不同数据类型,提供了相应的缓冲区(ByteBuffer,IntBuffer......),对于缓冲区的管理一致,通过allocate获取缓冲区
2.缓冲区存取数据的2个方法,put()存入,get()取出
3.缓冲区的4个核心属性
a.capacity:容量,最大存储数据的容量,一旦声明不能改变
b.limit:界限,表示缓冲区中可以操作数据的大小,(limit后面的数据不能进行读写)
c.limit:界限,表示缓冲区中可以操作数据的大小,(limit后面的数据不能进行读写)
d.position:位置,(表示缓冲区中正在操作数据的位置)
e:规则:position<=limit<=capacity
    @Test
    public void test1(){
        String str="abcde";
        //1.分配指定大小的缓冲区
        ByteBuffer buf = ByteBuffer.allocate(1024);
        System.out.println("allocatt.................................");
        System.out.println(buf.position());
        System.out.println(buf.limit());
        System.out.println(buf.capacity());

        //通过put存入缓冲区
        buf.put(str.getBytes());
        System.out.println("put.......................................");
        System.out.println(buf.position());
        System.out.println(buf.limit());
        System.out.println(buf.capacity());

        //切换成读数据模式
        buf.flip();
        System.out.println("flip.......................................");
        System.out.println(buf.position());
        System.out.println(buf.limit());
        System.out.println(buf.capacity());

        //读取缓冲区中的数据
        byte[] dst=new byte[buf.limit()];
        buf.get(dst);
        System.out.println(new String(dst));

        //获取完之后
        System.out.println(buf.position());
        System.out.println(buf.limit());
        System.out.println(buf.capacity());

        //rewide(),可重复读数据
        System.out.println("rewinde.....................");
        buf.rewind();
        System.out.println(buf.position());
        System.out.println(buf.limit());
        System.out.println(buf.capacity());

        //clear(),清空缓冲区,但是缓冲区中的数据依然存在,但是处于“被遗忘状态”(三个属性变为最初状态,不能正确的读取数据)
        buf.clear();
        System.out.println("clear.............................");
        System.out.println(buf.position());
        System.out.println(buf.limit());
        System.out.println(buf.capacity());
    }

allocatt.................................
0
1024
1024
put.......................................
5
1024
1024
flip.......................................
0
5
1024
abcde
5
5
1024
rewinde.....................
0
5
1024
clear.............................
0
1024
1024
说明:上面的程序是解释Buffer的基本属性,下面是其图解

4.mark。标记,记录当前position的位置,通过reset恢复到mark位置
    @Test
    public void test2(){
        String str="abcde";
        ByteBuffer buf = ByteBuffer.allocate(1024);

        buf.put(str.getBytes());

        buf.flip();
        byte[] dst=new byte[buf.limit()];
        buf.get(dst,0,2);
        System.out.println(new String(dst));

        System.out.println(buf.position());
        //标记一下
        buf.mark();

        buf.get(dst,2,2);
        System.out.println(new String(dst));
        System.out.println(buf.position());

        //恢复
        buf.reset();
        System.out.println(buf.position());
    }

ab
2
abcd
4
2
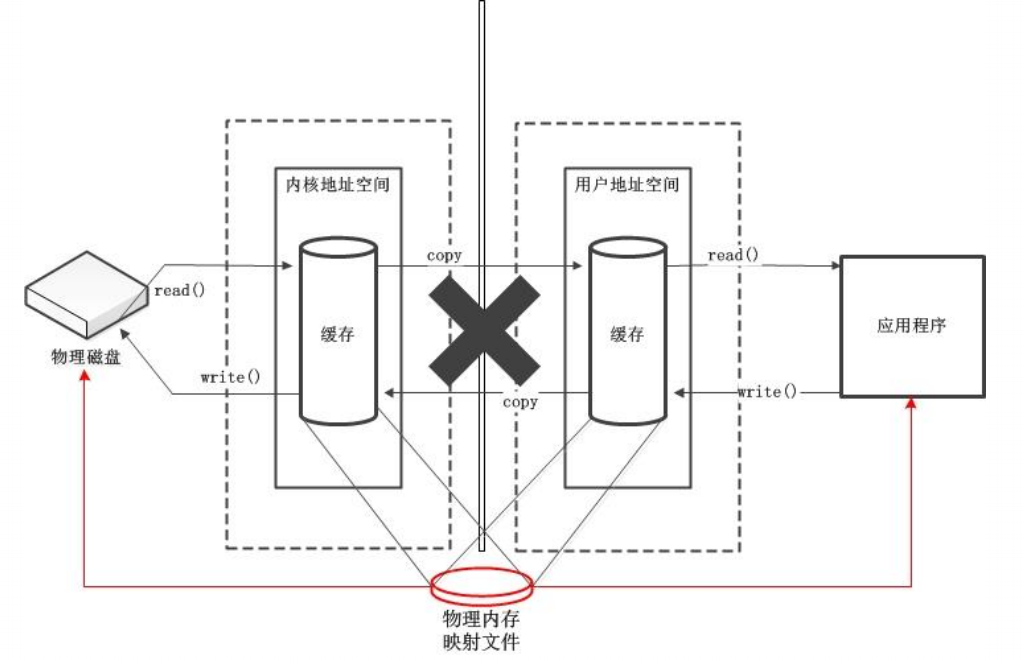
5.直接缓冲区与非直接缓冲区
* 非直接缓冲区:通过allocate()方法分配缓冲区,缓冲区建立再JVM内存中
* 直接缓冲区:通过allocateDirect()方法分配缓冲区,可以将缓冲区建立在操作系统的物理内存中.在某种情况下可以提高效率
    @Test
    public void test3(){
        //直接缓冲区
        ByteBuffer buf = ByteBuffer.allocateDirect(1024);
    }
图解直接缓冲区和非直接缓冲区:
非直接缓冲区:

直接缓冲区:

区别:直接缓冲区是直接在物理内存上面开辟空间,非直接缓冲区是在JVM上面开辟空间,在一定程度上面提高了效率
直接缓冲区的坏处:
a.创建和销毁开销大
b.数据进入直接缓冲区后,后续写入磁盘等操作就完全由操作系统决定了,不受我们控制
三:通道
1.负责源节点和目标节点的连接,在NIO中负责缓冲区中数据的传输,不能存储数据,配合缓冲区使用(理解为铁路(通道)和火车(缓冲区))
2.主要实现类
   java.nio.channels.Channel接口:
      FileChannel--本地
      SocketChannel--TCP
      SertverSocketChannel-TCP
      DatagramChannel-UDP

3.获取通道的三种方式*
  1.getChannel()方法
    本地
    FileInputStream/FILEOut
    网络
      Socket
      ServerSocket
      DatagramSocket
  2.在JDK1.7中的NIO.2针对各个通道提供了静态方法open()
  3.在JDK1.7中的NIO.2的Files的工具类的newByteChannel()

4.通道之间的数据传输
  1.transferForm()
  2.transferTo()

5.分散与聚集
  1.分散读取(将通道中的数据分散到多个缓冲区)
  2.聚集写入(将多个缓冲区中的数据聚集到通道中)

6.字符集
 编码:将字符串转换成字符数组
 解码:字符数组转换成字符串

下面举几个例子:
通过通道完成文件的复制
    @Test
    public void test1() throws IOException {
        FileInputStream fis=new FileInputStream("1.jpg");
        FileOutputStream fos=new FileOutputStream("2.jpg");

        //1.获取通道
        FileChannel inChannel = fis.getChannel();
        FileChannel outChannel = fos.getChannel();

        //2.分配指定大小缓冲区
        ByteBuffer buf=ByteBuffer.allocate(1024);
        //3.将通道中的数据存入缓冲区
        while(inChannel.read(buf)!=-1){
            buf.flip();//切换到读取模式
            //4.将缓冲区中的数据写入通道
            outChannel.write(buf);
            buf.clear();//清空缓冲区
        }
        //5.关闭通道
        inChannel.close();
        outChannel.close();
        fis.close();
        fos.close();
    }
使用直接缓冲区完成文件的复制
    //使用直接缓冲区
    @Test
    public void test2() throws IOException {
        FileChannel inChannel = FileChannel.open(Paths.get("1.jpg"), StandardOpenOption.READ);
        FileChannel outChannel = FileChannel.open(Paths.get("3.jpg"), StandardOpenOption.WRITE,StandardOpenOption.READ,StandardOpenOption.CREATE);

        //内存映射文件
        MappedByteBuffer inMapBuf = inChannel.map(FileChannel.MapMode.READ_ONLY, 0, inChannel.size());
        MappedByteBuffer outMapBuf = outChannel.map(FileChannel.MapMode.READ_WRITE, 0, inChannel.size());

        //直接堆缓冲区堆数据进行读写操作
        byte[] dst=new byte[inMapBuf.limit()];
        inMapBuf.get(dst);
        outMapBuf.put(dst);

        inChannel.close();
        outChannel.close();
    }
通道之间的数据传输(使用直接缓冲区)
    //通道之间的数据传输(直接缓冲区)
    @Test
    public void test3() throws IOException {
        FileChannel inChannel = FileChannel.open(Paths.get("1.jpg"), StandardOpenOption.READ);
        FileChannel outChannel = FileChannel.open(Paths.get("3.jpg"), StandardOpenOption.WRITE,StandardOpenOption.READ,StandardOpenOption.CREATE);

        inChannel.transferTo(0,inChannel.size(),outChannel);
        inChannel.close();
        outChannel.close();
    }
分散与聚集
说明:分散读取是将通道里面的数据依次读到多个缓冲区里面,聚集写入是将多个缓冲区里面的数据依次写入通道里面
    //分散与聚集
    @Test
    public void test4() throws IOException {
        RandomAccessFile raf1=new RandomAccessFile("1.txt","rw");

        //获取通道
        FileChannel channel = raf1.getChannel();

        //分配指定大小的缓冲区
        ByteBuffer bf1=ByteBuffer.allocate(100);
        ByteBuffer bf2=ByteBuffer.allocate(1024);

        //分散读取
        ByteBuffer[] bufs={bf1,bf2};
        channel.read(bufs);

        for (ByteBuffer byteBuffer:bufs) {
            byteBuffer.flip();
        }
        System.out.println(new String(bufs[0].array(),0,bufs[0].limit()));
        System.out.println("--------------------------------------------------");
        System.out.println(new String(bufs[1].array(),0,bufs[1].limit()));

        //聚集写入
        RandomAccessFile raf2=new RandomAccessFile("2.txt","rw");
        FileChannel channel2 = raf2.getChannel();
        channel2.write(bufs);
    }
console:

abvc
dse
fds
gfdgfd

gfdg
gfdg
gfdghytj
fgdgfcv
gfdr
xzcas
c
fds
aaaaaaaaaaaaaaaaaaaaaa
--------------------------------------------------
aaaaaaaaaaaaaaaaaaaaaaaaaaaaaaaaaaaaaaaaaaaaaaaaaaaaaaaaaaaaaaaaaaaaaaaaaaaaaaaaaaaaaaaaaaaaaaaaaaaaaaaaaaaaaaaaaaaaaaaaaaaaaaaa
字符集
    @Test
    public void test5(){
        SortedMap<String, Charset> map = Charset.availableCharsets();

        Set<Map.Entry<String, Charset>> set = map.entrySet();

        for (Map.Entry<String, Charset> entry:set) {
            System.out.println(entry.getKey()+"="+entry.getValue());
        }
    }
编码和解码
****使用哪种字符集编码就要使用哪种字符集解码
    @Test
    public void test6() throws CharacterCodingException {
        Charset cs1 = Charset.forName("GBK");
        //获取编码器和解码器
        CharsetEncoder ce = cs1.newEncoder();
        //获取解码器
        CharsetDecoder cd = cs1.newDecoder();

        CharBuffer cbuf = CharBuffer.allocate(1024);
        cbuf.put("xhww!!");
        cbuf.flip();

        //编码
        ByteBuffer bBuf = ce.encode(cbuf);
        for (int i=0;i<12;i++){
            System.out.println(bBuf.get());
        }
        //解码
        bBuf.flip();
        CharBuffer cBuf = cd.decode(bBuf);
        System.out.println(cBuf);
    }


 浙公网安备 33010602011771号