

@WebListener 注解方式实现监听
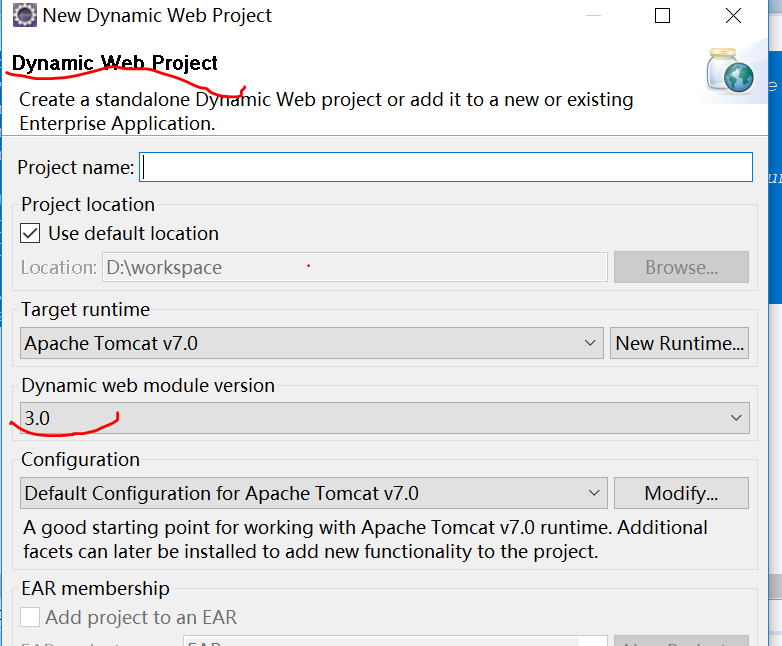
1.创建 Dynamic Web Project ,Dynamic Web module version选择3.0
2.在自动生成 的web.xml配置,增加 metadata-complete="false"

 1 <?xml version="1.0" encoding="UTF-8"?>
 2 <javaee:web-app xmlns:xsi="http://www.w3.org/2001/XMLSchema-instance"
 3 xmlns="http://Java.sun.com/xml/ns/javaee"
 4 xmlns:javaee="http://java.sun.com/xml/ns/javaee"
 5 xmlns:web="http://java.sun.com/xml/ns/javaee"
 6 xsi:schemaLocation="http://java.sun.com/xml/ns/javaee http://java.sun.com/xml/ns/javaee/web-app_3_0.xsd"
 7  metadata-complete="false" version="3.0">
 8   <javaee:display-name></javaee:display-name>
 9   <javaee:welcome-file-list>
10     <javaee:welcome-file>index.html</javaee:welcome-file>
11   </javaee:welcome-file-list>
12 </javaee:web-app>
3.创建监听类,在监听类头部增加 注解 @WebListener
1 2 3 4 5 6 7 8 9 10 11 12 13 14 15 16 17 | package com.xhkj.listener;import javax.servlet.ServletContextEvent;import javax.servlet.ServletContextListener;import javax.servlet.annotation.WebListener;@WebListenerpublic class MyServletContextListener implements ServletContextListener { @Override public void contextDestroyed(ServletContextEvent sce) { System.out.println("===========================MyServletContextListener销毁"); } @Override public void contextInitialized(ServletContextEvent sce) { System.out.println("===========================MyServletContextListener初始化"); System.out.println(sce.getServletContext().getServerInfo()); }} |
4.启动tomcat服务。打印结果如下

5 注意事项,每次修改配置或者java代码后,要重新编译,否则不起作用
6 代码所在地址
https://files.cnblogs.com/files/xhkj/TestWebListener.rar

【推荐】编程新体验,更懂你的AI,立即体验豆包MarsCode编程助手
【推荐】凌霞软件回馈社区,博客园 & 1Panel & Halo 联合会员上线
【推荐】抖音旗下AI助手豆包,你的智能百科全书,全免费不限次数
【推荐】博客园社区专享云产品让利特惠,阿里云新客6.5折上折
【推荐】轻量又高性能的 SSH 工具 IShell:AI 加持,快人一步