Spring(8)使用XML配置开发Spring AOP(二)
一、环境准备
前面我们利用账户转账的例子进行了Spring IOC的讲解,我们在学习 spring 的 aop 时,也采用账户转账作为示例,并且把 spring 的 ioc 也一起应用进来。
1.代码准备
实体类、接口及实现类我们沿用之前的代码。
2.引入必要的Maven依赖
<project xmlns="http://maven.apache.org/POM/4.0.0"
    xmlns:xsi="http://www.w3.org/2001/XMLSchema-instance"
    xsi:schemaLocation="http://maven.apache.org/POM/4.0.0 http://maven.apache.org/xsd/maven-4.0.0.xsd">
    <modelVersion>4.0.0</modelVersion>

    <groupId>com.xhbjava</groupId>
    <artifactId>Spring02</artifactId>
    <version>0.0.1-SNAPSHOT</version>
    <packaging>jar</packaging>

    <properties>
        <project.build.sourceEncoding>UTF-8</project.build.sourceEncoding>
    </properties>

    <dependencies>
        <dependency>
            <groupId>org.springframework</groupId>
            <artifactId>spring-context</artifactId>
            <version>5.0.2.RELEASE</version>
        </dependency>
        <dependency>
            <groupId>org.springframework</groupId>
            <artifactId>spring-test</artifactId>
            <version>5.0.2.RELEASE</version>
        </dependency>
        <dependency>
            <groupId>commons-dbutils</groupId>
            <artifactId>commons-dbutils</artifactId>
            <version>1.4</version>
        </dependency>

        <dependency>
            <groupId>mysql</groupId>
            <artifactId>mysql-connector-java</artifactId>
            <version>8.0.19</version>
        </dependency>


        <dependency>
            <groupId>c3p0</groupId>
            <artifactId>c3p0</artifactId>
            <version>0.9.1.2</version>
        </dependency>

        <dependency>
            <groupId>junit</groupId>
            <artifactId>junit</artifactId>
            <version>4.12</version>
        </dependency>
        <dependency>
            <groupId>org.aspectj</groupId>
            <artifactId>aspectjweaver</artifactId>
            <version>1.9.4</version>
        </dependency>
    </dependencies>
</project>
3.创建spring 的配置文件并导入约束
<?xml version="1.0" encoding="UTF-8"?>
<beans xmlns:xsi="http://www.w3.org/2001/XMLSchema-instance"
    xmlns:context="http://www.springframework.org/schema/context"
    xmlns:p="http://www.springframework.org/schema/p"
    xmlns:util="http://www.springframework.org/schema/util"
    xmlns="http://www.springframework.org/schema/beans"
    xmlns:aop="http://www.springframework.org/schema/aop"
    xsi:schemaLocation="http://www.springframework.org/schema/beans
     http://www.springframework.org/schema/beans/spring-beans.xsd
     http://www.springframework.org/schema/context
     http://www.springframework.org/schema/context/spring-context.xsd
     http://www.springframework.org/schema/aop
     http://www.springframework.org/schema/aop/spring-aop.xsd">
</beans>
4.配置Spring的IOC
    <!-- 注入切面 -->
    <bean id="xmlAspect" class="com.xhbjava.aspect.XmlAspect"/>
    <bean id="accountService"
        class="com.xhbjava.service.impl.AccountServiceImpl"/>
5.切面类
package com.xhbjava.aspect;

public class XmlAspect {
    public void before() {
        System.out.println("before....");
    }
    public void after() {
        System.out.println("after....");
    }
    public void afterThrowing() {
        System.out.println("after-throwing....");
    }
    public void afterReturning() {
        System.out.println("after-returning....");
    }

}
二、配置
1.前置通知、后置通知、返回通知和异常通知配置
    <!-- 配置AOP -->
    <aop:config>
        <!-- 引入切面 -->
        <aop:aspect ref="xmlAspect">
            <!-- 定义通知 -->
            <aop:before method="before"
                pointcut="execution(* com.xhbjava.service.impl.AccountServiceImpl.printAccount(..))" />

            <aop:after method="after"
                pointcut="execution(* com.xhbjava.service.impl.AccountServiceImpl.printAccount(..))" />
            <aop:after-throwing method="afterThrowing"
                pointcut="execution(* com.xhbjava.service.impl.AccountServiceImpl.printAccount(..))" />
            <aop:after-returning method="afterReturning"
                pointcut="execution(* com.xhbjava.service.impl.AccountServiceImpl.printAccount(..))" />
        </aop:aspect>
    </aop:config>
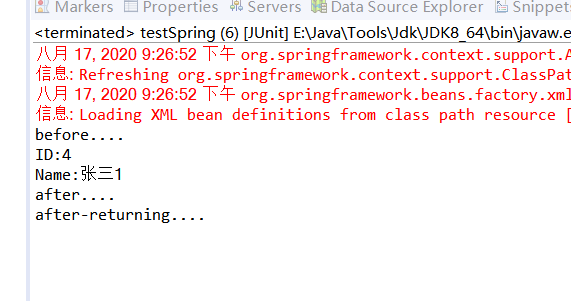
2.测试
package com.xhbjava.test;

import org.junit.Test;
import org.springframework.context.ApplicationContext;
import org.springframework.context.support.ClassPathXmlApplicationContext;

import com.xhbjava.pojo.Account;
import com.xhbjava.service.IAccountService;

public class testSpring {

    private ApplicationContext ctx;

    @Test
    public void testDelete() {
        ctx = new ClassPathXmlApplicationContext("bean.xml");
        Account account = new Account();
        account.setId(4);
        account.setName("张三1");
        account.setMmoney(6500f);
        IAccountService accountService = ctx.getBean(IAccountService.class);
        // 3.执行方法
        accountService.printAccount(account);

    }

}

三、改进
1.定义切点
<?xml version="1.0" encoding="UTF-8"?>
<beans xmlns:xsi="http://www.w3.org/2001/XMLSchema-instance"
    xmlns:context="http://www.springframework.org/schema/context"
    xmlns:p="http://www.springframework.org/schema/p"
    xmlns:util="http://www.springframework.org/schema/util"
    xmlns="http://www.springframework.org/schema/beans"
    xmlns:aop="http://www.springframework.org/schema/aop"
    xsi:schemaLocation="http://www.springframework.org/schema/beans
     http://www.springframework.org/schema/beans/spring-beans.xsd
     http://www.springframework.org/schema/context
     http://www.springframework.org/schema/context/spring-context.xsd
     http://www.springframework.org/schema/aop
     http://www.springframework.org/schema/aop/spring-aop.xsd">

    <!-- 注入切面 -->
    <bean id="xmlAspect" class="com.xhbjava.aspect.XmlAspect" />
    <bean id="accountService"
        class="com.xhbjava.service.impl.AccountServiceImpl" />
    <!-- 配置AOP -->
    <aop:config>
        <!-- 引入切面 -->
        <aop:aspect ref="xmlAspect">
            <!-- 定义切点 -->
            <aop:pointcut
                expression="execution(* com.xhbjava.service.impl.AccountServiceImpl.printAccount(..))"
                id="printAccount" />
            <!-- 定义通知 引入切点 -->
            <aop:before method="before" pointcut-ref="printAccount" />

            <aop:after method="after" pointcut-ref="printAccount" />
            <aop:after-throwing method="afterThrowing"
                pointcut-ref="printAccount" />
            <aop:after-returning method="afterReturning"
                pointcut-ref="printAccount" />
        </aop:aspect>
    </aop:config>
</beans>
2.有点
通过定义切点并引入,这样避免了重复代码。
四、环绕通知
1.环绕通知
和其他通知一样,环绕通知也可以织入到特定的流程中,我们在之前的切面类中添加如下代码:
public void around(ProceedingJoinPoint jp) {
        System.out.println("around before...");
        try {
            jp.proceed();
        } catch (Throwable t) {
            new RuntimeException("回调原有流程,产生异常。。。");

        }
        System.out.println("around after...");
    }
<aop:around method="around" pointcut-ref="printAccount"/>
2.给通知传递参数
(1)改造切面类方法
public void before(Account account) {
        System.out.println("before....");
        System.out.println("Account:"+account);
    }
(2)改造Spring 中的bean.xml配置文件:
<aop:before method="before"
                pointcut="execution(* com.xhbjava.service.impl.AccountServiceImpl.printAccount(..)) and args(account)" />
五、多切面
1.在原来的例子基础上增加切面
package com.xhbjava.aspect;

import org.aspectj.lang.ProceedingJoinPoint;

import com.xhbjava.pojo.Account;

public class XmlAspect {
    public void before(Account account) {
        System.out.println("before0....");
        System.out.println("Account:"+account);
    }

    public void after() {
        System.out.println("after0....");
    }

    public void afterThrowing() {
        System.out.println("after-throwing0....");
    }

    public void afterReturning() {
        System.out.println("after-returning0....");
    }

    public void around(ProceedingJoinPoint jp) {
        System.out.println("around before0...");
        try {
            jp.proceed();
        } catch (Throwable t) {
            new RuntimeException("回调原有流程,产生异常。。。");

        }
        System.out.println("around after0...");
    }
}
package com.xhbjava.aspect;

import org.aspectj.lang.ProceedingJoinPoint;

import com.xhbjava.pojo.Account;

public class XmlAspect1 {
    public void before(Account account) {
        System.out.println("before1....");
        System.out.println("Account:"+account);
    }

    public void after() {
        System.out.println("after1....");
    }

    public void afterThrowing() {
        System.out.println("after-throwing1....");
    }

    public void afterReturning() {
        System.out.println("after-returning1....");
    }

    public void around(ProceedingJoinPoint jp) {
        System.out.println("around before1...");
        try {
            jp.proceed();
        } catch (Throwable t) {
            new RuntimeException("回调原有流程,产生异常。。。");

        }
        System.out.println("around after1...");
    }
}
package com.xhbjava.aspect;

import org.aspectj.lang.ProceedingJoinPoint;

import com.xhbjava.pojo.Account;

public class XmlAspect2 {
    public void before(Account account) {
        System.out.println("before2....");
        System.out.println("Account:"+account);
    }

    public void after() {
        System.out.println("after2....");
    }

    public void afterThrowing() {
        System.out.println("after-throwing2....");
    }

    public void afterReturning() {
        System.out.println("after-returning2....");
    }

    public void around(ProceedingJoinPoint jp) {
        System.out.println("around before2...");
        try {
            jp.proceed();
        } catch (Throwable t) {
            new RuntimeException("回调原有流程,产生异常。。。");

        }
        System.out.println("around after2...");
    }
}
2.配置bean.xml
<?xml version="1.0" encoding="UTF-8"?>
<beans xmlns:xsi="http://www.w3.org/2001/XMLSchema-instance"
    xmlns:context="http://www.springframework.org/schema/context"
    xmlns:p="http://www.springframework.org/schema/p"
    xmlns:util="http://www.springframework.org/schema/util"
    xmlns="http://www.springframework.org/schema/beans"
    xmlns:aop="http://www.springframework.org/schema/aop"
    xsi:schemaLocation="http://www.springframework.org/schema/beans
     http://www.springframework.org/schema/beans/spring-beans.xsd
     http://www.springframework.org/schema/context
     http://www.springframework.org/schema/context/spring-context.xsd
     http://www.springframework.org/schema/aop
     http://www.springframework.org/schema/aop/spring-aop.xsd">

    <!-- 注入切面 -->
    <bean id="xmlAspect" class="com.xhbjava.aspect.XmlAspect" />
    <bean id="xmlAspect1" class="com.xhbjava.aspect.XmlAspect1" />
    <bean id="xmlAspect2" class="com.xhbjava.aspect.XmlAspect2" />
    <bean id="accountService"
        class="com.xhbjava.service.impl.AccountServiceImpl" />
    <!-- 配置AOP -->
    <aop:config>
        <!-- 引入切面 -->
        <aop:aspect ref="xmlAspect">
            <!-- 定义切点 -->
            <aop:pointcut
                expression="execution(* com.xhbjava.service.impl.AccountServiceImpl.printAccount(..))"
                id="printAccount" />
            <!-- 定义通知 引入切点 -->
            <aop:before method="before"
                pointcut="execution(* com.xhbjava.service.impl.AccountServiceImpl.printAccount(..)) and args(account)" />

            <aop:after method="after" pointcut-ref="printAccount" />
            <aop:after-throwing method="afterThrowing"
                pointcut-ref="printAccount" />
            <aop:after-returning method="afterReturning"
                pointcut-ref="printAccount" />
            <aop:around method="around" pointcut-ref="printAccount" />
        </aop:aspect>

            <aop:aspect ref="xmlAspect1">
            <!-- 定义切点 -->
            <aop:pointcut
                expression="execution(* com.xhbjava.service.impl.AccountServiceImpl.printAccount(..))"
                id="printAccount1" />
            <!-- 定义通知 引入切点 -->
            <aop:before method="before"
                pointcut="execution(* com.xhbjava.service.impl.AccountServiceImpl.printAccount(..)) and args(account)" />

            <aop:after method="after" pointcut-ref="printAccount1" />
            <aop:after-throwing method="afterThrowing"
                pointcut-ref="printAccount1" />
            <aop:after-returning method="afterReturning"
                pointcut-ref="printAccount1" />
            <aop:around method="around" pointcut-ref="printAccount1" />
        </aop:aspect>
            <aop:aspect ref="xmlAspect2">
            <!-- 定义切点 -->
            <aop:pointcut
                expression="execution(* com.xhbjava.service.impl.AccountServiceImpl.printAccount(..))"
                id="printAccount2" />
            <!-- 定义通知 引入切点 -->
            <aop:before method="before"
                pointcut="execution(* com.xhbjava.service.impl.AccountServiceImpl.printAccount(..)) and args(account)" />

            <aop:after method="after" pointcut-ref="printAccount2" />
            <aop:after-throwing method="afterThrowing"
                pointcut-ref="printAccount2" />
            <aop:after-returning method="afterReturning"
                pointcut-ref="printAccount2" />
            <aop:around method="around" pointcut-ref="printAccount" />
        </aop:aspect>
    </aop:config>
</beans>
3.测试

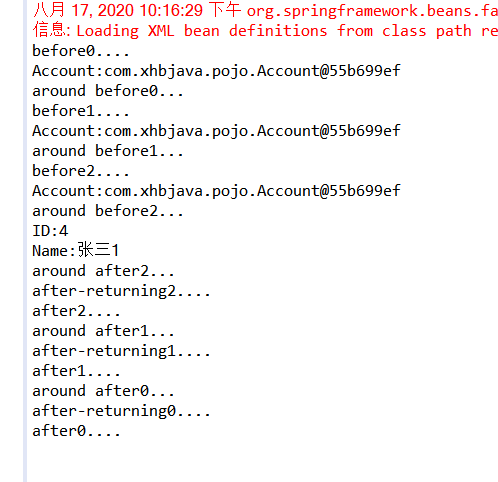
我们可以看出多个切面是无序的 其执行顺序值得我们探讨。
4.有序
我们在xml配置中加入排序:
<aop:aspect ref="xmlAspect1" order="2">
...
</aop:aspect >
测试:

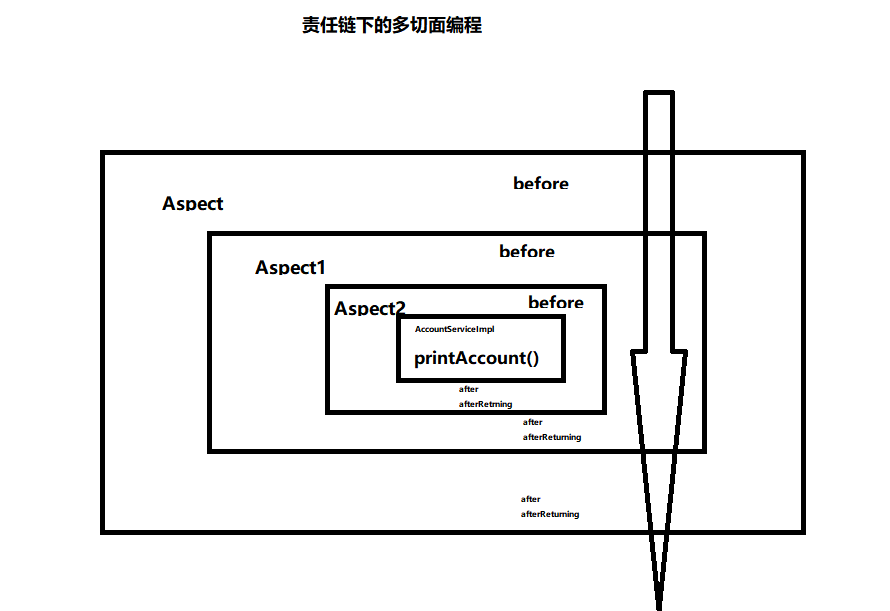
5.分析
通过上面测试,我们可以看到多切面按照顺序执行,我们知道Spring AOP实现原理基于动态代理,在多个代理模式下,按照责任链模式执行。简单图示如下:

六、XML节点解析
1.aop:config
用于声明开始 aop 的配置:
2.aop:aspect
用于配置切面。
属性: id:给切面提供一个唯一标识。 ref:引用配置好的通知类 bean 的 id。
3.aop:pointcut
用于配置切入点表达式,就是制定对那些类的那些方法进行增强。
属性:expression:用于定义切入点表达式。id:用于给切入点表达式提供一个唯一标识。
<aop:pointcut
                expression="execution(* com.xhbjava.service.impl.AccountServiceImpl.printAccount(..))"
                id="printAccount" />
4.通知类型
(1)aop:before
用于配置前置通知,指定增强方法在切入点方法之前执行。
属性:method:用于指定通知类中的增强方法名称;ponitcut-ref:用于指定切入点的表达式的引用;poinitcut:用于指定切入点表达式。
执行时间点:切入点方法执行之前执行。
<aop:before method="before" pointcut-ref="printAccount" />
(2)aop:after-returning
用于配置后置通知
属性:method:指定通知中方法的名称。pointct:定义切入点表达式。pointcut-ref:指定切入点表达式的引用
执行时间点:切入点方法正常执行之后。它和异常通知只能有一个执行
<aop:after-returning method="afterReturning" pointcut-ref="printAccount" />
(3)aop:after-throwing
用于配置异常通知。
属性:method:指定通知中方法的名称。pointct:定义切入点表达式。pointcut-ref:指定切入点表达式的引用。
执行时间点:切入点方法执行产生异常后执行。它和后置通知只能执行一个。
<aop:after-throwing method="rollback" pointcut-ref="pt1"/>
(4)aop:after
用于配置最终通知
属性:method:指定通知中方法的名称。pointct:定义切入点表达式。pointcut-ref:指定切入点表达式的引用。
执行时间点:无论切入点方法执行时是否有异常,它都会在其后面执行。
<aop:after method="after" pointcut-ref="printAccount2" />
(5)aop:around
用于配置环绕通知
属性:method:指定通知中方法的名称。pointct:定义切入点表达式。pointcut-ref:指定切入点表达式的引用。
说明:它是 spring 框架为我们提供的一种可以在代码中手动控制增强代码什么时候执行的方式。
注意:通常情况下,环绕通知都是独立使用的。
配置方式:
 <aop:config> <aop:pointcut expression="execution(*com.xhbjava.service.impl.*.*(..))"id="pt1"/>
<aop:aspect id="txAdvice" ref="txManager">
<!-- 配置环绕通知 -->
<aop:around method="transactionAround" pointcut-ref="pt1"/>
</aop:aspect>
</aop:config>
(6)切入点表达式说明
execution:匹配方法的执行(常用):
表达式语法:execution([修饰符] 返回值类型 包名.类名.方法名(参数))
写法说明:
全匹配方式:
public void com.xhbjava.service.impl.AccountServiceImpl.saveAccount(com.xhbjava.domain.Account)
访问修饰符可以省略:
void com.xhbjava.service.impl.AccountServiceImpl.saveAccount(com.xhbjava.domain.Account)
返回值可以使用*号,表示任意返回值:
* com.xhbjava.service.impl.AccountServiceImpl.saveAccount(com.xhbjava.domain.Account)
包名可以使用*号,表示任意包,但是有几级包,需要写几个*:
* *.*.*.*.AccountServiceImpl.saveAccount(com.xhbjava.domain.Account)
使用..来表示当前包,及其子包:
* com..AccountServiceImpl.saveAccount(com.xhbjava.domain.Account)
类名可以使用*号,表示任意类:
* com..*.saveAccount(com.xhbjava.domain.Account)
方法名可以使用*号,表示任意方法:
* com..*.*( com.xhbjava.domain.Account)
参数列表可以使用*,表示参数可以是任意数据类型,但是必须有参数:
* com..*.*(*)
参数列表可以使用..表示有无参数均可,有参数可以是任意类型:
* com..*.*(..)
全通配方式:
* *..*.*(..)
注:
通常情况下,我们都是对业务层的方法进行增强,所以切入点表达式都是切到业务层实现类。
execution(* com.xhbjava.service.impl.*.*(..))


 浙公网安备 33010602011771号