

Mybaits(6)连接池与事务
一.Mybatis连接池技术
我们经过了解接触过数据库连接池技术,在Mybatis中也有自己的连接池技术,我们可以在Mybatis的SqlMapConfig.xml配置文件中,通过过<dataSource type=”pooled”>来实现 Mybatis 中连接池的配置。
1.Mybaits连接池分类
POOLED:实现dataSource接口,并且使用了池的思想。
UNPOOLED:同样也是实现了dataSource接口,但是该类型并没有使用池的思想。
JDNI:采用服务器提供的JDNI技术实现的,并且在不同服务器之间获取的连接池是不一样的。
其具体结构如下:
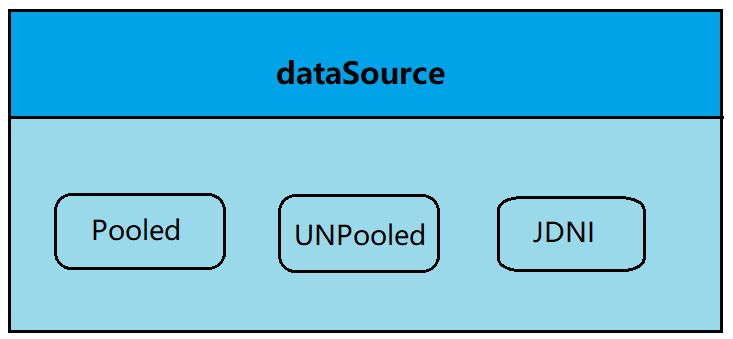
相应的MyBatis 内部分别定义了实现了 java.sql.DataSource 接口的 UnpooledDataSource,PooledDataSource 类来表示 UNPOOLED、POOLED 类型的数据源。
2.Mybaits连接池原理
在这三种数据源中,我们一般采用的是 POOLED 数据源,这里我们详细介绍下POOLED和UNPOOLED数据源代码原理。
(1)POOLED
使用连接池实现数据源。
连接池:其实就是用于存储连接对象的一个容器。该容器是一个集合,而且必须是线程安全的,即两个线程不能拿到同一个连接对象。同时还要具备队列的特性:先进先出原则。
连接池的好处:可以避免频繁创建和关闭数据库连接造成系统资源开销,节省系统资源。
程序运行实例分析:
第一步:将SqlMapConfig.xml数据库连接池改成“POOLED”
<!-- 配置数据源 -->
            <dataSource type="POOLED">
                <property name="driver" value="${jdbc.driver}" />
                <property name="url" value="${jdbc.url}" />
                <property name="username" value="${jdbc.username}" />
                <property name="password" value="${jdbc.password}" />
            </dataSource>
当我们MyBatis初始化时,根据我们配饰的数据库连接类型<dataSource>的type属性来创建相应类型的的数据源DataSource即UnpooledDataSource,PooledDataSource,JNDI的话会从JNDI服务上查找DataSource实例,然后返回使用。
第二步,启动测试程序
第三步,源码分析
MyBatis是通过工厂模式来创建数据源DataSource对象的,MyBatis定义了抽象的工厂接口:org.apache.ibatis.datasource.DataSourceFactory,通过其getDataSource()方法返回数据源DataSource:
package org.apache.ibatis.datasource;

import java.util.Properties;
import javax.sql.DataSource;

/**
 * @author Clinton Begin
 */
public interface DataSourceFactory {

  void setProperties(Properties props);

  DataSource getDataSource();

}
MyBatis创建了DataSource实例后,会将其放到Configuration对象内的Environment对象中, 供以后使用,当我们需要创建SqlSession对象并需要执行SQL语句时,这时候MyBatis才会去调用dataSource对象来创建java.sql.Connection对象。
打开XMLConfigBuilder类源码,我找到
  public Configuration parse() {
    if (parsed) {
      throw new BuilderException("Each XMLConfigBuilder can only be used once.");
    }
    parsed = true;
    parseConfiguration(parser.evalNode("/configuration"));
    return configuration;
  }

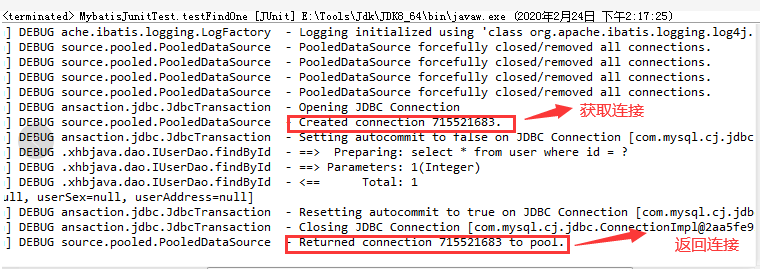
第四步,连接获取
 @Override
  public Connection getConnection() throws SQLException {
    return popConnection(dataSource.getUsername(), dataSource.getPassword()).getProxyConnection();
  }

  @Override
  public Connection getConnection(String username, String password) throws SQLException {
    return popConnection(username, password).getProxyConnection();
  }
private PooledConnection popConnection(String username, String password) throws SQLException {
    boolean countedWait = false;
    PooledConnection conn = null;
    long t = System.currentTimeMillis();
    int localBadConnectionCount = 0;

    while (conn == null) {
      synchronized (state) {
        if (!state.idleConnections.isEmpty()) {
          // Pool has available connection
          conn = state.idleConnections.remove(0);
          if (log.isDebugEnabled()) {
            log.debug("Checked out connection " + conn.getRealHashCode() + " from pool.");
          }
        } else {
          // Pool does not have available connection
          if (state.activeConnections.size() < poolMaximumActiveConnections) {
            // Can create new connection
            conn = new PooledConnection(dataSource.getConnection(), this);
            if (log.isDebugEnabled()) {
              log.debug("Created connection " + conn.getRealHashCode() + ".");
            }
          } else {
            // Cannot create new connection
            PooledConnection oldestActiveConnection = state.activeConnections.get(0);
            long longestCheckoutTime = oldestActiveConnection.getCheckoutTime();
            if (longestCheckoutTime > poolMaximumCheckoutTime) {
              // Can claim overdue connection
              state.claimedOverdueConnectionCount++;
              state.accumulatedCheckoutTimeOfOverdueConnections += longestCheckoutTime;
              state.accumulatedCheckoutTime += longestCheckoutTime;
              state.activeConnections.remove(oldestActiveConnection);
              if (!oldestActiveConnection.getRealConnection().getAutoCommit()) {
                try {
                  oldestActiveConnection.getRealConnection().rollback();
                } catch (SQLException e) {
                  /*
                     Just log a message for debug and continue to execute the following
                     statement like nothing happend.
                     Wrap the bad connection with a new PooledConnection, this will help
                     to not intterupt current executing thread and give current thread a
                     chance to join the next competion for another valid/good database
                     connection. At the end of this loop, bad {@link @conn} will be set as null.
                   */
                  log.debug("Bad connection. Could not roll back");
                }
              }
              conn = new PooledConnection(oldestActiveConnection.getRealConnection(), this);
              conn.setCreatedTimestamp(oldestActiveConnection.getCreatedTimestamp());
              conn.setLastUsedTimestamp(oldestActiveConnection.getLastUsedTimestamp());
              oldestActiveConnection.invalidate();
              if (log.isDebugEnabled()) {
                log.debug("Claimed overdue connection " + conn.getRealHashCode() + ".");
              }
            } else {
              // Must wait
              try {
                if (!countedWait) {
                  state.hadToWaitCount++;
                  countedWait = true;
                }
                if (log.isDebugEnabled()) {
                  log.debug("Waiting as long as " + poolTimeToWait + " milliseconds for connection.");
                }
                long wt = System.currentTimeMillis();
                state.wait(poolTimeToWait);
                state.accumulatedWaitTime += System.currentTimeMillis() - wt;
              } catch (InterruptedException e) {
                break;
              }
            }
          }
        }
        if (conn != null) {
          // ping to server and check the connection is valid or not
          if (conn.isValid()) {
            if (!conn.getRealConnection().getAutoCommit()) {
              conn.getRealConnection().rollback();
            }
            conn.setConnectionTypeCode(assembleConnectionTypeCode(dataSource.getUrl(), username, password));
            conn.setCheckoutTimestamp(System.currentTimeMillis());
            conn.setLastUsedTimestamp(System.currentTimeMillis());
            state.activeConnections.add(conn);
            state.requestCount++;
            state.accumulatedRequestTime += System.currentTimeMillis() - t;
          } else {
            if (log.isDebugEnabled()) {
              log.debug("A bad connection (" + conn.getRealHashCode() + ") was returned from the pool, getting another connection.");
            }
            state.badConnectionCount++;
            localBadConnectionCount++;
            conn = null;
            if (localBadConnectionCount > (poolMaximumIdleConnections + poolMaximumLocalBadConnectionTolerance)) {
              if (log.isDebugEnabled()) {
                log.debug("PooledDataSource: Could not get a good connection to the database.");
              }
              throw new SQLException("PooledDataSource: Could not get a good connection to the database.");
            }
          }
        }
      }

    }

    if (conn == null) {
      if (log.isDebugEnabled()) {
        log.debug("PooledDataSource: Unknown severe error condition.  The connection pool returned a null connection.");
      }
      throw new SQLException("PooledDataSource: Unknown severe error condition.  The connection pool returned a null connection.");
    }

    return conn;
  }
从上面popConnection方法分析如下:
1>看是否有空闲(idle)状态下的PooledConnection对象,如果有,就直接返回一个可用的PooledConnection对象;否则进行第2步。
2>查看活动状态的PooledConnection池activeConnections是否已满;如果没有满,则创建一个新的PooledConnection对象,然后放到activeConnections池中,然后返回此PooledConnection对象;否则进行第三步;
3>看最先进入activeConnections池中的PooledConnection对象是否已经过期:如果已经过期,从activeConnections池中移除此对象,然后创建一个新的PooledConnection对象,添加到activeConnections中,然后将此对象返回;否则进行第4步。
4>线程等待,循环2步
处理流程提如下:

(2)UPOOLED
上面我们已经知道MyBatis 内部分别定义了实现了 java.sql.DataSource 接口的 UnpooledDataSource,我们通过程序运行分析其原理。
第一步:将SqlMapConfig.xml数据库连接池改成“UNPOOLED”
<environments default="mysql">
        <!-- 配置mysql环境 -->
        <environment id="mysql">
            <!-- 配置事务类型 -->
            <transactionManager type="JDBC"></transactionManager>
            <!-- 配置数据源 -->
            <dataSource type="UNPOOLED">
                <property name="driver" value="${jdbc.driver}" />
                <property name="url" value="${jdbc.url}" />
                <property name="username" value="${jdbc.username}" />
                <property name="password" value="${jdbc.password}" />
            </dataSource>
        </environment>
    </environments>
第二步:运行测试类

不难发现,UPOOLED没吃都创建一个新的的数据库连接。
第三步:源码剖析
我们找到UnpooledDataSource类,发现有连接数据的信息
 private String driver;
  private String url;
  private String username;
  private String password;
接着我们找到了getConnection()方法
@Override
  public Connection getConnection() throws SQLException {
    return doGetConnection(username, password);
  }
接着继续跟踪doGetConnection()方法,看到将数据库用名密码封装到Properties中去了,然后调用 doGetConnection
private Connection doGetConnection(String username, String password) throws SQLException {
    Properties props = new Properties();
    if (driverProperties != null) {
      props.putAll(driverProperties);
    }
    if (username != null) {
      props.setProperty("user", username);
    }
    if (password != null) {
      props.setProperty("password", password);
    }
    return doGetConnection(props);
  }
接着跟踪doGetConnection(props);
 private Connection doGetConnection(Properties properties) throws SQLException {
    initializeDriver();
    Connection connection = DriverManager.getConnection(url, properties);
    configureConnection(connection);
    return connection;
  }
我们分析initializeDriver()方法,是之前jdbc注册驱动方法
private synchronized void initializeDriver() throws SQLException {
    if (!registeredDrivers.containsKey(driver)) {
      Class<?> driverType;
      try {
        if (driverClassLoader != null) {
          driverType = Class.forName(driver, true, driverClassLoader);
        } else {
          driverType = Resources.classForName(driver);
        }
        // DriverManager requires the driver to be loaded via the system ClassLoader.
        // http://www.kfu.com/~nsayer/Java/dyn-jdbc.html
        Driver driverInstance = (Driver)driverType.newInstance();
        DriverManager.registerDriver(new DriverProxy(driverInstance));
        registeredDrivers.put(driver, driverInstance);
      } catch (Exception e) {
        throw new SQLException("Error setting driver on UnpooledDataSource. Cause: " + e);
      }
    }
此时会发现就是一个注册驱动,生成连接返回连接的过程。所以每次调用就会产生一个新的connection对象。
(3)JNDI
JNDI:Java Naming and Directory Interface。是SUN公司推出的一套规范,属于JavaEE技术之一。目的是模仿windows系统中的注册表
分析JndiDataSourceFactory类关键代码
private static Properties getEnvProperties(Properties allProps) {
    final String PREFIX = ENV_PREFIX;
    Properties contextProperties = null;
    for (Entry<Object, Object> entry : allProps.entrySet()) {
      String key = (String) entry.getKey();
      String value = (String) entry.getValue();
      if (key.startsWith(PREFIX)) {
        if (contextProperties == null) {
          contextProperties = new Properties();
        }
        contextProperties.put(key.substring(PREFIX.length()), value);
      }
    }
    return contextProperties;
  }
我们通过JNDI的上下文中找到datasource并返回。
二、Mybatis事务
通过sqlsession对象的commit方法和rollback方法实现事务的提交和回滚。
这里我们简单的了解下,关于复杂的事务控制在Sping的学习中在深入了解。
(1)Mybatis中事务的提交方式
@Test
    public void testSave() {
        User user = new User();
        user.setUserName("王小李");
        user.setUserAddress("北京");
        user.setUserSex("男");
        user.setUserBirthday(new Date());
        userDao.saveUser(user);
        System.out.println("保存:" + user);
    }
@Before
    public void init() {
        // 1.读取配置文件
        try {
            in = Resources.getResourceAsStream("SqlMapConfig.xml");
        } catch (IOException e) {
            // TODO Auto-generated catch block
            e.printStackTrace();
        }
        // 2.创建构建者
        SqlSessionFactoryBuilder builder = new SqlSessionFactoryBuilder();
        // 3.创建session工厂
        factory = builder.build(in);
        // 4.创建session对象
        session = factory.openSession();
        // 5.创建Dao的代理对象
        userDao = session.getMapper(IUserDao.class);
    }
@After // 在测试方法执行完成之后执行
    public void destroy() throws Exception {
        // 提交事务
        session.commit();
        // 7.释放资源
        session.close();
        in.close();
    }
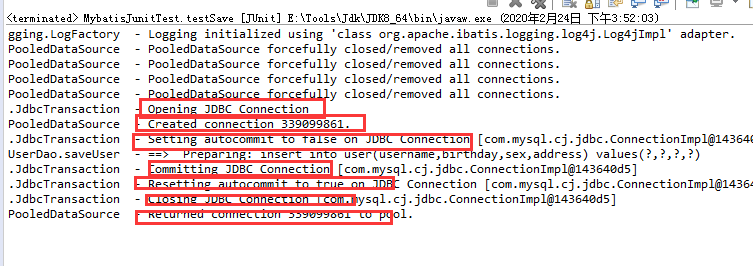
我们观察测试执行过程发现的Connection 的整个变化过程,通过分析我们能够发现之前的 CUD 操作过程中,我们都要手动进行事务的提交,原因是 setAutoCommit()方法,在执行时它的值被设置为 false 了,所以我们在 CUD 操作中,必须通过 sqlSession.commit()方法来执行提交操作。
@Test
    public void testSave() {
        User user = new User();
        user.setUserName("王小二");
        user.setUserAddress("北京");
        user.setUserSex("男");
        user.setUserBirthday(new Date());
        userDao.saveUser(user);
        System.out.println("保存:" + user);
    }
@Before
    public void init() {
        // 1.读取配置文件
        try {
            in = Resources.getResourceAsStream("SqlMapConfig.xml");
        } catch (IOException e) {
            // TODO Auto-generated catch block
            e.printStackTrace();
        }
        // 2.创建构建者
        SqlSessionFactoryBuilder builder = new SqlSessionFactoryBuilder();
        // 3.创建session工厂
        factory = builder.build(in);
        // 4.创建session对象
        session = factory.openSession(true);
        // 5.创建Dao的代理对象
        userDao = session.getMapper(IUserDao.class);
    }
@After // 在测试方法执行完成之后执行
    public void destroy() throws Exception {

        // 7.释放资源
        session.close();
        in.close();
    }
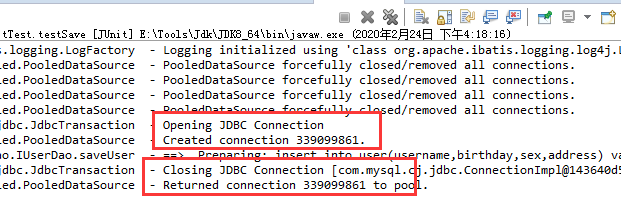
我们发现此时我们的事务自动提交了,在我们实际工作中我们会根据业务实际情况控制事务的提交,因此我们设置事务自动提交方式为false方式更常用。

 浙公网安备 33010602011771号