Raspberry Pi & 0.96 inch SSD1306 OLED display All In One
Raspberry Pi & 0.96 inch SSD1306 OLED display All In One
I2C
$ sudo apt-get install i2c-tools

$ sudo i2cdetect -y 1
- 开启
I2C前 ❌
$ sudo i2cdetect -y 1
Error: Could not open file `/dev/i2c-1' or `/dev/i2c/1': No such file or directory

- 开启
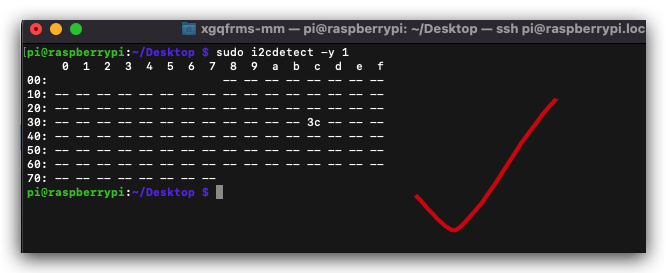
I2C后 ✅
$ sudo i2cdetect -y 1
     0  1  2  3  4  5  6  7  8  9  a  b  c  d  e  f
00:                         -- -- -- -- -- -- -- --
10: -- -- -- -- -- -- -- -- -- -- -- -- -- -- -- --
20: -- -- -- -- -- -- -- -- -- -- -- -- -- -- -- --
30: -- -- -- -- -- -- -- -- -- -- -- -- 3c -- -- --
40: -- -- -- -- -- -- -- -- -- -- -- -- -- -- -- --
50: -- -- -- -- -- -- -- -- -- -- -- -- -- -- -- --
60: -- -- -- -- -- -- -- -- -- -- -- -- -- -- -- --
70: -- -- -- -- -- -- -- --
pi@raspberrypi:~/Desktop $
raspi-config
# GUI 交互式命令行界面
$ sudo raspi-config
在本质上还是直接修改 /boot/config.txt 配置文件
https://www.raspberrypi.com/documentation/computers/configuration.html#the-raspi-config-tool
开启
I2C
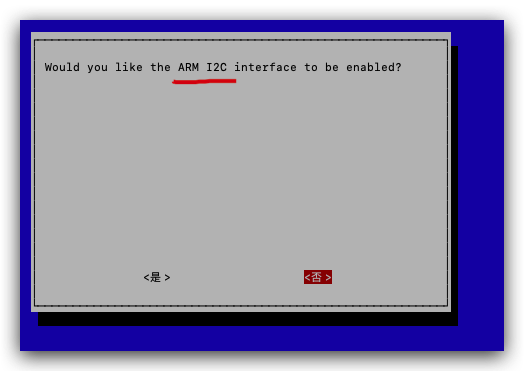
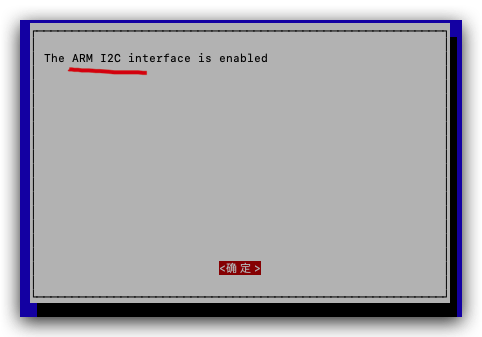
dtparam=i2c_arm=on ✅
# Uncomment some or all of these to enable the optional hardware interfaces
dtparam=i2c_arm=on
#dtparam=i2s=on
#dtparam=spi=on
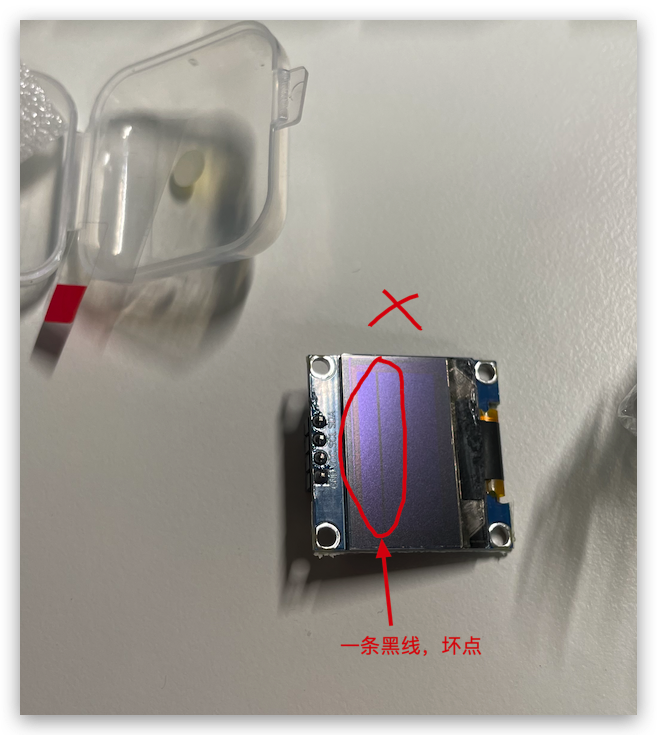
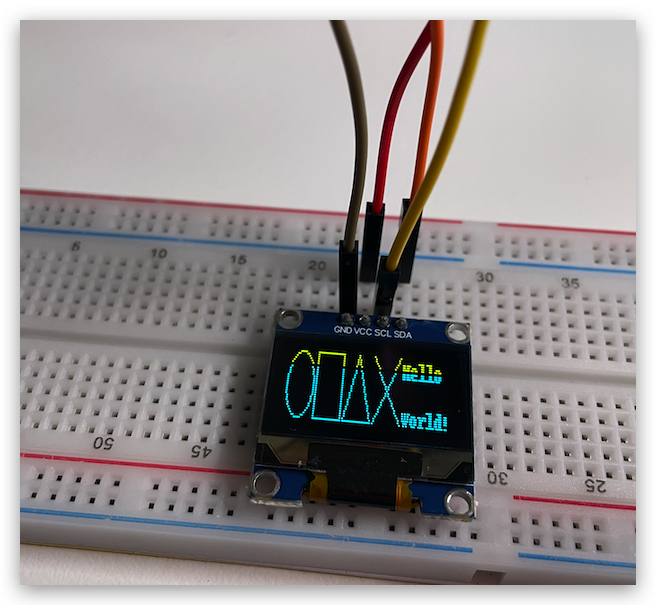
0.96 inch OLED display
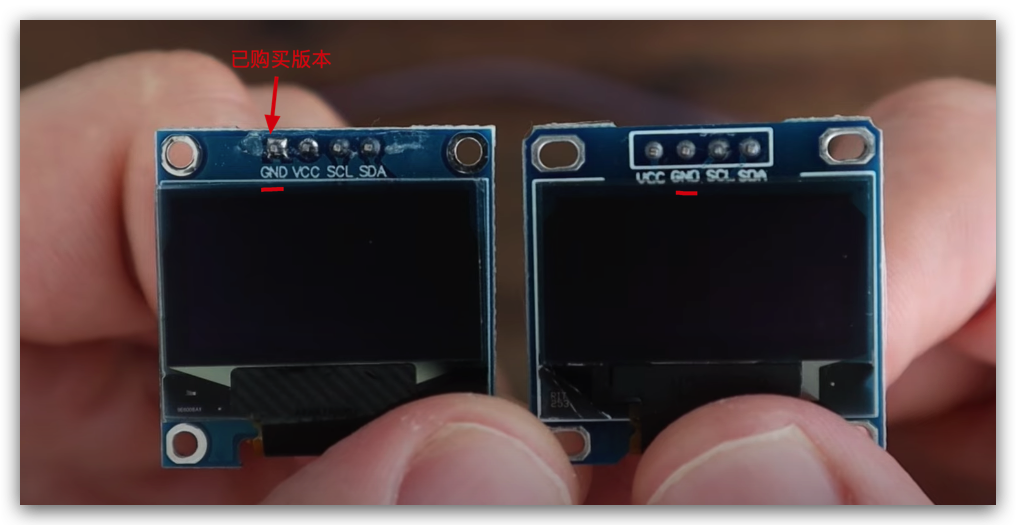
残次品/质量问题
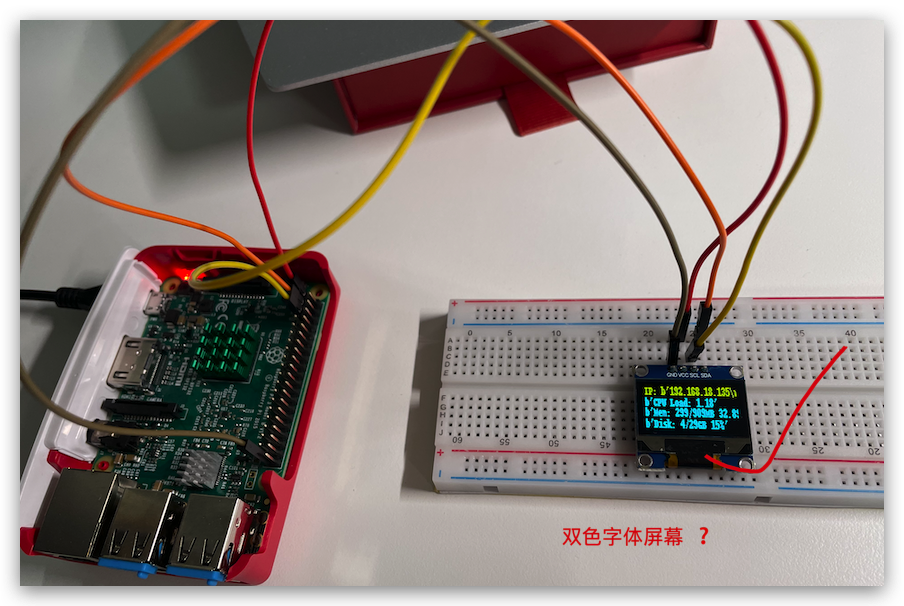
黄蓝双色显示屏的中间分割线 ✅
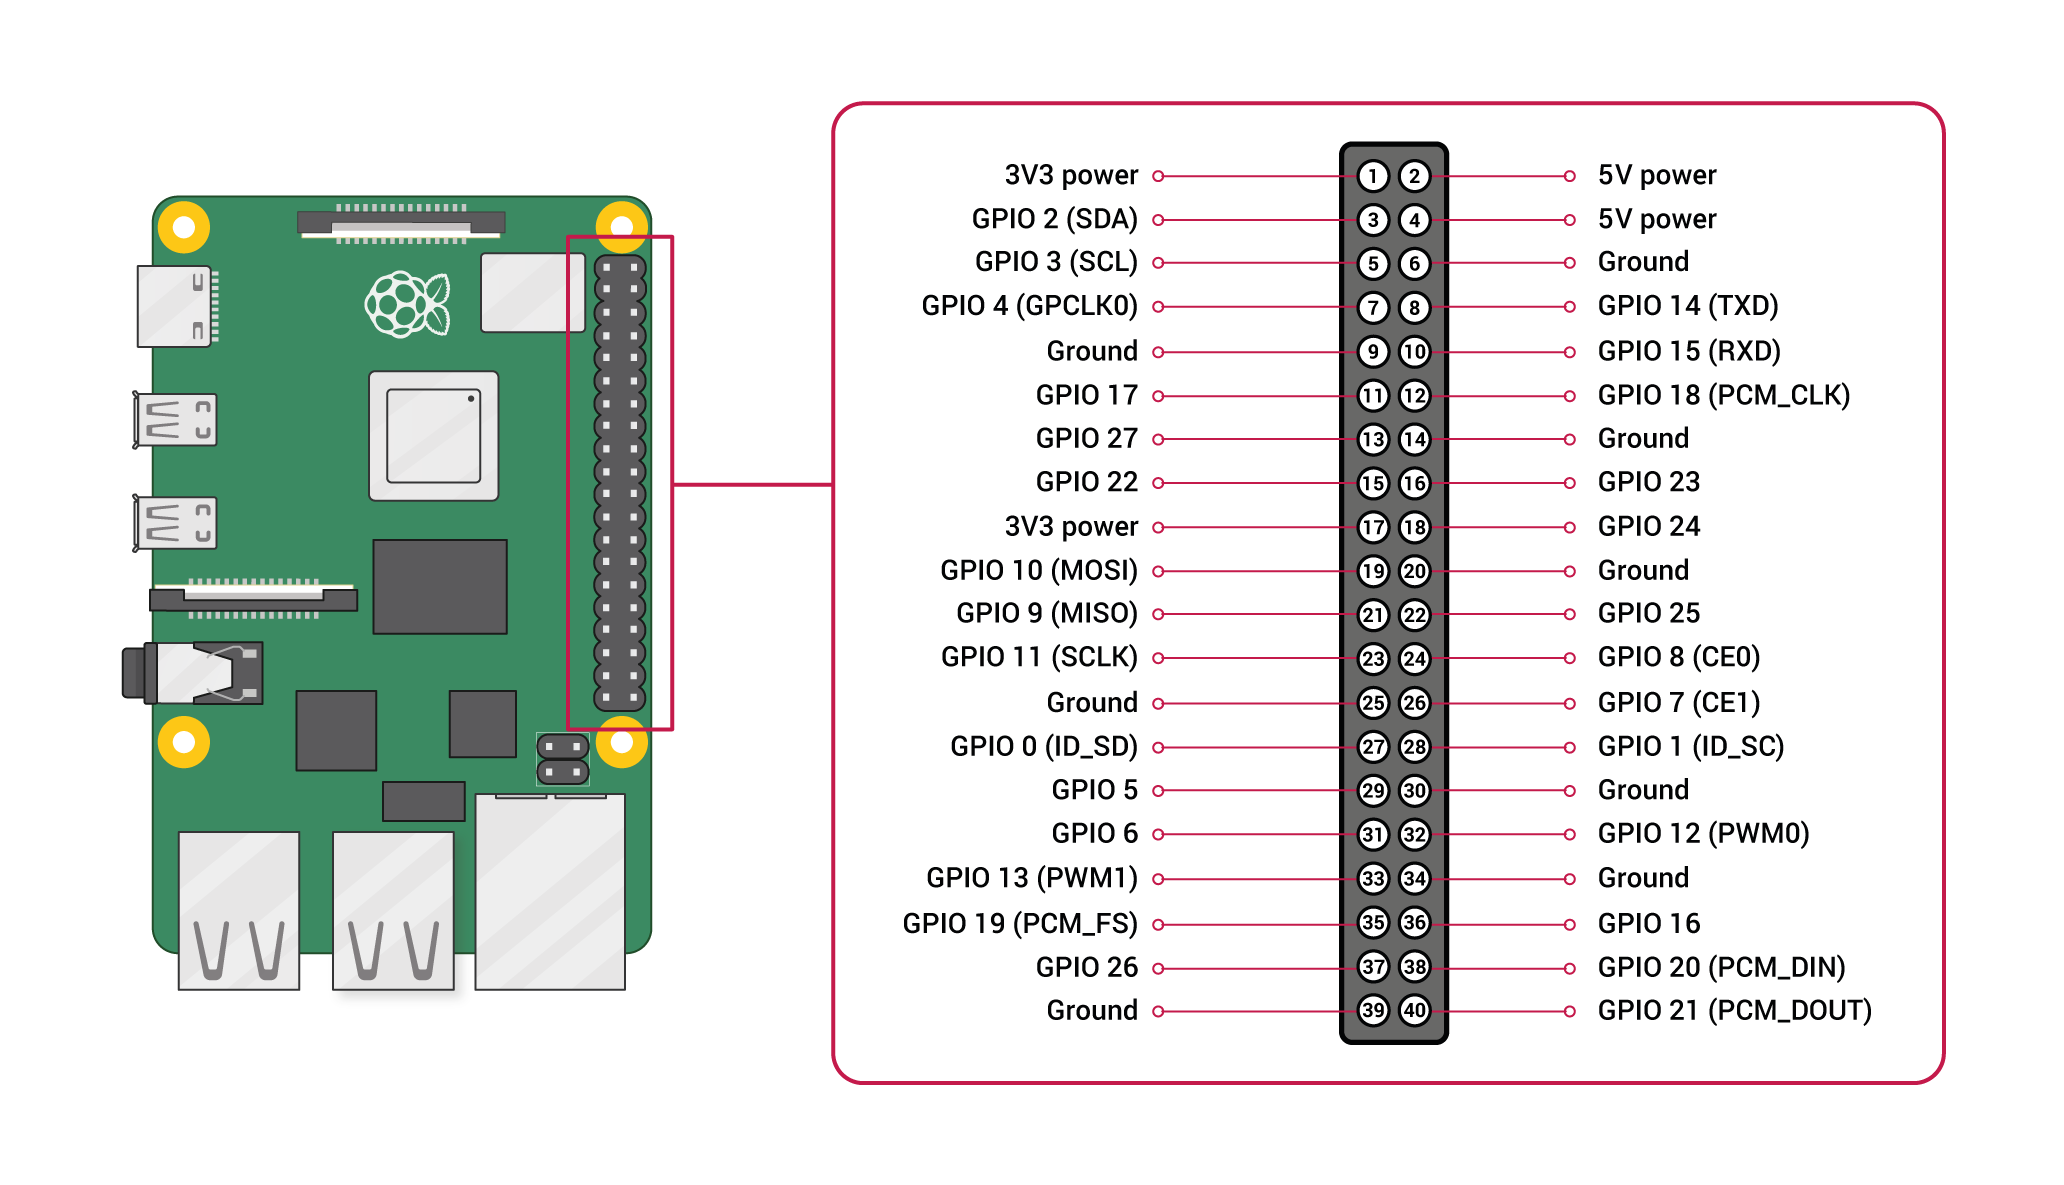
GPIO
GPIO Pinout Diagram
https://www.raspberrypi.com/documentation/computers/raspberry-pi.html
https://www.raspberrypi.com/documentation/computers/images/GPIO-Pinout-Diagram-2.png
GPIO and the 40-pin Header
Edit this on GitHub
A powerful feature of the Raspberry Pi is the row of GPIO (general-purpose input/output) pins along the top edge of the board.
A 40-pin GPIO header is found on all current Raspberry Pi boards (unpopulated on Raspberry Pi Zero, Raspberry Pi Zero W and Raspberry Pi Zero 2 W).
Prior to the Raspberry Pi 1 Model B+ (2014), boards comprised a shorter 26-pin header.
The GPIO header on all boards (including the Raspberry Pi 400) have a 0.1" (2.54mm) pin pitch.
杜邦线 / 跳线
针脚
端子
胶套
导线直径 2.54mm
SM 3P 公母端子接口 (2.54mm) => WS2812B OLED Strip 灯带
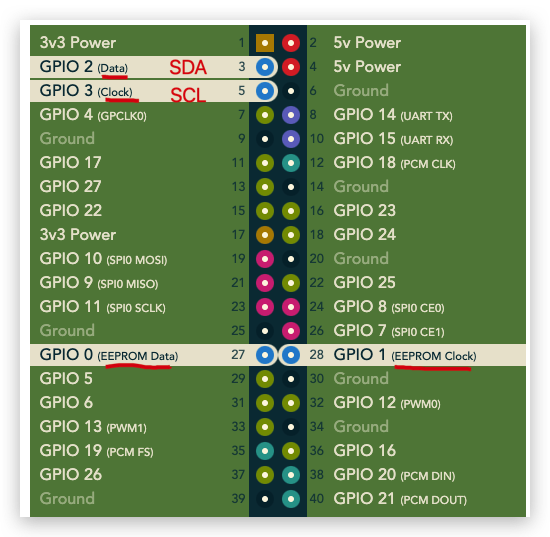
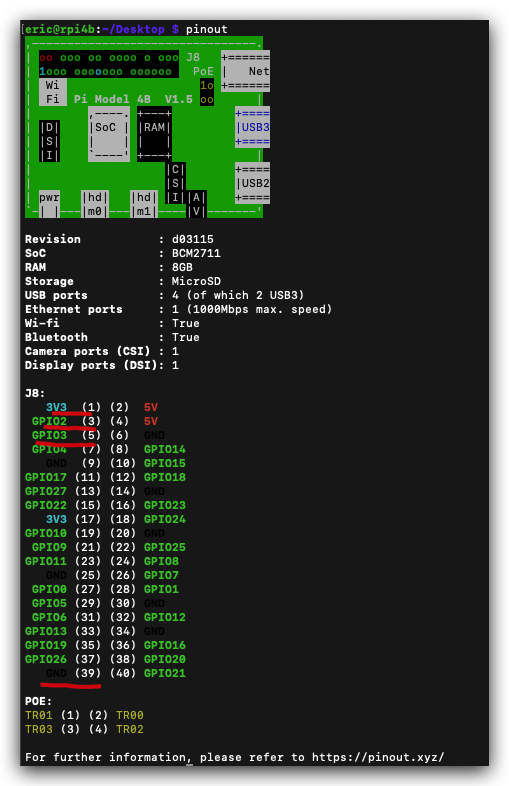
# GPIO
$ pinout

$ gpio readall

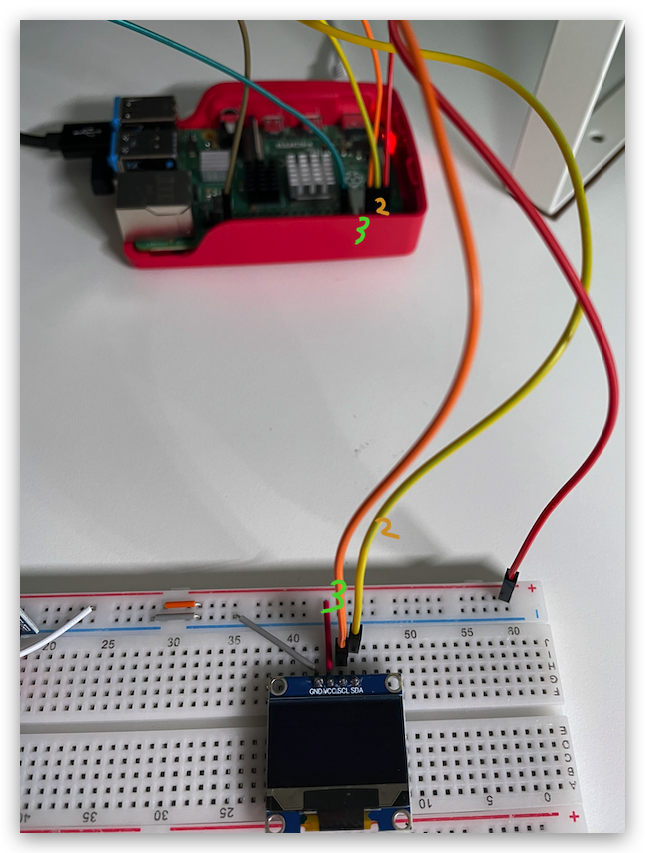
接线图
| OLED Pin | GPIO Pin | Pi Pin | Notes |
|---|---|---|---|
| GND | GND | 39 | Ground |
| VCC | 3V3 | 1 | 3.3V |
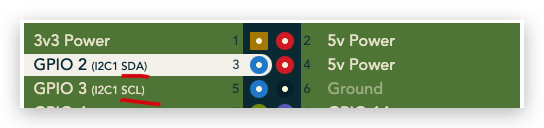
| SCL | GPIO3 | 5 | I2C SCL |
| SDA | GPIO2 | 3 | I2C SDA |
https://pinout.xyz/pinout/i2c
https://pinout.xyz/pinout/pin3_gpio2
https://pinout.xyz/pinout/pin5_gpio3
0.96 inch SSD1306 OLED displaydemo
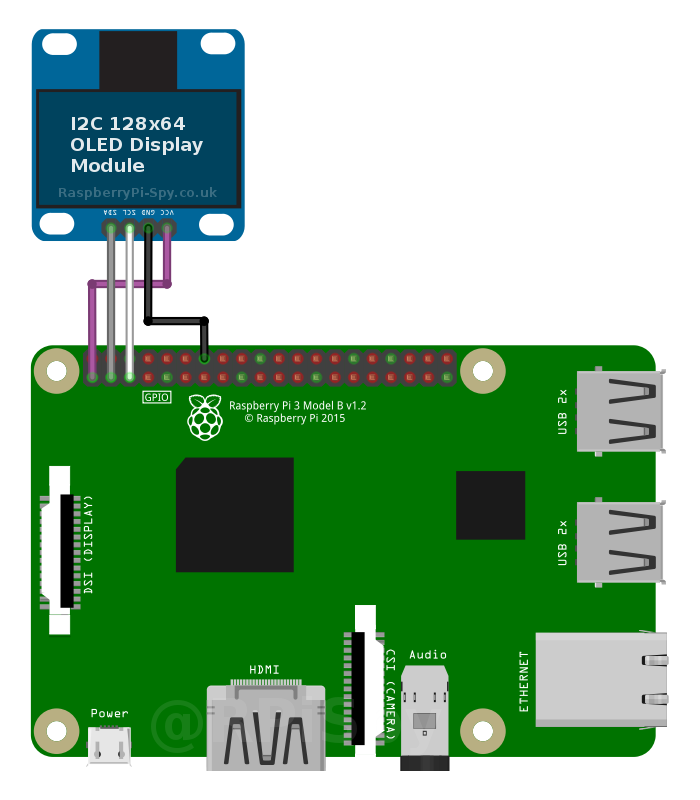
https://www.raspberrypi-spy.co.uk/2018/04/i2c-oled-display-module-with-raspberry-pi/
MicroPython
MicroPython - a lean and efficient Python implementation for microcontrollers and constrained systems
https://github.com/micropython/micropython
CircuitPython
CircuitPython - a Python implementation for teaching coding with microcontrollers
https://github.com/adafruit/circuitpython
Adafruit
https://github.com/adafruit/Adafruit_Python_SSD1306 👎 old
https://github.com/adafruit/Adafruit_CircuitPython_SSD1306 👍 new
https://learn.adafruit.com/monochrome-oled-breakouts/python-wiring
demos
Python
SSD1306
$ git clone https://github.com/adafruit/Adafruit_Python_SSD1306.git
$ cd Adafruit_Python_SSD1306
$ sudo python3 setup.py install
# 如果报错了,需要手动安装依赖 ✅
$ git clone https://github.com/adafruit/Adafruit_Python_GPIO.git
$ cd Adafruit_Python_GPIO
$ sudo python setup.py install
# Adafruit_Python_SSD1306 ✅
$ py3 ./examples/stats.py
# OR
$ python3 ./examples/stats.py
$ cat oled.sh
#!/usr/bin/env python3
# coding: utf8
# import time
from time import sleep
import subprocess
from PIL import Image
from PIL import ImageDraw
from PIL import ImageFont
import Adafruit_SSD1306
# old API ⚠️
import Adafruit_GPIO.SPI as SPI
# Raspberry Pi pin configuration:
# on the Pi OLED this pin isn't used
RST = None
# 128x32 display with hardware I2C:
display = Adafruit_SSD1306.SSD1306_128_32(rst=RST)
# 128x64 display with hardware I2C:
# disp = Adafruit_SSD1306.SSD1306_128_64(rst=RST)
# Initialize library.
display.begin()
# Clear display.
display.clear()
display.display()
# Create blank image for drawing.
# Make sure to create image with mode '1' for 1-bit color.
width = display.width
height = display.height
image = Image.new('1', (width, height))
# Get drawing object to draw on image.
draw = ImageDraw.Draw(image)
def cleanup():
# Draw a black filled box to clear the image.
# print('clear display ✅')
draw.rectangle((0, 0, width, height), outline=0, fill=0)
# Draw a black filled box to clear the image.
# draw.rectangle((0, 0, width, height), outline=0, fill=0)
cleanup()
# Draw some shapes.
# First define some constants to allow easy resizing of shapes.
padding = -2
top = padding
bottom = height-padding
# Move left to right keeping track of the current x position for drawing shapes.
x = 0
# Load default font.
font = ImageFont.load_default()
# Alternatively load a TTF font. Make sure the .ttf font file is in the same directory as the python script!
# font = ImageFont.truetype('Minecraftia.ttf', 8)
def render():
while True:
# Draw a black filled box to clear the image.
# draw.rectangle((0, 0, width, height), outline=0, fill=0)
cleanup()
# Shell scripts for system monitoring from here
# https://unix.stackexchange.com/questions/119126/command-to-display-memory-usage-disk-usage-and-cpu-load
cmd1 = "hostname -I | cut -d\' \' -f1"
IP = subprocess.check_output(cmd1, shell = True)
# cmd2 = "top -bn1 | grep load | awk '{printf \"CPU Load: %.2f\", $(NF-2)}'"
cmd2 = "top -bn1 | grep load | awk '{printf \"CPU Used: %.2f\", $(NF-2)}'"
CPU = subprocess.check_output(cmd2, shell = True)
# cmd3 = "free -m | awk 'NR==2{printf \"Mem: %s/%sMB %.2f%%\", $3, $2, $3*100/$2}'"
cmd3 = "free -m | awk 'NR==2{printf \"Memory: %s/%sMB\", $3, $2}'"
# cmd3 = "free -m | awk 'NR==2{printf \"内存: %s/%sMB\", $3, $2}'"
MemUsage = subprocess.check_output(cmd3, shell = True )
cmd4 = "df -h | awk '$NF==\"/\"{printf \"Disk: %d/%dGB %s\", $3, $2, $5}'"
Disk = subprocess.check_output(cmd4, shell = True)
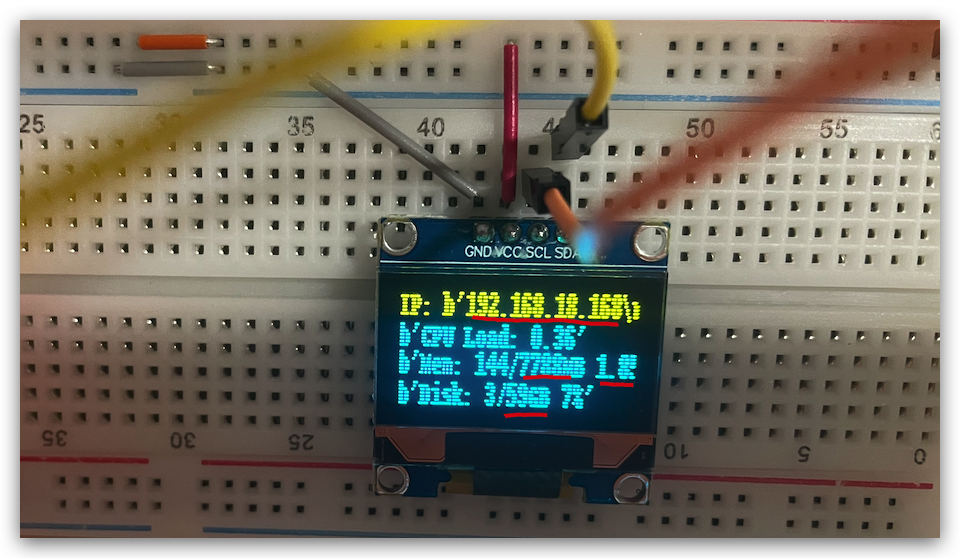
# Write two lines of text.
draw.text((x, top), "IP: " + str(IP), font=font, fill=255)
draw.text((x, top+8), str(CPU), font=font, fill=255)
draw.text((x, top+16), str(MemUsage), font=font, fill=255)
# draw.text((x, top+16), str(MemUsage).decode("UTF-8"), font=font, fill=255)
# draw.text((x, top+16), "中文 decode".decode("UTF-8"), font=font, fill=255)
# ❌ AttributeError: 'str' object has no attribute 'decode'
draw.text((x, top+25), str(Disk), font=font, fill=255)
# Display image.
display.image(image)
display.display()
sleep(.1)
# time.sleep(.1)
def clear():
# 清屏
display.clear()
display.display()
if __name__ == "__main__":
try:
render()
except KeyboardInterrupt:
print('Ctrl + C 退出 ✅')
cleanup()
clear()
sleep(1.0)
except RuntimeError as error:
print("error =", error, error.args[0])
cleanup()
pass
except Exception as error:
cleanup()
raise error
# finally:
# cleanup()
# 中文 编码 bug ❌
# while True:
# draw.rectangle((0,0,width,height), outline=0, fill=0)
# cmd1 = "hostname -I | cut -d\' \' -f1"
# IP = subprocess.check_output(cmd1, shell = True)
# cmd2 = "top -bn1 | grep load | awk '{printf \"CPU 负载: %.2f\", $(NF-2)}'"
# CPU = subprocess.check_output(cmd2, shell = True)
# cmd3 = "free -m | awk 'NR==2{printf \"内存: %s/%sMB\", $3, $2}'"
# MemUsage = subprocess.check_output(cmd3, shell = True )
# cmd4 = "df -h | awk '$NF==\"/\"{printf \"磁盘: %d/%dGB %s\", $3, $2, $5}'"
# Disk = subprocess.check_output(cmd4, shell = True)
# draw.text((x, top), "IP: " + str(IP), font=font, fill=255)
# draw.text((x, top+8), str(CPU), font=font, fill=255)
# draw.text((x, top+16), str(MemUsage), font=font, fill=255)
# draw.text((x, top+25), str(Disk), font=font, fill=255)
# display.image(image)
# display.display()
# time.sleep(.1)
"""
0.96 inch SSD1306 OLED display
https://www.cnblogs.com/xgqfrms/p/17380248.html
"""
https://github.com/adafruit/Adafruit_Python_SSD1306/blob/master/Adafruit_SSD1306/SSD1306.py#L211
#!/usr/bin/env python3
# coding: utf8

import time
import subprocess
from PIL import Image
from PIL import ImageDraw
from PIL import ImageFont
import Adafruit_SSD1306
# old API ⚠️
import Adafruit_GPIO.SPI as SPI

# Raspberry Pi pin configuration:
# on the Pi OLED this pin isn't used
RST = None

# 128x32 display with hardware I2C:
display = Adafruit_SSD1306.SSD1306_128_32(rst=RST)

# 128x64 display with hardware I2C:
# disp = Adafruit_SSD1306.SSD1306_128_64(rst=RST)

# Initialize library.
display.begin()

# Clear display.
display.clear()
display.display()

# Create blank image for drawing.
# Make sure to create image with mode '1' for 1-bit color.
width = display.width
height = display.height
image = Image.new('1', (width, height))

# Get drawing object to draw on image.
draw = ImageDraw.Draw(image)

# Draw a black filled box to clear the image.
draw.rectangle((0, 0, width, height), outline=0, fill=0)

# Draw some shapes.
# First define some constants to allow easy resizing of shapes.
padding = -2
top = padding
bottom = height-padding
# Move left to right keeping track of the current x position for drawing shapes.
x = 0

# Load default font.
font = ImageFont.load_default()
# Alternatively load a TTF font.  Make sure the .ttf font file is in the same directory as the python script!
# font = ImageFont.truetype('Minecraftia.ttf', 8)

while True:
  # Draw a black filled box to clear the image.
  draw.rectangle((0,0,width,height), outline=0, fill=0)
  # Shell scripts for system monitoring from here
  # https://unix.stackexchange.com/questions/119126/command-to-display-memory-usage-disk-usage-and-cpu-load
  cmd1 = "hostname -I | cut -d\' \' -f1"
  IP = subprocess.check_output(cmd1, shell = True)
  # cmd2 = "top -bn1 | grep load | awk '{printf \"CPU Load: %.2f\", $(NF-2)}'"
  cmd2 = "top -bn1 | grep load | awk '{printf \"CPU Used: %.2f\", $(NF-2)}'"
  CPU = subprocess.check_output(cmd2, shell = True)
  # cmd3 = "free -m | awk 'NR==2{printf \"Mem: %s/%sMB %.2f%%\", $3, $2, $3*100/$2}'"
  cmd3 = "free -m | awk 'NR==2{printf \"Memory: %s/%sMB\", $3, $2}'"
  MemUsage = subprocess.check_output(cmd3, shell = True )
  cmd4 = "df -h | awk '$NF==\"/\"{printf \"Disk: %d/%dGB %s\", $3, $2, $5}'"
  Disk = subprocess.check_output(cmd4, shell = True)
  # Write two lines of text.
  draw.text((x, top),  "IP: " + str(IP), font=font, fill=255)
  draw.text((x, top+8), str(CPU), font=font, fill=255)
  draw.text((x, top+16), str(MemUsage),  font=font, fill=255)
  draw.text((x, top+25),  str(Disk),  font=font, fill=255)
  # Display image.
  display.image(image)
  display.display()
  time.sleep(.1)

# 中文 编码 bug ❌
# while True:
#   draw.rectangle((0,0,width,height), outline=0, fill=0)
#   cmd1 = "hostname -I | cut -d\' \' -f1"
#   IP = subprocess.check_output(cmd1, shell = True)
#   cmd2 = "top -bn1 | grep load | awk '{printf \"CPU 负载: %.2f\", $(NF-2)}'"
#   CPU = subprocess.check_output(cmd2, shell = True)
#   cmd3 = "free -m | awk 'NR==2{printf \"内存: %s/%sMB\", $3, $2}'"
#   MemUsage = subprocess.check_output(cmd3, shell = True )
#   cmd4 = "df -h | awk '$NF==\"/\"{printf \"磁盘: %d/%dGB %s\", $3, $2, $5}'"
#   Disk = subprocess.check_output(cmd4, shell = True)
#   draw.text((x, top),  "IP: " + str(IP), font=font, fill=255)
#   draw.text((x, top+8), str(CPU), font=font, fill=255)
#   draw.text((x, top+16), str(MemUsage),  font=font, fill=255)
#   draw.text((x, top+25),  str(Disk),  font=font, fill=255)
#   display.image(image)
#   display.display()
#   time.sleep(.1)


"""
0.96 inch SSD1306 OLED display
https://www.cnblogs.com/xgqfrms/p/17380248.html

"""
# testing
$ cd examples
$ ls -al
总用量 88
drwxr-xr-x 2 pi pi  4096  5月  7 23:00 .
drwxr-xr-x 9 pi pi  4096  5月  7 23:02 ..
-rw-r--r-- 1 pi pi  4283  5月  7 23:00 animate.py
-rw-r--r-- 1 pi pi  5885  5月  7 23:00 buttons.py
-rw-r--r-- 1 pi pi 12341  5月  7 23:00 happycat_oled_32.ppm
-rw-r--r-- 1 pi pi 24629  5月  7 23:00 happycat_oled_64.ppm
-rw-r--r-- 1 pi pi  2523  5月  7 23:00 image.py
-rw-r--r-- 1 pi pi  4281  5月  7 23:00 shapes.py
-rw-r--r-- 1 pi pi  4794  5月  7 23:00 stats.py


$ python3 shapes.py
$ python3 stats.py

$ py3 image.py
$ py3 animate.py
$ py3 buttons.py
# /home/pi/Desktop/Adafruit_Python_SSD1306/examples
https://youtu.be/lRTQ0NsXMuw?t=326
https://www.youtube.com/watch?v=lRTQ0NsXMuw
PIP package
$ sudo pip3 install adafruit-circuitpython-ssd1306
$ git clone https://github.com/mklements/OLED_Stats.git

$ cd OLED_Stats

$ python3 stats.py
# Created by: Michael Klements
# For Raspberry Pi Desktop Case with OLED Stats Display
# Base on Adafruit CircuitPython & SSD1306 Libraries
# Installation & Setup Instructions - https://www.the-diy-life.com/add-an-oled-stats-display-to-raspberry-pi-os-bullseye/
import time
import board
import busio
import digitalio

from PIL import Image, ImageDraw, ImageFont
import adafruit_ssd1306

import subprocess

# Define the Reset Pin
oled_reset = digitalio.DigitalInOut(board.D4)

# Display Parameters
WIDTH = 128
HEIGHT = 64
BORDER = 5

# Display Refresh
LOOPTIME = 1.0

# Use for I2C.
i2c = board.I2C()
oled = adafruit_ssd1306.SSD1306_I2C(WIDTH, HEIGHT, i2c, addr=0x3C, reset=oled_reset)

# Clear display.
oled.fill(0)
oled.show()

# Create blank image for drawing.
# Make sure to create image with mode '1' for 1-bit color.
image = Image.new("1", (oled.width, oled.height))

# Get drawing object to draw on image.
draw = ImageDraw.Draw(image)

# Draw a white background
draw.rectangle((0, 0, oled.width, oled.height), outline=255, fill=255)

font = ImageFont.truetype('PixelOperator.ttf', 16)
#font = ImageFont.load_default()

while True:

    # Draw a black filled box to clear the image.
    draw.rectangle((0, 0, oled.width, oled.height), outline=0, fill=0)

    # Shell scripts for system monitoring from here : https://unix.stackexchange.com/questions/119126/command-to-display-memory-usage-disk-usage-and-cpu-load
    cmd = "hostname -I | cut -d\' \' -f1"
    IP = subprocess.check_output(cmd, shell = True )
    cmd = "top -bn1 | grep load | awk '{printf \"CPU: %.2f\", $(NF-2)}'"
    CPU = subprocess.check_output(cmd, shell = True )
    cmd = "free -m | awk 'NR==2{printf \"Mem: %s/%sMB %.2f%%\", $3,$2,$3*100/$2 }'"
    MemUsage = subprocess.check_output(cmd, shell = True )
    cmd = "df -h | awk '$NF==\"/\"{printf \"Disk: %d/%dGB %s\", $3,$2,$5}'"
    Disk = subprocess.check_output(cmd, shell = True )
    cmd = "vcgencmd measure_temp |cut -f 2 -d '='"
    Temp = subprocess.check_output(cmd, shell = True )

    # Pi Stats Display
    draw.text((0, 0), "IP: " + str(IP,'utf-8'), font=font, fill=255)
    draw.text((0, 16), str(CPU,'utf-8') + "LA", font=font, fill=255)
    draw.text((80, 16), str(Temp,'utf-8') , font=font, fill=255)
    draw.text((0, 32), str(MemUsage,'utf-8'), font=font, fill=255)
    draw.text((0, 48), str(Disk,'utf-8'), font=font, fill=255)

    # Display image
    oled.image(image)
    oled.show()
    time.sleep(LOOPTIME)
https://www.the-diy-life.com/add-an-oled-stats-display-to-raspberry-pi-os-bullseye/
crontab
# 开机自动运行
$ crontab –e

# & 后台运行
@reboot cd /home/pi/OLED_Stats && python3 stats.py &


# 或者, 把脚本和其依赖的字体字库 copy 到 pi 的 home 目录
@reboot python3 /home/pi/stats.py &
$ cd OLED_Stats
# 把脚本和其依赖的字体字库 copy 到 pi 的 home 目录
$ cp PixelOperator.ttf ~/PixelOperator.ttf
$ cp fontawesome-webfont.ttf ~/fontawesome-webfont.ttf

$ cp stats.py ~/stats.py
(🐞 反爬虫测试!打击盗版⚠️)如果你看到这个信息, 说明这是一篇剽窃的文章,请访问 https://www.cnblogs.com/xgqfrms/ 查看原创文章!
Raspberry Pi Pico
pico
pinout
https://www.raspberrypi.com/documentation/microcontrollers/raspberry-pi-pico.html
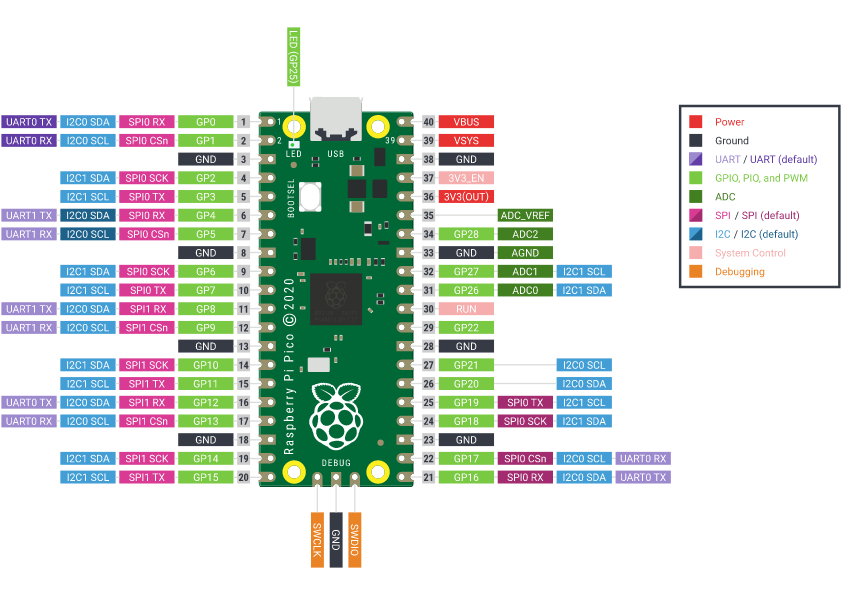
https://www.raspberrypi.com/documentation/microcontrollers/images/pico-pinout.svg
https://datasheets.raspberrypi.com/pico/Pico-R3-A4-Pinout.pdf
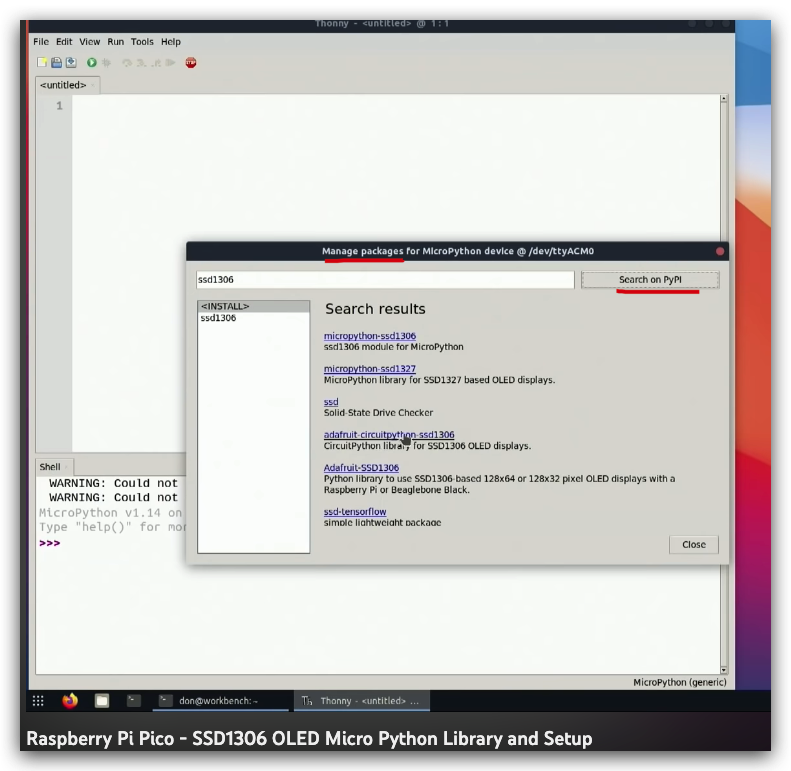
lib/ssd1306
https://www.youtube.com/watch?v=YR9v04qzJ5E
https://youtu.be/YR9v04qzJ5E?t=323
Why not automatically convert the image to a buffer in your code by importing the img2bytearray package? Copying and pasting manually is so inconvenient.
#  ✅
$ py3 ./show-image-on-oled.py ./logo.png 64x64
https://github.com/novaspirit/img2bytearray
from io import BytesIO
from PIL import Image
import sys

if len(sys.argv) > 1:
    path_to_image = str(sys.argv[1])
    x = int(sys.argv[2])
    y = int(sys.argv[3])

    im = Image.open(path_to_image).convert('1')
    im_resize = im.resize((x,y))
    buf = BytesIO()
    im_resize.save(buf, 'ppm')
    byte_im = buf.getvalue()
    temp = len(str(x) + ' ' + str(y)) + 4
    print(byte_im[temp::])
else:
    print("please specify the location of image i.e img2bytearray.py /path/to/image width heigh")
汉字取模软件 ???
0.96寸OLED模块4针-SSD1306技术资料(GND)
链接:https://pan.baidu.com/s/13d4aumAilHTenVaGKOGj-Q?pwd=1234
0.96寸OLED模块7针-SSD1306技术资料(GND)
链接:https://pan.baidu.com/s/1uxByen5j-H_Vv1yJlzYL0Q?pwd=1234
OLED
有机发光二极管(英语:Organic Light-Emitting Diode,缩写:OLED)又称有机电激发光显示(英语:Organic Electroluminescence Display,缩写:OELD)、有机发光半导体,OLED技术最早于1950年代和1960年代由法国人和美国人研制,其后由美国柯达及英国剑桥大学加以演进,日本SONY及韩国三星和LG等公司于21世纪开始量产,现在的市场都趋近于OLED但是在寿命上比LCD短。
OLED(有机发光二极管)与 TFT-LCD(薄膜晶体管液晶显示器)为不同类型的产品,OLED具有自发光性、广视角、高对比、低耗电、高反应速率、全彩化及制程简单等优点,但相对的在大面板价格、技术选择性 、寿命、分辨率、色彩还原方面便无法与TFT-LCD匹敌,有机发光二极管显示器可分单色、多彩及全彩等种类,而其中以全彩制作技术最为困难。
OLED显示器依驱动方式的不同又可分为被动式(Passive Matrix,PMOLED)与主动式(Active Matrix,AMOLED)。
https://en.wikipedia.org/wiki/OLED
https://zh.wikipedia.org/wiki/有機發光二極體
https://www.lg.com/us/oled-tvs
refs
0.96 oled display raspberry pi
https://www.youtube.com/results?search_query=0.96+oled+display+raspberry+pi
©xgqfrms 2012-2021
www.cnblogs.com/xgqfrms 发布文章使用:只允许注册用户才可以访问!
原创文章,版权所有©️xgqfrms, 禁止转载 🈲️,侵权必究⚠️!
本文首发于博客园,作者:xgqfrms,原文链接:https://www.cnblogs.com/xgqfrms/p/17380248.html
未经授权禁止转载,违者必究!
