池化技术——自定义线程池
池化技术——自定义线程池
1、为什么要使用线程池?
池化技术
1.1、池化技术的特点:
-
程序的运行,本质:占用系统的资源! 优化资源的使用!=>池化技术
-
线程池、连接池、内存池、对象池///..... 创建、销毁。十分浪费资源
-
池化技术:事先准备好一些资源,有人要用,就来我这里拿,用完之后还给我。
1.2、线程池的好处:
- 降低资源的消耗
- 降低资源的消耗
- 方便管理。
核心:线程复用、可以控制最大并发数、管理线程
1.3、如何自定义一个线程池
牢记:三大方法、7大参数、4种拒绝策略
2、三大方法
三大方法
在java的JDK中提够了Executors开启JDK默认线程池的类,其中有三个方法可以用来开启线程池。
2.1、单个线程的线程池方法
ExecutorService threadPool = Executors.newSingleThreadExecutor(); //单个线程的线程池
该方法开启的线程池,故名思义该池中只有一个线程。
2.2、固定的线程池的大小的方法
ExecutorService threadPool = Executors.newFixedThreadPool(5); //固定的线程池的大小
其中方法中传递的int类型的参数,就是池中的线程数量
2.3、可伸缩的线程池的方法
ExecutorService threadPool = Executors.newCachedThreadPool(); //可伸缩
该方法创建的线程池是不固定大小的,可以根据需求动态的在池子里创建线程,遇强则强。
2.4、完整的测试代码为:
package com.xgp.pool;

import java.util.concurrent.ExecutorService;
import java.util.concurrent.Executors;

/**
 * 工具类,三大方法
 */
public class Demo01 {
    public static void main(String[] args) {
        ExecutorService threadPool = Executors.newSingleThreadExecutor();    //单个线程的线程池
//        ExecutorService threadPool = Executors.newFixedThreadPool(5);    //固定的线程池的大小
//        ExecutorService threadPool = Executors.newCachedThreadPool();        //可伸缩

       try{
           for(int i = 0;i < 10;i++) {
               //使用线程池去创建
               threadPool.execute(() -> {
                   System.out.println(Thread.currentThread().getName() + " OK");
               });
           }
       }catch (Exception e) {
           e.printStackTrace();
       }finally {
           //关闭线程池
           threadPool.shutdown();
       }
    }
}
将三行注释部分依次打开的运行结果为:
pool-1-thread-1 OK
pool-1-thread-1 OK
pool-1-thread-1 OK
pool-1-thread-1 OK
pool-1-thread-1 OK
pool-1-thread-1 OK
pool-1-thread-1 OK
pool-1-thread-1 OK
pool-1-thread-1 OK
pool-1-thread-1 OK
上述运行结果为单个线程的线程池的结果:可以看出的确只有一条线程在执行。
pool-1-thread-1 OK
pool-1-thread-1 OK
pool-1-thread-1 OK
pool-1-thread-1 OK
pool-1-thread-1 OK
pool-1-thread-1 OK
pool-1-thread-2 OK
pool-1-thread-3 OK
pool-1-thread-4 OK
pool-1-thread-5 OK
上述运行结果为固定线程的线程池的结果:因为固定的大小为5,可以看出的确有5条线程在执行。
pool-1-thread-1 OK
pool-1-thread-3 OK
pool-1-thread-2 OK
pool-1-thread-4 OK
pool-1-thread-5 OK
pool-1-thread-7 OK
pool-1-thread-9 OK
pool-1-thread-10 OK
pool-1-thread-8 OK
pool-1-thread-6 OK
上述运行结果为弹性线程的线程池的结果:可以看出的确有10条线程在执行。
3、为什么要自定义线程池?三大方法创建线程池的弊端分析
-
在单个线程池和固定大小的线程池中,因为处理的线程有限,当大量的请求进来时,都会在阻塞队列中等候,而允许请求的队列长度为Integet.MAX_VALUE,整数的最大值约为21亿,会导致JVM内存溢出。
-
在弹性伸缩的线程池中,允许创建的线程数量为Integet.MAX_VALUE,可能会创建大量的线程,使得Jvm内存溢出。
对于上述的两点,其数值会在后面分析源码的环节看到,关于这一点,在阿里巴巴开发手册中有着详细的说明,并极力推荐采用自定义线程池,而不使用这三大方法。

4、七大参数
七大参数
源码分析:我们要指定义自己的线程池,先从源码的角度看一看JDK现有的三个线程池是如何编写的。
	public static ExecutorService newSingleThreadExecutor() {
    	return new FinalizableDelegatedExecutorService
      	  (new ThreadPoolExecutor(1, 1,
           	                     0L, TimeUnit.MILLISECONDS,
          	                      new LinkedBlockingQueue<Runnable>()));
	}

	public static ExecutorService newFixedThreadPool(int nThreads) {
        return new ThreadPoolExecutor(nThreads, nThreads,
                                      0L, TimeUnit.MILLISECONDS,
                                      new LinkedBlockingQueue<Runnable>());
    }

    public static ExecutorService newCachedThreadPool() {
        return new ThreadPoolExecutor(0, Integer.MAX_VALUE,
                                      60L, TimeUnit.SECONDS,
                                      new SynchronousQueue<Runnable>());
    }
从三大方法的源代码中可以看出,三种线程池都是new 了一个 ThreadPoolExecutor 对象,点击源码中看看。
public ThreadPoolExecutor(int corePoolSize,
                          int maximumPoolSize,
                          long keepAliveTime,
                          TimeUnit unit,
                          BlockingQueue<Runnable> workQueue) {
    this(corePoolSize, maximumPoolSize, keepAliveTime, unit, workQueue,
         Executors.defaultThreadFactory(), defaultHandler);
}
这里调用了一个 this() 方法,在点击进去一看。
public ThreadPoolExecutor(int corePoolSize,
                          int maximumPoolSize,
                          long keepAliveTime,
                          TimeUnit unit,
                          BlockingQueue<Runnable> workQueue,
                          ThreadFactory threadFactory,
                          RejectedExecutionHandler handler) {
    if (corePoolSize < 0 ||
        maximumPoolSize <= 0 ||
        maximumPoolSize < corePoolSize ||
        keepAliveTime < 0)
        throw new IllegalArgumentException();
    if (workQueue == null || threadFactory == null || handler == null)
        throw new NullPointerException();
    this.corePoolSize = corePoolSize;
    this.maximumPoolSize = maximumPoolSize;
    this.workQueue = workQueue;
    this.keepAliveTime = unit.toNanos(keepAliveTime);
    this.threadFactory = threadFactory;
    this.handler = handler;
}
到这里就可以很明显的看出本节想要讲述的7大参数,是哪7大了吧。根据英文意思,可以很容易的说明这七大参数的意思了。
    public ThreadPoolExecutor(int corePoolSize,   //核心线程数
                              int maximumPoolSize,  //最大线程数
                              long keepAliveTime,   //超时等待
                              TimeUnit unit,        //超时等待的单位
                              BlockingQueue<Runnable> workQueue,    //阻塞队列
                              ThreadFactory threadFactory,      //线程池工厂
                              RejectedExecutionHandler handler) {     //拒绝策略
在阿里巴巴开发手册中,推荐的也是使用 ThreadPoolExecutor 来进行创建线程池的。

这里可以用一张在银行办理业务的图来生动的说明这七大参数。

这里,解释下这张图对应的含义:
-
银行在人很少的时候也只开放两个窗口,并且什么时候都不会进行关闭。——核心线程数
-
当人数大于2又小于5人时,后来的三人就在候客区等候办理业务。——阻塞队列
-
当人数大于5人又小于8人时,另外三个正在关闭的窗口需要开放进行办理业务,于是乎就有了5个窗口在进行办理业务。——最大线程数
-
将开启其他三个窗口,需要领导将这三个窗口的员工叫回。——线程池工厂
-
当人数实在太多时,银行都挤不下了,此时就会把门关了,不接受新的服务了。——拒绝策略
-
当银行人数又变少时,另外的三个非核心窗口太久没又生意,为了节约成本,则又会进行关闭。——超时等待
通过对上述7大参数的分析,同学们也能够更加理解JDK自带的三大方法的弊端,以及为什么是整数的最大值的这个数值。
5、如何手动的去创建一个线程池
手动创建连接池
七大参数的说明也都讲了,于是乎我们可以仿照这七大参数,来定义一个自己的线程池。对于其中的线程工厂,我们也一般采用默认的工厂,而其中的拒绝策略我们可以通过源码分析,先使用三大方法使用的拒绝策略。
点击进入 defaultHandler 的源码中可以看到。
    private static final RejectedExecutionHandler defaultHandler =
        new AbortPolicy();
其中的 new AbortPolicy(); 就是三大方法使用的拒绝策略,我们先仿照银行的例子,自定义一个线程池。代码如下:
package com.xgp.pool;

import java.util.concurrent.*;

/**
 * 自定义线程池
 */
public class Demo02 {
/*    public ThreadPoolExecutor(int corePoolSize,   //核心线程数
                              int maximumPoolSize,  //最大线程数
                              long keepAliveTime,   //超时等待
                              TimeUnit unit,        //超时等待的单位
                              BlockingQueue<Runnable> workQueue,    //阻塞队列
                              ThreadFactory threadFactory,      //线程池工厂
                              RejectedExecutionHandler handler) {*/     //拒绝策略
    public static void main(String[] args) {
        ExecutorService pool = new ThreadPoolExecutor(
                2,
                5,
                3,
                TimeUnit.SECONDS,
                new LinkedBlockingDeque<>(3),
                Executors.defaultThreadFactory(),
                new ThreadPoolExecutor.AbortPolicy()    //会抛出异常的实现类
//                new ThreadPoolExecutor.CallerRunsPolicy()  //哪来的去哪里
//                new ThreadPoolExecutor.DiscardOldestPolicy()    //不会抛出异常,会丢掉任务
//                new ThreadPoolExecutor.AbortPolicy()        //尝试会和第一个竞争
                );


        try{
            for(int i = 0;i < 8;i++) {
                //使用线程池去创建
                pool.execute(() -> {
                    System.out.println(Thread.currentThread().getName() + " OK");
                });
            }
        }catch (Exception e) {
            e.printStackTrace();
        }finally {
            //关闭线程池
            pool.shutdown();
        }
    }
}
于是乎,我们完成了一个自定义的线程池,核心线程数为2,最大线程数为5,超时等待的秒数为3s,阻塞队列的长度为3。
6、四种拒绝策略
四种拒绝策略
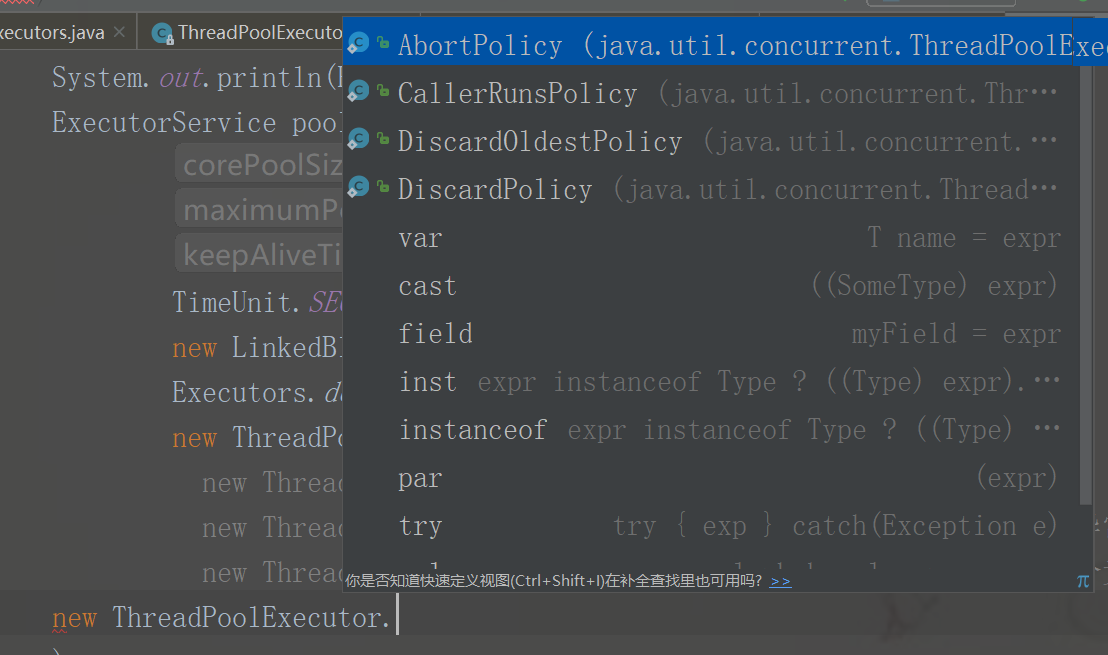
通过分析源码,可以知道三大方法默认的拒绝策略在ThreadPoolExecutor这个类中,由于该类较为复杂,寻找起来不方便,于是我们可以采用IDEA的代码提示功能,非常明显的提示出了四种拒绝策略,也就是上面自定义线程池中的被注释部分。

将上面自定义线程池的代码注释一一打开,我们来进行测试:
6.1、会抛出异常的拒绝策略
new ThreadPoolExecutor.AbortPolicy() //会抛出异常的实现类
该拒绝策略运行的结果为:
pool-1-thread-1 OK
pool-1-thread-2 OK
pool-1-thread-1 OK
pool-1-thread-3 OK
pool-1-thread-4 OK
pool-1-thread-1 OK
pool-1-thread-2 OK
pool-1-thread-5 OK
java.util.concurrent.RejectedExecutionException: Task com.xgp.pool.Demo02$$Lambda$1/2093631819@378bf509 rejected from java.util.concurrent.ThreadPoolExecutor@5fd0d5ae[Running, pool size = 5, active threads = 4, queued tasks = 0, completed tasks = 4]
	at java.util.concurrent.ThreadPoolExecutor$AbortPolicy.rejectedExecution(ThreadPoolExecutor.java:2047)
	at java.util.concurrent.ThreadPoolExecutor.reject(ThreadPoolExecutor.java:823)
	at java.util.concurrent.ThreadPoolExecutor.execute(ThreadPoolExecutor.java:1369)
	at com.xgp.pool.Demo02.main(Demo02.java:40)
该策略就是当最大线程数+阻塞队列数都不满足请求数时,系统将抛出异常来进行解决。
6.2、哪来的去哪里拒绝策略
new ThreadPoolExecutor.CallerRunsPolicy() //哪来的去哪里
该拒绝策略运行的结果为:
pool-1-thread-1 OK
main OK
main OK
pool-1-thread-1 OK
pool-1-thread-1 OK
pool-1-thread-1 OK
pool-1-thread-2 OK
pool-1-thread-3 OK
pool-1-thread-4 OK
pool-1-thread-5 OK
可以看出,该拒绝策略当线程池的线程数不能够满足需求时,会将不能服务的任务打道回府,即交给main线程来解决,该拒绝策略适用于原来的线程能够解决问题的情况。
6.3、丢掉任务拒绝策略
new ThreadPoolExecutor.DiscardOldestPolicy() //不会抛出异常,会丢掉任务
该拒绝策略运行的结果为:
pool-1-thread-2 OK
pool-1-thread-1 OK
pool-1-thread-2 OK
pool-1-thread-1 OK
pool-1-thread-3 OK
pool-1-thread-2 OK
pool-1-thread-4 OK
pool-1-thread-5 OK
数一数,一共是10个任务,但根据执行的情况只处理了8个任务,该拒绝策略将不能够分配线程执行的任务全部丢弃了,会造成数据的丢失。
6.4、尝试竞争拒绝策略
new ThreadPoolExecutor.DiscardPolicy() //尝试会和第一个竞争
该拒绝策略运行的结果为:
pool-1-thread-1 OK
pool-1-thread-2 OK
pool-1-thread-3 OK
pool-1-thread-1 OK
pool-1-thread-3 OK
pool-1-thread-2 OK
pool-1-thread-1 OK
pool-1-thread-4 OK
pool-1-thread-5 OK
数一数,一共是10个任务,但根据执行的情况只处理了9个任务,其中竞争成功了一个,失败了一个。该策略将会于最早进来的线程进行竞争,类似于操作系统中的抢占式短作业优先算法,该拒绝策略同样会造成数据的丢失。
7、关于最大线程数应该如何确定
7.1、CPU密集型
CPU密集型
对于有多核Cpu的电脑,应该让cpu充分忙碌起来,不要低于Cpu的核数,并且不应该在代码中写死,而是应该能够自动的获取当前机器的Cpu核数,获取的代码如下:
System.out.println(Runtime.getRuntime().availableProcessors());
7.2、IO密集型
IO密集型
对于系统中有大量IO任务时,应该要预留出足够的线程来处理IO任务,因为IO任务极度耗时。如果判断出系统中的IO密集的任务有10个,则定义的线程数量需要大于10。
7.3、公式总结
最大线程数 = 机器核素*2 + IO密集型任务数
对于上述该公式,只是网上的一种总结,作者也没有进行深入的测试于了解,读者应该根据自己的业务需要进行合理的调整。


