SpringBoot集成Spring Security
Spring Security介绍
Spring Security是一个功能强大且高度可定制的身份验证和访问控制框架。提供了完善的认证机制和方法级的授权功能。是一款非常优秀的权限管理框架。它的核心是一组过滤器链,不同的功能经由不同的过滤器。
spring security使用目的:验证,授权,攻击防护。
原理:创建大量的filter和interceptor来进行请求的验证和拦截,以此来达到安全的效果。
大家可以先了解下Spring Security:
- Spring Security原理分析【1】——整体布局切入
- Spring Security原理分析【2】——SecurityFilterChain的构建
- SpringSecurity 原理解析【3】——认证与授权
- SpringSecurity 原理解析【4】——令牌还原与Session
- SpringSecurity 原理解析【5】——Spring Security核心组件
SpringBoot集成Spring Security
基本用法
创建一个springboot项目,添加一个/helloController
@RestController
public class HelloController {

    @RequestMapping("/hello")
    public String hello(){
        return "hello";
    }
}
这样,这个/hello是可以默认访问,返回一个hello字符串。
添加spring security
向pom.xml中添加security依赖
<dependency>
<groupId>org.springframework.boot</groupId>
<artifactId>spring-boot-starter-security</artifactId>
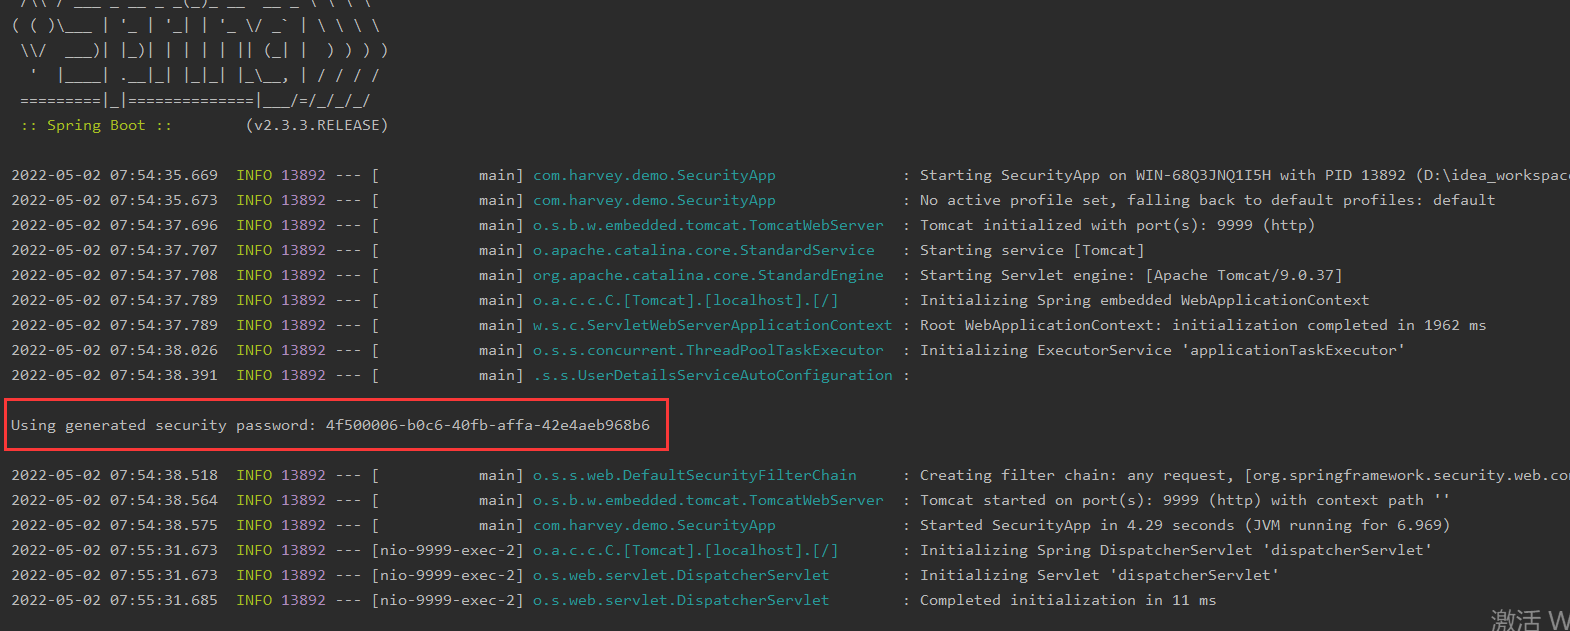
</dependency>这样在启动的时候会在控制台显示随机生成的密码。
这时访问http://localhost:9999/hello会重定向到http://localhost:9999/login,这个页面是spring默认的。
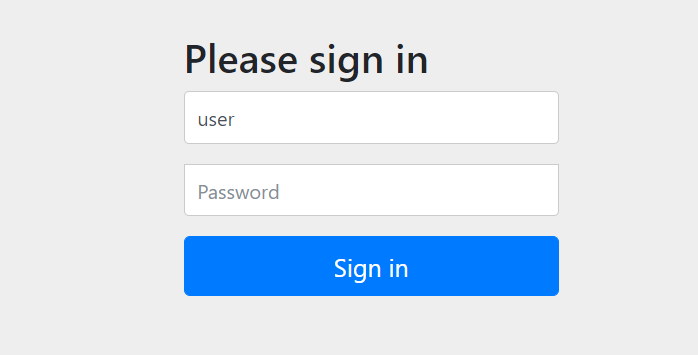
登陆
1、使用默认用户和随机生成的密码登录
spring security 默认的用户名是user,spring security启动的时候会生成默认密码(在启动日志中可以看到)。
我们填入user 和 上图显示的随机密码,那么就会正常的访问/hello。
2、使用yaml文件定义的用户名、密码登录
在application.yaml中定义用户名密码:
spring:
  security:
    user:
      name: root
      password: root
使用root/root登录,可以正常访问/hello。
3、使用代码中指定的用户名、密码登录
- 使用configure(AuthenticationManagerBuilder) 添加认证。
- 使用configure(httpSecurity) 添加权限
@Configuration
public class MySecurityConfiguration extends WebSecurityConfigurerAdapter {
    @Override
    protected void configure(AuthenticationManagerBuilder auth) throws Exception {
        auth.inMemoryAuthentication()
            .withUser("admin") // 添加用户admin
            .password("{noop}admin")  // 不设置密码加密
            .roles("ADMIN", "USER")// 添加角色为admin,user
            .and()
            .withUser("user") // 添加用户user
            .password("{noop}user")
            .roles("USER")
            .and()
            .withUser("tmp") // 添加用户tmp
            .password("{noop}tmp")
            .roles(); // 没有角色
    }
    @Override
    protected void configure(HttpSecurity http) throws Exception {
        http.authorizeRequests()
            .antMatchers("/product/**").hasRole("USER") //添加/product/** 下的所有请求只能由user角色才能访问
            .antMatchers("/admin/**").hasRole("ADMIN") //添加/admin/** 下的所有请求只能由admin角色才能访问
            .anyRequest().authenticated() // 没有定义的请求,所有的角色都可以访问(tmp也可以)。
            .and()
            .formLogin().and()
            .httpBasic();
    }
}
添加AdminController、ProductController
@RestController
@RequestMapping("/admin")
public class AdminController {
    @RequestMapping("/hello")
    public String hello(){
        return "admin hello";
    }
}
@RestController
@RequestMapping("/product")
public class ProductController {
@RequestMapping("/hello")
public String hello(){
return "product hello";
}
}通过上面的设置,访问http://localhost:9999/admin/hello只能由admin访问,http://localhost:9999/product/hello admin和user都可以访问,http://localhost:9999/hello 所有用户(包括tmp)都可以访问。
4、使用数据库的用户名、密码登录
1)添加依赖
<!-- JDBC -->
<dependency>
    <groupId>org.springframework.boot</groupId>
    <artifactId>spring-boot-starter-jdbc</artifactId>
</dependency>

<!-- MySQL 驱动包-->
<!--MySQL Server 版本为 8.x时,mysql-connector-java使用5.1.35时会报错-->
<dependency>
    <groupId>mysql</groupId>
    <artifactId>mysql-connector-java</artifactId>
    <version>8.0.11</version>
</dependency>
2)添加数据库配置
spring:
  datasource:
    #通用配置
    driver-class-name: com.mysql.jdbc.Driver
    password: root
    username: root
    url: jdbc:mysql://localhost:3306/demo?serverTimezone=Asia/Shanghai&useUnicode=true&charcterEncoding=UTF-8&useSSL=false
    #数据源连接池配置
    hikari:
      minimum-idle: 10
      maximum-pool-size: 20
      idle-timeout: 500000
      max-lifetime: 540000
      connection-timeout: 60000
      connection-test-query: select 1
3)配置spring-security认证和授权
@Configuration
public class MySecurityConfiguration extends WebSecurityConfigurerAdapter {

    @Autowired
    private UserDetailsService userDetailsService;

    @Override
    protected void configure(AuthenticationManagerBuilder auth) throws Exception {
        auth.userDetailsService(userDetailsService)// 设置自定义的userDetailsService
                .passwordEncoder(passwordEncoder());
    }

    @Override
    protected void configure(HttpSecurity http) throws Exception {
        http.authorizeRequests()
                .antMatchers("/product/**").hasRole("USER")
                .antMatchers("/admin/**").hasRole("ADMIN")
                .anyRequest().authenticated() //
                .and()
                .formLogin()
                .and()
                .httpBasic()
                .and().logout().logoutUrl("/logout");
    }

    @Bean
    public PasswordEncoder passwordEncoder() {
        return NoOpPasswordEncoder.getInstance();// 使用不使用加密算法保持密码
        //return new BCryptPasswordEncoder();
    }
}
如果需要使用BCryptPasswordEncoder,可以先在测试环境中加密后放到数据库中:
@Test
public void encode() {
    BCryptPasswordEncoder bCryptPasswordEncoder = new BCryptPasswordEncoder();
    String password = bCryptPasswordEncoder.encode("user");
    String password2 = bCryptPasswordEncoder.encode("admin");
    System.out.println(password);
    System.out.println(password2);
}
4)配置自定义UserDetailsService来进行验证
@Component("userDetailsService")
public class CustomUserDetailsService implements UserDetailsService {

    @Autowired
    private UserDao userDao;

    @Override
    public UserDetails loadUserByUsername(String login) throws UsernameNotFoundException {
        // 1. 查询用户
        User userFromDatabase = userDao.findOneByLogin(login);
        if (userFromDatabase == null) {
            //log.warn("User: {} not found", login);
            throw new UsernameNotFoundException("User " + login + " was not found in db");
            //这里找不到必须抛异常
        }

        // 2. 设置角色
        Collection<GrantedAuthority> grantedAuthorities = new ArrayList<>();
        GrantedAuthority grantedAuthority = new SimpleGrantedAuthority(userFromDatabase.getRole());
        grantedAuthorities.add(grantedAuthority);

        return new org.springframework.security.core.userdetails.User(login,
                userFromDatabase.getPassword(), grantedAuthorities);
    }

}
5)数据库查询UserDao
接口:
public interface UserDao {
    User findOneByLogin(String login);
}
实现类:
@Repository
public class UserDaoImpl implements UserDao {

    @Autowired
    private JdbcTemplate jdbcTemplate;

    @Override
    public User findOneByLogin(String login) {
        return jdbcTemplate.queryForObject("select * from user where login = ?",
                new BeanPropertyRowMapper<User>(User.class), new Object[]{login});
    }
}
6)添加数据库数据

CREATE TABLE `user` (
  `id` int(28) NOT NULL,
  `login` varchar(255) COLLATE utf8mb4_general_ci DEFAULT NULL,
  `password` varchar(255) COLLATE utf8mb4_general_ci DEFAULT NULL,
  `role` varchar(255) COLLATE utf8mb4_general_ci DEFAULT NULL,
  PRIMARY KEY (`id`)
) ENGINE=InnoDB DEFAULT CHARSET=utf8mb4 COLLATE=utf8mb4_general_ci;
INSERT INTO `demo`.`user`(`id`, `login`, `password`, `role`) VALUES (1, 'user', 'user', 'ROLE_USER');
INSERT INTO `demo`.`user`(`id`, `login`, `password`, `role`) VALUES (2, 'admin', 'admin', 'ROLE_ADMIN');
默认角色前缀必须是ROLE_,因为spring-security会在授权的时候自动使用match中的角色加上ROLE_后进行比较。
7)测试验证
访问 http://localhost:9999/admin/hello 或 http://localhost:9999/product/hello 都会要求输入登陆用户名和密码。
注:当登陆/admin/hello后,如果要想登陆/product/hello,需要先请求/logout退出,再登陆。
8)获取登陆信息
@RequestMapping("/info")
public String info(){
    String userDetails = null;
    Object principal = SecurityContextHolder.getContext().getAuthentication().getPrincipal();
    if(principal instanceof UserDetails) {
        userDetails = ((UserDetails)principal).getUsername();
    }else {
        userDetails = principal.toString();
    }
    return userDetails;
}
spring security session 无状态支持权限控制(前后分离)
spring security会在默认的情况下将认证信息放到HttpSession中。
但是对于我们的前后端分离的情况,如app,小程序,web前后分离等,httpSession就没有用武之地了。这时我们可以通过configure(httpSecurity)设置spring security是否使用httpSession。
@Configuration
public class MySecurityConfiguration extends WebSecurityConfigurerAdapter {
    // code...
    @Override
    protected void configure(HttpSecurity http) throws Exception {
        http
                .sessionManagement()
            	//设置无状态,所有的值如下所示。
                .sessionCreationPolicy(SessionCreationPolicy.STATELESS)
                // code...
    }
    // code...
}
共有四种值,其中默认的是ifRequired。
- always:总是创建HttpSession
- ifRequired:在需要时创建一个HttpSession
- never:不会创建HttpSession,但如果它已经存在,将可以使用HttpSession
- stateless:永远不会创建HttpSession,它不会使用HttpSession来获取SecurityContext
由于前后端不通过保存session和cookie来进行判断,所以为了保证spring security能够记录登录状态,所以需要传递一个值,让这个值能够自我验证来源,同时能够得到数据信息。选型我们选择JWT。对于java客户端我们选择使用jjwt。
添加相关依赖
<!-- jwt -->
<dependency>
    <groupId>io.jsonwebtoken</groupId>
    <artifactId>jjwt-api</artifactId>
    <version>0.11.2</version>
</dependency>
<dependency>
    <groupId>io.jsonwebtoken</groupId>
    <artifactId>jjwt-impl</artifactId>
    <version>0.11.2</version>
    <scope>runtime</scope>
</dependency>
<dependency>
    <groupId>io.jsonwebtoken</groupId>
    <artifactId>jjwt-jackson</artifactId>
    <version>0.11.2</version>
    <scope>runtime</scope>
</dependency>
创建工具类JWTProvider
JWTProvider需要至少提供两个方法,一个用来创建我们的token,另一个根据token获取Authentication。
provider需要保证Key密钥是唯一的,使用init()构建,否则会抛出异常。
@Component
public class JWTProvider {
    private Key key;    // 私钥
    private long tokenValidityInMilliseconds; // 有效时间
    private long tokenValidityInMillisecondsForRememberMe; // 记住我有效时间
    @Autowired
    private JJWTProperties jjwtProperties; // jwt配置参数
    @Autowired
    private UserDao userDao;

    @PostConstruct
    public void init() {
        byte[] keyBytes;
        String secret = jjwtProperties.getSecret();
        if (StringUtils.hasText(secret)) {
            System.out.println("Warning: the JWT key used is not Base64-encoded. " +
                    "We recommend using the `jhipster.security.authentication.jwt.base64-secret` key for optimum security.");
            keyBytes = secret.getBytes(StandardCharsets.UTF_8);
        } else {
            System.out.println("Using a Base64-encoded JWT secret key");
            keyBytes = Decoders.BASE64.decode(jjwtProperties.getBase64Secret());
        }
        this.key = Keys.hmacShaKeyFor(keyBytes); // 使用mac-sha算法的密钥
        this.tokenValidityInMilliseconds =
                1000 * jjwtProperties.getTokenValidityInSeconds();
        this.tokenValidityInMillisecondsForRememberMe =
                1000 * jjwtProperties.getTokenValidityInSecondsForRememberMe();
    }

    public String createToken(Authentication authentication, boolean rememberMe) {
        long now = (new Date()).getTime();
        Date validity;
        if (rememberMe) {
            validity = new Date(now + this.tokenValidityInMillisecondsForRememberMe);
        } else {
            validity = new Date(now + this.tokenValidityInMilliseconds);
        }
        User user = userDao.findOneByLogin(authentication.getName());
        Map<String, Object> map = new HashMap<>();
        map.put("sub", authentication.getName());
        map.put("user", user);
        return Jwts.builder()
                .setClaims(map) // 添加body
                .signWith(key, SignatureAlgorithm.HS512) // 指定摘要算法
                .setExpiration(validity) // 设置有效时间
                .compact();
    }

    public Authentication getAuthentication(String token) {
        Claims claims = Jwts.parserBuilder()
                .setSigningKey(key)
                .build()
                .parseClaimsJws(token).getBody(); // 根据token获取body
        User principal;
        Collection<? extends GrantedAuthority> authorities;
        principal = userDao.findOneByLogin(claims.getSubject());
        authorities = principal.getAuthorities();
        return new UsernamePasswordAuthenticationToken(principal, token, authorities);
    }
}
1)application.yml中添加jwt的配置
# jwt配置
jwt:
  # secret 必须足够长
  # 否则 The specified key byte array is 40 bits which is not secure enough for any JWT HMAC-SHA algorithm
  secret: 777@#12!123~%123456000##1112345111
  # base64加密后的secret
  base64Secret: Nzc3QCMxMiExMjN+JTEyMzQ1NjAwMCMjMTExMjM0NTExMQ==
  # 有效时间(秒)
  tokenValidityInSeconds: 1800
  # 记住我有效时间(秒)
  tokenValidityInSecondsForRememberMe: 1800
2)JJWTProperties.java
@Component
@ConfigurationProperties(prefix = "jwt")
public class JJWTProperties {

    private String secret;

    private String base64Secret;

    private Long tokenValidityInSeconds;

    private Long tokenValidityInSecondsForRememberMe;

    public String getSecret() {
        return secret;
    }

    public void setSecret(String secret) {
        this.secret = secret;
    }

    public String getBase64Secret() {
        return base64Secret;
    }

    public void setBase64Secret(String base64Secret) {
        this.base64Secret = base64Secret;
    }

    public Long getTokenValidityInSeconds() {
        return tokenValidityInSeconds;
    }

    public void setTokenValidityInSeconds(Long tokenValidityInSeconds) {
        this.tokenValidityInSeconds = tokenValidityInSeconds;
    }

    public Long getTokenValidityInSecondsForRememberMe() {
        return tokenValidityInSecondsForRememberMe;
    }

    public void setTokenValidityInSecondsForRememberMe(Long tokenValidityInSecondsForRememberMe) {
        this.tokenValidityInSecondsForRememberMe = tokenValidityInSecondsForRememberMe;
    }
}
3)注意:这里我们创建的User需要实现UserDetails对象,这样我们可以根据principal.getAuthorities()获取到权限,如果不实现UserDetails,那么需要自定义authorities并添加到UsernamePasswordAuthenticationToken中。
public class User implements UserDetails {

    private Integer id;

    private String login;

    private String password;

    private String role;

    public Integer getId() {
        return id;
    }

    public void setId(Integer id) {
        this.id = id;
    }

    public String getLogin() {
        return login;
    }

    public void setLogin(String login) {
        this.login = login;
    }

    public String getPassword() {
        return password;
    }

    public void setPassword(String password) {
        this.password = password;
    }

    public String getRole() {
        return role;
    }

    public void setRole(String role) {
        this.role = role;
    }

    //-------------------- 以下方法是实现UserDetails接口必须重写的方法
    @Override
    // 获取权限,这里就用简单的方法
    // 在spring security中,Authorities既可以是ROLE也可以是Authorities
    public Collection<? extends GrantedAuthority> getAuthorities() {
        return Collections.singleton(new SimpleGrantedAuthority(role));
    }

    @Override
    public String getUsername() {
        return login;
    }

    @Override
    public boolean isAccountNonExpired() {
        return true;
    }

    @Override
    public boolean isAccountNonLocked() {
        return false;
    }

    @Override
    public boolean isCredentialsNonExpired() {
        return true;
    }

    @Override
    public boolean isEnabled() {
        return true;
    }
}
创建登录成功,登出成功处理器
认证成功,返回jwt:
@Component
public class MyAuthenticationSuccessHandler implements AuthenticationSuccessHandler {

    @Autowired
    private JWTProvider jwtProvider;

    @Override
    public void onAuthenticationSuccess(HttpServletRequest servletRequest, HttpServletResponse servletResponse, Authentication authentication) throws IOException, ServletException {
        PrintWriter writer = servletResponse.getWriter();
        writer.println(jwtProvider.createToken(authentication, true));
    }
}
登出成功:
@Component
public class MyLogoutSuccessHandler implements LogoutSuccessHandler {

    @Override
    public void onLogoutSuccess(HttpServletRequest servletRequest, HttpServletResponse servletResponse, Authentication authentication) throws IOException, ServletException {
        PrintWriter writer = servletResponse.getWriter();
        writer.println("logout success");
        writer.flush();
    }
}
设置登录、登出、取消csrf防护
登出无法对token进行失效操作,可以使用数据库保存token,然后在登出时删除该token。
@Configuration
public class MySecurityConfiguration extends WebSecurityConfigurerAdapter {

    @Autowired
    private MyAuthenticationSuccessHandler authenticationSuccessHandler;

    @Autowired
    public MyLogoutSuccessHandler logoutSuccessHandler;

    @Override
    protected void configure(HttpSecurity http) throws Exception {
        // 添加登录处理器
        http.formLogin()
                .loginProcessingUrl("/login")
                .successHandler(authenticationSuccessHandler)
                .and().csrf().disable(); //取消csrf防护

        // 添加登出处理器
        http.logout()
                .logoutUrl("/logout")
                .logoutSuccessHandler(logoutSuccessHandler);
    }
}
使用JWT集成spring-security
- 添加Filter供spring-security解析token,并向securityContext中添加我们的用户信息。
- 在UsernamePasswordAuthenticationFilter.class之前我们需要执行根据token添加authentication。关键方法是从jwt中获取authentication,然后添加到securityContext中。
- 在SecurityConfiguration中需要设置Filter添加的位置。
1、创建自定义Filter,用于jwt获取authentication:
public class JWTFilter extends GenericFilterBean {

    private final static String HEADER_AUTH_NAME = "auth";

    private JWTProvider jwtProvider;

    public JWTFilter(JWTProvider jwtProvider) {
        this.jwtProvider = jwtProvider;
    }

    @Override
    public void doFilter(ServletRequest servletRequest, ServletResponse servletResponse, FilterChain filterChain) throws IOException, ServletException {
        try {
            HttpServletRequest httpServletRequest = (HttpServletRequest) servletRequest;
            String authToken = httpServletRequest.getHeader(HEADER_AUTH_NAME);
            if (StringUtils.hasText(authToken)) {
                // 从自定义tokenProvider中解析用户
                Authentication authentication = this.jwtProvider.getAuthentication(authToken);
                SecurityContextHolder.getContext().setAuthentication(authentication);
            }
            // 调用后续的Filter,如果上面的代码逻辑未能复原“session”,SecurityContext中没有想过信息,后面的流程会检测出"需要登录"
            filterChain.doFilter(servletRequest, servletResponse);
        } catch (Exception ex) {
            throw new RuntimeException(ex);
        }
    }
}
2、向HttpSecurity添加Filter和设置Filter位置:
public class MySecurityConfiguration extends WebSecurityConfigurerAdapter {
    // code...
    @Override
    protected void configure(HttpSecurity http) throws Exception {
        http
                .sessionManagement()
            	//设置添加Filter和位置
                .and().addFilterBefore(new JWTFilter(jwtProvider), UsernamePasswordAuthenticationFilter.class);
                // code...
    }
    // code...
}
3、MySecurityConfiguration代码:
@Configuration
public class MySecurityConfiguration extends WebSecurityConfigurerAdapter {

    @Autowired
    private MyLogoutSuccessHandler logoutSuccessHandler;

    @Autowired
    public MyAuthenticationSuccessHandler authenticationSuccessHandler;

    @Autowired
    private UserDetailsService userDetailsService;

    @Autowired
    private JWTProvider jwtProvider;

    @Override
    protected void configure(AuthenticationManagerBuilder auth) throws Exception {
        auth.userDetailsService(userDetailsService)// 设置自定义的userDetailsService
                .passwordEncoder(passwordEncoder());
    }

    @Override
    protected void configure(HttpSecurity http) throws Exception {
        http
                .sessionManagement()
                .sessionCreationPolicy(SessionCreationPolicy.STATELESS)//设置无状态
                .and()
                .authorizeRequests() // 配置请求权限
                .antMatchers("/product/**").hasRole("USER") // 需要角色
                .antMatchers("/admin/**").hasRole("ADMIN")
                .anyRequest().authenticated() // 所有的请求都需要登录
                .and()
                // 配置登录url,和登录成功处理器
                .formLogin().loginProcessingUrl("/login").successHandler(authenticationSuccessHandler)
                // 取消csrf防护
                .and().csrf().disable()
                .httpBasic()
                // 配置登出url,和登出成功处理器
                .and().logout().logoutUrl("/logout")
                .logoutSuccessHandler(logoutSuccessHandler)
                // 在UsernamePasswordAuthenticationFilter之前执行我们添加的JWTFilter
                .and().addFilterBefore(new JWTFilter(jwtProvider), UsernamePasswordAuthenticationFilter.class);
    }

    @Bean
    public PasswordEncoder passwordEncoder() {
        return NoOpPasswordEncoder.getInstance();
    }

    @Override
    public void configure(WebSecurity web) {
        // 添加不做权限的URL
        web.ignoring()
                .antMatchers("/swagger-resources/**")
                .antMatchers("/swagger-ui.html")
                .antMatchers("/webjars/**")
                .antMatchers("/v2/**")
                .antMatchers("/h2-console/**");
    }
}
4、使用注解对方法进行权限管理
需要在MySecurityConfiguration上添加@EnableGlobalMethodSecurity(prePostEnabled = true)注解,prePostEnabled默认为false,需要设置为true后才能全局的注解权限控制。
prePostEnabled设置为true后,可以使用四个注解:
添加实体类School:
public class School implements Serializable {
    private Long id;
    private String name;
    private String address;
}
1)@PreAuthorize
在访问之前就进行权限判断
@RestController
public class AnnoController {

    @Autowired
    private JWTProvider jwtProvider;

    @RequestMapping("/annotation")
    //@PreAuthorize("hasRole('ADMIN')")
    @PreAuthorize("hasAuthority('ROLE_ADMIN')")
    public String info(){
        return "拥有admin权限";
    }
}
hasRole和hasAuthority都会对UserDetails中的getAuthorities进行判断区别是hasRole会对字段加上ROLE_后再进行判断,上例中使用了hasRole('ADMIN'),那么就会使用ROLE_ADMIN进行判断,如果是hasAuthority('ADMIN'),那么就使用ADMIN进行判断。
2)@PostAuthorize
在请求之后进行判断,如果返回值不满足条件,会抛出异常,但是方法本身是已经执行过了的。
@RequestMapping("/postAuthorize")
@PreAuthorize("hasRole('ADMIN')")
@PostAuthorize("returnObject.id%2==0")
public School postAuthorize(Long id) {
    School school = new School();
    school.setId(id);
    return school;
}
returnObject是内置对象,引用的是方法的返回值。
如果returnObject.id%2==0为 true,那么返回方法值。如果为false,会返回403 Forbidden。
3)@PreFilter
在方法执行之前,用于过滤集合中的值。
@RequestMapping("/preFilter")
@PreAuthorize("hasRole('ADMIN')")
@PreFilter("filterObject%2==0")
public List<Long> preFilter(@RequestParam("ids") List<Long> ids) {
    return ids;
}
filterObject是内置对象,引用的是集合中的泛型类,如果有多个集合,需要指定filterTarget。
@PreFilter(filterTarget="ids", value="filterObject%2==0")
public List<Long> preFilter(@RequestParam("ids") List<Long> ids,@RequestParam("ids") List<User> users,) {
    return ids;
}
filterObject%2==0会对集合中的值会进行过滤,为true的值会保留。
第一个例子返回的值在执行前过滤返回2,4。
4)@PostFilter
会对返回的集合进行过滤。
@RequestMapping("/postFilter")
@PreAuthorize("hasRole('ADMIN')")
@PostFilter("filterObject.id%2==0")
public List<School> postFilter() {
    List<School> schools = new ArrayList<School>();
    School school;
    for (int i = 0; i < 10; i++) {
        school = new School();
        school.setId((long)i);
        schools.add(school);
    }
    return schools;
}
上面的方法返回结果为:id为0,2,4,6,8的School对象。
Spring Security API
HttpSecurity
下面是HttpSecurity中的所有方法
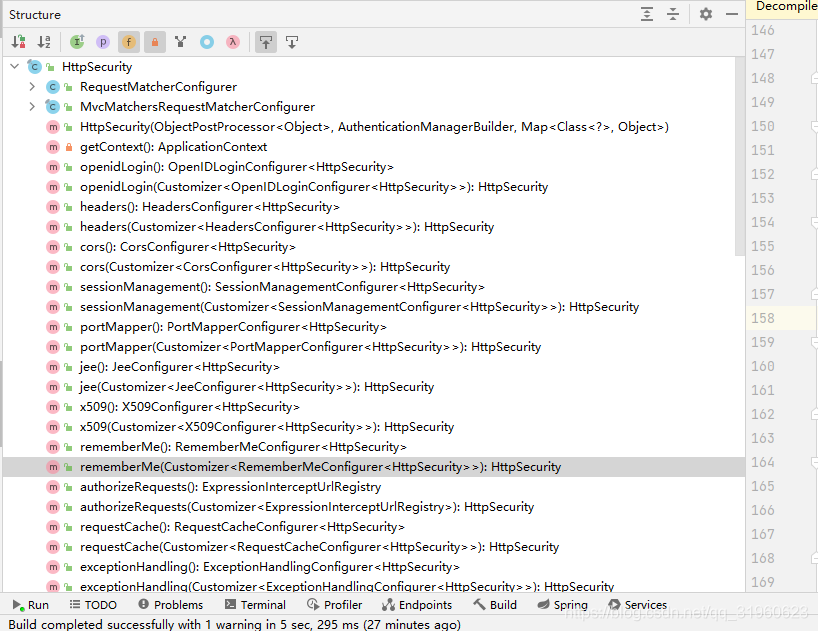
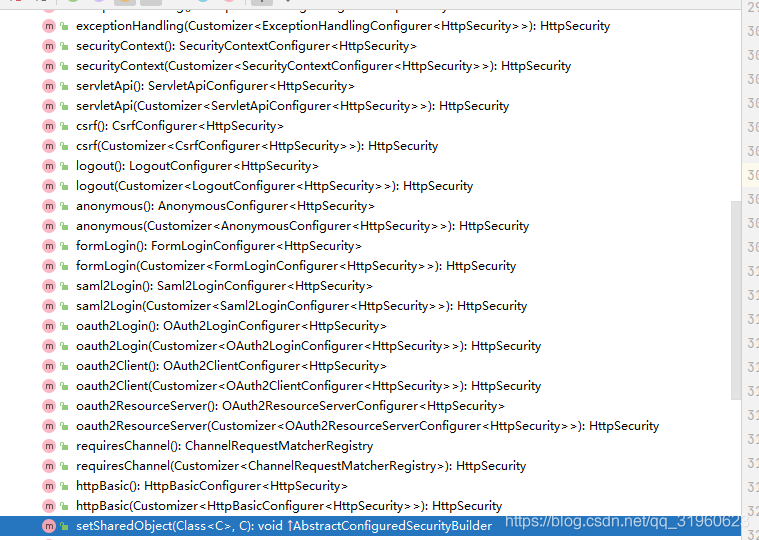
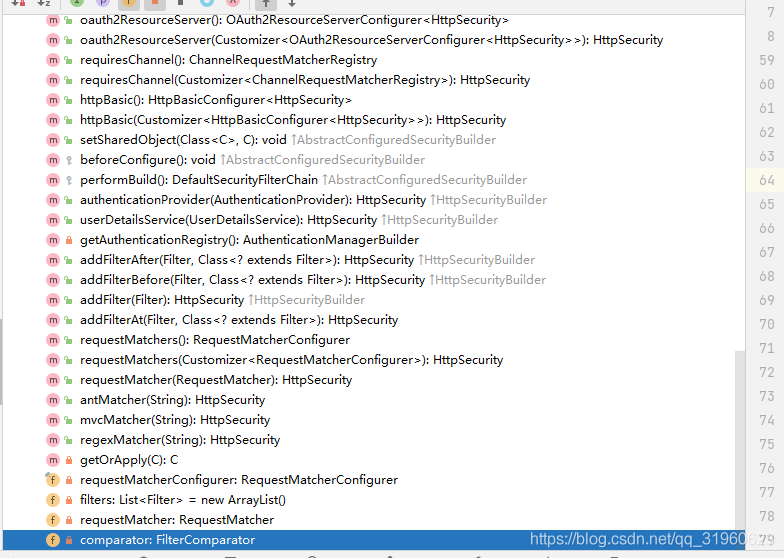
常用的方法说明
1)openidLogin()
用于基于 OpenId 的验证
2)headers()
将安全标头添加到响应
3)cors()
配置跨域资源共享( CORS )
4)sessionManagement()
允许配置会话管理
5)portMapper()
允许配置一个PortMapper(HttpSecurity#(getSharedObject(class))),其他提供SecurityConfigurer的对象使用 PortMapper 从 HTTP 重定向到 HTTPS 或者从 HTTPS 重定向到 HTTP。默认情况下,Spring Security使用一个PortMapperImpl映射 HTTP 端口8080到 HTTPS 端口8443,HTTP 端口80到 HTTPS 端口443。
6)jee()
配置基于容器的预认证。 在这种情况下,认证由Servlet容器管理
7)x509()
配置基于x509的认证
8)rememberMe
允许配置“记住我”的验证
9)authorizeRequests()
允许基于使用HttpServletRequest限制访问
10)requestCache()
允许配置请求缓存
11)exceptionHandling()
允许配置错误处理
12)securityContext()
在HttpServletRequests之间的SecurityContextHolder上设置SecurityContext的管理。 当使用WebSecurityConfigurerAdapter时,这将自动应用。
13)servletApi()
将HttpServletRequest方法与在其上找到的值集成到SecurityContext中。 当使用WebSecurityConfigurerAdapter时,这将自动应用。
14)csrf()
添加 CSRF 支持,使用WebSecurityConfigurerAdapter时,默认启用
15)logout()
添加退出登录支持。当使用WebSecurityConfigurerAdapter时,这将自动应用。默认情况是,访问URL”/ logout”,使HTTP Session无效来清除用户,清除已配置的任何#rememberMe()身份验证,清除SecurityContextHolder,然后重定向到”/login?success”
16)anonymous()
允许配置匿名用户的表示方法。 当与WebSecurityConfigurerAdapter结合使用时,这将自动应用。 默认情况下,匿名用户将使用org.springframework.security.authentication.AnonymousAuthenticationToken表示,并包含角色 “ROLE_ANONYMOUS”
17)formLogin()
指定支持基于表单的身份验证。如果未指定FormLoginConfigurer#loginPage(String),则将生成默认登录页面
18)oauth2Login()
根据外部OAuth 2.0或OpenID Connect 1.0提供程序配置身份验证
19)requiresChannel()
配置通道安全。为了使该配置有用,必须提供至少一个到所需信道的映射
20)httpBasic()
配置 Http Basic 验证
21)addFilterAt()
在指定的Filter类的位置添加过滤器
更详细的介绍:HttpSecurity 详解
HttpSecurity示例
登录注销配置
@Configuration
public class SecurityConfig extends WebSecurityConfigurerAdapter {

    @Override
    protected void configure(HttpSecurity http) throws Exception {
        http.authorizeRequests()
                .formLogin()
            	// 登录处理接口
                .loginProcessingUrl("/login")
            	// 定义登录页面,未登录时,访问一个需要登录之后才能访问的接口,会自动跳转到该页面
                .loginPage("/login")
            	// 定义登录时,用户名的 key,默认为 username
                .usernameParameter("uname")
            	// 定义登录时,用户密码的 key,默认为 password
                .passwordParameter("passwd")
            	// 登录成功的处理器
                .successHandler(new AuthenticationSuccessHandler() {
                    @Override
                    public void onAuthenticationSuccess(HttpServletRequest httpServletRequest, HttpServletResponse httpServletResponse, Authentication authentication) throws IOException, ServletException {
                        httpServletResponse.setContentType("application/json;charset=utf-8");
                        PrintWriter out = httpServletResponse.getWriter();
                        Map<String, Object> map = new HashMap<>();
                        map.put("status", 200);
                        map.put("msg", authentication.getPrincipal());
                        out.write(new ObjectMapper().writeValueAsString(map));
                        out.flush();
                        out.close();
                    }
                })
            	// 登录失败的处理器
                .failureHandler(new AuthenticationFailureHandler() {
                    @Override
                    public void onAuthenticationFailure(HttpServletRequest httpServletRequest, HttpServletResponse httpServletResponse, AuthenticationException e) throws IOException, ServletException {
                        httpServletResponse.setContentType("application/json;charset=utf-8");
                        PrintWriter out = httpServletResponse.getWriter();
                        Map<String, Object> map = new HashMap<>();
                        map.put("status", 401);
                        if (e instanceof LockedException) {
                            map.put("msg", "账户被锁定,登录失败!");
                        } else if (e instanceof BadCredentialsException) {
                            map.put("msg", "用户名或密码输入错误,登录失败!");
                        } else if (e instanceof DisabledException) {
                            map.put("msg", "账户被禁用,登录失败!");
                        } else if (e instanceof AccountExpiredException) {
                            map.put("msg", "账户过期,登录失败!");
                        } else if (e instanceof CredentialsExpiredException) {
                            map.put("msg", "密码过期,登录失败!");
                        } else {
                            map.put("msg", "登录失败!");
                        }
                        out.write(new ObjectMapper().writeValueAsString(map));
                        out.flush();
                        out.close();
                    }
                })
            	// 和表单登录相关的接口统统都直接通过
                .permitAll()
                .and()
                .logout()
                .logoutUrl("/logout")
            	// 注销成功的处理器
                .logoutSuccessHandler(new LogoutSuccessHandler() {
                    @Override
                    public void onLogoutSuccess(HttpServletRequest httpServletRequest, HttpServletResponse httpServletResponse, Authentication authentication) throws IOException, ServletException {
                        httpServletResponse.setContentType("application/json;charset=utf-8");
                        PrintWriter out = httpServletResponse.getWriter();
                        Map<String, Object> map = new HashMap<>();
                        map.put("status", 200);
                        map.put("msg", "注销登录成功!");
                        out.write(new ObjectMapper().writeValueAsString(map));
                        out.flush();
                        out.close();
                    }
                });
    }

}

 浙公网安备 33010602011771号