Spring MVC九大组件之HandlerMapping
本文将聚焦于Spring MVC中最重要的一个组件:HandlerMapping。
HandlerMapping
用来查找Handler的。在SpringMVC中会有很多请求,每个请求都需要一个Handler处理,具体接收到一个请求之后使用哪个Handler进行处理呢?这就是HandlerMapping需要做的事。
HandlerMapping:负责映射用户的URL和对应的处理类Handler,HandlerMapping并没有规定这个URL与应用的处理类如何映射。所以在HandlerMapping接口中仅仅定义了根据一个URL必须返回一个由HandlerExecutionChain代表的处理链,我们可以在这个处理链中添加任意的HandlerAdapter实例来处理这个URL对应的请求(这样保证了最大的灵活性映射关系)。
public interface HandlerMapping {
    //@since 4.3.21
    String BEST_MATCHING_HANDLER_ATTRIBUTE = HandlerMapping.class.getName() + ".bestMatchingHandler";

    String PATH_WITHIN_HANDLER_MAPPING_ATTRIBUTE = HandlerMapping.class.getName() + ".pathWithinHandlerMapping";
    String BEST_MATCHING_PATTERN_ATTRIBUTE = HandlerMapping.class.getName() + ".bestMatchingPattern";
    String INTROSPECT_TYPE_LEVEL_MAPPING = HandlerMapping.class.getName() + ".introspectTypeLevelMapping";
    String URI_TEMPLATE_VARIABLES_ATTRIBUTE = HandlerMapping.class.getName() + ".uriTemplateVariables";
    String MATRIX_VARIABLES_ATTRIBUTE = HandlerMapping.class.getName() + ".matrixVariables";
    String PRODUCIBLE_MEDIA_TYPES_ATTRIBUTE = HandlerMapping.class.getName() + ".producibleMediaTypes";

    // 该接口提供的唯一一个方法~~~~
    @Nullable
    HandlerExecutionChain getHandler(HttpServletRequest request) throws Exception;

}
看看它的继承树:
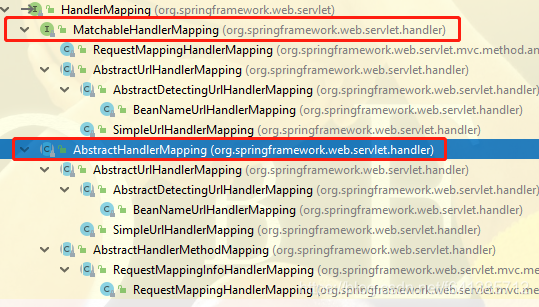
它有两大继承主线:MatchableHandlerMapping和AbstractHandlerMapping。
AbstractHandlerMapping
这是Spring的常用模式了,一言不合就先来个抽象实现。查看它的继承图谱:
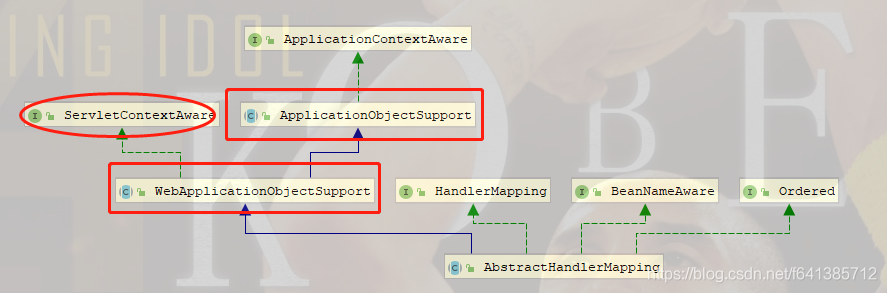
有必要先对两个XXXSupport进行一个非常简单的说明~
WebApplicationObjectSupport 和 ApplicationObjectSupport
看它们的声明,它们更像是ApplicationContextAware和ServletContextAware的适配器。
public abstract class ApplicationObjectSupport implements ApplicationContextAware { ... }

public abstract class WebApplicationObjectSupport extends ApplicationObjectSupport implements ServletContextAware { ... }
所以如果我们在继承允许的情况下,只需要继承此类就能自动拥有上面两个接口的功能了。
@Service
public class HelloServiceImpl extends WebApplicationObjectSupport implements HelloService {
    @Override
    public Object hello() {
        // 继承自ApplicationObjectSupport就可以很方便的获取到下面这两个值
        System.out.println(super.getApplicationContext());
        System.out.println(super.obtainApplicationContext()); //@since 5.0
        // MessageSourceAccessor参考:MessageSourceAware   它是对MessageSource的一个包装  处理国际化
        System.out.println(super.getMessageSourceAccessor());

        // 这里需要继承和web相关的:WebApplicationObjectSupport
        System.out.println(super.getWebApplicationContext());
        System.out.println(super.getServletContext());
        System.out.println(super.getTempDir()); //Tomcat9_demowar\work\Catalina\localhost\demo_war_war

        return "service hello";
    }

    @Override
    protected void initApplicationContext() throws BeansException {
        // 这是父类提供给子类的(父类为空实现~),子类可以自行实现,实现子类的逻辑
        // 比如子类AbstractDetectingUrlHandlerMapping就复写了此方法去detectHandlers();
        super.initApplicationContext();
    }
}
就这样可以通过继承的方式快速的实现获取上下文等,推荐使用~~~
WebApplicationObjectSupport用于提供上下文ApplicationContext和ServletContext的功能~
很显然如果你已经有继承了,那就没办法只能选择实现接口的方式了~
继续来看看AbstractHandlerMapping这个抽象实现给我们做了哪些事情~
// 它自己又额外实现了BeanNameAware和Ordered排序接口
public abstract class AbstractHandlerMapping extends WebApplicationObjectSupport
		implements HandlerMapping, Ordered, BeanNameAware {

    //默认的Handler,这边使用的Obejct,子类实现的时候,使用HandlerMethod,HandlerExecutionChain等
    // the default handler for this handler mapping
    @Nullable
    private Object defaultHandler;
    // url路径计算的辅助类、工具类
    private UrlPathHelper urlPathHelper = new UrlPathHelper();
    // Ant风格的Path匹配模式~  解决如/books/{id}场景
    private PathMatcher pathMatcher = new AntPathMatcher();
    // 保存着拦截器们~~~
    private final List<Object> interceptors = new ArrayList<>();
    // 从interceptors中解析得到,直接添加给全部handler
    private final List<HandlerInterceptor> adaptedInterceptors = new ArrayList<>();

    // 跨域相关的配置~
    private CorsConfigurationSource corsConfigurationSource = new UrlBasedCorsConfigurationSource();
    private CorsProcessor corsProcessor = new DefaultCorsProcessor();
    // 最低的顺序(default: same as non-Ordered)
    private int order = Ordered.LOWEST_PRECEDENCE;
    @Nullable
    private String beanName;

    ...

    // 关于UrlPathHelper 的属性的一些设置~~~
    public void setAlwaysUseFullPath(boolean alwaysUseFullPath) {...}
    public void setUrlDecode(boolean urlDecode) { ... }
    public void setRemoveSemicolonContent(boolean removeSemicolonContent) { ... }
    public void setUrlPathHelper(UrlPathHelper urlPathHelper) { ... } //我们也是可议自己指定一个自己的UrlPathHelper 的
    ...
    // PathMatcher我们也可以自己指定
    public void setPathMatcher(PathMatcher pathMatcher) { ... }
    // Set the interceptors to apply for all handlers mapped by this handler mapping
    // 可变参数:可以一次性添加多个拦截器~~~~  这里使用的Object
    public void setInterceptors(Object... interceptors) {
    	this.interceptors.addAll(Arrays.asList(interceptors));
    }
    // 设值一个UrlBasedCorsConfigurationSource  Map表示它的一些属性们~~~
    public void setCorsConfigurations(Map<String, CorsConfiguration> corsConfigurations) { ... }
    // 重载方法  @since 5.1  Spring5.1之后才有的方法
    public void setCorsConfigurationSource(CorsConfigurationSource corsConfigurationSource) {
    	Assert.notNull(corsConfigurationSource, "corsConfigurationSource must not be null");
    	this.corsConfigurationSource = corsConfigurationSource;
    }
    // Configure a custom {@link CorsProcessor} to use to apply the matched
    // @since 4.2
    public void setCorsProcessor(CorsProcessor corsProcessor) {
    	Assert.notNull(corsProcessor, "CorsProcessor must not be null");
    	this.corsProcessor = corsProcessor;
    }
    ...
    // 这步骤是最重要的。相当于父类setApplicationContext完成了之后,就会执行到这里~~~
    // 这这步骤可议看出   这里主要处理的都是拦截器~~~相关的内容
    @Override
    protected void initApplicationContext() throws BeansException {
    	// 给子类扩展:增加拦截器,默认为空实现
    	extendInterceptors(this.interceptors);
    	// 找到所有MappedInterceptor类型的bean添加到adaptedInterceptors中
    	detectMappedInterceptors(this.adaptedInterceptors);
    	// 将interceptors中的拦截器取出放入adaptedInterceptors
    	// 如果是WebRequestInterceptor类型的拦截器  需要用WebRequestHandlerInterceptorAdapter进行包装适配
    	initInterceptors();
    }
    // 去容器(含祖孙容器)内找到所有的MappedInterceptor类型的拦截器出来,添加进去   非单例的Bean也包含
    // 备注MappedInterceptor为Spring MVC拦截器接口`HandlerInterceptor`的实现类  并且是个final类 Spring3.0后出来的。
    protected void detectMappedInterceptors(List<HandlerInterceptor> mappedInterceptors) {
    	mappedInterceptors.addAll(
    			BeanFactoryUtils.beansOfTypeIncludingAncestors(
    					obtainApplicationContext(), MappedInterceptor.class, true, false).values());
    }
    // 它就是把调用者放进来的interceptors们,适配成HandlerInterceptor然后统一放在`adaptedInterceptors`里面装着~~~
    protected void initInterceptors() {
    	if (!this.interceptors.isEmpty()) {
    		for (int i = 0; i < this.interceptors.size(); i++) {
    			Object interceptor = this.interceptors.get(i);
    			if (interceptor == null) {
    				throw new IllegalArgumentException("Entry number " + i + " in interceptors array is null");
    			}
    			this.adaptedInterceptors.add(adaptInterceptor(interceptor));
    		}
    	}
    }
    // 适配其实也很简单~就是支持源生的HandlerInterceptor以及WebRequestInterceptor两种情况而已
    protected HandlerInterceptor adaptInterceptor(Object interceptor) {
    	if (interceptor instanceof HandlerInterceptor) {
    		return (HandlerInterceptor) interceptor;
    	} else if (interceptor instanceof WebRequestInterceptor) {
    		// WebRequestHandlerInterceptorAdapter它就是个`HandlerInterceptor`,内部持有一个WebRequestInterceptor的引用而已
    		// 内部使用到了DispatcherServletWebRequest包request和response包装成`WebRequest`等等
    		return new WebRequestHandlerInterceptorAdapter((WebRequestInterceptor) interceptor);
    	} else {
    		throw new IllegalArgumentException("Interceptor type not supported: " + interceptor.getClass().getName());
    	}
    }
    protected final HandlerInterceptor[] getAdaptedInterceptors() { ... }
    // 它只会返回MappedInterceptor这种类型的,上面是返回adaptedInterceptors所有
    protected final MappedInterceptor[] getMappedInterceptors() { ... }
    // 这个方法也是一个该抽象类提供的一个非常重要的模版方法:根据request获取到一个HandlerExecutionChain
    // 也是抽象类实现接口HandlerMapping的方法~~~
    @Override
    @Nullable
    public final HandlerExecutionChain getHandler(HttpServletRequest request) throws Exception {
    	// 根据request获取对应的handler   抽象方法,由具体的子类去实现~~~~
    	Object handler = getHandlerInternal(request);
    	// 若没有匹配上处理器,那就走默认的处理器~~~   默认的处理器也是需要由子类给赋值  否则也会null的
    	if (handler == null) {
    		handler = getDefaultHandler();
    	}
    	// 若默认的处理器都木有  那就直接返回null啦~
    	if (handler == null) {
    		return null;
    	}
    	// 意思是如果是个String类型的名称,那就去容器内找这个Bean,当作一个Handler~
    	if (handler instanceof String) {
    		String handlerName = (String) handler;
    		handler = obtainApplicationContext().getBean(handlerName);
    	}
    	// 关键步骤:根据handler和request构造一个请求处理链~~
    	HandlerExecutionChain executionChain = getHandlerExecutionChain(handler, request);
    	// 4.2版本提供了对CORS跨域资源共享的支持  此处暂时略过~
    	if (CorsUtils.isCorsRequest(request)) {
    		...
    	}
    	return executionChain;
    }
    // 已经找到handler了,那就根据此构造一个请求链
    // 这里主要是吧拦截器们给糅进来~  构成对指定请求的一个拦截器链
    protected HandlerExecutionChain getHandlerExecutionChain(Object handler, HttpServletRequest request) {
    	// 小细节:因为handler本身也许就是个Chain,所以此处需要判断一下~
    	HandlerExecutionChain chain = (handler instanceof HandlerExecutionChain ? (HandlerExecutionChain) handler : new HandlerExecutionChain(handler));
    	// 此处就用到了urlPathHelper来解析request
    	// 如我的请求地址为:`http://localhost:8080/demo_war_war/api/v1/hello`  那么lookupPath=/api/v1/hello
    	String lookupPath = this.urlPathHelper.getLookupPathForRequest(request);
    	for (HandlerInterceptor interceptor : this.adaptedInterceptors) {
    		if (interceptor instanceof MappedInterceptor) {

    			// 这里其实就能体现出MappedInterceptor的些许优势了:也就是它只有路径匹配上了才会拦截,没有匹配上的就不会拦截了,处理起来确实是更加的优雅些了~~~~
    			// 备注:MappedInterceptor可以设置includePatterns和excludePatterns等~~~~~
    			MappedInterceptor mappedInterceptor = (MappedInterceptor) interceptor;
    			if (mappedInterceptor.matches(lookupPath, this.pathMatcher)) {
    				chain.addInterceptor(mappedInterceptor.getInterceptor());
    			}
    		} else {
    			chain.addInterceptor(interceptor);
    		}
    	}
    	return chain;
    }
    ...
}AbstractHandlerMapping主要实现了对方法getHandler()的模版实现,它主要是对HandlerInterceptor进行了一个通用处理,最终会把他们放进HandlerExecutionChain里面去。
MappedInterceptor
一个包括includePatterns和excludePatterns字符串集合并带有HandlerInterceptor功能的类。
很明显,就是对于某些地址做特殊包括和排除的拦截器。
Spring3.0推出的对HandlerInterceptor的实现类,且是个final类。所以扩展它并不是像通过继承HandlerInterceptorAdapter这样去扩展,而是通过了类似代理的方式~~~~
// @since 3.0  它是个final类  所以不允许你直接使用继承的方式来扩展
public final class MappedInterceptor implements HandlerInterceptor {

    // 可以看到它哥俩都是可以不用指定,可以为null的
    @Nullable
    private final String[] includePatterns;
    @Nullable
    private final String[] excludePatterns;
    // 持有一个interceptor的引用,类似于目标类~
    private final HandlerInterceptor interceptor;

    // 注意:该类允许你自己指定路径的匹配规则。但是Spring里,不管哪个上层服务,默认使用的都是Ant风格的匹配
    // 并不是正则的匹配  所以效率上还是蛮高的~
    @Nullable
    private PathMatcher pathMatcher;

    //======构造函数:发现它不仅仅兼容HandlerInterceptor,还可以把WebRequestInterceptor转换成此~
    public MappedInterceptor(@Nullable String[] includePatterns, HandlerInterceptor interceptor) {
    	this(includePatterns, null, interceptor);
    }
    ...
    public MappedInterceptor(@Nullable String[] includePatterns, @Nullable String[] excludePatterns,
    		WebRequestInterceptor interceptor) {
    	// 此处使用WebRequestHandlerInterceptorAdapter这个适配器~~~
    	this(includePatterns, excludePatterns, new WebRequestHandlerInterceptorAdapter(interceptor));
    }

    // 原则:excludePatterns先执行,includePatterns后执行
    // 如果excludePatterns执行完都木有匹配的,并且includePatterns是空的,那就返回true(这是个处理方式技巧~  对这种互斥的情况  这一步判断很关键~~~)
    public boolean matches(String lookupPath, PathMatcher pathMatcher) { ... }
    ...
}
因为它不能简单的像扩展HandlerInterceptorAdapter一样使用,下面给出一个Demo,推荐大家以后都采用这种方案去更加优雅的处理你的拦截器:
@ComponentScan(value = "com.buqiong", useDefaultFilters = false,
        includeFilters = {@Filter(type = FilterType.ANNOTATION, classes = {Controller.class, ControllerAdvice.class, RestControllerAdvice.class})}
)
@Configuration
@EnableWebMvc
public class WebMvcConfig extends WebMvcConfigurerAdapter {

    //方式一:最源生的使用方式:直接注册进去即可
    //其实它也挺强大,支持includePatterns和exclude...
    //其实它底层原理是一个依赖于`InterceptorRegistration`,它是个普通类,协助create一个`MappedInterceptor`
    //由此可见最终底层还是使用的`MappedInterceptor`哦~~~~~
    //@Override
    //public void addInterceptors(InterceptorRegistry registry) {
    //    registry.addInterceptor(new HelloInterceptor())
    //            .addPathPatterns() // 就是includePatterns
    //            .excludePathPatterns();
    //}

    // 方式二:如果说上述方式是交给Spring去帮我自动处理,这种方式相当于自己手动来处理~~~~~
    // 请务必注意:  请务必注意:此处的返回值必须是MappedInterceptor,而不能是HandlerInterceptor  否则不生效~~~
    // 因为BeanFactoryUtils.beansOfTypeIncludingAncestors(obtainApplicationContext(), MappedInterceptor.class, true, false)
    // 这个方法它只去找MappedInterceptor类型,如果你是父类型,那就匹配不上了的~~~  这个工厂方法的Bean定义信息有关~~
    @Bean
    public MappedInterceptor myHandlerInterceptor() {
        String[] includePatterns = {"/api/v1/hello"};
        MappedInterceptor handlerInterceptor = new MappedInterceptor(includePatterns, new HelloInterceptor());
        return handlerInterceptor;
    }
}
HelloInterceptor自己的业务拦截逻辑写在自己里面即可。需要注意的是,若你的拦截器里想去使用Spring容器内的其它Bean,请不用使用new的方式,而是应该交给Spring管理(可用@Component)。然后此处可写如方法入参或者通过@Autowired的方式注入进来
提供了两种方法,但推荐使用方式一,直观且不容易出错
在基于XML的配置中,如下配置其实使用的就是MappedInterceptor
<mvc:interceptors>
	<mvc:interceptor>
    	<!--拦截器mapping 符合的才会执行拦截器-->
    	<mvc:mapping path="/**"/>
         	<!--在拦截器mapping中除去下面的url -->
         	<mvc:exclude-mapping path="/transactional_test/*"/>
         	<!--执行的拦截器(其实这个Bean并没有必要放进容器里面)-->
         	<ref bean="apiInterceptor"/>
    </mvc:interceptor>
</mvc:interceptors>
MatchableHandlerMapping
这是HandlerMapping的另外一个分支,这是它的一个子接口。
// @since 4.3.1 出现得挺晚的接口
public interface MatchableHandlerMapping extends HandlerMapping {
    // 确定给定的请求是否符合请求条件  pattern:模版
    @Nullable
    RequestMatchResult match(HttpServletRequest request, String pattern);
}
目前有两个类实现了此方法RequestMappingHandlerMapping和AbstractUrlHandlerMapping,但是Spring内部并还没有调用过此接口方法。
接下来最重要的就是以AbstractHandlerMapping为主线,看看它的真正实现类们了。它主要分为两大主线:AbstractUrlHandlerMapping方向和AbstractHandlerMethodMapping
AbstractHandlerMethodMapping系列是当前使用得最多的,基于方法的Handler模式。
AbstractUrlHandlerMapping系列
从命名中也能看出来,它和URL有关。它的大致思路为:将url对应的Handler保存在一个Map中,在getHandlerInternal方法中使用url从Map中获取Handler
// 虽然附加实现了MatchableHandlerMapping ,但本文并不准备详细分析
public abstract class AbstractUrlHandlerMapping extends AbstractHandlerMapping implements MatchableHandlerMapping {

    // 根路径 / 的处理器~
    @Nullable
    private Object rootHandler;
    // 是否使用斜线/匹配   如果为true  那么`/users`它也会匹配上`/users/`  默认是false的
    private boolean useTrailingSlashMatch = false;
    // 设置是否延迟初始化handler。仅适用于单实例handler   默认是false表示立即实例化
    private boolean lazyInitHandlers = false;

    // 这个Map就是缓存下,URL对应的Handler(注意这里只是handler,而不是chain)
    private final Map<String, Object> handlerMap = new LinkedHashMap<>();
    ...

    // 这个就是父类留给子类实现的抽象方法,此抽象类相当于进行了进一步的模版实现~
    @Override
    @Nullable
    protected Object getHandlerInternal(HttpServletRequest request) throws Exception {
    	// 找到URL的后半段:如`/api/v1/hello`  由此可见Spring MVC处理URL路径匹配都是从工程名后面开始匹配的~~~~
    	String lookupPath = getUrlPathHelper().getLookupPathForRequest(request);
    	// 根据url查找handler
    	// 1、先去handlerMap里找,若找到了那就实例化它,并且并且给chain里加入一个拦截器:`PathExposingHandlerInterceptor`  它是个private私有类的HandlerInterceptor
    	// 该拦截器的作用:request.setAttribute()请求域里面放置四个属性 key见HandlerMapping的常量们~~~
    	// 2、否则就使用PathMatcher去匹配URL,这里面光匹配其实是比较简单的。但是这里面还解决了一个问题:那就是匹配上多个路径的问题
    	// 因此:若匹配上多个路径了,就按照PathMatcher的排序规则排序,取值get(0)~~~最后就是同上,加上那个HandlerInterceptor即可
    	// 需要注意的是:若存在uriTemplateVariables,也就是路径里都存在多个最佳的匹配的情况  比如/book/{id}和/book/{name}这两种。
    	// 还有就是URI完全一样,但是一个是get方法,一个是post方法之类的  那就再加一个拦截器`UriTemplateVariablesHandlerInterceptor`  它request.setAttribute()了一个属性:key为 xxx.uriTemplateVariables
    	// 这些Attribute后续都是有用滴~~~~~~ 请注意:这里默认的两个拦截器每次都是new出来的和Handler可议说是绑定的,所以不会存在线程安全问题~~~~
    	Object handler = lookupHandler(lookupPath, request);

    	// 若没找到:
    	if (handler == null) {
    		// 处理跟路径 / 和默认的Handler~~~~
    		Object rawHandler = null;
    		if ("/".equals(lookupPath)) {
    			rawHandler = getRootHandler();
    		}
    		if (rawHandler == null) {
    			rawHandler = getDefaultHandler();
    		}
    		if (rawHandler != null) {
    			if (rawHandler instanceof String) {
    				String handlerName = (String) rawHandler;
    				rawHandler = obtainApplicationContext().getBean(handlerName);
    			}
    			validateHandler(rawHandler, request);
    			// 就是注册上面说的默认的两个拦截器~~~~~~~  第四个参数为null,就只会注册一个拦截器~~~
    			// 然后把rawHandler转换成chain(这个时候chain里面可能已经有两个拦截器了,然后父类还会继续把用户自定义的拦截器放上去~~~~)
    			handler = buildPathExposingHandler(rawHandler, lookupPath, lookupPath, null);
    		}
    	}
    	return handler;
    }

    // =========该抽象类提供的这个方法就特别重要了:向handlerMap里面put值的唯一入口~~~  可以批量urls
    protected void registerHandler(String[] urlPaths, String beanName) throws BeansException, IllegalStateException {
    	Assert.notNull(urlPaths, "URL path array must not be null");
    	for (String urlPath : urlPaths) {
    		registerHandler(urlPath, beanName);
    	}
    }
    protected void registerHandler(String urlPath, Object handler) throws BeansException, IllegalStateException {
		Assert.notNull(urlPath, "URL path must not be null");
		Assert.notNull(handler, "Handler object must not be null");
		Object resolvedHandler = handler;

    	// 如果是beanName,并且它是立马加载的~~~~
    	if (!this.lazyInitHandlers && handler instanceof String) {
    		String handlerName = (String) handler;
    		ApplicationContext applicationContext = obtainApplicationContext();
    		// 并且还需要是单例的,那就立马实例化吧~~~~
    		if (applicationContext.isSingleton(handlerName)) {
    			resolvedHandler = applicationContext.getBean(handlerName);
    		}
    	}

    	// 先尝试从Map中去获取
    	Object mappedHandler = this.handlerMap.get(urlPath);
    	if (mappedHandler != null) {
    		// 这个异常错误信息,相信我们在开发中经常碰到吧:简单就是说就是一个URL只能映射到一个Handler上(但是一个Handler是可以处理多个URL的,这个需要注意)
    		// 这个校验必不可少啊~~~~
    		if (mappedHandler != resolvedHandler) {
    			throw new IllegalStateException("Cannot map " + getHandlerDescription(handler) + " to URL path [" + urlPath +
    					"]: There is already " + getHandlerDescription(mappedHandler) + " mapped.");
    		}
    	} else {
    		// 如果你的handler处理的路径是根路径,那太好了  你的这个处理器就很特殊啊~~~~
    		if (urlPath.equals("/")) {
    			setRootHandler(resolvedHandler);
    		}
    		// 这个路径相当于处理所有  优先级是最低的  所以当作默认的处理器来使用~~~~
    		else if (urlPath.equals("/*")) {
    			setDefaultHandler(resolvedHandler);
    		}
    		// 正常的路径了~~~
    		// 注意此处:好像是Spring5之后 把这句Mapped的日志级别   直接降低到trace级别了,简直太低了有木有~~~
    		// 在Spring 5之前,这里的日志级别包括上面的setRoot等是info(所以我们在控制台经常能看见大片的'Mapped URL path'日志~~~~)
    		// 所以:自Spring5之后不再会看controller这样的映射的日志了(除非你日志界别调低~~~)可能Spring认为这种日志多,且不认为是重要的信息吧~~~
    		else {
    			this.handlerMap.put(urlPath, resolvedHandler);
    			if (logger.isTraceEnabled()) {
    				logger.trace("Mapped [" + urlPath + "] onto " + getHandlerDescription(handler));
    			}
    		}
    	}
    }
    // 该缓存也提供了一个只读视图给调用者访问~~~
    public final Map<String, Object> getHandlerMap() {
    	return Collections.unmodifiableMap(this.handlerMap);
    }

}
该抽象类提供了一个Map,缓存着URL和它对应的Handler,这是个非常重要的缓存。它提供了registerHandler()允许子类调用,向缓存里注册url和handler的对应关系~
注意:此处肯定不能把Map放出去,让子类直接put的。因为程序必须要高内聚,才能保证更好的隔离性以及稳定性
AbstractDetectingUrlHandlerMapping
这又是个抽象类,继承自AbstractUrlHandlerMapping。它就越来越具有功能化了:Detecting表明它是有检测URL的功能的~
// @since 2.5  它Spring2.5后才出来
public abstract class AbstractDetectingUrlHandlerMapping extends AbstractUrlHandlerMapping {
    // 是否要去祖先容器里面检测所有的Handlers    默认是false表示只在自己的容器里面找
    // 若设置为true,相当于在父容器里的Controller也会被挖出来~~~~ 一般我并不建议这么去做
    private boolean detectHandlersInAncestorContexts = false;

    public void setDetectHandlersInAncestorContexts(boolean detectHandlersInAncestorContexts) {
    	this.detectHandlersInAncestorContexts = detectHandlersInAncestorContexts;
    }

    // 说白了,这里是检测的入口 detectHandlers();
    @Override
    public void initApplicationContext() throws ApplicationContextException {
    	super.initApplicationContext();
    	detectHandlers();
    }

    protected void detectHandlers() throws BeansException {
    	// 这个就不解释了:默认只会在当前容器里面去查找检测~~~
    	// 注意:这里使用的Object.class  说明是把本容器内所有类型的Bean定义都拿出来了~~~~
    	String[] beanNames = (this.detectHandlersInAncestorContexts ? BeanFactoryUtils.beanNamesForTypeIncludingAncestors(getApplicationContext(), Object.class) :
    			getApplicationContext().getBeanNamesForType(Object.class));
    	// Take any bean name that we can determine URLs for.
    	for (String beanName : beanNames) {
    		// 这是个抽象方法由子类去实现。  它的作用就是看看url和bean怎么才算是匹配呢?也就是说这个handler到底能够处理哪些URL呢?
    		// 注意:此处还是类级别(Bean),相当于一个类就是一个Handler哦~~~~
    		String[] urls = determineUrlsForHandler(beanName);
    		if (!ObjectUtils.isEmpty(urls)) {
    			// 注册进去  缓存起来~
    			registerHandler(urls, beanName);
    		}
    	}
    }

}
AbstractDetectingUrlHandlerMapping是通过扫描方式注册Handler,收到请求时由AbstractUrlHandlerMapping的getHandlerInternal进行分发,看看到底是交给哪个Handler进行处理~
BeanNameUrlHandlerMapping
它是AbstractDetectingUrlHandlerMapping的唯一实现类。
说明:DefaultAnnotationHandlerMapping、BeanNameUrlHandlerMapping、AbstractControllerUrlHandlerMapping在Spring4.3的时候都被标记为过期,在Spring5以后直接就把这些类干掉了,因此本处说的唯一、源码都是基于Spring5.以上的版本的~~~
public class BeanNameUrlHandlerMapping extends AbstractDetectingUrlHandlerMapping {

    @Override
    protected String[] determineUrlsForHandler(String beanName) {
    	List<String> urls = new ArrayList<>();
    	// 意思就是必须以/开头才行~~~~~~这算是一种约定吧~~~
    	// 这种方式和@WebServlet方式一毛一样~~~~~
    	if (beanName.startsWith("/")) {
    		urls.add(beanName);
    	}
    	// 当然别名也是可以的
    	String[] aliases = obtainApplicationContext().getAliases(beanName);
    	for (String alias : aliases) {
    		if (alias.startsWith("/")) {
    			urls.add(alias);
    		}
    	}
    	return StringUtils.toStringArray(urls);
    }
}
该实现就是根据bean的名称来匹配URL。方式同@WebServlet一模一样。
SimpleUrlHandlerMapping
它是AbstractUrlHandlerMapping的直接实现类,也是一个基于Map的简单实现。
public class SimpleUrlHandlerMapping extends AbstractUrlHandlerMapping {
    private final Map<String, Object> urlMap = new LinkedHashMap<>();

    public void setMappings(Properties mappings) {
		CollectionUtils.mergePropertiesIntoMap(mappings, this.urlMap);
    }
    public void setUrlMap(Map<String, ?> urlMap) {
    	this.urlMap.putAll(urlMap);
    }

    @Override
    public void initApplicationContext() throws BeansException {
    	super.initApplicationContext();
    	registerHandlers(this.urlMap);
    }
    // 这个实现简单到令人发指
    protected void registerHandlers(Map<String, Object> urlMap) throws BeansException {
    	if (urlMap.isEmpty()) {
    		logger.trace("No patterns in " + formatMappingName());
    	} else {
    		urlMap.forEach((url, handler) -> {
    			// 如果还没有斜线,在前面加上斜线
    			if (!url.startsWith("/")) {
    				url = "/" + url;
    			}
    			if (handler instanceof String) {
    				handler = ((String) handler).trim();
    			}
    			registerHandler(url, handler);
    		});
    	}
    }
}
它的实现就是把开发者指定的一个Map,然后容器启动的时候把它注册进去即可,非常的简单的一个实现。当然我们自己已经知道了URL和Handler的映射关系了,然后需要进一步构造出一个HandlerMapping的时候,或许它是一个较快解决问题的选择~~~~ 它最重要的是urlMap这个参数~
它一般用于基于XML的配置文件的形式,形如:
<bean class="org.springframework.web.servlet.handler.SimpleUrlHandlerMapping">
	<property>
		<map>
			<entry key="/hello.do" value="myController"/>
			<entry key="/my.do" value="myController"/>
		</map>
	</property>
</bean>
示例
写一个控制器:
@Controller("/hello") // 注意此处BeanName必须是/开头,否则是不会作为handler的
public class HelloController { }
这样项目启动的时候,就可以看到这么一句日志,证明url是映射成功了的~:
org.springframework.web.servlet.handler.BeanNameUrlHandlerMapping.registerHandler Mapped URL path [/hello] onto handler '/hello'但是请求后报出如下错误
No adapter for handler [com.fsx.controller.HelloController@5e31e1a4]: The DispatcherServlet configuration needs to include a HandlerAdapter that supports this handler找不到适配器,这是属于HandlerAdapter的内容,此处介绍怎么做:
// 实现`org.springframework.web.servlet.mvc.Controller`这个接口,才被认为是一个控制器~
@Controller("/hello")
public class HelloController extends AbstractController {

    @Override
    protected ModelAndView handleRequestInternal(HttpServletRequest request, HttpServletResponse response) throws Exception {
        System.out.println("this is my demo");
        return null;
    }
}
这样子我们再请求,就能正常的进入handleRequestInternal方法来处理请求了。
我们的Controller类必须(直接|间接)实现org.springframework.web.servlet.mvc.Controller接口,否则无法判断具体处理方法是谁!!!
BeanNameUrlHandlerMapping和SimpleUrlHandlerMapping,属于Spring最早期的控制器实现。完全是基于类级别的:一个类就是一个Handler。
从分析DispatcherServlet的时候发现,SpringMVC默认是给容器内注入了两个HandlerMapping组件的:RequestMappingHandlerMapping和BeanNameUrlHandlerMapping。
分析过了HandlerMapping的一些抽象实现,以及AbstractHandlerMapping的一个主要分支:AbstractUrlHandlerMapping体系的实现原理分析:它是基于类级别的Handler实现,大体上和原生Servlet如出一辙,也还没有脱原生Servlet的API。
接下来将介绍它的另外一个系列:AbstractHandlerMethodMapping系列,基于方法级别的Handler实现。也是当下最为主流的实现方式,更是最为常用使用方式。
AbstractHandlerMethodMapping系列
AbstractHandlerMethodMapping系列是将method作为handler来使用的,比如@RequestMapping所注释的方法就是这种handler(当然它并不强制你一定得使用@RequestMapping这样的注解)。
在前面我们已经知道了AbstractHandlerMethodMapping的父类AbstractHandlerMapping,其定义了抽象方法getHandlerInternal(HttpServletRequest request),那么这里主要看看它对此抽象方法的实现:
// @since 3.1  Spring3.1之后才出现,这个时候注解驱动也出来了
// 实现了initializingBean接口,其实主要的注册操作则是通过afterPropertiesSet()接口方法来调用的
// 它是带有泛型T的。
// T:包含HandlerMethod与传入请求匹配所需条件的handlerMethod的映射~
public abstract class AbstractHandlerMethodMapping<T> extends AbstractHandlerMapping implements InitializingBean {
	// SCOPED_TARGET的BeanName的前缀
	private static final String SCOPED_TARGET_NAME_PREFIX = "scopedTarget.";
	private static final HandlerMethod PREFLIGHT_AMBIGUOUS_MATCH = new HandlerMethod(new EmptyHandler(), ClassUtils.getMethod(EmptyHandler.class, "handle"));
	// 跨域相关
	private static final CorsConfiguration ALLOW_CORS_CONFIG = new CorsConfiguration();
	static {
		ALLOW_CORS_CONFIG.addAllowedOrigin("*");
		ALLOW_CORS_CONFIG.addAllowedMethod("*");
		ALLOW_CORS_CONFIG.addAllowedHeader("*");
		ALLOW_CORS_CONFIG.setAllowCredentials(true);
	}

	// 默认不会去祖先容器里面找Handlers
	private boolean detectHandlerMethodsInAncestorContexts = false;
	// @since 4.1提供的新接口
	// 为处HandlerMetho的映射分配名称的策略接口   只有一个方法getName()
	// 唯一实现为:RequestMappingInfoHandlerMethodMappingNamingStrategy
	// 策略为:@RequestMapping指定了name属性,那就以指定的为准  否则策略为:取出Controller所有的`大写字母` + # + method.getName()
	// 如:AppoloController#match方法  最终的name为:AC#match
	// 当然这个你也可以自己实现这个接口,然后set进来即可(只是一般没啥必要这么去干~~)
	@Nullable
	private HandlerMethodMappingNamingStrategy<T> namingStrategy;
	// 内部类:负责注册~
	private final MappingRegistry mappingRegistry = new MappingRegistry();

	// 此处细节:使用的是读写锁  比如此处使用的是读锁   获得所有的注册进去的Handler的Map
	public Map<T, HandlerMethod> getHandlerMethods() {
		this.mappingRegistry.acquireReadLock();
		try {
			return Collections.unmodifiableMap(this.mappingRegistry.getMappings());
		} finally {
			this.mappingRegistry.releaseReadLock();
		}
	}
	// 此处是根据mappingName来获取一个Handler  此处需要注意哦~~~
	@Nullable
	public List<HandlerMethod> getHandlerMethodsForMappingName(String mappingName) {
		return this.mappingRegistry.getHandlerMethodsByMappingName(mappingName);
	}
	// 最终都是委托给mappingRegistry去做了注册的工作   此处日志级别为trace级别
	public void registerMapping(T mapping, Object handler, Method method) {
		if (logger.isTraceEnabled()) {
			logger.trace("Register \"" + mapping + "\" to " + method.toGenericString());
		}
		this.mappingRegistry.register(mapping, handler, method);
	}
	public void unregisterMapping(T mapping) {
		if (logger.isTraceEnabled()) {
			logger.trace("Unregister mapping \"" + mapping + "\"");
		}
		this.mappingRegistry.unregister(mapping);
	}

	// 这个很重要,是初始化HandlerMethods的入口~~~~~
	@Override
	public void afterPropertiesSet() {
		initHandlerMethods();
	}
	// 看initHandlerMethods(),观察是如何实现加载HandlerMethod
	protected void initHandlerMethods() {
		// getCandidateBeanNames:Object.class相当于拿到当前容器(一般都是当前容器) 内所有的Bean定义信息
		// 如果阁下容器隔离到到的话,这里一般只会拿到@Controller标注的web组件  以及其它相关web组件的  不会非常的多的~~~~
		for (String beanName : getCandidateBeanNames()) {
			// BeanName不是以这个打头得  这里才会process这个BeanName~~~~
			if (!beanName.startsWith(SCOPED_TARGET_NAME_PREFIX)) {
				// 会在每个Bean里面找处理方法,HandlerMethod,然后注册进去
				processCandidateBean(beanName);
			}
		}
		// 略:它就是输出一句日志:debug日志或者trace日志   `7 mappings in 'requestMappingHandlerMapping'`
		handlerMethodsInitialized(getHandlerMethods());
	}

	// 确定指定的候选bean的类型,如果标识为Handler类型,则调用DetectHandlerMethods
	// isHandler(beanType):判断这个type是否为Handler类型   它是个抽象方法,由子类去决定到底啥才叫Handler~~~~
	// `RequestMappingHandlerMapping`的判断依据为:该类上标注了@Controller注解或者@Controller注解  就算作是一个Handler
	// 所以此处:@Controller起到了一个特殊的作用,不能等价于@Component的哟~~~~
	protected void processCandidateBean(String beanName) {
		Class<?> beanType = null;
		try {
			beanType = obtainApplicationContext().getType(beanName);
		} catch (Throwable ex) {
			// 即使抛出异常  程序也不会终止~
		}
		if (beanType != null && isHandler(beanType)) {
			// 这个和我们上篇博文讲述的类似,都属于detect探测系列~~~~
			detectHandlerMethods(beanName);
		}
	}

	// 在指定的Handler的bean中查找处理程序方法Methods  找打就注册进去:mappingRegistry
	protected void detectHandlerMethods(Object handler) {
		Class<?> handlerType = (handler instanceof String ?
				obtainApplicationContext().getType((String) handler) : handler.getClass());

		if (handlerType != null) {
			Class<?> userType = ClassUtils.getUserClass(handlerType);

			// 又是非常熟悉的方法:MethodIntrospector.selectMethods
			// 它在我们招@EventListener、@Scheduled等注解方法时已经遇到过多次
			// 此处特别之处在于:getMappingForMethod属于一个抽象方法,由子类去决定它的寻找规则~~~~  什么才算作一个处理器方法
			Map<Method, T> methods = MethodIntrospector.selectMethods(userType,
					(MethodIntrospector.MetadataLookup<T>) method -> {
						try {
							return getMappingForMethod(method, userType);
						} catch (Throwable ex) {
							throw new IllegalStateException("Invalid mapping on handler class [" + userType.getName() + "]: " + method, ex);
						}
					});

			// 把找到的Method  一个个遍历,注册进去~~~~
			methods.forEach((method, mapping) -> {
				// 找到这个可调用的方法(AopUtils.selectInvocableMethod)
				Method invocableMethod = AopUtils.selectInvocableMethod(method, userType);
				registerHandlerMethod(handler, invocableMethod, mapping);
			});
		}
	}
}
该抽象类完成了所有的Handler以及handler里面所有的HandlerMethod的模版操作,但是决定哪些Bean是Handler类和哪些方法才是HandlerMathod,这些逻辑都是交给子类自己去实现,所以这层抽象可谓也是非常的灵活,并没有把Handler的实现方式定死,允许不同。
这里面有个核心内容:那就是注册handlerMethod,是交给AbstractHandlerMethodMapping的一个内部类MappingRegistry去完成的,用来专门维持所有的映射关系,并提供方法去查找方法去提供当前url映射的方法。
AbstractHandlerMethodMapping.MappingRegistry:内部类注册中心
维护几个Map(键值对),用来存储映射的信息, 还有一个MappingRegistration专门保存注册信息
class MappingRegistry {
	// mapping对应的其MappingRegistration对象~~~
	private final Map<T, MappingRegistration<T>> registry = new HashMap<>();
	// 保存着mapping和HandlerMethod的对应关系~
	private final Map<T, HandlerMethod> mappingLookup = new LinkedHashMap<>();
	// 保存着URL与匹配条件(mapping)的对应关系  当然这里的URL是pattern式的,可以使用通配符
	// 这里的Map不是普通的Map,而是MultiValueMap,它是个多值Map。其实它的value是一个list类型的值
	// 至于为何是多值?有这么一种情况  URL都是/api/v1/hello  但是有的是get post delete等方法   所以有可能是会匹配到多个MappingInfo的
	private final MultiValueMap<String, T> urlLookup = new LinkedMultiValueMap<>();
	// 这个Map是Spring MVC4.1新增的(毕竟这个策略接口HandlerMethodMappingNamingStrategy在Spring4.1后才有,这里的name是它生成出来的)
	// 保存着name和HandlerMethod的对应关系(一个name可以有多个HandlerMethod)
	private final Map<String, List<HandlerMethod>> nameLookup = new ConcurrentHashMap<>();

	// 这两个就不用解释了
	private final Map<HandlerMethod, CorsConfiguration> corsLookup = new ConcurrentHashMap<>();
	// 读写锁~~~ 读写分离  提高启动效率
	private final ReentrantReadWriteLock readWriteLock = new ReentrantReadWriteLock();

	... // 提供一些查找方法,都不是线程安全的

	// 读锁提供给外部访问,写锁自己放在内部即可~~~
	public void acquireReadLock() {
		this.readWriteLock.readLock().lock();
	}
	public void releaseReadLock() {
		this.readWriteLock.readLock().unlock();
	}

	// 注册Mapping和handler 以及Method    此处上写锁保证线程安全~
	public void register(T mapping, Object handler, Method method) {
		this.readWriteLock.writeLock().lock();
		try {
			// 此处注意:都是new HandlerMethod()了一个新的出来~~~~
			HandlerMethod handlerMethod = createHandlerMethod(handler, method);
			// 同样的:一个URL Mapping只能对应一个Handler
			// 这里可能会出现常见的一个异常信息:Ambiguous mapping. Cannot map XXX
			assertUniqueMethodMapping(handlerMethod, mapping);

			// 缓存Mapping和handlerMethod的关系
			this.mappingLookup.put(mapping, handlerMethod);

			// 保存url和RequestMappingInfo(mapping)对应关系
			// 这里注意:多个url可能对应着同一个mappingInfo呢~  毕竟@RequestMapping的url是可以写多个的~~~~
			List<String> directUrls = getDirectUrls(mapping);
			for (String url : directUrls) {
				this.urlLookup.add(url, mapping);
			}

			// 保存name和handlerMethod的关系  同样也是一对多
			String name = null;
			if (getNamingStrategy() != null) {
				name = getNamingStrategy().getName(handlerMethod, mapping);
				addMappingName(name, handlerMethod);
			}

			CorsConfiguration corsConfig = initCorsConfiguration(handler, method, mapping);
			if (corsConfig != null) {
				this.corsLookup.put(handlerMethod, corsConfig);
			}

			// 注册mapping和MappingRegistration的关系
			this.registry.put(mapping, new MappingRegistration<>(mapping, handlerMethod, directUrls, name));
		}
		// 释放锁
		finally {
			this.readWriteLock.writeLock().unlock();
		}
	}

	// 相当于进行一次逆向操作~
	public void unregister(T mapping) { ... }
	...
}
这个注册中心,核心是保存了多个Map映射关系,相当于缓存下来。在请求过来时需要查找的时候,可以迅速定位到处理器。
下面继续,终于来到AbstractHandlerMethodMapping它对父类抽象方法:getHandlerInternal的实现如下:
public abstract class AbstractHandlerMethodMapping<T> extends AbstractHandlerMapping implements InitializingBean {
	...
	@Override
	protected HandlerMethod getHandlerInternal(HttpServletRequest request) throws Exception {
		// 要进行匹配的  请求的URI path
		String lookupPath = getUrlPathHelper().getLookupPathForRequest(request);
		this.mappingRegistry.acquireReadLock();
		try {
			//委托给方法lookupHandlerMethod() 去找到一个HandlerMethod去最终处理~
			HandlerMethod handlerMethod = lookupHandlerMethod(lookupPath, request);
			return (handlerMethod != null ? handlerMethod.createWithResolvedBean() : null);
		}
		finally {
			this.mappingRegistry.releaseReadLock();
		}
	}
	@Nullable
	protected HandlerMethod lookupHandlerMethod(String lookupPath, HttpServletRequest request) throws Exception {
		// Match是一个private class,内部就两个属性:T mapping和HandlerMethod handlerMethod
		List<Match> matches = new ArrayList<>();

		// 根据lookupPath去注册中心里查找mappingInfos,因为一个具体的url可能匹配上多个MappingInfo的
		// 至于为何是多值?有这么一种情况  URL都是/api/v1/hello  但是有的是get post delete等方法  当然还有可能是headers/consumes等等不一样,都算多个的  所以有可能是会匹配到多个MappingInfo的
		// 所有这个里可以匹配出多个出来。比如/hello 匹配出GET、POST、PUT都成,所以size可以为3
		List<T> directPathMatches = this.mappingRegistry.getMappingsByUrl(lookupPath);

		if (directPathMatches != null) {
			// 依赖于子类实现的抽象方法:getMatchingMapping()  看看到底匹不匹配,而不仅仅是URL匹配就行
			// 比如还有method、headers、consumes等等这些不同都代表着不同的MappingInfo的
			// 最终匹配上的,会new Match()放进matches里面去
			addMatchingMappings(directPathMatches, matches, request);
		}

		// 当还没有匹配上的时候,别无选择,只能浏览所有映射
		// 这里为何要浏览所有的mappings呢?而不是报错404呢?这里我有点迷糊,愿有知道的指明这个设计意图~~~
		if (matches.isEmpty()) {
			// No choice but to go through all mappings...
			addMatchingMappings(this.mappingRegistry.getMappings().keySet(), matches, request);
		}

		// 单反只要找到了一个匹配的  就进来这里了~~~
		// 请注意:因为到这里   匹配上的可能还不止一个  所以才需要继续处理~~
		if (!matches.isEmpty()) {
			// getMappingComparator这个方法也是抽象方法由子类去实现的。
			// 比如:`RequestMappingInfoHandlerMapping`的实现为先比较Method,patterns、params
			Comparator<Match> comparator = new MatchComparator(getMappingComparator(request));
			matches.sort(comparator);
			// 排序后的最佳匹配为get(0)
			Match bestMatch = matches.get(0);

			// 如果总的匹配个数大于1的话
			if (matches.size() > 1) {
				if (CorsUtils.isPreFlightRequest(request)) {
					return PREFLIGHT_AMBIGUOUS_MATCH;
				}

				// 次最佳匹配
				Match secondBestMatch = matches.get(1);
				// 如果发现次最佳匹配和最佳匹配  比较是相等的  那就报错吧~~~~
				// Ambiguous handler methods mapped for~~~
				// 注意:这个是运行时的检查,在启动的时候是检查不出来的~~~  所以运行期的这个检查也是很有必要的~~~   否则就会出现意想不到的效果
				if (comparator.compare(bestMatch, secondBestMatch) == 0) {
					Method m1 = bestMatch.handlerMethod.getMethod();
					Method m2 = secondBestMatch.handlerMethod.getMethod();
					String uri = request.getRequestURI();
					throw new IllegalStateException(
							"Ambiguous handler methods mapped for '" + uri + "': {" + m1 + ", " + m2 + "}");
				}
			}
			// 把最最佳匹配的方法  放进request的属性里面~~~
			request.setAttribute(BEST_MATCHING_HANDLER_ATTRIBUTE, bestMatch.handlerMethod);
			// 它也是做了一件事:request.setAttribute(HandlerMapping.PATH_WITHIN_HANDLER_MAPPING_ATTRIBUTE, lookupPath)
			handleMatch(bestMatch.mapping, lookupPath, request);
			// 最终返回的是HandlerMethod~~~
			return bestMatch.handlerMethod;
		}
		// 一个都没匹配上,handleNoMatch这个方法虽然不是抽象方法,protected方法子类复写
		// RequestMappingInfoHandlerMapping有复写此方法~~~~
		else {
			return handleNoMatch(this.mappingRegistry.getMappings().keySet(), lookupPath, request);
		}
	}
	...

	// 因为上面说了mappings可能会有多个,比如get post put的都算~~~这里就是要进行筛选出所有match上的
	private void addMatchingMappings(Collection<T> mappings, List<Match> matches, HttpServletRequest request) {
		for (T mapping : mappings) {
			// 只有RequestMappingInfoHandlerMapping 实现了一句话:return info.getMatchingCondition(request);
			// 因此RequestMappingInfo#getMatchingCondition() 方法里大有文章可为~~~
			// 它会对所有的methods、params、headers... 都进行匹配  但凡匹配不上的就返回null
			T match = getMatchingMapping(mapping, request);
			if (match != null) {
				matches.add(new Match(match, this.mappingRegistry.getMappings().get(mapping)));
			}
		}
	}
}

// ===============RequestMappingInfo 的源码部分讲解================
public final class RequestMappingInfo implements RequestCondition<RequestMappingInfo> {

	// 这些个匹配器都继承自AbstractRequestCondition,会进行各自的匹配工作
	// 下面会以PatternsRequestCondition为例进行示例讲解~~~~~
	// 他们顶级抽象接口为:RequestCondition  @since 3.1 :Contract for request mapping conditions
	private final PatternsRequestCondition patternsCondition;
	private final RequestMethodsRequestCondition methodsCondition;
	private final ParamsRequestCondition paramsCondition;
	private final HeadersRequestCondition headersCondition;
	private final ConsumesRequestCondition consumesCondition;
	private final ProducesRequestCondition producesCondition;
	private final RequestConditionHolder customConditionHolder;

	// 因为类上和方法上都可能会有@RequestMapping注解,所以这里是把语意思合并  该方法来自顶层接口
	@Override
	public RequestMappingInfo combine(RequestMappingInfo other) {
		String name = combineNames(other);
		PatternsRequestCondition patterns = this.patternsCondition.combine(other.patternsCondition);
		RequestMethodsRequestCondition methods = this.methodsCondition.combine(other.methodsCondition);
		ParamsRequestCondition params = this.paramsCondition.combine(other.paramsCondition);
		HeadersRequestCondition headers = this.headersCondition.combine(other.headersCondition);
		ConsumesRequestCondition consumes = this.consumesCondition.combine(other.consumesCondition);
		ProducesRequestCondition produces = this.producesCondition.combine(other.producesCondition);
		RequestConditionHolder custom = this.customConditionHolder.combine(other.customConditionHolder);

		return new RequestMappingInfo(name, patterns,
				methods, params, headers, consumes, produces, custom.getCondition());
	}

	// 合并后,就开始发挥作用了,该接口来自于顶层接口~~~~
	@Override
	@Nullable
	public RequestMappingInfo getMatchingCondition(HttpServletRequest request) {
		RequestMethodsRequestCondition methods = this.methodsCondition.getMatchingCondition(request);
		if (methods == null) {
			return null;
		}
		ParamsRequestCondition params = this.paramsCondition.getMatchingCondition(request);
		if (params == null) {
			return null;
		}
		HeadersRequestCondition headers = this.headersCondition.getMatchingCondition(request);
		if (headers == null) {
			return null;
		}
		ConsumesRequestCondition consumes = this.consumesCondition.getMatchingCondition(request);
		if (consumes == null) {
			return null;
		}
		ProducesRequestCondition produces = this.producesCondition.getMatchingCondition(request);
		if (produces == null) {
			return null;
		}
		PatternsRequestCondition patterns = this.patternsCondition.getMatchingCondition(request);
		if (patterns == null) {
			return null;
		}
		RequestConditionHolder custom = this.customConditionHolder.getMatchingCondition(request);
		if (custom == null) {
			return null;
		}

		return new RequestMappingInfo(this.name, patterns,
				methods, params, headers, consumes, produces, custom.getCondition());
	}
}
到这里,这个抽象类所做的工作都全部完成了。
可以看到它做的事还是非常非常多的。它用泛型来抽象Mapping关系(包括条件、属性等),实现并不要求一定是@RequestMapping这种注解的方式,可以是任意方式,体现了它对扩展开放的设计思想~
Spring MVC请求URL带后缀匹配的情况,如/hello.json也能匹配/hello
RequestMappingInfoHandlerMapping 在处理http请求的时候, 如果 请求url 有后缀,如果找不到精确匹配的那个@RequestMapping方法。那么,就把后缀去掉,然后.*去匹配,这样,一般都可以匹配,默认这个行为是被开启的。
比如有一个@RequestMapping("/rest"), 那么精确匹配的情况下, 只会匹配/rest请求。 但如果我前端发来一个 /rest.abcdef 这样的请求, 又没有配置 @RequestMapping("/rest.abcdef") 这样映射的情况下, 那么@RequestMapping("/rest") 就会生效。
这样会带来什么问题呢?绝大多数情况下是没有问题的,但是如果你是一个对权限要求非常严格的系统,强烈关闭此项功能,否则你会有意想不到的"收获"。
究其原因咱们可以接着上面的分析,其实就到了PatternsRequestCondition这个类上,具体实现是它的匹配逻辑来决定的。
public final class PatternsRequestCondition extends AbstractRequestCondition<PatternsRequestCondition> {
	...
	@Override
	@Nullable
	public PatternsRequestCondition getMatchingCondition(HttpServletRequest request) {
		// patterns表示此MappingInfo可以匹配的值们。一般对应@RequestMapping注解上的patters数组的值
		if (this.patterns.isEmpty()) {
			return this;
		}
		// 拿到待匹配的值,比如此处为"/hello.json"
		String lookupPath = this.pathHelper.getLookupPathForRequest(request);

		// 最主要就是这个方法了,它拿着这个lookupPath匹配~~~~
		List<String> matches = getMatchingPatterns(lookupPath);
		// 此处如果为empty,就返回null了~~~~
		return (!matches.isEmpty() ? new PatternsRequestCondition(matches, this.pathHelper, this.pathMatcher, this.useSuffixPatternMatch, this.useTrailingSlashMatch, this.fileExtensions) : null);
	}

	public List<String> getMatchingPatterns(String lookupPath) {
		List<String> matches = new ArrayList<>();
		for (String pattern : this.patterns) {

			// 最最最重点就是在getMatchingPattern()这个方法里~~~ 拿着lookupPath和pattern看它俩合拍不~
			String match = getMatchingPattern(pattern, lookupPath);
			if (match != null) {
				matches.add(match);
			}
		}
		// 解释一下为何匹配的可能是多个。因为url匹配上了,但是还有可能@RequestMapping的其余属性匹配不上啊,所以此处需要注意  是可能匹配上多个的  最终是唯一匹配就成~
		if (matches.size() > 1) {
			matches.sort(this.pathMatcher.getPatternComparator(lookupPath));
		}
		return matches;
	}


	// // ===============url的真正匹配规则  非常重要~~~===============
	// 注意这个方法的取名,上面是负数,这里是单数~~~~命名规范也是有艺术感的
	@Nullable
	private String getMatchingPattern(String pattern, String lookupPath) {
		// 完全相等,那就不继续聊了~~~
		if (pattern.equals(lookupPath)) {
			return pattern;
		}

		// 注意了:useSuffixPatternMatch 这个属性就是我们最终要关闭后缀匹配的关键
		// 这个值默外部给传的true(其实内部默认值是boolean类型为false)
		if (this.useSuffixPatternMatch) {

			// 这个意思是若useSuffixPatternMatch=true我们支持后缀匹配。我们还可以配置fileExtensions让只支持我们自定义的指定的后缀匹配,而不是下面最终的.*全部支持
			if (!this.fileExtensions.isEmpty() && lookupPath.indexOf('.') != -1) {
				for (String extension : this.fileExtensions) {
					if (this.pathMatcher.match(pattern + extension, lookupPath)) {
						return pattern + extension;
					}
				}
			}

			// 若你没有配置指定后缀匹配,并且你的handler也没有.*这样匹配的,那就默认你的pattern就给你添加上后缀".*",表示匹配所有请求的url的后缀~~~
			else {
				boolean hasSuffix = pattern.indexOf('.') != -1;
				if (!hasSuffix && this.pathMatcher.match(pattern + ".*", lookupPath)) {
					return pattern + ".*";
				}
			}
		}
		// 若匹配上了 直接返回此patter
		if (this.pathMatcher.match(pattern, lookupPath)) {
			return pattern;
		}

		// 这又是它支持的匹配规则。默认useTrailingSlashMatch它也是true
		// 这就是为何我们的/hello/也能匹配上/hello的原因
		// 从这可以看出,Spring MVC的宽容度是很高的,容错处理做得是非常不错的~~~~~~~
		if (this.useTrailingSlashMatch) {
			if (!pattern.endsWith("/") && this.pathMatcher.match(pattern + "/", lookupPath)) {
				return pattern + "/";
			}
		}
		return null;
	}
}
分析了URL的匹配原因,现在肯定知道为何默认情况下"/hello.aaaa"或者"/hello.aaaa/“或者”"/hello/""能匹配上我们/hello的原因了吧~~~
Spring和SpringBoot中如何关闭此项功能呢?
为何要关闭的理由,上面其实已经说了。当我们涉及到严格的权限校验(强权限控制)的时候。特别是一些银行系统、资产系统等等,关闭后缀匹配事非常有必要的。
public class RequestMappingHandlerMapping extends RequestMappingInfoHandlerMapping implements MatchableHandlerMapping, EmbeddedValueResolverAware {

    private boolean useSuffixPatternMatch = true;
    private boolean useTrailingSlashMatch = true;
}
可以看到这两个属性值都直接冒泡到RequestMappingHandlerMapping这个实现类上来了,所以我们直接通过配置来改变它的默认行为就成。
@Configuration
@EnableWebMvc
public class WebMvcConfig extends WebMvcConfigurerAdapter {

    // 关闭后缀名匹配,关闭最后一个/匹配
    @Override
    public void configurePathMatch(PathMatchConfigurer configurer) {
        configurer.setUseSuffixPatternMatch(false);
        configurer.setUseTrailingSlashMatch(false);
    }
}
就这么一下,我们的URL就安全了,再也不能后缀名任意匹配了。再想用后缀匹配,直接就给你404:

RequestMappingInfoHandlerMapping
提供匹配条件RequestMappingInfo的解析处理。
// @since 3.1 此处泛型为:RequestMappingInfo   用这个类来表示mapping映射关系、参数、条件等
public abstract class RequestMappingInfoHandlerMapping extends AbstractHandlerMethodMapping<RequestMappingInfo> {
	// 专门处理Http的Options方法的HandlerMethod
	private static final Method HTTP_OPTIONS_HANDLE_METHOD;
	static {
		try {
			HTTP_OPTIONS_HANDLE_METHOD = HttpOptionsHandler.class.getMethod("handle");
		} catch (NoSuchMethodException ex) {
			throw new IllegalStateException("Failed to retrieve internal handler method for HTTP OPTIONS", ex);
		}
	}

	// 构造函数:给set了一个HandlerMethodMappingNamingStrategy
	protected RequestMappingInfoHandlerMapping() {
		setHandlerMethodMappingNamingStrategy(new RequestMappingInfoHandlerMethodMappingNamingStrategy());
	}

	// 复写父类的抽象方法:获取mappings里面的patters们~~~
	@Override
	protected Set<String> getMappingPathPatterns(RequestMappingInfo info) {
		return info.getPatternsCondition().getPatterns();
	}
	// 校验看看这个Mapping是否能匹配上这个request,若能匹配上就返回一个RequestMappingInfo
	@Override
	protected RequestMappingInfo getMatchingMapping(RequestMappingInfo info, HttpServletRequest request) {
		return info.getMatchingCondition(request);
	}
	@Override
	protected Comparator<RequestMappingInfo> getMappingComparator(final HttpServletRequest request) {
		return (info1, info2) -> info1.compareTo(info2, request);
	}
	...
}
它主要做的事就是确定了泛型类型为:RequestMappingInfo,然后很多方法都依托它来完成判定逻辑,比如上面三个@Override方法就是对父类抽象方法的实现。委托给RequestMappingInfo去实现的~
而RequestMappingInfo的构建工作,Spring MVC理论上是可以允许有多种方案。Spring MVC给出的唯一实现类为RequestMappingHandlerMapping。
下面就介绍Spring MVC目前的唯一构造方案:通过@RequestMapping来构造一个RequestMappingInfo。
RequestMappingHandlerMapping 唯一实现类
根据@RequestMapping注解生成RequestMappingInfo,同时提供isHandler实现。
直到这个具体实现类,才与具体的实现方式@RequestMapping做了强绑定了
有了三层抽象的实现,其实留给本类需要实现的功能已经不是非常的多了~
// @since 3.1  Spring3.1才提供的这种注解扫描的方式的支持~~~  它也实现了MatchableHandlerMapping分支的接口
// EmbeddedValueResolverAware接口:说明要支持解析Spring的表达式~
public class RequestMappingHandlerMapping extends RequestMappingInfoHandlerMapping
		implements MatchableHandlerMapping, EmbeddedValueResolverAware {

	...
	private Map<String, Predicate<Class<?>>> pathPrefixes = new LinkedHashMap<>();

	// 配置要应用于控制器方法的路径前缀
	// @since 5.1:Spring5.1才出来的新特性,其实有时候还是很好的使的  下面给出使用的Demo
	// 前缀用于enrich每个@RequestMapping方法的映射,至于匹不匹配由Predicate来决定  有种前缀分类的效果~~~~
	// 推荐使用Spring5.1提供的类:org.springframework.web.method.HandlerTypePredicate
	public void setPathPrefixes(Map<String, Predicate<Class<?>>> prefixes) {
		this.pathPrefixes = Collections.unmodifiableMap(new LinkedHashMap<>(prefixes));
	}
	// @since 5.1   注意pathPrefixes是只读的~~~因为上面Collections.unmodifiableMap了  有可能只是个空Map
	public Map<String, Predicate<Class<?>>> getPathPrefixes() {
		return this.pathPrefixes;
	}

	public void setUseRegisteredSuffixPatternMatch(boolean useRegisteredSuffixPatternMatch) {
		this.useRegisteredSuffixPatternMatch = useRegisteredSuffixPatternMatch;
		this.useSuffixPatternMatch = (useRegisteredSuffixPatternMatch || this.useSuffixPatternMatch);
	}
	// If enabled a method mapped to "/users" also matches to "/users/".
	public void setUseTrailingSlashMatch(boolean useTrailingSlashMatch) {
		this.useTrailingSlashMatch = useTrailingSlashMatch;
	}

	@Override
	public void afterPropertiesSet() {
		// 对RequestMappingInfo的配置进行初始化  赋值
		this.config = new RequestMappingInfo.BuilderConfiguration();
		this.config.setUrlPathHelper(getUrlPathHelper()); // 设置urlPathHelper默认为UrlPathHelper.class
		this.config.setPathMatcher(getPathMatcher()); //默认为AntPathMatcher,路径匹配校验器
		this.config.setSuffixPatternMatch(this.useSuffixPatternMatch); // 是否支持后缀补充,默认为true
		this.config.setTrailingSlashMatch(this.useTrailingSlashMatch); // 是否添加"/"后缀,默认为true
		this.config.setRegisteredSuffixPatternMatch(this.useRegisteredSuffixPatternMatch); // 是否采用mediaType匹配模式,比如.json/.xml模式的匹配,默认为false
		this.config.setContentNegotiationManager(getContentNegotiationManager()); //mediaType处理类:ContentNegotiationManager

		// 此处 必须还是要调用父类的方法的
		super.afterPropertiesSet();
	}
	...

	// 判断该类,是否是一个handler(此处就体现出@Controller注解的特殊性了)
	// 这也是为何我们的XXXController用@Bean申明是无效的原因(前提是类上木有@RequestMapping注解,否则也是阔仪的哦~~~)
	// 因此我个人建议:为了普适性,类上的@RequestMapping也统一要求加上,即使你不写@Value也木关系,这样是最好的
	@Override
	protected boolean isHandler(Class<?> beanType) {
		return (AnnotatedElementUtils.hasAnnotation(beanType, Controller.class) ||
				AnnotatedElementUtils.hasAnnotation(beanType, RequestMapping.class));
	}

	// 还记得父类:AbstractHandlerMethodMapping#detectHandlerMethods的时候,回去该类里面找所有的指定的方法
	// 而什么叫指定的呢?就是靠这个来判定方法是否符合条件的~~~~~
	@Override
	@Nullable
	protected RequestMappingInfo getMappingForMethod(Method method, Class<?> handlerType) {
		// 第一步:先拿到方法上的info
		RequestMappingInfo info = createRequestMappingInfo(method);
		if (info != null) {
			// 方法上有。在第二步:拿到类上的info
			RequestMappingInfo typeInfo = createRequestMappingInfo(handlerType);
			if (typeInfo != null) {
				// 倘若类上面也有,那就combine把两者结合
				// combile的逻辑基如下:
				// names:name1+#+name2
				// path:路径拼接起来作为全路径(容错了方法里没有/的情况)
				// method、params、headers:取并集
				// consumes、produces:以方法的为准,没有指定再取类上的
				// custom:谁有取谁的。若都有:那就看custom具体实现的.combine方法去决定把  简单的说就是交给调用者了~~~
				info = typeInfo.combine(info);
			}

			// 在Spring5.1之后还要处理这个前缀匹配~~~
			// 根据这个类,去找看有没有前缀  getPathPrefix():entry.getValue().test(handlerType) = true算是hi匹配上了
			// 备注:也支持${os.name}这样的语法拿值,可以把前缀也写在专门的配置文件里面~~~~
			String prefix = getPathPrefix(handlerType);
			if (prefix != null) {
				// RequestMappingInfo.paths(prefix)  相当于统一在前面加上这个前缀~
				info = RequestMappingInfo.paths(prefix).build().combine(info);
			}
		}
		return info;
	}

	// 根据此方法/类,创建一个RequestMappingInfo
	@Nullable
	private RequestMappingInfo createRequestMappingInfo(AnnotatedElement element) {
		// 注意:此处使用的是findMergedAnnotation  这也就是为什么虽然@RequestMapping它并不具有继承的特性,但是你子类仍然有继承的效果的原因~~~~
		RequestMapping requestMapping = AnnotatedElementUtils.findMergedAnnotation(element, RequestMapping.class);

		// 请注意:这里进行了区分处理  如果是Class的话  如果是Method的话
		// 这里返回的是一个condition 也就是看看要不要处理这个请求的条件~~~~
		RequestCondition<?> condition = (element instanceof Class ?
				getCustomTypeCondition((Class<?>) element) : getCustomMethodCondition((Method) element));

		// 这个createRequestMappingInfo就是根据一个@RequestMapping以及一个condition创建一个
		// 显然如果没有找到此注解,这里就返回null了,表面这个方法啥的就不是一个info~~~~
		return (requestMapping != null ? createRequestMappingInfo(requestMapping, condition) : null);
	}

	// 他俩都是返回的null。protected方法留给子类复写,子类可以据此自己定义一套自己的规则来限制匹配
	// Provide a custom method-level request condition.
	// 它相当于在Spring MVC默认的规则的基础上,用户还可以自定义条件进行处理~~~~
	@Nullable
	protected RequestCondition<?> getCustomTypeCondition(Class<?> handlerType) {
		return null;
	}
	@Nullable
	protected RequestCondition<?> getCustomMethodCondition(Method method) {
		return null;
	}

	// 根据@RequestMapping 创建一个RequestMappingInfo
	protected RequestMappingInfo createRequestMappingInfo(RequestMapping requestMapping, @Nullable RequestCondition<?> customCondition) {

		RequestMappingInfo.Builder builder = RequestMappingInfo
				// 强大的地方在此处:path里竟然还支持/api/v1/${os.name}/hello 这样形式动态的获取值
				// 也就是说URL还可以从配置文件里面读取  Spring考虑很周到啊~~~
				// @GetMapping("/${os.name}/hello") // 支持从配置文件里读取此值  Windows 10
				.paths(resolveEmbeddedValuesInPatterns(requestMapping.path()))
				.methods(requestMapping.method())
				.params(requestMapping.params())
				.headers(requestMapping.headers())
				.consumes(requestMapping.consumes())
				.produces(requestMapping.produces())
				.mappingName(requestMapping.name());
		// 调用者自定义的条件~~~
		if (customCondition != null) {
			builder.customCondition(customCondition);
		}
		// 注意此处:把当前的config设置进去了~~~~
		return builder.options(this.config).build();
	}

	@Override
	public RequestMatchResult match(HttpServletRequest request, String pattern) { ... }
	// 支持了@CrossOrigin注解  Spring4.2提供的注解
	@Override
	protected CorsConfiguration initCorsConfiguration(Object handler, Method method, RequestMappingInfo mappingInfo) { ... }
}
至此RequestMappingHandlerMapping的初始化完成了。像pathPrefixes这种配置,可以全局统一配置来控制每个Controller,如常用的/api/v1前缀~
如何配置呢?下面给个示例:
@Configuration
@EnableWebMvc
public class WebMvcConfig extends WebMvcConfigurerAdapter {
    @Override
    public void configurePathMatch(PathMatchConfigurer configurer) {
        //configurer.setUseSuffixPatternMatch(false); //关闭后缀名匹配,关闭最后一个/匹配
        //configurer.setUseTrailingSlashMatch(false);

        // 这样HelloController上的方法自动就会有此前缀了,而别的controller上是不会有的
        // 注意:这是Spring5.1后才支持的新特性
        configurer.addPathPrefix("/api/v1", clazz -> clazz.isAssignableFrom(HelloController.class));

        // 使用Spring提供的HandlerTypePredicate,更加的强大
        HandlerTypePredicate predicate = HandlerTypePredicate.forBasePackage("com.buqiong");
        //HandlerTypePredicate predicate = HandlerTypePredicate.forBasePackageClass(HelloController.class);
        //HandlerTypePredicate predicate = HandlerTypePredicate.forAssignableType(...);
        //HandlerTypePredicate predicate = HandlerTypePredicate.forAnnotation(...);
        //HandlerTypePredicate predicate = HandlerTypePredicate.builder()
        //        .basePackage()
        //        .basePackageClass()
        //        .build();
        configurer.addPathPrefix("/api/v2", predicate);
    }
}
细节注意:若添加了两prefix都可以作用在某个Controller上,那么会按照放入的顺序(因为它是LinkedHashMap)以先匹配上的为准,可参考RequestMappingHandlerMapping#getPathPrefix方法~
RequestMappingHandlerMapping 向容器中注册的时候,检测到实现了 InitializingBean接口,容器去执行afterPropertiesSet(),在afterPropertiesSet中完成Controller中完成方法的映射。
以上就是Spring MVC在容器启动过程中,完成URL到Handler映射的所有内容~
@RequestMapping属性详解
使用@RequestMapping 来映射URL 到控制器类,或者是到Controller 控制器的处理方法上。
当@RequestMapping 标记在Controller 类上的时候,里面使用@RequestMapping 标记的方法的请求地址都是相对于类上的@RequestMapping 而言的;当Controller 类上没有标记@RequestMapping 注解时,方法上的@RequestMapping 都是绝对路径。
这种绝对路径和相对路径所组合成的最终路径都是相对于根路径“/ ”而言的。
这个注解的属性众多,下面逐个解释一下:
// @since 2.5 用于将Web请求映射到具有灵活方法签名的请求处理类中的方法的注释  Both Spring MVC and `Spring WebFlux` support this annotation
// @Mapping这个注解是@since 3.0  但它目前还只有这个地方使用到了~~~ 我感觉是多余的
@Target({ElementType.METHOD, ElementType.TYPE}) // 能够用到类上和方法上
@Retention(RetentionPolicy.RUNTIME)
@Documented
@Mapping
public @interface RequestMapping {

	//给这个Mapping取一个名字。若不填写,就用HandlerMethodMappingNamingStrategy去按规则生成
	String name() default "";

	// 路径  数组形式  可以写多个。  一般都是按照Ant风格进行书写~
	@AliasFor("path")
	String[] value() default {};
	@AliasFor("value")
	String[] path() default {};

	// 请求方法:GET, HEAD, POST, PUT, PATCH, DELETE, OPTIONS, TRACE
	// 显然可以指定多个方法。如果不指定,表示适配所有方法类型~~
	// 同时还有类似的枚举类:org.springframework.http.HttpMethod
	RequestMethod[] method() default {};

	// 指定request中必须包含某些参数值时,才让该方法处理
	// 使用 params 元素,你可以让多个处理方法处理到同一个URL 的请求, 而这些请求的参数是不一样的
	// 如:@RequestMapping(value = "/fetch", params = {"personId=10"} 和 @RequestMapping(value = "/fetch", params = {"personId=20"}
	// 这两个方法都处理请求`/fetch`,但是参数不一样,进入的方法也不一样~~~~
	// 支持!myParam和myParam!=myValue这种~~~
	String[] params() default {};

	// 指定request中必须包含某些指定的header值,才能让该方法处理请求
	// @RequestMapping(value = "/head", headers = {"content-type=text/plain"}
	String[] headers() default {};

	// 指定处理请求request的**提交内容类型**(Content-Type),例如application/json、text/html等
	// 相当于只有指定的这些Content-Type的才处理
	// @RequestMapping(value = "/cons", consumes = {"application/json", "application/XML"}
	// 不指定表示处理所有~~  取值参见枚举类:org.springframework.http.MediaType
	// 它可以使用!text/plain形如这样非的表达方式
	String[] consumes() default {};
	// 指定返回的内容类型,返回的内容类型必须是request请求头(Accept)中所包含的类型
	// 仅当request请求头中的(Accept)类型中包含该指定类型才返回;
	// 参见枚举类:org.springframework.http.MediaType
	// 它可以使用!text/plain形如这样非的表达方式
	String[] produces() default {};

}
Spring4.3之后提供了组合注解5枚:
@GetMapping
@PostMapping
@PutMapping
@DeleteMapping
@PatchMapping
consumes 与 headers 区别
consumes produces params headers四个属性都是用来缩小请求范围。
consumes只能指定 content-Type 的内容类型,但是headers可以指定所有。
所以可以认为:headers是更为强大的(所有需要指定key和value嘛),而consumes和produces是专用的,头的key是固定的,所以只需要写value值即可,使用起来也更加的方便~。
推荐一个类:org.springframework.http.HttpHeaders,它里面有常量:几乎所有的请求头的key,以及我们可以很方便的构建一个HttpHeader,平时可以作为参考使用
Spring MVC默认使用的HandlerMapping是什么?
Spring对这块的设计也是很灵活的,允许你自己配置,也允许你啥都不做,使用Spring默认的配置。处理代码在:DispatcherServlet#initHandlerMappings
public class DispatcherServlet extends FrameworkServlet {

	// 为此DispatcherServlet 初始化HandlerMappings
	// 备注:DispatcherServlet是允许你有多个的~~~~
	private void initHandlerMappings(ApplicationContext context) {
		this.handlerMappings = null;

		//detectAllHandlerMappings该属性默认为true,表示会去容器内找所有的HandlerMapping类型的定义信息
		// 若想改为false,请调用它的setDetectAllHandlerMappings() 自行设置值(绝大部分情况下没啥必要)
		if (this.detectAllHandlerMappings) {
			// 这里注意:若你没有标注注解`@EnableWebMvc`,那么这里找的结果是空的
			// 若你标注了此注解,这个注解就会默认向容器内注入两个HandlerMapping:RequestMappingHandlerMapping和BeanNameUrlHandlerMapping
			Map<String, HandlerMapping> matchingBeans = BeanFactoryUtils.beansOfTypeIncludingAncestors(context, HandlerMapping.class, true, false);

			if (!matchingBeans.isEmpty()) {
				this.handlerMappings = new ArrayList<>(matchingBeans.values());
				// 多个的话 还需要进行一次排序~~~
				AnnotationAwareOrderComparator.sort(this.handlerMappings);
			}
		}
		// 不全部查找,那就只找一个名字为`handlerMapping`的HandlerMapping 实现精准控制
		// 绝大多数情况下  我们并不需要这么做~
		else {
			try {
				HandlerMapping hm = context.getBean(HANDLER_MAPPING_BEAN_NAME, HandlerMapping.class);
				this.handlerMappings = Collections.singletonList(hm);
			} catch (NoSuchBeanDefinitionException ex) {
				// Ignore, we'll add a default HandlerMapping later.
			}
		}

		// 若一个都没找到自定义的,回滚到Spring的兜底策略,它会想容器注册两个:RequestMappingHandlerMapping和BeanNameUrlHandlerMapping
		if (this.handlerMappings == null) {
			this.handlerMappings = getDefaultStrategies(context, HandlerMapping.class);
			// 输出trace日志:表示使用了兜底策略~
			// 兜底策略配置文件:DispatcherServlet.properties
			if (logger.isTraceEnabled()) {
				logger.trace("No HandlerMappings declared for servlet '" + getServletName() +
						"': using default strategies from DispatcherServlet.properties");
			}
		}
	}
}
通过这段代码,我们能够很清晰的看到。绝大部分情况下,我们容器内会有这两个HandlerMapping Bean:RequestMappingHandlerMapping和BeanNameUrlHandlerMapping
换句话说,默认情况下@RequestMapping和BeanNameUrl的方式都是被支持的~
请注意,使用@EnableWebMvc和不使用它有一个非常重要的区别:
使用@EnableWebMvc原来是依托于这个WebMvcConfigurationSupport config类向容器中注入了对应的Bean,所以它们都是交给了Spring管理的(所以你可以@Autowired它们)。但是,若是走了Spring它自己去读取配置文件走默认值,它的Bean是没有交给Spring管理的,没有交给Spring管理的。它是这样创建的:context.getAutowireCapableBeanFactory().createBean(clazz) 它创建出来的Bean都不会交给Spring管理。
在Spring5以下,DispatcherServlet.properties这个配置文件里写的是这样的:

相当于最底层默认使用的是DefaultAnnotationHandlerMapping,而在Spring5之后,改成了RequestMappingHandlerMapping。DefaultAnnotationHandlerMapping是Spring2.5用来处理@RequestMapping注解的,自从Spring3.2后已被标记为:@Deprecated。
需要注意的是:纯Spring MVC环境下我们都会开启@EnableWebMvc,所以我们实际使用的还是RequestMappingHandlerMapping的。而在SpringBoot环境下,虽然我们一般不建议标注@EnableWebMvc,但是Boot它默认也会注册RequestMappingHandlerMapping的。
DefaultAnnotationHandlerMapping的一个小坑
在功能上DefaultAnnotationHandlerMapping和RequestMappingHandlerMapping绝大多数是等价的。但是因为DefaultAnnotationHandlerMapping过于古老了,它并不支持像@GetMapping(Spring4.3后提供)这样的组合注解的。 从源码角度理由如下:
比如Handler这么写的:
@ResponseBody
@GetMapping("/hello/test")
public Object test(String userName) {
    System.out.println(userName);
    return null;
}
DefaultAnnotationHandlerMapping处理代码为:
...
RequestMapping mapping = AnnotationUtils.findAnnotation(method, RequestMapping.class);
...
值如下:

发现我们的URL并没有获取到。
但是RequestMappingHandlerMapping的获取代码为:
...
RequestMapping requestMapping = AnnotatedElementUtils.findMergedAnnotation(element, RequestMapping.class);
...
可以发现使用AnnotatedElementUtils.findMergedAnnotation是支持这个组合注解的。但是AnnotatedElementUtils整个工具类是Spring4.0后才有,而DefaultAnnotationHandlerMapping早在Spring3.2后就被标记为废弃了,因为就无需Spring继续维护了~~~~
所以若你是纯Spring MVC环境,为确保万无一失,请开启SpringMVC:@EnableWebMvc
若使用非组合注解如@RequestMapping,两者大体一样。但既然人家都废弃了,所以非常不建议再继续使用~~~
其实在Spring5.以后,就直接把这个两个类拿掉了,所以也就没有后顾之忧了。(DispatcherServlet.properties这个配置文件也做了对应的修改)
总结
Spring MVC在启动时会扫描所有的@RequestMapping并封装成对应的RequestMapingInfo。
一个请求过来会与RequestMapingInfo进行逐个比较,找到最适合的那个RequestMapingInfo。
Spring MVC通过HandlerMapping建立起了Url Pattern和Handler的对应关系,这样任何一个URL请求过来时,就可以快速定位一个唯一的Handler,然后交给其进行处理了~
当然这里面还有很多实现细节,其中还有一个非常重要的一块:HandlerAdapter,接下来我们会继续讨论。
|
参考: |


【推荐】国内首个AI IDE,深度理解中文开发场景,立即下载体验Trae
【推荐】编程新体验,更懂你的AI,立即体验豆包MarsCode编程助手
【推荐】抖音旗下AI助手豆包,你的智能百科全书,全免费不限次数
【推荐】轻量又高性能的 SSH 工具 IShell:AI 加持,快人一步
· go语言实现终端里的倒计时
· 如何编写易于单元测试的代码
· 10年+ .NET Coder 心语,封装的思维:从隐藏、稳定开始理解其本质意义
· .NET Core 中如何实现缓存的预热?
· 从 HTTP 原因短语缺失研究 HTTP/2 和 HTTP/3 的设计差异
· 使用C#创建一个MCP客户端
· 分享一个免费、快速、无限量使用的满血 DeepSeek R1 模型,支持深度思考和联网搜索!
· ollama系列1:轻松3步本地部署deepseek,普通电脑可用
· 基于 Docker 搭建 FRP 内网穿透开源项目(很简单哒)
· 按钮权限的设计及实现