Servlet 3.0(不使用web.xml部署描述符,使用ServletContainerInitializer)整合SpringMVC
Servlet3.0是一次Java EE规范的一次重要升级,支持到可以全部采用注解驱动,大大简化了配置web.xml的麻烦。现在启动一个web容器并不强制依赖于web.xml部署描述符了。
最让我们印象深刻的是,之前我们在使用Spring MVC的时候,DispatcherServlet是必须要要在web.xml里配置,现在没有了这个,我们该怎么办呢?
创建一个maven工程
<?xml version="1.0" encoding="UTF-8"?>

<project xmlns="http://maven.apache.org/POM/4.0.0" xmlns:xsi="http://www.w3.org/2001/XMLSchema-instance"
  xsi:schemaLocation="http://maven.apache.org/POM/4.0.0 http://maven.apache.org/xsd/maven-4.0.0.xsd">
  <modelVersion>4.0.0</modelVersion>

  <groupId>com.buqiong</groupId>
  <artifactId>spring-study02</artifactId>
  <version>1.0-SNAPSHOT</version>
  <packaging>war</packaging>

  <properties>
    <project.build.sourceEncoding>UTF-8</project.build.sourceEncoding>
    <project.reporting.outputEncoding>UTF-8</project.reporting.outputEncoding>
    <java.version>1.8</java.version>
  </properties>

  <dependencies>
    <dependency>
      <groupId>org.springframework</groupId>
      <artifactId>spring-webmvc</artifactId>
      <version>5.0.6.RELEASE</version>
    </dependency>

    <dependency>
      <groupId>javax.servlet</groupId>
      <artifactId>javax.servlet-api</artifactId>
      <version>3.1.0</version>
      <scope>provided</scope>
    </dependency>

    <dependency>
      <groupId>org.projectlombok</groupId>
      <artifactId>lombok</artifactId>
      <scope>provided</scope>
      <version>1.18.4</version>
    </dependency>

    <!-- 记录log日志  logback-core并不需要显示导入-->
    <dependency>
      <groupId>ch.qos.logback</groupId>
      <artifactId>logback-classic</artifactId>
      <version>1.2.3</version>
    </dependency>

    <!-- Spring MVC自动数据封装依赖的包  否则可能出现下面的错误,若使用@RequestBody的时候 -->
    <!-- Content type 'application/json' not supported 当然还有其余配置,原理了解-->

    <!-- 此处需要导入databind包即可, jackson-annotations、jackson-core都不需要显示自己的导入了-->
    <dependency>
      <groupId>com.fasterxml.jackson.core</groupId>
      <artifactId>jackson-databind</artifactId>
      <version>2.9.8</version>
    </dependency>
    <!-- fastjson -->
    <dependency>
      <groupId>com.alibaba</groupId>
      <artifactId>fastjson</artifactId>
      <version>1.2.57</version>
    </dependency>

  </dependencies>

  <build>
    <plugins>
      <!-- 该插件是为了没有web.xml情况下,打war包。编译不要报错 -->
      <plugin>
        <groupId>org.apache.maven.plugins</groupId>
        <artifactId>maven-war-plugin</artifactId>
        <version>2.6</version>
        <configuration>
          <failOnMissingWebXml>false</failOnMissingWebXml>
        </configuration>
      </plugin>

      <!-- 编译环境在1.8编译 -->
      <plugin>
        <groupId>org.apache.maven.plugins</groupId>
        <artifactId>maven-compiler-plugin</artifactId>
        <version>3.8.0</version>
        <configuration>
          <source>${java.version}</source>
          <target>${java.version}</target>
          <compilerVersion>${java.version}</compilerVersion>
          <encoding>${project.build.sourceEncoding}</encoding>
        </configuration>
      </plugin>
    </plugins>


    <!--
         directory:属性指定资源文件放置的目录。
         includes:包含哪些配置文件(.class文件不用写)
         filtering:如果设置为false的话,则表示上文的filters配置失效;如果设置为true,则会根据${env}.properties里面的键值对来
                    填充includes指定文件里的${xxxx}占位符(若不做环境区分,一般就是false即可)
     -->
    <resources>
      <resource>
        <directory>src/main/java</directory>
        <includes>
          <include>**/*.properties</include>
          <include>**/*.xml</include>
          <include>**/*.tld</include>
        </includes>
        <filtering>false</filtering>
      </resource>
    </resources>

  </build>
</project>
然后创建logback.xml一个最小配置:
<configuration scan="true" scanPeriod="60 seconds" debug="false">
    <appender name="STDOUT" class="ch.qos.logback.core.ConsoleAppender">
        <encoder>
            <pattern>%d{HH:mm:ss.SSS} [%thread] %-5level %logger{36} - %msg%n</pattern>
        </encoder>
    </appender>

    <root level="INFO">
        <appender-ref ref="STDOUT"/>
    </root>
</configuration>
写一个最基本的Servlet,然后就可以访问了http://localhost:8888/study02/hello
/**
 * @author buqiong
 */
@WebServlet(urlPatterns = "/hello")
public class HelloServlet extends HttpServlet {

    @Override
    protected void doGet(HttpServletRequest req, HttpServletResponse resp) throws ServletException, IOException {
        resp.getWriter().write("hello servlet...");
    }
}
我们发现,比之前采用web.xml配置的方式,省事太多了,真的非常方便。
ServletContainerInitializer
之前web容器要整合其余模块,都是通过web.xml来的。那么现在注解驱动的话,怎么做呢?
这就是Servlet3.0给我们提供的特别特别重要的一个类ServletContainerInitializer来整个其它模块组件。通过读Servlet3.0的官方文档如下:
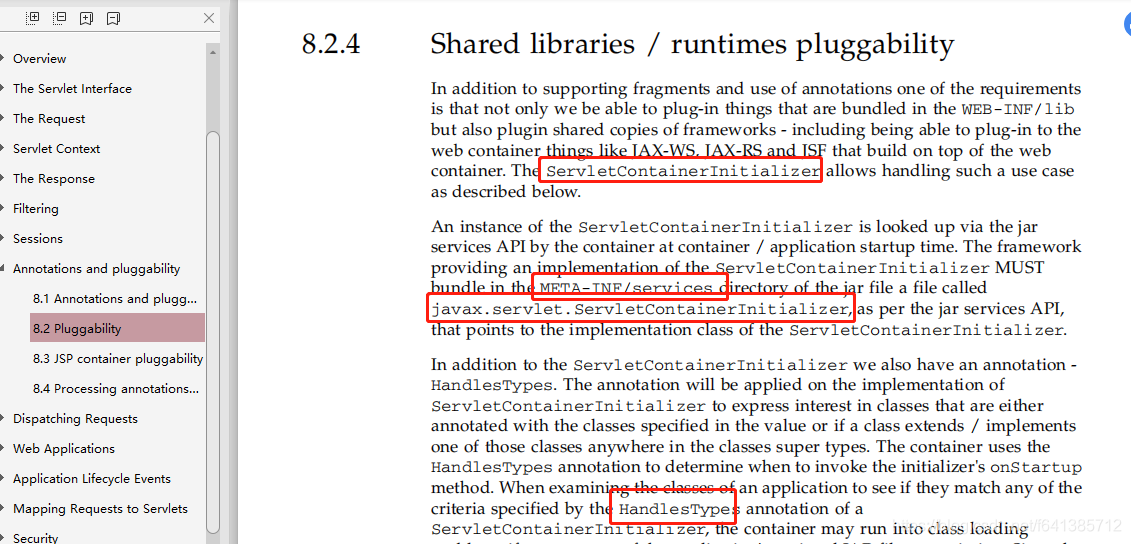
大致可以看出如下意思,它有如下能力:
Shared libraries(共享库) / runtimes pluggability(运行时插件能力)
- Servlet容器启动会扫描,当前应用里面每一个jar包ServletContainerInitializer的实现
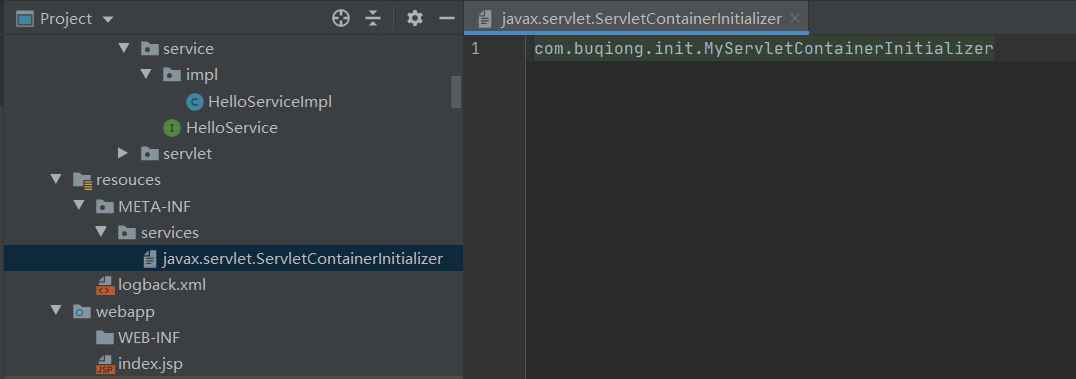
- coder可以自己提供ServletContainerInitializer的实现类;然后自己书写逻辑。但是要记住,一定要必须绑定在META-INF/services/javax.servlet.ServletContainerInitializer这个文件里,文件内容为就是ServletContainerInitializer实现类的全类名;
这样web容器在启动的时候,就会执行该接口的实现方法,从而我们就可以书写我们自己的模块初始化的一些逻辑。

/**
 * 容器启动的时候会将@HandlesTypes指定的这个类型下面的子类(实现类,子接口等)传递过来;
 * @author buqiong
 */
@HandlesTypes(value = {HelloService.class})
public class MyServletContainerInitializer implements ServletContainerInitializer {

    /**
     * 应用启动的时候,会运行onStartup方法;
     * @param c 感兴趣的类型的所有子类型;
     * @param ctx 代表当前Web应用的ServletContext;一个Web应用一个ServletContext;
     * @throws ServletException
     */
    @Override
    public void onStartup(Set<Class<?>> c, ServletContext ctx) throws ServletException {
  		//这里的c会把所有我们感兴趣的类型都拿到
        System.out.println("感兴趣的类型:");
        for (Class<?> claz : c) {
            System.out.println(claz);
        }

		//==========================编码形式注册三大组件============================
        //注册组件  ServletRegistration
        //ServletRegistration.Dynamic servlet = ctx.addServlet("userServlet", new UserServlet());

        //配置servlet的映射信息
        //servlet.addMapping("/user");

        //注册Listener
        //ctx.addListener(UserListener.class);

        //注册Filter  FilterRegistration
        //FilterRegistration.Dynamic filter = ctx.addFilter("userFilter", UserFilter.class);
        //配置Filter的映射信息
        //filter.addMappingForUrlPatterns(EnumSet.of(DispatcherType.REQUEST), true, "/*");
    }

}
HelloService和实现类简单如下:
/**
 * @author buqiong
 */
public interface HelloService {

    String sayHello(String name);
}

/**
 * @author buqiong
 */
public class HelloServiceImpl implements HelloService {
    @Override
    public String sayHello(String name) {
        return "hello " + name + "!";
    }
}
启动容器,我们会看到:

把我们关心的接口子类型(包含子接口、抽象类、实现类)都放进来了。但是需要注意:不包含自己哦~
使用ServletContext注册Web组件(Servlet、Filter、Listener)
1)使用编码的方式,在项目启动的时候给ServletContext里面添加组件;
2)必须在项目启动的时候来添加(为了安全考虑,若已经启动完成再添加,是无效的)
ServletContainerInitializer得到的ServletContext;
ServletContextListener得到的ServletContext;
/ 不拦截.jsp。而/*都会拦截
DispatcherServlet映射:/
Filter映射:/*
Spring MVC拦截器的映射:/**
整合Spring MVC
整合Spring MVC是重中之重。前面已经说过ServletContainerInitializer了,相信大家能够想到Spring是怎么做的了吧?直接参照Spring官方文档先看看:
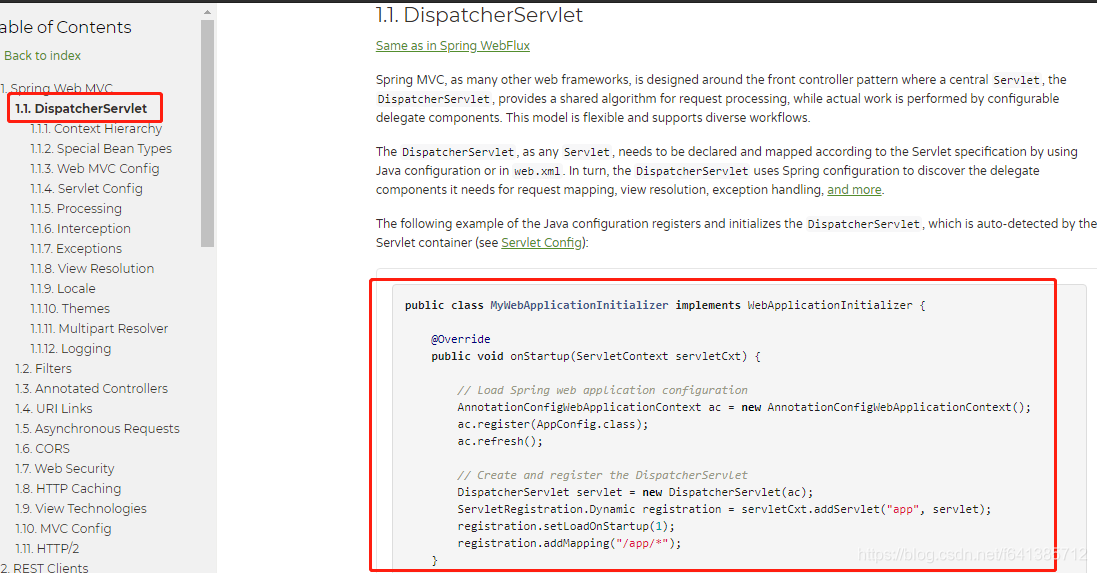
API 使用文档:https://docs.spring.io/spring/docs/5.1.5.RELEASE/spring-framework-reference/web.html#mvc-servlet
我们看看Spring-web包jar包内:
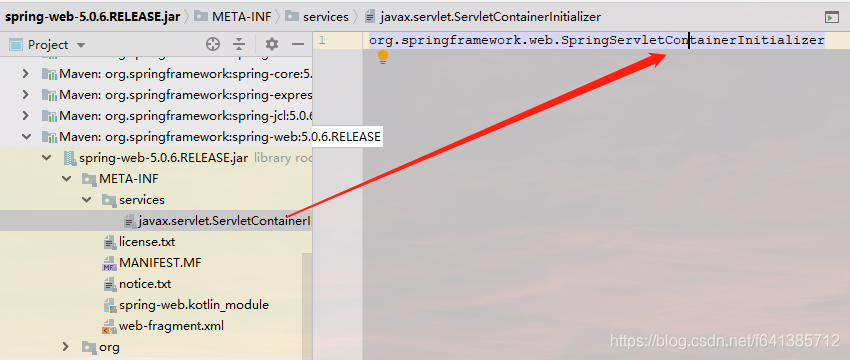
很显然的发现,Spring MVC也是通过这种方式和Servlet容器进行整合的。web容器在启动的时候,就会自动去加载org.springframework.web.SpringServletContainerInitializer这个类。源码如下(它关心的是WebApplicationInitializer的子类们):
@HandlesTypes(WebApplicationInitializer.class)
public class SpringServletContainerInitializer implements ServletContainerInitializer {

	@Override
	public void onStartup(@Nullable Set<Class<?>> webAppInitializerClasses, ServletContext servletContext)
			throws ServletException {

		List<WebApplicationInitializer> initializers = new LinkedList<>();

		if (webAppInitializerClasses != null) {
			for (Class<?> waiClass : webAppInitializerClasses) {
				// Be defensive: Some servlet containers provide us with invalid classes,
				// no matter what @HandlesTypes says...
				if (!waiClass.isInterface() && !Modifier.isAbstract(waiClass.getModifiers()) &&
						WebApplicationInitializer.class.isAssignableFrom(waiClass)) {
					try {
						initializers.add((WebApplicationInitializer)
								ReflectionUtils.accessibleConstructor(waiClass).newInstance());
					}
					catch (Throwable ex) {
						throw new ServletException("Failed to instantiate WebApplicationInitializer class", ex);
					}
				}
			}
		}

		if (initializers.isEmpty()) {
			servletContext.log("No Spring WebApplicationInitializer types detected on classpath");
			return;
		}

		servletContext.log(initializers.size() + " Spring WebApplicationInitializers detected on classpath");
		AnnotationAwareOrderComparator.sort(initializers);
		for (WebApplicationInitializer initializer : initializers) {
			initializer.onStartup(servletContext);
		}
	}

}
步骤分析:
(1) spring的应用一启动就会加载感兴趣的WebApplicationInitializer接口的下的所有组件;
(2) 为WebApplicationInitializer组件创建对象(组件不是接口,不是抽象类)

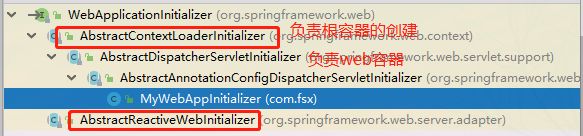
① AbstractContextLoaderInitializer:创建根容器;createRootApplicationContext();
② AbstractDispatcherServletInitializer:
- 创建一个web的ioc容器;createServletApplicationContext();
- 创建了DispatcherServlet;createDispatcherServlet();
- 将创建的DispatcherServlet添加到ServletContext中;
----------- 抽象方法:getServletMappings();
③ AbstractAnnotationConfigDispatcherServletInitializer:注解方式配置的DispatcherServlet初始化器(本文重点)
- 创建根容器:createRootApplicationContext()
- 创建web的ioc容器: createServletApplicationContext();
------------ 获取配置类;getServletConfigClasses();
说明:虽然父类只有两个abstract抽象方法要求子类必须实现。但是父类的设计都是可以扩展的,若你想定制化自己的需求,都是可以通过复写父类的protected的方式扩展的
比如:你想定制化自己的DispatcherServlet(父类默认值是单纯的new一下),那么你就可以通过复写createDispatcherServlet()去定制~。
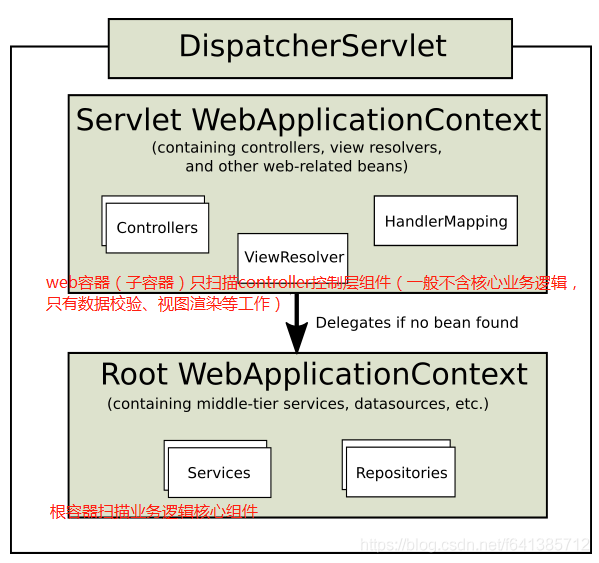
Spring容器推荐使用父子容器的概念
从上面分析得知,我们要使用注解驱动的话。只需要我们自己实现AbstractAnnotationConfigDispatcherServletInitializer这个抽象类就行了,这样web容器启动的时候就能处理我们实现的这个类的内容。示例如下(采用父子容器):
/**
 * 此处@ControllerAdvice、RestControllerAdvice 这个注解不要忘了,属于Controller层处理全局异常的,应该交给web去扫描
 * @author linhongwei
 */
@ComponentScan(value = "com.buqiong", excludeFilters = {
        @ComponentScan.Filter(type = FilterType.ANNOTATION, classes = {Controller.class, ControllerAdvice.class, RestControllerAdvice.class})
})
@Configuration
public class RootConfig {

}

/**
 * 实际使用时,记得排除掉@Controller和@ControllerAdvice、@RestControllerAdvice,不要与RootConfig配置重复扫描
 * @author buqiong
 */
@ComponentScan(value = "com.buqiong", useDefaultFilters = false,
        includeFilters = {@ComponentScan.Filter(type = FilterType.ANNOTATION, classes = {Controller.class, ControllerAdvice.class, RestControllerAdvice.class})}
)
@Configuration
public class AppConfig {

}
1)@RestControllerAdvice是Spring4.3后提供的注解。@ControllerAdvice是Spring3.2提供的。它俩的区别就像@Controller和@RestController的区别。(也就是说@RestControllerAdvice可以省略@ResponseBody不用写了~~~)
2)useDefaultFilters默认值为true,表示默认情况下@Component、@Repository、@Service、@Controller都会扫描。useDefaultFilters=false加上includeFilters我们就可以只扫描指定的组件了,比如Spring MVC的web子容器只扫描Controller组件。excludeFilters的时候,就不需要去设置useDefaultFilters=false,这样子我们直接排除掉即可哟~
特别注意:useDefaultFilters的正确使用,不要造成重复扫描。否则很有可能造成事务不生效,并且你还非常不好定位这个错误。
然后我们自己来实现AbstractAnnotationConfigDispatcherServletInitializer的一个初始化实现类:
/**
 * 自己实现 基于注解驱动的ServletInitializer来初始化DispatcherServlet
 */
public class MyWebAppInitializer extends AbstractAnnotationConfigDispatcherServletInitializer {

    /**
     * 根容器的配置类;(Spring的配置文件)   父容器;
     */
    @Override
    protected Class<?>[] getRootConfigClasses() {
        return new Class<?>[]{RootConfig.class};
    }

    /**
     * web容器的配置类(SpringMVC配置文件)  子容器;
     */
    @Override
    protected Class<?>[] getServletConfigClasses() {
        return new Class<?>[]{AppConfig.class};
    }

    //获取DispatcherServlet的映射信息
    // 注意:
    // /:拦截所有请求(包括静态资源(xx.js,xx.png)),但是不包括*.jsp;
    // /*:拦截所有请求;连*.jsp页面都拦截;jsp页面是tomcat的jsp引擎解析的;
    @Override
    protected String[] getServletMappings() {
        return new String[]{"/"};
    }

    // 若你想定制化父类的一些默认行为  这里都是可以复写父类的protected方法的~~~~
    // Spring MVC也推荐你这么干~
    @Override
    protected FrameworkServlet createDispatcherServlet(WebApplicationContext servletAppContext) {
        DispatcherServlet dispatcherServlet = (DispatcherServlet) super.createDispatcherServlet(servletAppContext);
        // dispatcherServlet.setDetectAllHandlerAdapters(false);
        return dispatcherServlet;
    }

}
我们写个测试类试试:
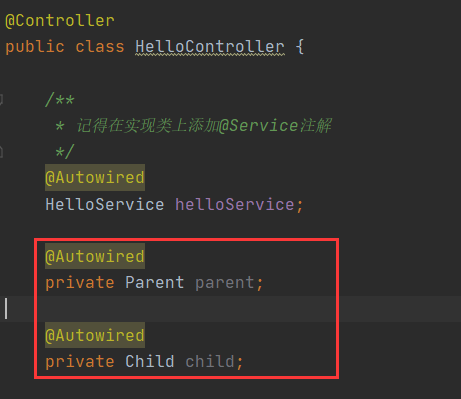
@Controller
public class HelloController {

    /**
     * 记得在实现类上添加@Service注解
     */
    @Autowired
    HelloService helloService;

    @ResponseBody
    @RequestMapping("/sayHello")
    public String sayHello() {
        System.out.println(helloService); //com.buqiong.service.impl.HelloServiceImpl@3a29e4d
        return "hello...";
    }
}
这样我们就可以正常访问controller的请求了。
web容器中的Spring的应用 一启动就会 加载感兴趣的WebApplicationInitializer接口的下的所有组件,并且为WebApplicationInitializer组件创建对象(组件不是接口,不是抽象类)。
特别注意的是:
按照上面的配置,我偶然的发现了,RootConfig仍然去扫描了我的controller,导致我的controller被扫描了两次,怎么回事呢?
找了好久,终于找到原因了,并不是@ComponentScan或者excludeFilters的问题,而是因为咱们在执行RootConfig的时候,虽然不去扫描Controller注解了,但是它会扫描AppConfig.java这个配置类,从而间接的又去扫描了@Controller了,因此最正确的做法应该如下:
/**
 * 此处@ControllerAdvice、RestControllerAdvice 这个注解不要忘了,属于Controller层处理全局异常的,应该交给web去扫描
 *
 * @author linhongwei
 */
@ComponentScan(value = "com.buqiong", excludeFilters = {
        @ComponentScan.Filter(type = FilterType.ANNOTATION, classes = {Controller.class, ControllerAdvice.class, RestControllerAdvice.class}),
        //排除掉web容器的配置文件,否则会重复扫描
        @ComponentScan.Filter(type = FilterType.ASSIGNABLE_TYPE, classes = {AppConfig.class})
})
@Configuration
public class RootConfig {

}
这样子,我们的Controller就只会被扫描一次了,容器也就非常的干净了,强烈建议这么干。
当然,如果你还是当初xml的方式来做的,分别是两个配置文件下,只要不自己import之类,就不会出现此种问题~
容器完全隔离后的好处是非常明显的,比如我们的web组件,就放在AppConfig里,其它的放在RootConfig里,不要什么都往RootConfig里面塞,比如如下:
//web子容器里注册一个Child
public class AppConfig {

    @Bean
    public Child child() {
        return new Child();
    }
}

//父容器里注册一个Parent
public class RootConfig {

    @Bean
    public Parent parent() {
        return new Parent();
    }

}
然后我们会发现在Controller层注入这两个Bean是正常的:
但是在Service层注入,启动的时候就会报错了
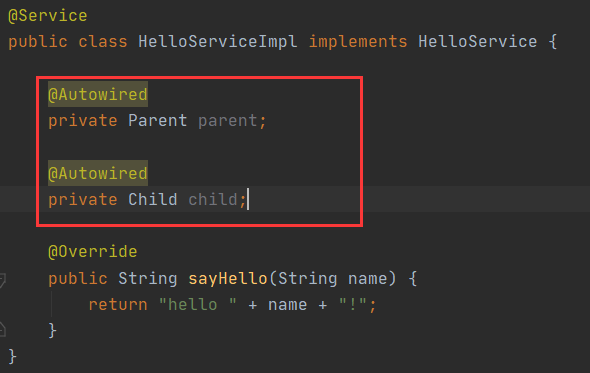
报错如下:

这里说个结论:
- 父子容器的关系跟内部类的关系一样。子容器能得到父容器的Bean,但是父容器得不到子容器的Bean
- 父子容器中,属性值都不是互通的。@Value注入的时候需要注意一下
定制Spring MVC
之前我们使用xml文件的时候,我们可以配置Spring MVC等相关选项。
比如视图解析器、视图映射、静态资源映射、拦截器。
1)首先,在配置文件里加上注解@EnableWebMvc:开启SpringMVC定制配置功能;
2)其次,实现WebMvcConfigurer接口。通过这个接口我们可以发现,里面有很多方法,但大多数情况下我们并不需要配置这么多项,因此Spring MVC也考虑到了这一点,提供给我们一个WebMvcConfigurerAdapter来extends就行,Adapter都是空实现~,这样我们需要配置什么,复写对应方法就行
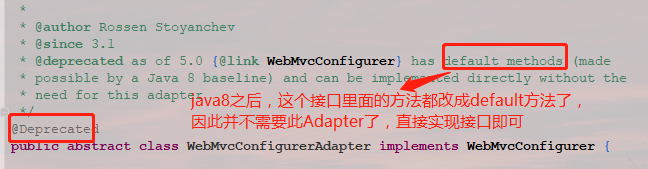
从以上可以看出,如果你的项目是构建在Spring5.0(基于java8)以上的,直接实现接口即可。不用再继承此Adapter了~
@EnableWebMvc
@Configuration //一定要说明这个文件是个配置文件
public class WebMvcConfig implements WebMvcConfigurer {

    //视图解析器
    @Override
    public void configureViewResolvers(ViewResolverRegistry registry) {
        //默认所有的页面都从 /WEB-INF/ xxx .jsp
        //registry.jsp();
        registry.jsp("/WEB-INF/views/", ".jsp");
    }

    // 开启静态资源的请求转发到默认servlet上,不配置页面报错404,(默认servlet不是DispatcherServlet!理解的)
    @Override
    public void configureDefaultServletHandling(DefaultServletHandlerConfigurer configurer) {
        configurer.enable();
    }

    //自定义添加拦截器=========这个比较常用
    @Override
    public void addInterceptors(InterceptorRegistry registry) {
        //registry.addInterceptor(new MyFirstInterceptor()).addPathPatterns("/**");
    }

}
这样我们就可以通过此配置文件,个性化定制我们的Spring MVC了。
Spring MVC中WebMvcConfigurerAdapter、WebMvcConfigurationSupport与WebMvcConfigurer
WebMvcConfigurationSupport与WebMvcConfigurer的关系
说结论:最佳实践还是继承WebMvcConfigurerAdapter(或直接实现接口WebMvcConfigurer),只不过要多加一个@EnableWebMvc注解而已。
若是SpringBoot环境,请不要加@EnableWebMvc注解,因为springboot已经实例化了WebMvcConfigurationSupport,如果添加了该注解,默认的WebMvcConfigurationSupport配置类是不会生效的。
HandlerInterceptor与WebRequestInterceptor的异同
WebRequestInterceptor间接实现了HandlerInterceptor,只是它们之间使用WebRequestHandlerInterceptorAdapter适配器类联系。
这两个Spring MVC的拦截器接口比较就简单了:
1)两个接口都可用于Controller层请求拦截,接口中定义的方法作用也是一样的。
2)WebRequestInterceptor的入参WebRequest是包装了HttpServletRequest 和HttpServletResponse的,通过WebRequest获取Request中的信息更简便直接。
3)WebRequestInterceptor的preHandle是没有返回值的,说明该方法中的逻辑并不影响后续的方法执行,所以这个接口实现就是为了获取Request中的信息,没有阻止请求的作用
4)HandlerInterceptor的功能更强大也更基础,可以在preHandle方法中就直接拒绝请求进入controller方法。
最佳实践:HandlerInterceptor能够实现所有WebRequestInterceptor做的事,更偏底层些。因此建议使用HandlerInterceptor。
最后需要注意一点的是,关于自定义视图解析的自定义配置。此处还有一种方法是直接向容器里面注册Bean即可,如下:
//自定义一个视图解析器
@Bean
public ViewResolver viewResolver() {
	InternalResourceViewResolver resolver = new InternalResourceViewResolver();
	resolver.setPrefix("WEB-INF/views/");
	resolver.setSuffix(".html");
	resolver.setExposeContextBeansAsAttributes(true);
	return resolver;
}
Spring Boot环境下并不建议启用@EnableWebMvc。
Filter的执行顺序问题
在web.xml中,我们知道,执行顺序是谁在前边执行谁。但是现在没有这个web.xml了,怎么定这个执行顺序呢?
若是在Spring Boot环境,我们很好的确定Bean的执行顺序,我们可以用@Order注解:
@Bean
@Order(Integer.MAX_VALUE)
也可以这样:
registration.setOrder(Integer.MAX_VALUE);Spring boot 会按照order值的大小,从小到大的顺序来依次过滤。也就是说,数字越小,越先执行
那么问题来了,现在我们只根据@WebFilter来排序Filter的执行顺序,怎么破呢?很多人曾经给出答案说没办法,是无序的。
其实不然,经过我的实践发现,servlet容器是根据Filter的类名按照自然顺序排序的。什么意思呢?比如我有两个Filter:UserLoginFilter和ApiLog。因为这两个文件的首字母A排U之前,所以每次都会限制性ApiLog。
那么我们就是想先要执行UserLoginFilter怎么办呢?这里有个小技巧,我们可以这么来写即可:
Filter0_UserLogin.java
Filter1_ApiLog.java
完美。但是在Spring Boot环境下的话,还是用Order来控制更加优雅
总结
从Servlet3.0开始,Spring3.2开始,就推荐全部使用注解来驱动应用了。在当下流行的SpringBoot环境中,注解驱动可以说体现的淋漓尽致,完全摒弃了之前的xml配置文件,化简为繁。
关于启动Spring容器的说明
启动Spring容器有三种方式:spring容器启动的三种方式
需要说明的是:
若我们采用原始的方式,配置ContextLoaderListener监听器启动的时候会创建一个web容器,部分源代码如下:

可以看出,它配置的是一个Web容器。这样我们的Spring容器就启动了~
关于DispatchServlet的配置,只是让支持了Spring MVC的功能,能够分发请求了。
非Boot环境,如何用main方法启动Spring MVC的web上下文
我们知道我们自己new一个上下文也是ok的。但是如果我们要new一个web上下文呢?比如我想new一个AnnotationConfigWebApplicationContext
public static void main(String[] args) {
	ApplicationContext applicationContext = new AnnotationConfigApplicationContext(RootConfig.class);
	System.out.println(applicationContext.containsBean("person")); // true
}
这样Spring上下文就正常启动了。
请注意:若构造函数没有放入Config文件,而是后期自己register进去的,那么请手动refresh()。因为空构造函数式不会自动refresh的
那如果我想一个web环境呢?比如我想new一个 AnnotationConfigWebApplicationContext。首先我们看看该类源码:它只有一个的构造函数。 若我们模仿着这么做:
public static void main(String[] args) {
	AnnotationConfigWebApplicationContext webApplicationContext = new AnnotationConfigWebApplicationContext();
	//webApplicationContext.setParent(applicationContext);
	webApplicationContext.register(WebMvcConfig.class); // 注册上web环境的的配置类
	webApplicationContext.refresh(); // 手动刷新
	System.out.println(webApplicationContext.containsBean("helloController "));
}
如果这样,你会看到报错:
Exception in thread "main" java.lang.NoClassDefFoundError: javax/servlet/ServletRequest没错。这属于Servlet的web组件,它一般都在tomcat等容器里面,我们maven自己导入一般也会规定为<scope>provided</scope>。
即使我们把scope去掉真的导入进来,再运行依然报错:
threw exception; nested exception is java.lang.IllegalStateException: No ServletContext set显然web容器的初始化,它是依赖于Servlet上下文的,而我们并没有初始化掉这个上下文,所以就报错了。
|
参考: |

 浙公网安备 33010602011771号