聊聊Spring的缓存及如何自定义缓存
Spring的缓存机制
Spring的缓存不是一种具体的缓存实现方案,它底层需要依赖EhCache、Guava等具体的缓存工具。应用程序只要面向Spring缓存API编程,应用底层的缓存实现可以在不同的缓存之间自由切换,应用程序无须任何改变,只需要对配置略作修改即可。
启用Spring缓存
(1) 创建一个有@Configuration注解的配置类,添加@EnableCaching注解开启缓存机制,并继承CachingConfigurerSupport自定义缓存(或xml配置:<cache:annotation-driven cache-mangager="缓存管理器ID"/>)
(2) 针对不同的缓存实现配置对应的缓存管理器。
① spring-context-*.jar 包含了 cache 需要的类。
② 如果引入了spring-data-redis,要注意版本的问题。我使用spring 5.0.2 与 spring-data-redis 2.0.2.RELEASE是兼容的,但是跟spring-data-redis 2.1.9.RELEASE是有问题的(因为该版本使用的spring与项目的spring版本有冲突)。
③ 只有使用public定义的方法才可以被缓存,而private方法、protected 方法或者使用default 修饰符的方法都不能被缓存。 当在一个类上使用注解时,该类中每个公共方法的返回值都将被缓存到指定的缓存项中或者从中移除。
④ 命名空间:
xmlns:cache="http://www.springframework.org/schema/cache"
xsi:schemaLocation="http://www.springframework.org/schema/cache http://www.springframework.org/schema/cache/spring-cache.xsd"
Spring内置缓存实现的配置
Spring内置的缓存实现只是一种内存中的缓存,并非真正的缓存实现,因此通常只能用于简单的测试环境,不建议在实际项目中使用Spring内置的缓存实现。
Spring内置的缓存实现使用SimpleCacheManager作为缓存管理器,使用SimpleCacheManager配置缓存非常简单,直接在Spring容器中配置该Bean,然后通过<property.../>驱动该缓存管理器执行setCaches()放来来设置缓存区即可。
SimpleCacheManager是一种内存中的缓存区,底层直接使用了JDK的ConcurrentMap来实现缓存,SimpleCacheManager使用了ConcurrentMapCacheFactoryBean作为缓存区,每个ConcurrentMapCacheFactoryBean配置一个缓存区。
xml配置:
<cache:annotation-driven cache-mangager="cacheManager"/>

<!-- 使用SimpleCacheManager配置Spring内置的缓存管理器 -->
<bean id="cacheManager" class="org.springframework.cache.suppot.SimpleCacheManager">
    <!-- 配置缓存区 -->
    <property name="caches">
        <set>
            <!-- 使用ConcurrentMapCacheFactoryBean配置缓存区
                下面列出多个缓存区,p:name用于为缓存区指定名字 -->
            <bean class="org.springframeword.cache.concurrent.ConcurrentMapCacheFactoryBean" p:name="default"/>
            <bean class="org.springframeword.cache.concurrent.ConcurrentMapCacheFactoryBean" p:name="users"/>
        </set>
    </property>
</bean>在实际应用中,开发者可以根据自己的需要,配置更多的缓存区,一般来说,应用有多少个组件需要缓存,程序就应该配置多少个缓存区。
Java配置:
import org.springframework.cache.Cache;
import org.springframework.cache.CacheManager;
import org.springframework.cache.annotation.CachingConfigurerSupport;
import org.springframework.cache.annotation.EnableCaching;
import org.springframework.cache.concurrent.ConcurrentMapCacheFactoryBean;
import org.springframework.cache.support.SimpleCacheManager;
import org.springframework.context.annotation.Bean;
import org.springframework.context.annotation.Configuration;

import javax.annotation.Resource;
import java.util.List;

@EnableCaching
@Configuration
public class SpringCacheConfig2  extends CachingConfigurerSupport {

    @Resource(name = "simpleCacheManager")
    private CacheManager simpleCacheManager;

    @Override
    public CacheManager cacheManager() {
        return simpleCacheManager;
    }

    @Bean
    public SimpleCacheManager simpleCacheManager(List<Cache> cacheList){
        SimpleCacheManager cacheManager = new SimpleCacheManager();
        cacheManager.setCaches(cacheList);
        return cacheManager;
    }

    @Bean
    public ConcurrentMapCacheFactoryBean defaultCacheBean(){
        ConcurrentMapCacheFactoryBean defaultFactoryBean = new ConcurrentMapCacheFactoryBean();
        defaultFactoryBean.setName("default");
        return defaultFactoryBean;
    }

    @Bean
    public ConcurrentMapCacheFactoryBean userCacheBean(){
        ConcurrentMapCacheFactoryBean usersFactoryBean = new ConcurrentMapCacheFactoryBean();
        usersFactoryBean.setName("users");
        return usersFactoryBean;
    }
}
CachingConfigurerSupport类
cacheManager方法
指定使用哪一种缓存。Spring内置了SimpleCacheManager。
keyGenerator方法
指定默认的key生成方式。Spring内置了SimpleKeyGenerator。
/**
 * 自定义Redis Key生产策略
 * 在使用是, 指定@Cacheable(cacheNames = "keyName", keyGenerator = "myKeyGenerator")
 */
@Bean(name = "myKeyGenerator")
public KeyGenerator keyGenerator() {
    return new KeyGenerator() {
        @Override
        public Object generate(Object target, Method method, Object... params) {
            StringBuilder builder = new StringBuilder();
            builder.append(target.getClass().getName()); // 类名
            builder.append(method.getName()); // 方法名
            for (Object param : params) { // 参数
                builder.append(param);
            }
            return builder.toString();
        }
    };
}
errorHandler方法
添加自定义缓存异常处理,实现CacheErrorHandler接口即可。
Spring内置了SimpleCacheErrorHandler。
缓存仅仅是为了业务更快地查询而存在的,如果因为缓存操作失败导致正常的业务流程失败,有点得不偿失了。因此需要开发者自定义CacheErrorHandler处理缓存读写的异常。
/**
 * 当缓存读写异常时,忽略异常
 */
public class IgnoreExceptionCacheErrorHandler implements CacheErrorHandler {

    private static final Logger log = LoggerFactory.getLogger(IgnoreExceptionCacheErrorHandler.class);

    @Override
    public void handleCacheGetError(RuntimeException exception, Cache cache, Object key) {
        log.error(exception.getMessage(), exception);
    }

    @Override
    public void handleCachePutError(RuntimeException exception, Cache cache, Object key, Object value) {
        log.error(exception.getMessage(), exception);
    }

    @Override
    public void handleCacheEvictError(RuntimeException exception, Cache cache, Object key) {
        log.error(exception.getMessage(), exception);
    }

    @Override
    public void handleCacheClearError(RuntimeException exception, Cache cache) {
        log.error(exception.getMessage(), exception);
    }
}
Spring的缓存注解
@Cacheable注解执行缓存
@Cacheable可用于修饰类或修饰方法,当使用@Cacheable修饰类时,用于告诉Spring在类级别上进行缓存 —— 程序调用该类的实例的任何方法时都需要缓存,而且共享同一个缓存区;当使用@Cacheable修饰方法时,用于告诉Spring在方法级别上进行缓存——只有当程序调用该方法时才需要缓存。
(1)类级别的缓存:使用@Cacheable修饰类时,就可控制Spring在类级别进行缓存,这样当程序调用该类的任意方法时,只要传入的参数相同,Spring就会使用缓存。
当程序第一次调用该类的实例的某个方法时,Spring缓存机制会将该方法返回的数据放入指定缓存区。以后程序调用该类的实例的任何方法时,只要传入的参数相同,Spring将不会真正执行该方法,而是直接利用缓存区中的数据
(2)方法级别的缓存:使用@Cacheable修饰方法时,就可控制Spring在方法级别进行缓存,这样当程序调用该方法时,只要传入的参数相同,Spring就会使用缓存。
在 @Cacheable 注解的使用中,共有 9 个属性供我们来使用,这 9 个属性分别是: value、 cacheNames、 key、 keyGenerator、 cacheManager、 cacheResolver、 condition、 unless、 sync。
value/cacheNames 属性
这两个属性代表的意义相同,根据@AliasFor注解就能看出来了。这两个属性都是用来指定缓存组件的名称,即将方法的返回结果放在哪个缓存中,属性定义为数组,可以指定多个缓存;
//这两种配置等价
@Cacheable(value = "user") //@Cacheable(cacheNames = "user")
User getUser(Integer id);
key属性
可以通过 key 属性来指定缓存数据所使用的的 key,默认使用的是方法调用传过来的参数作为 key。最终缓存中存储的内容格式为:Entry<key,value> 形式。
(1) 如果请求没有参数:key=new SimpleKey();
(2) 如果请求有一个参数:key=参数的值
(3) 如果请求有多个参数:key=new SimpleKey(params); (你只要知道 key不会为空就行了)
key值的编写,可以使用 SpEL 表达式的方式来编写;除此之外,我们同样可以使用 keyGenerator 生成器的方式来指定 key,我们只需要编写一个 keyGenerator ,将该生成器注册到 IOC 容器即可。
| 名字 | 位置 | 描述 | 示例 |
|
methodName |
root object | 当前被调用的方法名 | #root.method.name |
|
method |
root object | 当前被调用的方法 | #root.methodName |
|
target |
root object | 当前被调用的目标对象 | #root.target |
|
targetClass |
root object | 当前被调用的目标对象类 | #root.targetClass |
|
args |
root object | 当前被调用的方法的参数列表 | #root.args[0] |
| caches | root object | 当前方法调用使用的缓存列表(如@Cacheable(value={“cache1”,“cache2”})),则有两个cache | #root.caches[0].name |
| argument name | evaluation context | 方法参数的名字. 可以直接 #参数名 ,也可以使用 #p0或#a0 的形式,0代表参数的索引; | #id、#p0、#a0 |
| result | evaluation context | 方法执行后的返回值(仅当方法执行之后的判断有效,如’unless’、'cache put’的表达式 'cacheevict’的表达式beforeInvocation=false) | #result |
使用示例如下:
@Cacheable(value = "user",key = "#root.method.name")
User getUser(Integer id);
keyGenerator 属性
key 的生成器。如果觉得通过参数的方式来指定比较麻烦,我们可以自己指定 key 的生成器的组件 id。key/keyGenerator属性:二选一使用。我们可以通过自定义配置类方式,将 keyGenerator 注册到 IOC 容器来使用。
@Bean("myKeyGenerator")
public KeyGenerator keyGenerator(){
    return new KeyGenerator(){

        @Override
        public Object generate(Object target, Method method, Object... params) {
            return method.getName()+ Arrays.asList(params).toString();
        }
    };
}
cacheManager 属性
该属性,用来指定缓存管理器。针对不同的缓存技术,需要实现不同的 cacheManager,Spring 也为我们定义了如下的一些 cacheManger 实现:
| CacheManger | 描述 |
| SimpleCacheManager | 使用简单的Collection来存储缓存,主要用于测试 |
| ConcurrentMapCacheManager | 使用ConcurrentMap作为缓存技术(默认) |
| NoOpCacheManager | 测试用 |
| EhCacheCacheManager | 使用EhCache作为缓存技术,以前在hibernate的时候经常用 |
| GuavaCacheManager | 使用google guava的GuavaCache作为缓存技术 |
| HazelcastCacheManager | 使用Hazelcast作为缓存技术 |
| JCacheCacheManager | 使用JCache标准的实现作为缓存技术,如Apache Commons JCS |
| RedisCacheManager | 使用Redis作为缓存技术 |
cacheResolver 属性
该属性,用来指定缓存管理器。使用配置同 cacheManager 类似。(cacheManager指定管理器/cacheResolver指定解析器 它俩也是二选一使用)。
condition 属性
条件判断属性,用来指定符合指定的条件下才可以缓存。也可以通过 SpEL 表达式进行设置。这个配置规则和上面表格中的配置规则是相同的。
@Cacheable(value = "user",condition = "#id>0")//传入的 id 参数值>0才进行缓存
User getUser(Integer id);
@Cacheable(value = "user",condition = "#a0>1")//传入的第一个参数的值>1的时候才进行缓存
User getUser(Integer id);@Cacheable(value = "user",condition = "#a0>1 and #root.methodName eq 'getUser'")//传入的第一个参数的值>1 且 方法名为 getUser 的时候才进行缓存
User getUser(Integer id);unless 属性
unless属性,意为"除非"的意思。即只有 unless 指定的条件为 true 时,方法的返回值才不会被缓存。可以在获取到结果后进行判断。
@Cacheable(value = "user",unless = "#result == null")//当方法返回值为 null 时,就不缓存
User getUser(Integer id);
@Cacheable(value = "user",unless = "#a0 == 1")//如果第一个参数的值是1,结果不缓存
User getUser(Integer id);sync 属性
该属性用来指定是否使用异步模式,该属性默认值为 false,默认为同步模式。异步模式指定 sync = true 即可,异步模式下 unless 属性不可用。
@Cacheput注解执行缓存
在支持Spring Cache的环境下,对于使用@Cacheable标注的方法,Spring在每次执行前都会检查Cache中是否存在相同key的缓存元素,如果存在就不再执行该方法,而是直接从缓存中获取结果进行返回,否则才会执行并将返回结果存入指定的缓存中。
@CachePut也可以声明一个方法支持缓存功能。与@Cacheable不同的是使用@CachePut标注的方法在执行前不会去检查缓存中是否存在之前执行过的结果,而是每次都会执行该方法,并将执行结果以键值对的形式存入指定的缓存中。
@CachePut注解和@Cacheable注解,唯一不同的是:
- @CachePut注解是先调用方法再将方法的返回值写入缓存,方法体是一定会执行的;
- @Cacheable注解是先查询缓存,if 缓存==null,就查询数据库,然后将方法的返回值写入缓存
@CachePut也可以标注在类上和方法上。使用@CachePut时我们可以指定的属性跟@Cacheable是一样的。
@CacheEvict注解清除缓存
@CacheEvict是用来标注在需要清除缓存元素的方法或类上的。
当标记在一个类上时表示所有的方法的执行都会触发缓存的清除操作。
@CacheEvict可以指定的属性有value、key、condition、allEntries和beforeInvocation。
其中value、key和condition的语义与@Cacheable对应的属性类似。
- value表示清除操作是发生在哪些Cache上的(对应Cache的名称);
- key表示需要清除的是哪个key,如未指定则会使用默认策略生成的key;
- condition表示清除操作发生的条件。
下面我们来介绍一下新出现的两个属性allEntries和beforeInvocation。
allEntries
allEntries是boolean类型,表示是否需要清除缓存中的所有元素。默认为false,表示不需要。当指定了allEntries为true时,Spring Cache将忽略指定的key。有的时候我们需要Cache一下清除所有的元素,这比一个一个清除元素更有效率。
@CacheEvict(value="users", allEntries=true)
public void delete(Integer id) {
    System.out.println("delete user by id: " + id);
}
beforeInvocation属性
清除操作默认是在对应方法成功执行之后触发的,即方法如果因为抛出异常而未能成功返回时也不会触发清除操作。使用beforeInvocation可以改变触发清除操作的时间,当我们指定该属性值为true时,Spring会在调用该方法之前清除缓存中的指定元素。
@CacheEvict(value="users", beforeInvocation=true)
public void delete(Integer id) {
    System.out.println("delete user by id: " + id);
}
@Caching
@Caching注解可以让我们在一个方法或者类上同时指定多个Spring Cache相关的注解。其拥有三个属性:cacheable、put和evict,分别用于指定@Cacheable、@CachePut和@CacheEvict。
@Caching(cacheable = @Cacheable("users"), evict = { @CacheEvict("cache2"),
     @CacheEvict(value = "cache3", allEntries = true) })
public User find(Integer id) {
    return null;
}
使用自定义注解
Spring允许我们在配置可缓存的方法时使用自定义的注解,前提是自定义的注解上必须使用对应的注解进行标注。加入有如下这么一个使用@Cacheable进行标注的自定义注解。
自定义注解:
@Target({ElementType.TYPE, ElementType.METHOD})
@Retention(RetentionPolicy.RUNTIME)
@Cacheable(value="users")
public @interface MyCacheable {

}
那么在我们需要缓存的方法上使用@MyCacheable进行标注也可以达到同样的效果。
@MyCacheable
public User findById(Integer id) {
    System.out.println("find user by id: " + id);
    User user = new User();
    user.setId(id);
    user.setName("Name" + id);
    return user;
}
@CacheConfig 公共的缓存配置
@CacheConfig 在类级别设置一些缓存相关的共同配置(与其它缓存配合使用)
@Cacheable的实现原理
Cacheable注解是典型的Spring AOP实现,在Spring里,aop可以简单的理解为代理(AspectJ除外),我们声明了@Cacheable的方法的类,都会被代理,在代理中,实现缓存的查询与设置操作。
众所周知,使用CgLib进行AOP动态代理是通过拦截器中的invoke方法执行的。
在这里找到了缓存方面的代理配置:
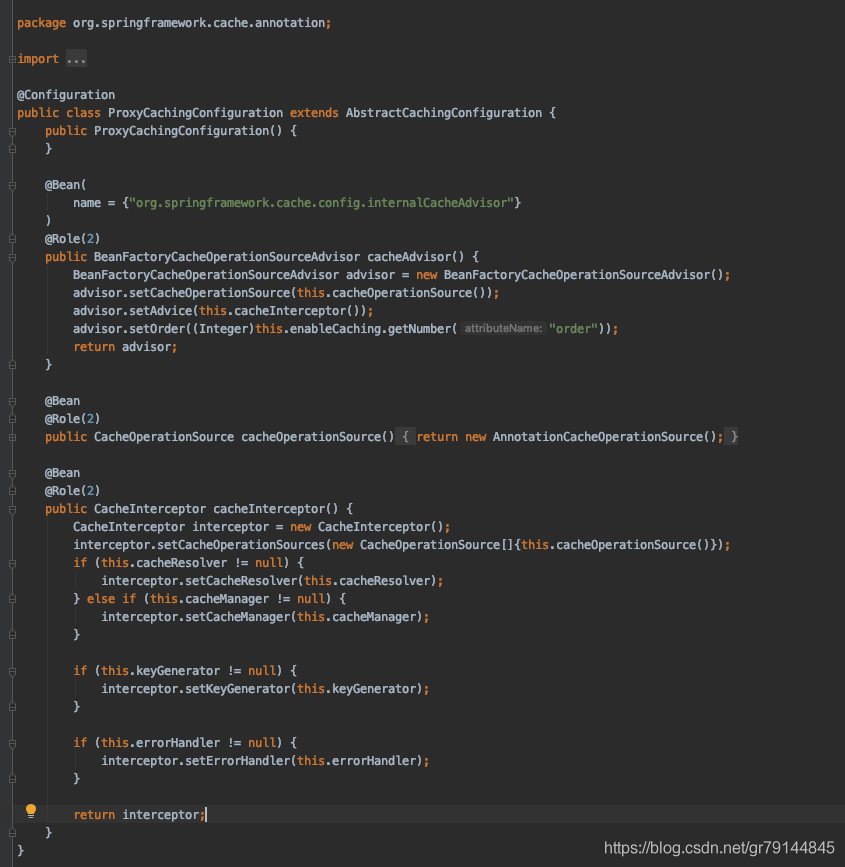
在配置中看到声明了一个CacheInterceptor的拦截器。
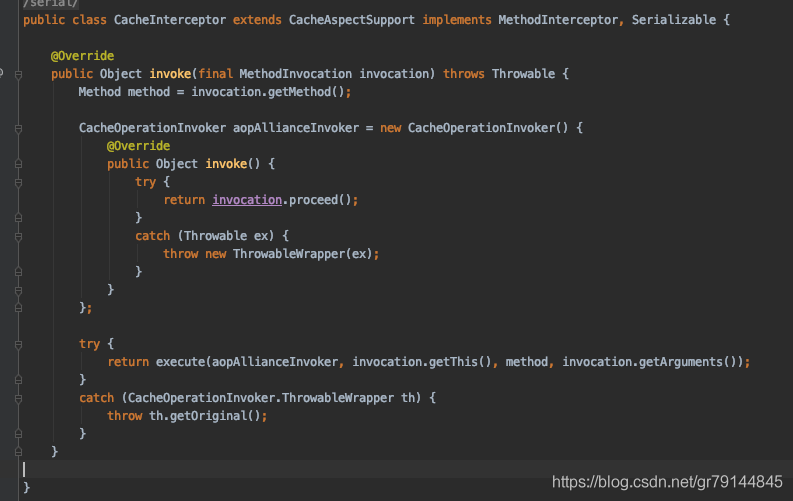
它实现了MethodInterceptor接口并重写其invoke方法。其中excute的主要逻辑在CacheAspectSupport中。
在CacheAspectSupport中可以找到方法:

自定义缓存
使用EhCache
EhCache 是一个纯Java的进程内缓存框架,具有快速、精干等特点,是Hibernate中默认CacheProvider。Ehcache是一种广泛使用的开源Java分布式缓存。主要面向通用缓存,Java EE和轻量级容器。它具有内存和磁盘存储,缓存加载器,缓存扩展,缓存异常处理程序,一个gzip缓存servlet过滤器,支持REST和SOAP api等特点。
Spring 提供了对缓存功能的抽象:即允许绑定不同的缓存解决方案(如Ehcache),但本身不直接提供缓存功能的实现。它支持注解方式使用缓存,非常方便。
特性:
- 快速
- 简单
- 多种缓存策略
- 缓存数据有两级:内存和磁盘,因此无需担心容量问题
- 缓存数据会在虚拟机重启的过程中写入磁盘
- 可以通过RMI、可插入API等方式进行分布式缓存
- 具有缓存和缓存管理器的侦听接口
- 支持多缓存管理器实例,以及一个实例的多个缓存区域
- 提供Hibernate的缓存实现
1、pom配置
<!-- spring-data-redis -->
<dependency>
    <groupId>org.springframework.data</groupId>
    <artifactId>spring-data-redis</artifactId>
    <version>2.0.2.RELEASE</version>
</dependency>


<!-- ehcache -->
<dependency>
    <groupId>net.sf.ehcache</groupId>
    <artifactId>ehcache</artifactId>
    <version>2.10.6</version>
</dependency>
2、在src/main/resources/创建一个配置文件 ehcache.xml
默认情况下Ehcache会自动加载classpath根目录下名为ehcache.xml文件,也可以将该文件放到其他地方在使用时指定文件的位置。
<?xml version="1.0" encoding="UTF-8"?>
<ehcache>

    <!-- 磁盘缓存位置 -->
    <diskStore path="D:\workspace\emptyPro\spring-study01\ehcache"/>

    <!-- 默认缓存 -->
    <defaultCache
            maxEntriesLocalHeap="10000"
            eternal="false"
            timeToIdleSeconds="120"
            timeToLiveSeconds="120"
            maxEntriesLocalDisk="10000000"
            diskExpiryThreadIntervalSeconds="120"
            memoryStoreEvictionPolicy="LRU">
        <persistence strategy="localTempSwap"/>
    </defaultCache>

    <!-- hello缓存 -->
    <cache name="hello"
           maxElementsInMemory="1000"
           eternal="false"
           timeToIdleSeconds="50"
           timeToLiveSeconds="50"
           overflowToDisk="false"
           memoryStoreEvictionPolicy="LRU"/>

    <cache name="users"
           maxElementsInMemory="1000"
           eternal="false"
           timeToIdleSeconds="50"
           timeToLiveSeconds="50"
           overflowToDisk="false"
           memoryStoreEvictionPolicy="LRU"/>
</ehcache>
3、创建一个配置类继承CachingConfigurerSupport,重写cacheManager方法,返回Ehcache的CacheManager管理器。
@EnableCaching
@Configuration
public class SpringCacheConfig extends CachingConfigurerSupport {

    @Resource(name = "ehcacheCacheManager")
    private CacheManager ehcacheCacheManager;

    @Override
    public CacheManager cacheManager() {
        return ehcacheCacheManager;
    }

    @Bean
    public CacheManager ehcacheCacheManager(){
        EhCacheCacheManager cacheManager = new EhCacheCacheManager();
        EhCacheManagerFactoryBean ehCacheManagerFactoryBean = new EhCacheManagerFactoryBean();
        ClassPathResource resource = new ClassPathResource("ehcache.xml");
        ehCacheManagerFactoryBean.setConfigLocation(resource);
        cacheManager.setCacheManager(ehCacheManagerFactoryBean.getObject());
        return cacheManager;
    }
}
注:如果涉及到多个缓存管理器(如同时有redis和ehcache),重写的cacheManager方法指定一个默认缓存管理器就行,其余缓存管理器只需用@Bean交给Spring IOC托管就行,然后在使用@Cacheable注解时通过cacheManager属性指定。
Spring提供了CompositeCacheManager 。
使用Redis
1、pom配置
spring 5.0.2.RELEASE。
spring-data-redis 2.0.2.RELEASE
jedis 2.10.2
<!-- spring-data-redis (注意与redis的版本问题与spring的版本问题)-->
<dependency>
    <groupId>org.springframework.data</groupId>
    <artifactId>spring-data-redis</artifactId>
    <version>2.0.2.RELEASE</version>
    <exclusions>

    </exclusions>
</dependency>
<!--2.9.1有连接泄露的bug-->
<dependency>
    <groupId>redis.clients</groupId>
    <artifactId>jedis</artifactId>
    <version>2.10.2</version>
</dependency>
2、配置RedisCacheManager
import com.fasterxml.jackson.annotation.JsonAutoDetect;
import com.fasterxml.jackson.annotation.PropertyAccessor;
import com.fasterxml.jackson.databind.ObjectMapper;
import org.springframework.cache.CacheManager;
import org.springframework.cache.annotation.CachingConfigurerSupport;
import org.springframework.cache.annotation.EnableCaching;
import org.springframework.context.annotation.Bean;
import org.springframework.context.annotation.Configuration;
import org.springframework.data.redis.cache.RedisCacheConfiguration;
import org.springframework.data.redis.cache.RedisCacheManager;
import org.springframework.data.redis.cache.RedisCacheWriter;
import org.springframework.data.redis.connection.RedisClusterConfiguration;
import org.springframework.data.redis.connection.jedis.JedisConnectionFactory;
import org.springframework.data.redis.serializer.Jackson2JsonRedisSerializer;
import org.springframework.data.redis.serializer.RedisSerializationContext;
import redis.clients.jedis.JedisPoolConfig;

import java.time.Duration;
import java.util.*;


@EnableCaching
@Configuration
public class SpringCacheConfig extends CachingConfigurerSupport {

    @Override
    public CacheManager cacheManager() {
        return new RedisCacheManager(
                RedisCacheWriter.nonLockingRedisCacheWriter(connectionFactory()),
                this.getRedisCacheConfigurationWithTtl(600), // 默认策略,未配置的 key 会使用这个
                this.getRedisCacheConfigurationMap() // 指定 key 策略
        );
    }

    /**
     * 配置连接池
     *
     * @return
     */
    @Bean
    public JedisPoolConfig clusterPoolConfig() {
        JedisPoolConfig poolConfig = new JedisPoolConfig();
        //连接池中最多可空闲链接个数,这里取值20,表示即使没有用数据库链接依然保持20个空闲链接
        poolConfig.setMaxIdle(20);
        //控制一个pool可以分配多少个jedis实例
        poolConfig.setMaxTotal(300);
        //最大等待时间,当没有可用连接时,连接池等待链接被归还的最大时间ms,超过时间就抛出异常
        poolConfig.setMaxWaitMillis(1000);
        //在获取连接的时候检查链接的有效性
        poolConfig.setTestOnCreate(true);
        return poolConfig;
    }

    /**
     * redis单机配置
     * RedisStandaloneConfiguration 单机
     * RedisSentinelConfiguration 主从复制(哨兵模式)
     * RedisClusterConfiguration 集群
     *
     * @return
     */
    @Bean
    public RedisClusterConfiguration configuration() {
        RedisClusterConfiguration clusterConfiguration = new RedisClusterConfiguration();
        clusterConfiguration.clusterNode("127.0.0.1", 6380);
        clusterConfiguration.clusterNode("127.0.0.1", 6381);
        clusterConfiguration.clusterNode("127.0.0.1", 6382);
        return clusterConfiguration;
    }

    /**
     * 配置连接工厂
     *
     * @return
     */
    @Bean
    public JedisConnectionFactory connectionFactory() {
        return new JedisConnectionFactory(configuration());
    }

    private Map<String, RedisCacheConfiguration> getRedisCacheConfigurationMap() {
        Map<String, RedisCacheConfiguration> redisCacheConfigurationMap = new HashMap();
        //缓存设置,可以单独为一个cache设置配置
        redisCacheConfigurationMap.put("users", this.getRedisCacheConfigurationWithTtl(3000));
        redisCacheConfigurationMap.put("usersAnother", this.getRedisCacheConfigurationWithTtl(18000));
        return redisCacheConfigurationMap;
    }

    private RedisCacheConfiguration getRedisCacheConfigurationWithTtl(Integer seconds) {
        Jackson2JsonRedisSerializer<Object> jackson2JsonRedisSerializer = new Jackson2JsonRedisSerializer<>(Object.class);
        ObjectMapper om = new ObjectMapper();
        om.setVisibility(PropertyAccessor.ALL, JsonAutoDetect.Visibility.ANY);
        jackson2JsonRedisSerializer.setObjectMapper(om);

        RedisCacheConfiguration redisCacheConfiguration = RedisCacheConfiguration.defaultCacheConfig();
        redisCacheConfiguration = redisCacheConfiguration.serializeValuesWith(
                RedisSerializationContext
                        .SerializationPair
                        .fromSerializer(jackson2JsonRedisSerializer)
        ).entryTtl(Duration.ofSeconds(seconds));

        return redisCacheConfiguration;
    }
}
3、测试验证
UserService.java
public interface UserService {

    String getNameById(Long id);

    void deleteById(Long id);
}
UserServiceImpl.java
@Service
public class UserServiceImpl implements UserService {

    private static Map<Long, String> userMap = new HashMap();

    static {
        userMap.put(10001L, "张三");
        userMap.put(10002L, "李四");
    }

    @Cacheable(cacheNames = "users", key = "#id")
    @Override
    public String getNameById(Long id) {
        System.out.println("----查询id=" + id);
        return userMap.get(id);
    }

    @CacheEvict(cacheNames = "users", key = "#id")
    @Override
    public void deleteById(Long id){
        System.out.println("清除:" + id);
    }
}
HelloController.java
@Controller
@RequestMapping("/hello")
public class HelloController {

    @Autowired
    private UserService userService;

    @ResponseBody
    @GetMapping("getNameById")
    public Map<String, Object> getNameById(Long id) {
        String name = userService.getNameById(id);
        Map<String, Object> result = new HashMap();
        result.put("name", name);
        return result;
    }

    @PostMapping("deleteById")
    public void deleteById(Long id){
        userService.deleteById(id);
    }
}
在postman访问以下请求,观察redis缓存的变化:
设置缓存 GET http://localhost:8888/hello/getNameById?id=10002
清除缓存 POST http://localhost:8888/hello/deleteById?id=10001

常见问题
@Cacheable不生效的原因
@Cacheable注解中,一个方法A调同一个类里的另一个有缓存注解的方法B,这样是不走缓存的。例如在同一个service里面两个方法的调用,缓存是不生效的。
解决方案:
① 不使用注解的方式,直接取CacheManger 对象,把需要缓存的数据放到里面,类似于使用 Map,缓存的逻辑自己控制;或者可以使用redis的缓存方式去添加缓存;
② 把方法A和方法B放到两个不同的类里面,例如:如果两个方法都在同一个service接口里,把方法B放到另一个service里面,这样在A方法里调B方法,就可以使用B方法的缓存。
③ 如果确实要在方法内部调用,要在aop的配置上加上exposeProxy=true,然后使用的时候使用AopContext.currentProxy() 代替this(不推荐)
为什么缓存没有被正常创建因为@Cacheable 是使用AOP 代理实现的 ,通过创建内部类来代理缓存方法,这样就会导致一个问题,类内部的方法调用类内部的缓存方法不会走代理(因为方法之间的调用直接使用的是原始对象this,而非代理对象,因而内部调用不会产生代理),不会走代理,就不能正常创建缓存,所以每次都需要去调用数据库。
注意点
因为@Cacheable 由AOP 实现,所以如果该方法被其它注解切入,当缓存命中的时候,则其它注解不能正常切入并执行,@Before 也不行,当缓存没有命中的时候,其它注解可以正常工作
@Cacheable 方法不能进行内部调用,否则缓存无法创建。

 浙公网安备 33010602011771号