一、简介
1、什么是Spring?
Spring是一个轻量级的控制反转和面向切面编程的开源容器框架,致力于轻量级的javaEE应用,简化程序开发。
目的:消除重复的代码,解耦合。
2、轻量级:从大小和开销方面来看都是轻量的,可以在一个很小的jar文件中发布,需要的处理开销也很小。
3、容器:从程序设计的角度来看,就是装对象的对象。
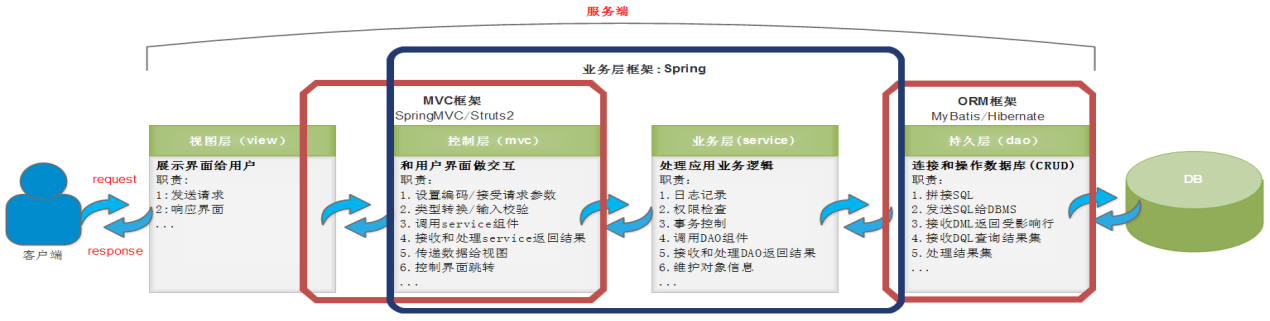
4、spring为我们提供了javaEE每一个环节的解决方案
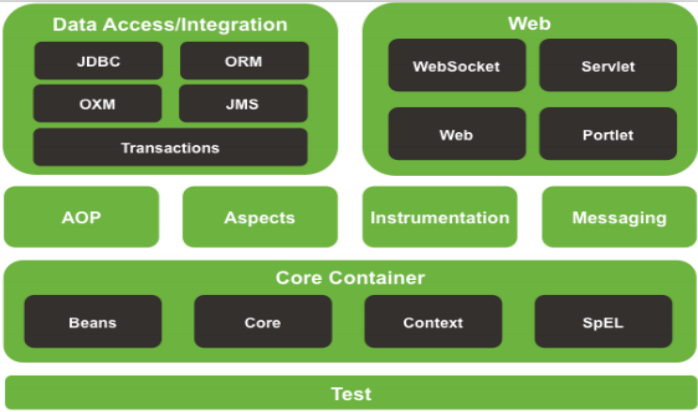
5、spring框架结构图
二、IoC控制反转和DI注入思想
1、IoC:Inversion of Control控制反转
是一种设计思想,将原本手动创建对象的控制权,交由Spring框架来管理。
2、DI:Dependency Injection依赖注入
在创建对象的过程中,将对象依赖的属性通过配置xml文件的方式进行设值。
三、实例讲解
1、通过写一个入门类实现对spring的初步了解
写简单的程序HelloWorld
- 第一步:导入依赖****没有依赖什么都执行不了
- 第二步:写出HelloWorld实体类
- 第三步:在applicationContext.xml和App.xml中进行配置
- 第四步:启动容器
- 第五步:从容器中得到获取HelloWorld对象
- 第六步:控制台输入获取的对象查看是否有值
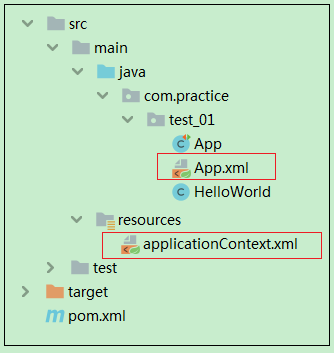
2、文件结构
3、代码详解
第一步:在maven生成的pom.xml中导入依赖


<?xml version="1.0" encoding="UTF-8"?>
<project xmlns="http://maven.apache.org/POM/4.0.0"
         xmlns:xsi="http://www.w3.org/2001/XMLSchema-instance"
         xsi:schemaLocation="http://maven.apache.org/POM/4.0.0 http://maven.apache.org/xsd/maven-4.0.0.xsd">
    <modelVersion>4.0.0</modelVersion>

    <groupId>com.test</groupId>
    <artifactId>spring01</artifactId>
    <version>1.0.0</version>

    <properties>
        <project.spring.version>5.0.0.RELEASE</project.spring.version>
    </properties>
    <dependencies>
        <dependency>
            <groupId>junit</groupId>
            <artifactId>junit</artifactId>
            <version>4.12</version>
        </dependency>
        <dependency>
            <groupId>org.springframework</groupId>
            <artifactId>spring-core</artifactId>
            <version>${project.spring.version}</version>
        </dependency>
        <dependency>
            <groupId>org.springframework</groupId>
            <artifactId>spring-beans</artifactId>
            <version>${project.spring.version}</version>
        </dependency>
    </dependencies>

    <build>
        <!--设置配置文件寻找路径-->
        <resources>
            <resource>
                <directory>src/main/resources</directory>
                <includes>
                    <include>**/*.xml</include>
                </includes>
            </resource>
            <resource>
                <directory>src/main/java</directory>
                <includes>
                    <include>**/*.xml</include>
                </includes>
            </resource>
        </resources>
    </build>
</project>
第二步:写实体类
public class HelloWorld {
    private String name;
    private int age;

    public String toString() {
        return "HelloWorld{" +
                "name='" + name + '\'' +
                ", age=" + age +
                '}';
    }
    public int getAge() {
        return age;
    }
    public void setAge(int age) {
        this.age = age;
    }
    public String getName() {
        return name;
    }
    public void setName(String name) {
        this.name = name;
    }
}
第三步:配置applicationContext.xml和App.xml
<?xml version="1.0" encoding="UTF-8"?>
<beans xmlns="http://www.springframework.org/schema/beans"
       xmlns:xsi="http://www.w3.org/2001/XMLSchema-instance"
       xsi:schemaLocation="http://www.springframework.org/schema/beans http://www.springframework.org/schema/beans/spring-beans.xsd">

    <import resource="classpath:com/practice/test_01/App.xml"/>
</beans>
<?xml version="1.0" encoding="UTF-8"?>
<beans xmlns="http://www.springframework.org/schema/beans"
       xmlns:xsi="http://www.w3.org/2001/XMLSchema-instance"
       xsi:schemaLocation="http://www.springframework.org/schema/beans http://www.springframework.org/schema/beans/spring-beans.xsd">

    <bean id="helloWorld" class="com.practice.test_01.HelloWorld">
        <property name="name" value="啊啊啊,黑猫警长"/>
        <property name="age" value="22"/>
    </bean>
</beans>
第四步:使用ClassPathResource读取配置文件,使用XmlBeanFactory创建容器beanFactory
第五步:使用getBean()获取被容器实例化的对象
第六步:使用打印语句看获取的对象是否有值
public class App {
    @Test
    public void testHello(){
        ClassPathResource classPathResource = new ClassPathResource("applicationContext.xml");
        BeanFactory factory = new XmlBeanFactory(classPathResource);
        HelloWorld helloWorld = (HelloWorld) factory.getBean("helloWorld");
        System.out.println(helloWorld);
}
4、知识点详解
1.什么是BeanFactory?
Spring最基本的接口,表示spring容器--生产bean的工厂,负责配置、创建和管理bean
注:bean是spring管理的单位
2.虽然BeanFactory是Spring的顶层接口,但实际开发中仍不建议使用,一般使用ApplicationContext容器。原因如下:
1,ApplicationContext继承了BeanFactory,拥有基本的IoC功能。
2,除此之外,ApplicationContext还提供了支持国际化、支持消息机制、支持统一的资源加载和AOP功能
3.ApplicationContext的常见实现类:ClassPathXmlApplicationContext读取classpath中的资源创建容器
然后就可以使用getBean()进行对象的获取
4.BeanFactory和ApplicationContext的区别:
BeanFactory需要到用到bean的时候才对bean进行实例化
ApplicationContext在加载容器时就会创建所有的bean
代码示例:
public class App {
    @Test
    public void testApplicationContext(){
        //在创建容器时就会实例化容器管理的对象
        ApplicationContext context = new ClassPathXmlApplicationContext("applicationContext.xml");
        System.out.println("=======================");
        Student student = context.getBean(Student.class);
        System.out.println(student);
    }
    @Test
    public void testBeanFactory(){
        //在从容器中获取对象时,容器才会实例化被获取的对象
        Resource resource = new ClassPathResource("applicationContext.xml");
        BeanFactory beanFactory = new XmlBeanFactory(resource);
        System.out.println("------------------------");
        Student student = (Student)beanFactory.getBean(Student.class);
        System.out.println(student);
    }
}
<?xml version="1.0" encoding="UTF-8"?>
<beans xmlns="http://www.springframework.org/schema/beans"
       xmlns:xsi="http://www.w3.org/2001/XMLSchema-instance"
       xsi:schemaLocation="http://www.springframework.org/schema/beans http://www.springframework.org/schema/beans/spring-beans.xsd">

    <import resource="classpath:com/practice/test_02/App.xml"/>

</beans>
<?xml version="1.0" encoding="UTF-8"?>
<beans xmlns="http://www.springframework.org/schema/beans"
       xmlns:xsi="http://www.w3.org/2001/XMLSchema-instance"
       xsi:schemaLocation="http://www.springframework.org/schema/beans http://www.springframework.org/schema/beans/spring-beans.xsd">
    <!--lazy-init是选择是否延迟加载,主要体现在applicationContext和beanFactory的区别上-->
    <bean id="student" class="com.practice.test_02.Student" lazy-init="false">
        <property name="name" value="qq"/>
    </bean>
</beans>
public class Student {
    public String name;
    public void setName(String name) {
        this.name = name;
    }
    public Student(){
        System.out.println("======构造方法执行了=========");
    }
}
5.spring管理bean的原理
通过Resource对象加载配置文件applicationContext.xml,解析配置文件,获取App.xml文件中的bean并管理,利用反射
将bean元素转化为对应的bean对象,调用对象的setter方法为对象属性赋值,并将创建好的对象与id一起存放,方便使用时获取。
6.BeanFactory获取bean的三种签名
<?xml version="1.0" encoding="UTF-8"?>
<beans xmlns="http://www.springframework.org/schema/beans"
       xmlns:xsi="http://www.w3.org/2001/XMLSchema-instance"
       xsi:schemaLocation="http://www.springframework.org/schema/beans http://www.springframeworppk.org/schema/beans/spring-beans.xsd">

    <bean id="helloWorld1" class="com.practice.test_01.HelloWorld">
        <property name="name" value="啊啊啊,黑猫警长"/>
        <property name="age" value="22"/>
    </bean>
    <bean id="helloWorld2" class="com.practice.test_01.HelloWorld">
        <property name="name" value="啊啊啊,黑猫警长"/>
        <property name="age" value="22"/>
    </bean>
</beans>
public class App {
    @Test
    public void testHello(){
        ClassPathResource classPathResource = new ClassPathResource("applicationContext.xml");
        BeanFactory factory = new XmlBeanFactory(classPathResource);
        //使用bean的名字拿bean
        //HelloWorld helloWorld = (HelloWorld) factory.getBean("helloWorld1");

        //使用类型拿bean,适合只有一个对象的类
        //HelloWorld helloWorld = factory.getBean(HelloWorld.class);

        //使用名字和类型一起
        HelloWorld helloWorld = (HelloWorld) factory.getBean("helloWorld1",HelloWorld.class);
        System.out.println(helloWorld);
    }
}
错误1:NoSuchBeanDefinitionException: No bean named 'helloWorld2' available
按照bean名称去获取bean时,不存在名称为helloWorld2的bean.

错误2:BeanDefinitionParsingException: Configuration problem: Bean name 'helloWorld' is already used in this <beans> element Offending resource: class path resource [applicationContext.xml]
在applicationContext.xml文件中,多个bean元素的名称是helloWorld.

错误3:NoUniqueBeanDefinitionException: No qualifying bean of type 'cn.wolfcode.day1._02_hello.HelloWorld' available: expected single matching bean but found 2: helloWorld,helloWorld2
按照HelloWorld'类型去获取bean时,期望找到该类型唯一的一个bean,可是此时找到了两个。
5、spring的基本bean的id/name:
在Spring配置中,id和name属性都可以定义bean元素的名称,不同的是:
 id属性,遵守XML语法ID约束。必须以字母开始,可以使用字母、数字、连字符、下划线、句话、冒号,不能以“/”开头。
 name属性,就可以使用很多特殊字符,比如在Spring和Struts1或Spring MVC的整合中,就得使用name属性来定义bean的名称。
<bean name="/login" class="xx.xx.LoginAction" />

注意:从Spring3.1开始,id属性不再是ID类型了,而是String类型,也就是说id属性也可以使用“/”开头了,
而bean元素的id的唯一性由容器负责检查。
<bean id="/login" class="xx.xx.LoginAction" />

当然也可以使用name属性为<bean/>元素起多个别名,多个别名之间使用逗号或空格隔开,
在代码中依然使用BeanFactory对象.getBean(...)方法获取。
<bean name="hello,hello1" class="xx.xx.HelloWorld"/>
或
<bean name="hello hello1" class="xx.xx.HelloWorld"/>
建议:bean起名尽量规范,不要搞一些非主流的名字,尽量使用id。

spring引入其他配置文件,为了避免applicationContext.xml文件过于臃肿,使用上面文件中使用的
<import resource="classpath:com/practice/test_01/App.xml"/>
引入其他的配置文件,使用import时注意file和classpath
1、默认情况下,从classpath的跟路径寻找。
2、classpath后面的文件从classpath路径开始找(推荐)
   java项目中,指向项目编译之后的classes文件夹;
   web项目中,指向WEB-INF文件夹中的classes文件夹
 file后面的文件使用文件系统的路径开始找
四、Spring中的测试
1、传统测试和Spring框架测试的区别
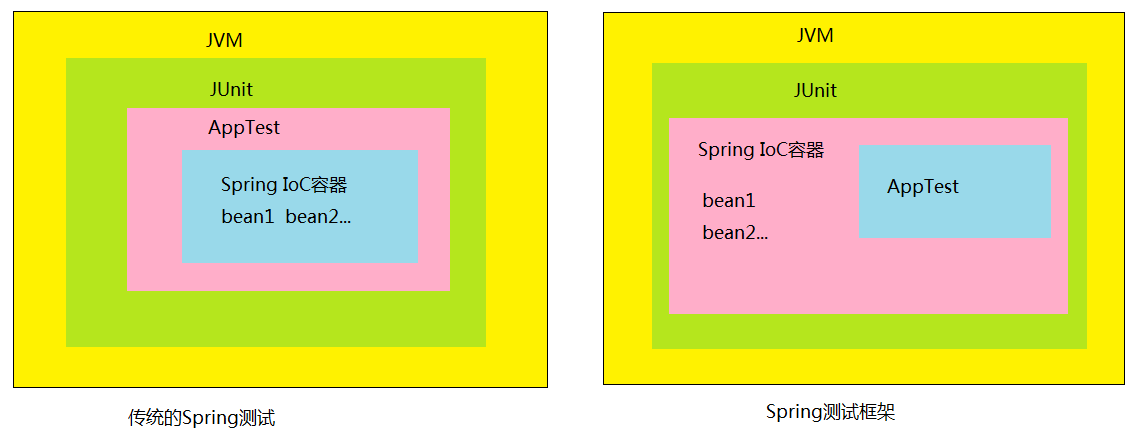
可以看出传统测试每次测试都需要重新启动容器,启动容器的开销大,而Spring框架的测试不需要重启容器。
2、步骤:
- 导入依赖spring-test、spring-expression、spring-context、spring-aop
- 在测试类上添加注解@RunWith(SpringJunit4ClassRunner.class) @ContextConfigration("classpath:applicationContext.xml")
如果不写@ContextConfigration后面括号里的内容时,会默认在同一目录下找(“类名-Context.xml”)配置文件
代码示例:
<?xml version="1.0" encoding="UTF-8"?>
<beans xmlns="http://www.springframework.org/schema/beans"
       xmlns:xsi="http://www.w3.org/2001/XMLSchema-instance"
       xsi:schemaLocation="http://www.springframework.org/schema/beans http://www.springframework.org/schema/beans/spring-beans.xsd">

    <import resource="classpath:com/practice/test_02/App.xml"/>
</beans>
public class Student {
    public String name;
    public void setName(String name) {
        this.name = name;
    }
    public Student(){
        System.out.println("======构造方法执行了=========");
    }
}
@RunWith(SpringJUnit4ClassRunner.class)
@ContextConfiguration("App.xml")
//不写名字默认为App-context.xml
public class App {
    @Autowired
    private Student student;
    @Autowired
    private BeanFactory beanFactory;
    @Test
    public void testStudent(){
        //通过两次打印对象的hashCode,可以看出是同一个对象
        System.out.println(student.hashCode());
        Student bean = beanFactory.getBean(Student.class);
        System.out.println(bean.hashCode());
    }
}
<?xml version="1.0" encoding="UTF-8"?>
<beans xmlns="http://www.springframework.org/schema/beans"
       xmlns:xsi="http://www.w3.org/2001/XMLSchema-instance"
       xsi:schemaLocation="http://www.springframework.org/schema/beans http://www.springframework.org/schema/beans/spring-beans.xsd">
    <bean id="student" class="com.practice.test_02.Student" lazy-init="false">
        <property name="name" value="qq"/>
    </bean>
</beans>

 浙公网安备 33010602011771号