【Python】天气预报(发送网易邮件,微信公众测试号,企业微信),周末用时一天,两万字代码,纯肝货(完整项目)一一CSDN21天学习挑战赛

目录
本系列文章为参与【Python】CSDN21天学习挑战赛,成为更好的自己,根据自身的学习进度并记录自己的学习过程。我也是Python纯小白,和大家一起学习,保持热爱学习的好习惯😁
活动地址:CSDN21天学习挑战赛
前言
不清楚怎么发送消息的,可以参考以下三篇文章:
关于定时任务的文章:
一、新建项目WeatherForecast
1.项目结构

2.新建config.ini配置文件
其中留空的需要填写自己的信息
####################################################### # 项目应用配置 # web_url:网页地址(用于获取七天天气) # api_url:接口地址(用于获取当前天气) ####################################################### [App] web_url = https://weather.cma.cn/web/weather/53463.html api_url = https://weather.cma.cn/api/now/53463 ####################################################### # 发送消息平台配置 # wechat_official_account:微信公众号平台 # enterprise_wechat:企业微信 ####################################################### [Platform] wechat_official_account = WeChatOfficialAccount enterprise_wechat = EnterpriseWeChat ####################################################### # 网易邮箱配置 # host:服务器地址 # port:端口 # password:授权码(不是邮箱密码) # from_addr:登录用户(邮件发送者) # subtype_plain:文本格式(plain) # subtype_html:HTML格式(html) # attachment:附件 # embedded:内嵌 # subtype:邮件格式:plain:文本;html:超文本标记语言(默认plain) # charset:编码(默认utf-8) ####################################################### host = smtp.163.com port = 25 password = from_addr = subtype_plain = plain subtype_html = html attachment = attachment embedded = embedded subtype = plain charset = utf-8 ####################################################### # 微信公众测试号配置 # app_id:微信公众测试号账号 # app_secret:微信公众测试号密钥 # touser:消息接收者 # template_id:消息模板id # click_url:点击消息跳转链接(可无) ####################################################### [WeChatOfficialAccount] app_id = app_secret = touser = template_id = click_url = https://blog.csdn.net/sxdgy_?spm=1011.2415.3001.5349 ####################################################### # 企业微信配置 # corp_id:企业ID # corp_secret:企业密钥 # agent_id:应用ID ####################################################### [EnterpriseWeChat] corp_id = corp_secret = agent_id =
3.新建config.xml配置文件
配置任务只是配置了执行任务的时间策略
<?xml version="1.0" encoding="utf-8"?> <Root> <Node> <Name>微信公众号消息</Name> <Description>2022年9月7号执行</Description> <Triggers>data</Triggers> <Year>2022</Year> <Month>9</Month> <Day>7</Day> </Node> <Node> <Name>网易邮件消息</Name> <Description>每60秒执行一次</Description> <Triggers>interval</Triggers> <Second>60</Second> </Node> <Node> <Name>企业微信消息</Name> <Description>11分钟7秒时执行</Description> <Triggers>cron</Triggers> <Minute>11</Minute> <Second>7</Second> </Node> </Root>
4.新建config_helper.py文件
#!/usr/bin/python # -*- coding: utf-8 -*- """ @Time :2022/8/21 7:35 @Auth :小呆瓜 @File :config_helper.py @IDE :PyCharm @Description:配置文件辅助 """ # 导入ini配置文件操作模块 import configparser # 导入xml操作模块 import xml.etree.ElementTree as ET class XmlConfigHelper(object): def __init__(self): # xml配置路径;注:如果同一目录,可以这样填写,不同目录就用相对路劲或者绝对路径 self.tree = ET.parse('config.xml') def get_root(self): """ 获取xml根节点 :return: xml根节点 """ return self.tree.getroot() def get_int(self, data) -> int: """ 获取int整数 :param data: 转换数 :return: 如果字符串或者None或者其他不能转int的,则返回0 """ try: if data is None: return 0 return int(data) except ValueError: return 0 class IniConfigHelper(object): def __init__(self) -> None: # 实例ini配置解析 self.config = configparser.ConfigParser() # ini配置路径;注:如果同一目录,可以这样填写,不同目录就用相对路劲或者绝对路径 self.config.read("config.ini", encoding="utf-8") def get_config(self, section: str, option: str = None): """ 获取config.ini配置 :param section: 节点 :param option: 项(key) :return: key对应的值 """ section_dic = dict(self.config.items(section)) if option is not None: return section_dic[option] else: return section_dic def get_app_config(self, option: str = None): """ 项目应用配置 :param option: key :return: key对应的值 """ return self.get_config('App', option) def get_platform_config(self, option: str = None): """ 获取发送消息平台配置 :param option: key :return: key对应的值 """ return self.get_config('Platform', option) def get_email163_config(self, option: str = None): """ 获取网易邮箱配置 :param option: key :return: key对应的值 """ return self.get_config('Email163', option) def get_wechat_official_account_config(self, option: str = None): """ 获取微信公众测试号配置 :param option: key :return: key对应的值 """ return self.get_config('WeChatOfficialAccount', option) def get_enterprise_wechat_config(self, option: str = None): """ 获取企业微信配置 :param option: key :return: key对应的值 """ return self.get_config('EnterpriseWeChat', option)
5.新建app_const.py文件
该文件是应用程序所有常量字段(从配置获取)
#!/usr/bin/python # -*- coding: utf-8 -*- """ @Time :2022/8/21 7:42 @Auth :小呆瓜 @File :app_const.py @IDE :PyCharm @Description:应用程序常量(配置获取) """ # 导入ini配置文件辅助模块 from config_helper import IniConfigHelper class AppConst(object): # 实例配置辅助 ini_config = IniConfigHelper() ####################################################### # 项目应用配置 ####################################################### # 网页地址(用于获取七天天气) WEB_URL = ini_config.get_app_config('web_url') # 接口地址(用于获取当前天气) API_URL = ini_config.get_app_config('api_url') ####################################################### # 发送消息平台配置 ####################################################### # 微信公众号平台 WECHAT_OFFICIAL_ACCOUNT = ini_config.get_platform_config('wechat_official_account') # 企业微信平台 ENTERPRISE_WECHAT = ini_config.get_platform_config('enterprise_wechat') ####################################################### # 网易邮箱配置 ####################################################### # 服务器地址 HOST = ini_config.get_email163_config('host') # 端口 PORT = ini_config.get_email163_config('port') # 授权码(不是邮箱密码) PASSWORD = ini_config.get_email163_config('password') # 登录用户(邮件发送者) FROM_ADDR = ini_config.get_email163_config('from_addr') # 文本格式 SUBTYPE_PLAIN = ini_config.get_email163_config('subtype_plain') # HTML格式 SUBTYPE_HTML = ini_config.get_email163_config('subtype_html') # 附件 ATTACHMENT = ini_config.get_email163_config('attachment') # 内嵌 EMBEDDED = ini_config.get_email163_config('embedded') # 邮件格式 SUBTYPE = ini_config.get_email163_config('subtype') # 编码 CHARSET = ini_config.get_email163_config('charset') ####################################################### # 微信公众测试号配置 ####################################################### # 微信公众测试号账号 APP_ID = ini_config.get_wechat_official_account_config('app_id') # 微信公众测试号密钥 APP_SECRET = ini_config.get_wechat_official_account_config('app_secret') # 消息接收者 TOUSER = ini_config.get_wechat_official_account_config('touser') # 消息模板id TEMPLATE_ID = ini_config.get_wechat_official_account_config('template_id') # 点击消息跳转链接,可无 CLICK_URL = ini_config.get_wechat_official_account_config('click_url') ####################################################### # 企业微信配置 ####################################################### # 企业ID CORP_ID = ini_config.get_enterprise_wechat_config('corp_id') # 企业密钥 CORP_SECRET = ini_config.get_enterprise_wechat_config('corp_secret') # 应用ID(企业微信) AGENT_ID = ini_config.get_enterprise_wechat_config('agent_id')
6.新建cma.py文件
#!/usr/bin/python # -*- coding: utf-8 -*- """ @Time :2022/8/21 7:35 @Auth :小呆瓜 @File :cma.py @IDE :PyCharm @Description:获取天气 """ # 导入正则匹配模块 import re # 导入网络请求模块 import requests # 导入应用程序常量 from app_const import AppConst class CmaWeather(object): def __init__(self, web_url=AppConst.WEB_URL, api_url=AppConst.API_URL): """ 构造函数 :param web_url: 网页地址 :param api_url: 接口地址 """ self.web_url = web_url self.api_url = api_url return def get_html(self, url, headers=None): """ 获取网页html :param url: 网页地址 :param headers: 请求头 :return: 网页内容 """ # 请求地址 resp = requests.get(url, headers=headers) # 设置响应结果编码为utf-8 resp.encoding = "utf-8" # 返回结果的文本 return resp.text def get_api_result(self, headers=None): """ 获取接口响应数据 :param api_url: 接口地址 :param headers: 请求头 :return: 接口响应json数据 """ resp = requests.get(self.api_url, headers=headers) json_data = resp.json() data = json_data["data"] return data def get_re_compile(self) -> str: """ 获取匹配规则 :return: 匹配规则 """ re_compile = re.compile(r'.*?<div class="day-item">(?P<day>.*?)</div>' r'.*?<div class="day-item">(?P<wea>.*?)</div>' r'.*?<div class="day-item">(?P<win>.*?)</div>' r'.*?<div class="day-item">(?P<wins>.*?)</div>' r'.*?<div class="high">(?P<high>.*?)</div>' r'.*?<div class="low">(?P<low>.*?)</div>' r'.*?<div class="day-item">(?P<night_wea>.*?)</div>' r'.*?<div class="day-item">(?P<night_win>.*?)</div>' r'.*?<div class="day-item">(?P<night_wins>.*?)</div>', re.S) return re_compile def get_html_info(self, re_compile, html): """ 根据re的匹配规则,从html中匹配内容,并返回字典 :param re_compile: 匹配规则 :param html:html内容 :return:字典 """ result = re_compile.finditer(html) dic = [] # 循环匹配的结果 for item in result: # 每个匹配到的信息转成字典 item_dic = item.groupdict() for dic_key in item_dic: # 移除空格换行 item_dic[dic_key] = item_dic[dic_key].replace("<br>", "").replace("\n", "").replace("\t", "").replace( " ", "").replace(" ", "").strip() dic.append(item_dic) return dic def get_current_weather_content(self, data_type: str) -> str: """ 获取并构造当前天气信息 :param data_type: 消息类型:text,markdown,html :return: 当前天气信息 """ json_data = self.get_api_result() if data_type == 'json': return json_data location = json_data["location"] now = json_data["now"] # 城市 city = location["path"] # 降水量 precipitation = now["precipitation"] # 温度 temperature = now["temperature"] # 气压 pressure = now["pressure"] # 湿度 humidity = now["humidity"] # 风向 wind_direction = now["windDirection"] # 风向程度 wind_direction_degree = now["windDirectionDegree"] # 风速 wind_peed = now["windSpeed"] # 风力等级 wind_scale = now["windScale"] # 构造消息 if data_type == 'text': # 两种写法都可以 # return f"城市:{city}" \ # f"\n降水量:{precipitation}" \ # f"\n温度:{temperature}" \ # f"\n气压:{pressure}" \ # f"\n湿度:{humidity}" \ # f"\n风向:{wind_direction}" \ # f"\n风向程度:{wind_direction_degree}" \ # f"\n风速:{wind_peed}" \ # f"\n风力等级:{wind_scale}" return f"""城市:{city} 降水量:{precipitation} 温度:{temperature} 气压:{pressure} 湿度:{humidity} 风向:{wind_direction} 风向程度:{wind_direction_degree} 风速:{wind_peed} 风力等级:{wind_scale} """ elif data_type == 'markdown': # 两种写法都可以 # return f"> 城市:**`{city}`**" \ # f"\n> 降水量:<font color='warning'>{precipitation}</font>" \ # f"\n> 温度:<font color='info'>{temperature}</font>" \ # f"\n> 气压:{pressure}" \ # f"\n> 湿度:{humidity}" \ # f"\n> 风向:{wind_direction}" \ # f"\n> 风向程度:{wind_direction_degree}" \ # f"\n> 风速:{wind_peed}" \ # f"\n> 风力等级:{wind_scale}" return f"""> 城市:**`{city}`** > 降水量:<font color='warning'>{precipitation}</font> > 温度:<font color='info'>{temperature}</font> > 气压:{pressure} > 湿度:{humidity} > 风向:{wind_direction} > 风向程度:{wind_direction_degree} > 风速:{wind_peed} > 风力等级:{wind_scale} """ elif data_type == 'html': return f"""<label>城市:<font style="color:#E93C3C;background: #EFEFEF;">{city}</font></label> <label>降水量:<font color="orange">{precipitation}</font></label> <label>温度:<font color="green">{temperature}</font></label> <label>气压:{pressure}</label> <label>湿度:{humidity}</label> <label>风向:{wind_direction}</label> <label>风向程度:{wind_direction_degree}</label> <label>风速:{wind_peed}</label> <label>风力等级:{wind_scale}</label> """ else: return print('消息类型错误') def main(self) -> None: """ 主函数 :return: None """ print('*****************************************************') # 获取网页内容 html = self.get_html(self.web_url) # 获取匹配规则 re_compile = self.get_re_compile() # 获取天气信息 html_info = self.get_html_info(re_compile, html) # 近七天天气信息 for item in html_info: weather = item['day'], item['wea'], item['win'], item['wins'], item['high'], item['low'], \ item['night_wea'], item['night_win'], item['night_wins'] print(weather) print('*****************************************************') if __name__ == '__main__': cma = CmaWeather() cma.main()
7.新建email_163.py文件
#!/usr/bin/python # -*- coding: utf-8 -*- """ @Time :2022/8/21 7:35 @Auth :小呆瓜 @File :email_163.py @IDE :PyCharm @Description:发送邮件 """ # 导入发送邮件模块 import smtplib # 导入邮件主题构造模块 from email.header import Header # 导入邮件文字构造模块 from email.mime.text import MIMEText # 导入邮件混合构造模块 from email.mime.multipart import MIMEMultipart # 导入邮件图片处理模块 from email.mime.image import MIMEImage # 导入应用程序常量 from app_const import AppConst # 发送网易邮件类 class Email163(object): def __init__(self, host=AppConst.HOST, port=AppConst.PORT, password=AppConst.PASSWORD, from_addr=AppConst.FROM_ADDR, subtype_plain=AppConst.SUBTYPE_PLAIN, subtype_html=AppConst.SUBTYPE_HTML, attachment=AppConst.ATTACHMENT, embedded=AppConst.EMBEDDED, subtype=AppConst.SUBTYPE, charset=AppConst.CHARSET) -> None: """ 构造函数 :param host: 服务器地址 :param port: 端口 :param password: 授权码(不是邮箱密码) :param from_addr: 登录用户(邮件发送者) :param subtype_plain: 文本格式 :param subtype_html: HTML格式 :param attachment: 附件 :param embedded: 内嵌 :param subtype: 邮件格式:plain:文本,html:超文本标记语言,n(默认plain) :param charset: 编码,默认utf-8 """ self.host = host self.port = port self.password = password self.from_addr = from_addr self.subtype_plain = subtype_plain self.subtype_html = subtype_html self.attachment = attachment self.embedded = embedded self.subtype = subtype self.charset = charset def get_smtp(self) -> smtplib.SMTP: """ 实例SMTP并验证 :return: smtplib.SMTP """ try: # 实例SMTP smtp = smtplib.SMTP() # 连接邮箱服务器 smtp.connect(self.host, self.port) # 验证授权码 smtp.login(self.from_addr, self.password) return smtp except smtplib.SMTPException: raise f'验证邮箱失败:用户:{self.from_addr},授权码:{self.password}' def get_message(self, subject: str, text: str, subtype: str = None): """ 获取邮件信息 :param subject: 主题 :param text: 内容 :param charset: 编码 :return: 消息对象 """ # 构造邮件内容 # 第一个参数_text:内容 # 第二个参数_subtype:格式 # 第三个参数_charset:编码 if subtype == "attachment": # 实例混合邮件(附件) message = MIMEMultipart() elif subtype == "embedded": # 实例内嵌的邮件(文本,HTML,图片) message = MIMEMultipart('related') else: # 实例文字邮件 message = MIMEText(text, self.subtype, self.charset) # 构造邮件主题信息 # 主题 message['Subject'] = Header(subject, self.charset) # 发送者 message['From'] = Header(self.from_addr, self.charset) # 接收者,接收者为多人[]时,需要用,拼接为字符串 # message['To'] = Header(','.join(to_addrs), self.charset) # 返回消息实例 return message def attach_attachment(self, message, text: str, subtype: str, attachment_list: list[dict[str, str]]) -> None: """ 附加上传附件(可多文件) :param message: 邮件消息 :param subtype: 邮件类型 :param attachment_list: 附件列表:格式[{"path":"附件路径1","name":"显示名称"},{"path":"附件路径2","name":"显示名称"}] :return: None """ # 附加正文 if subtype in (self.attachment, self.embedded): message.attach(MIMEText(text, self.subtype, self.charset)) if subtype == self.attachment: # 附件 for item in attachment_list: with open(item["path"], 'rb') as f: file_data = f.read() # 上传文件 attachment = MIMEText(file_data, 'base64', 'utf-8') # 指定消息内容为字节流 attachment["Content-Type"] = 'application/octet-stream' # 消息描述,这里的filename可以随便填写,这里填写的就会在邮件中附件名称显示 attachment["Content-Disposition"] = f'attachment; filename="{item["name"]}"' # 附加文件 message.attach(attachment) elif subtype == self.embedded: # 内嵌 for item in attachment_list: with open(item["path"], 'rb') as f: img_data = f.read() # 创建图片 img = MIMEImage(img_data) # 定义图片ID,在HTML文本中引用 img.add_header('Content-ID', item["name"]) # 附加图片 message.attach(img) def send_email(self, subject: str, text: str, to_addrs: list[str], attachment_list: list[dict[str, str]] = None) -> None: """ 发送网易邮件 :param subject: 主题 :param text: 内容 :param to_addrs: 接收者 :param attachment_list: 附件(默认空,格式[{"path":"文件路径","name":"显示文件名"}]) :return: None """ try: # 获取SMTP实例 smtp = self.get_smtp() # 获取邮件消息 message = self.get_message(subject, text, self.subtype) # 处理附件和内嵌 self.attach_attachment(message, text, self.subtype, attachment_list) # 发送邮件 smtp.sendmail(self.from_addr, ','.join(to_addrs), message.as_string()) # 发送完邮件,关闭服务 smtp.close() print(f'邮件成功发送给:{to_addrs}') except smtplib.SMTPException: raise f'给{to_addrs}发送邮件失败'
8.新建access_token.py文件
因为企业微信和微信公众号获取access_token方式类似,我把它们写在一个文件中,根据实例时的构造函数作为区分
#!/usr/bin/python # -*- coding: utf-8 -*- """ @Time :2022/8/21 7:35 @Auth :小呆瓜 @File :access_token.py @IDE :PyCharm @Description:获取access_token """ # 导入网络请求模块 import requests # 导入应用程序常量 from app_const import AppConst class AccessToken(object): def __init__(self, platform, app_id=AppConst.APP_ID, app_secret=AppConst.APP_SECRET, corp_id=AppConst.CORP_ID, corp_secret=AppConst.CORP_SECRET) -> None: """ 构造函数 :param platform: 平台 :param app_id: 微信公众测试号账号 :param app_secret: 微信公众测试号密钥 :param corp_id: 企业ID :param corp_secret: 企业密钥 """ self.platform = platform self.app_id = app_id self.app_secret = app_secret self.corp_id = corp_id self.corp_secret = corp_secret def get_access_token(self) -> str: """ 获取access_token凭证 :return: access_token """ if self.platform == AppConst.WECHAT_OFFICIAL_ACCOUNT: url = f"https://api.weixin.qq.com/cgi-bin/token?grant_type=client_credential&appid={self.app_id}&secret={self.app_secret}" elif self.platform == AppConst.ENTERPRISE_WECHAT: url = f"https://qyapi.weixin.qq.com/cgi-bin/gettoken?corpid={self.corp_id}&corpsecret={self.corp_secret}" else: return print('暂不支持该平台对接') resp = requests.get(url) result = resp.json() if 'access_token' in result: return result["access_token"] else: print(result)
9.新建send_message.py文件
和access_token.py文件一样,我将两者的发送消息写在同个文件
#!/usr/bin/python # -*- coding: utf-8 -*- """ @Time :2022/8/21 7:35 @Auth :小呆瓜 @File :send_message.py @IDE :PyCharm @Description:发送消息 """ # 导入json处理模块 import json # 导入网络请求模块 import requests # 导入获取access_token模块 from access_token import AccessToken # 导入应用程序常量 from app_const import AppConst class SendMessage(object): # # 实例配置辅助 # ini_config = IniConfigHelper() # # 微信公众号平台 # WECHAT_OFFICIAL_ACCOUNT = ini_config.get_platform_config('wechat_official_account') # # 企业微信平台 # ENTERPRISE_WECHAT = ini_config.get_platform_config('enterprise_wechat') # # 消息接收者 # TOUSER = ini_config.get_wechat_official_account_config('touser') # # 消息模板id # TEMPLATE_ID = ini_config.get_wechat_official_account_config('template_id') # # 点击消息跳转链接,可无 # CLICK_URL = ini_config.get_wechat_official_account_config('click_url') # # # 应用ID(企业微信) # AGENT_ID = ini_config.get_enterprise_wechat_config('agent_id') def __init__(self, platform, touser=AppConst.TOUSER, template_id=AppConst.TEMPLATE_ID, click_url=AppConst.CLICK_URL, agent_id=AppConst.AGENT_ID) -> None: """ 构造函数 :param platform: 平台,可用WeatherForecast.main.Main中类常量WECHATOFFICIALACCOUNT,ENTERPRISEWECHAT :param touser: 接收者 :param template_id: 模板id :param click_url: 点击跳转链接 :param agent_id: 应用ID """ self.platform = platform self.touser = touser self.template_id = template_id self.click_url = click_url self.agent_id = agent_id if self.platform == AppConst.WECHAT_OFFICIAL_ACCOUNT: self.access_token = AccessToken(AppConst.WECHAT_OFFICIAL_ACCOUNT).get_access_token() elif self.platform == AppConst.ENTERPRISE_WECHAT: self.access_token = AccessToken(AppConst.ENTERPRISE_WECHAT).get_access_token() def get_send_data(self, data, msgtype) -> object: """ 获取发送消息data :param data: 消息内容 :param msgtype: 消息类型: 微信公众号:使用模板消息,不需要指定类型 企业微信:文本消息(text),文本卡片消息(textcard),图文消息(news),markdown消息(markdown) :return: """ if self.platform == AppConst.WECHAT_OFFICIAL_ACCOUNT: # 微信公众测试号这里是使用模板消息发送 location = data["location"] now = data["now"] return { "touser": self.touser, "template_id": self.template_id, "url": self.click_url, "topcolor": "#FF0000", # json数据对应模板 "data": { "city": { "value": location["path"], # 字体颜色 "color": "#173177" }, "precipitation": { "value": str(now["precipitation"]), "color": "#FEAD39" }, "temperature": { "value": str(now["temperature"]), "color": "#20995F" }, "pressure": { "value": str(now["pressure"]), }, "humidity": { "value": str(now["humidity"]), }, "wind_direction": { "value": str(now["windDirection"]), }, "wind_direction_degree": { "value": str(now["windDirectionDegree"]), }, "wind_speed": { "value": str(now["windSpeed"]), }, "wind_scale": { "value": str(now["windScale"]), }, } } elif self.platform == AppConst.ENTERPRISE_WECHAT: # touser:@all向该企业应用的全部成员发送;指定接收消息的成员,成员ID列表(多个接收者用‘|’分隔,最多支持1000个) if msgtype in ('text', 'markdown'): return { "touser": "@all", "msgtype": msgtype, "agentid": self.agent_id, # 这里这样写是因为,消息类型是什么,内容的key就是什么 f"{msgtype}": { "content": data } } elif msgtype == 'textcard': return { "touser": "@all", "msgtype": msgtype, "agentid": self.agent_id, f"{msgtype}": data } elif msgtype == 'news': return { "touser": "@all", "msgtype": msgtype, "agentid": self.agent_id, f"{msgtype}": { "articles": data } } else: return print('消息类型错误') def send_message(self, data, msgtype=None) -> None: """ 发送消息 :param data: 消息数据 :param msgtype: 消息类型 微信公众号:使用模板消息,不需要指定类型 企业微信:文本消息(text),文本卡片消息(textcard),图文消息(news),markdown消息(markdown) :return: None """ # 模板消息请求地址 if self.platform == AppConst.WECHAT_OFFICIAL_ACCOUNT: url = f"https://api.weixin.qq.com/cgi-bin/message/template/send?access_token={self.access_token}" post_data = json.dumps(self.get_send_data(data, msgtype)) elif self.platform == AppConst.ENTERPRISE_WECHAT: url = f"https://qyapi.weixin.qq.com/cgi-bin/message/send?access_token={self.access_token}" post_data = json.dumps(self.get_send_data(data, msgtype)) resp = requests.post(url, data=post_data) result = resp.json() if result["errcode"] == 0: print(f"{self.platform} {msgtype} 消息发送成功") else: print(result)
10.新建main.py文件
#!/usr/bin/python # -*- coding: utf-8 -*- """ @Time :2022/8/21 7:35 @Auth :小呆瓜 @File :main.py @IDE :PyCharm @Description:天气预报主文件 """ # 导入前台调度模块 from apscheduler.schedulers.blocking import BlockingScheduler # 导入发送消息模块 from send_message import SendMessage # 导入发送邮件模块 from email_163 import Email163 # 导入获取天气模块 from cma import CmaWeather # 导入xml配置文件辅助模块 from config_helper import XmlConfigHelper # 导入应用程序常量 from app_const import AppConst class Main(object): def __init__(self): self.xml_config = XmlConfigHelper() def get_current_weather_content(self, data_type: str) -> str: """ 接口获取当前天气信息 :return: 当前天气信息 """ return cma.get_current_weather_content(data_type) def send_email_163(self) -> None: """ 发送网易邮件消息 :return: """ print('发送网易邮件消息') # 实例发送网易邮件 email163 = Email163() # 主题 subject = '天气预报' # 接收者(用list[str]) to_addrs = ['980338974@qq.com'] # 邮件内容 text = self.get_current_weather_content('html') email163.send_email(subject, text, to_addrs) def send_wechat_official_account(self) -> None: """ 发送微信公众号消息 :return: None """ print('发送微信公众号消息') # 实例SendMessage sm = SendMessage(AppConst.WECHAT_OFFICIAL_ACCOUNT) data = self.get_current_weather_content('json') sm.send_message(data) def send_enterprise_wechat(self) -> None: """ 发送企业微信消息 :return: None """ print('发送企业微信消息') # 实例SendMessage sm = SendMessage(AppConst.ENTERPRISE_WECHAT) # 企业微信需要加上消息类型 data = self.get_current_weather_content('markdown') # 企业微信需要加上消息类型 sm.send_message(data, 'markdown') def main(self) -> None: app_name = '天气预报' print('*****************************************************') print(f" {app_name} \n") # 实例一个前台调度 scheduler = BlockingScheduler(timezone='MST') # 读取配置 root = self.xml_config.get_root() for node in root.findall('Node'): name = node.findtext('Name') description = node.findtext('Description') triggers = node.findtext('Triggers') year = self.xml_config.get_int(node.findtext('Year')) month = self.xml_config.get_int(node.findtext('Month')) day = self.xml_config.get_int(node.findtext('Day')) hour = self.xml_config.get_int(node.findtext('Hour')) minute = self.xml_config.get_int(node.findtext('Minute')) second = self.xml_config.get_int(node.findtext('Second')) print(name, description, triggers, year, month, day, hour, minute, second) if triggers == 'data': scheduler.add_job(self.send_enterprise_wechat, 'date', run_date=f'{year}-{month}-{day}') elif triggers == 'interval': scheduler.add_job(self.send_email_163, 'interval', seconds=second) elif triggers == 'cron': scheduler.add_job(self.send_wechat_official_account, 'cron', minute=minute, second=second) else: print(f'{name}任务触发器类型错误:{triggers},请指定Triggers:data/interval/cron') # 输出所有任务信息 # scheduler.print_jobs() # 开始执行调度 scheduler.start() print('\n*****************************************************') if __name__ == '__main__': # 实例获取天气 cma = CmaWeather() main = Main() main.main()
二、运行main.py
等待任务执行

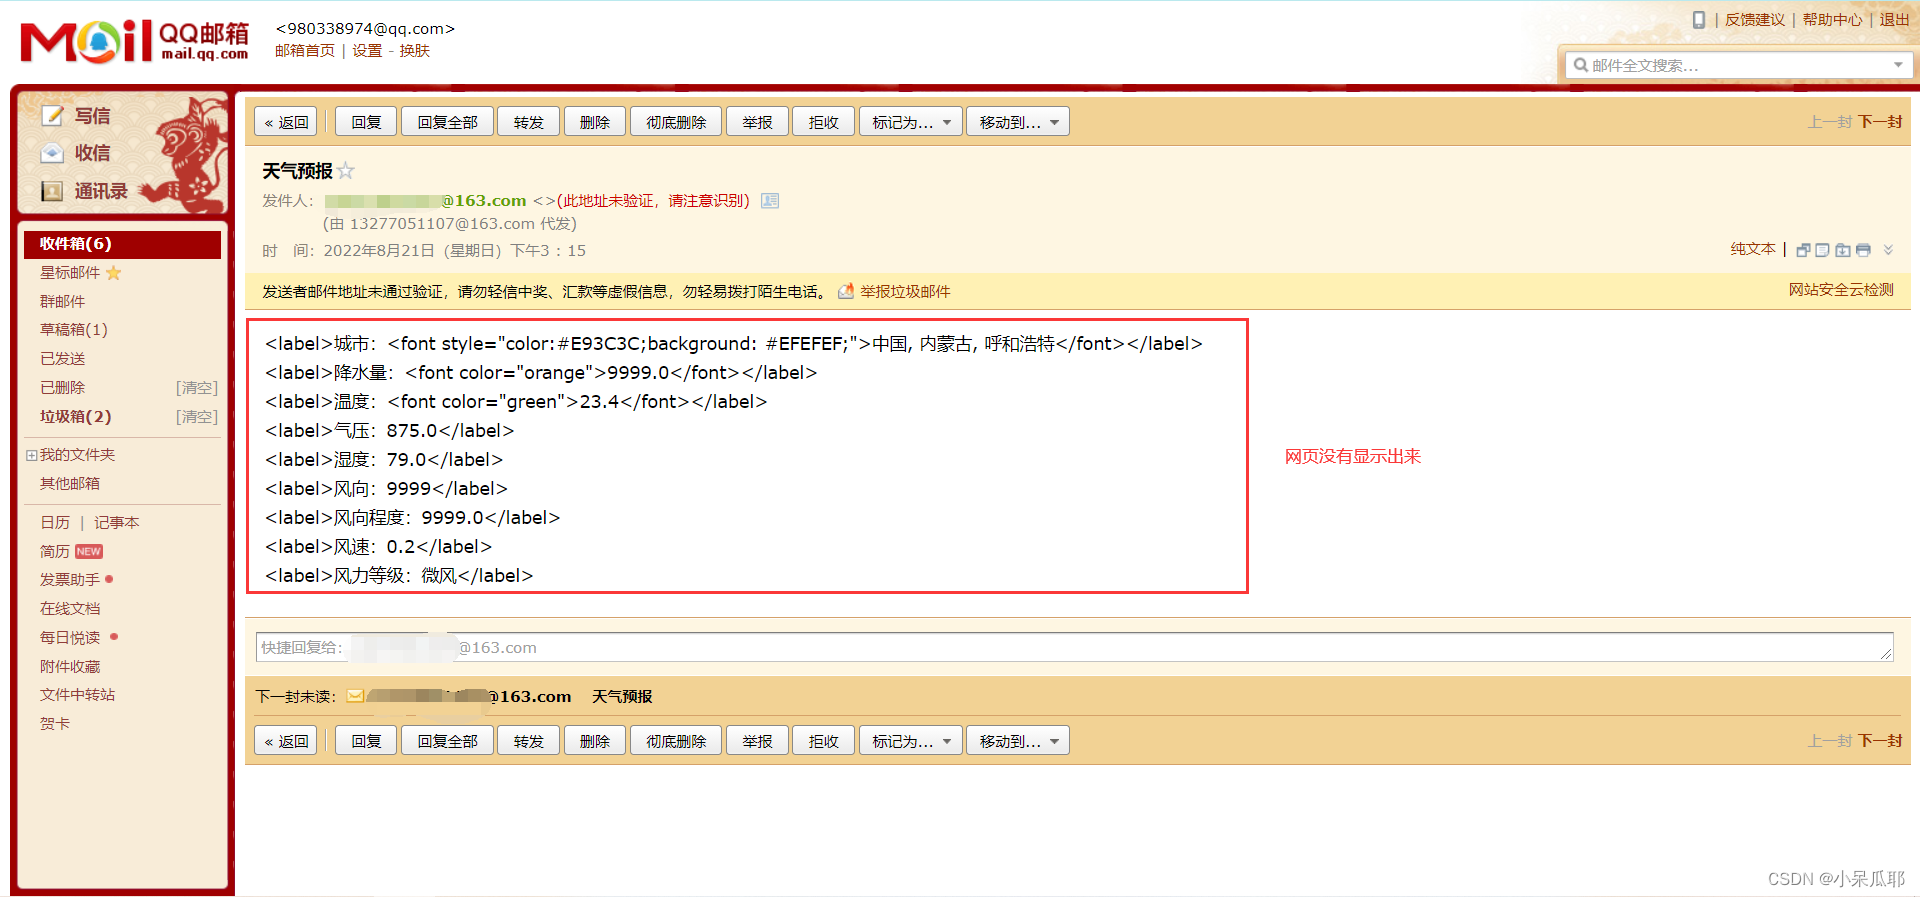
接收邮件消息,不知道什么原因,用网页打开看没有渲染html

用手机打开正常显示,很奇怪

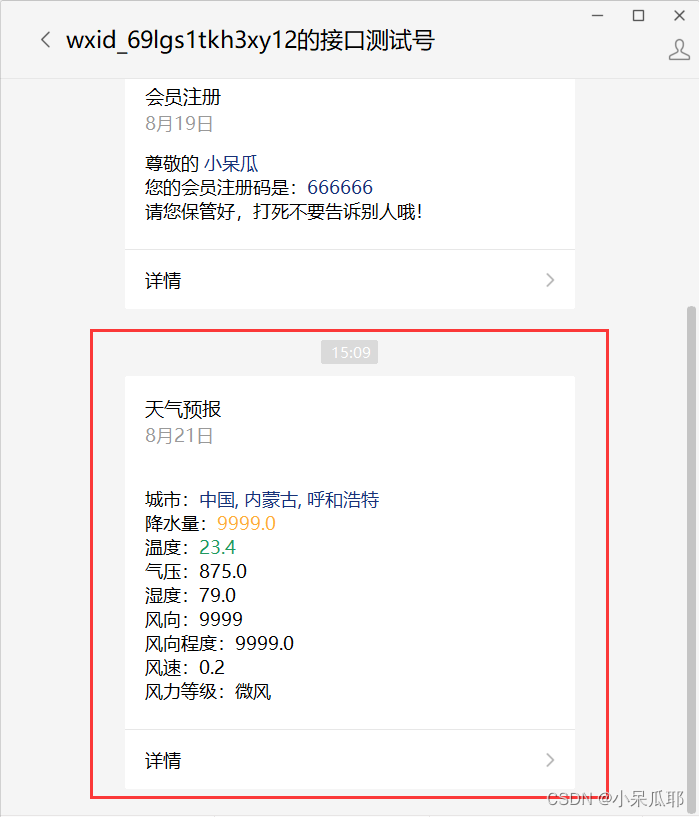
接收微信公众号消息

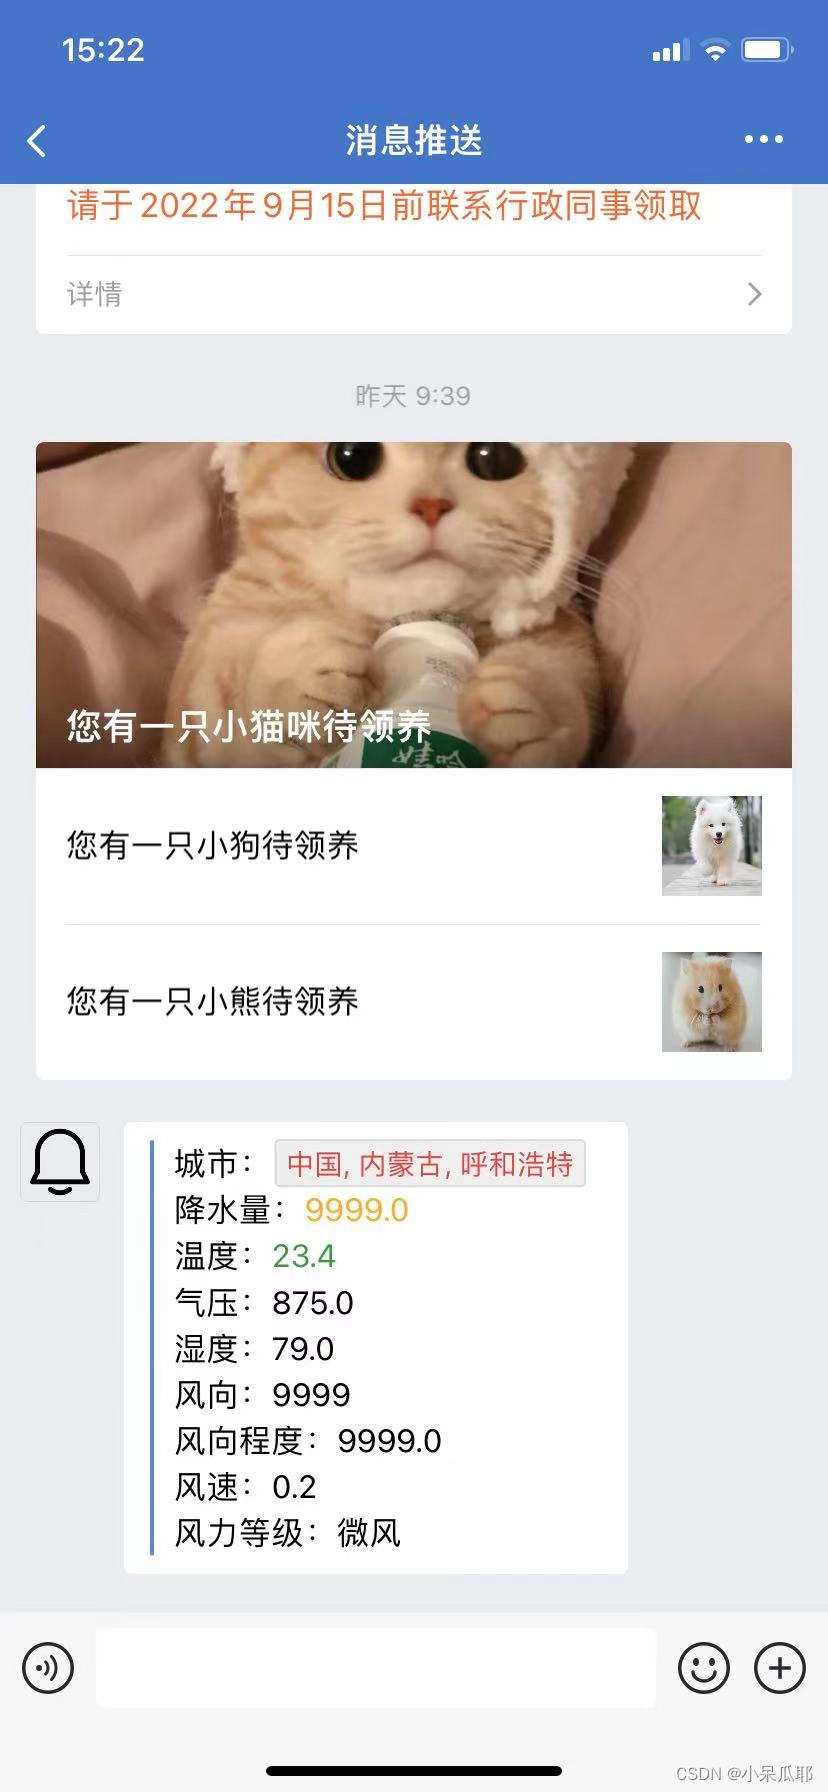
企业微信,也是手机看正常

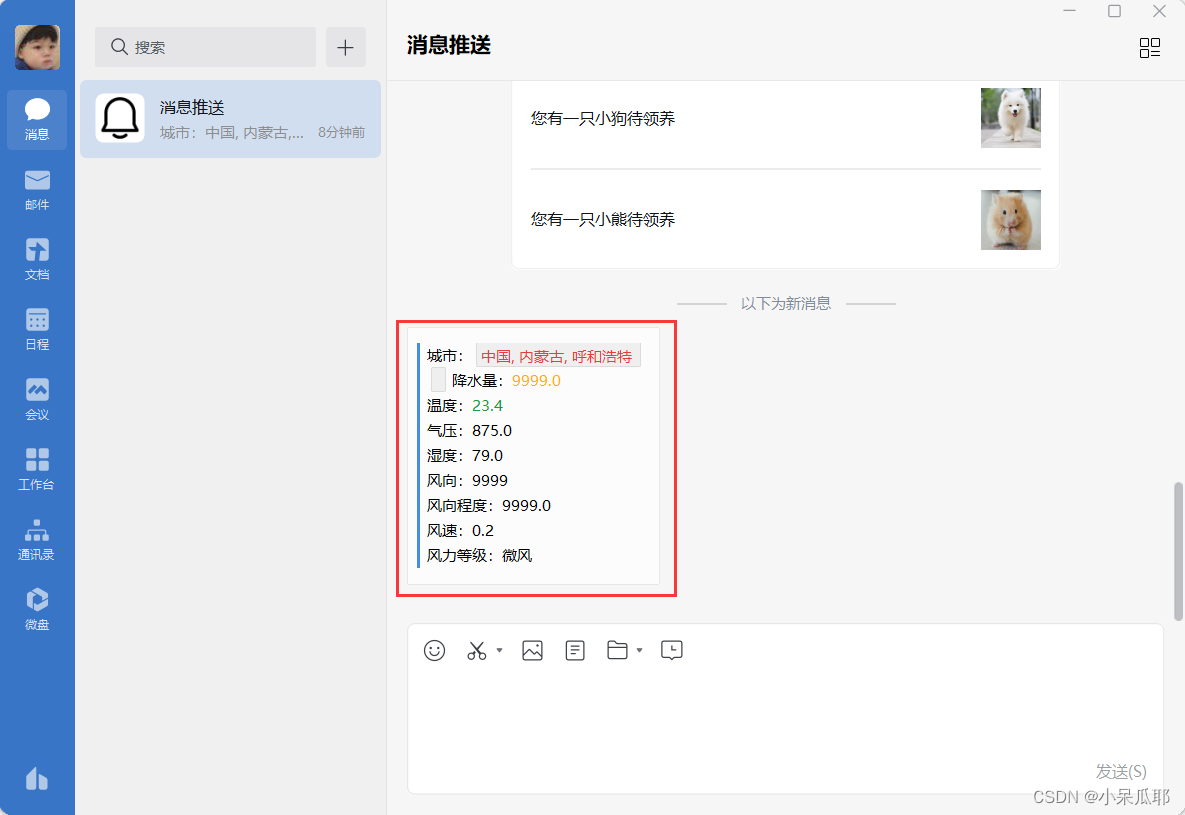
电脑客户端看不正常

这里只是一个简单的演示,代码还有很多可以优化的地方,例如access_token,每天请求次数有限制,实际开发中也不可能每次都去请求,浪费了资源,我是因为每天定时发送一次就够了,如果有大量请求的,最好做成配置的超过有效期了再重新获取
三、编程思想
扩展(主要讲 单一职责)
这里扩展讲一下开发过程中的函数封装的思维,比如一个简单的发送天气邮件例子:需要获取一个天气网站上的天气信息,并且每次获取成功都要保存成html文件,然后需要获取网页中当天天气信息,格式化成需要的消息模板后,发送该模板消息到邮箱很多人可能习惯写在一个类里,分几步执行,这样也没问题,但其实我们应该将任务拆分为一件一件小的事情去处理,这样思考的好处就是,如果后面比如说获取天气的网站变了,邮箱改成了短信发送了,那要修改起来其实整个文件都要改动;
我大致讲一下我的思路,这应该分为以下几件事情(几个函数)
get_html_content(url):该函数需要url参数,获取该网页html内容并返回(获取网页内容)
save_html(html_content):该函数需要html_content参数,就是get_html_content函数返回的html内容,然后保存为html文件(保存网页内容)
get_weather_info(html_content):该函数一样需要html_content参数,然后提取html中有用的天气信息并返回,这个函数只是返回有用信息,并没有处理消息内容格式(获取天气信息)
get_message(weather_info):该函数需要weather参数,根据get_weather返回的有用的天气信息,返回构造好后需要发送的消息(将天气信息构造成要发送的信息)
send_message(message):该函数需要message参数,负责发送消息到邮箱(发送消息到邮箱步骤我这里写成一步,应该也是分为几步的,配置信息,发送人,收件人等...道理一样)(发送信息)
最后一个main方法调用如下:
main(): # 网站url url = "http://www.weather.com.cn/" # 获取网站html内容 html_content = get_html_content(url) # 保存html内容,这一步可以在get_html_content函数中去调用 # save_html(html_content) # 获取网站html中有用得天气信息 weather = get_weather(html_content) # 根据天气信息获取要发送的消息 message = get_message(weather) # 最后,发送消息 send_message(message) # 有人又会问了,刚刚不是说一个函数只做一件事情吗?现在get_html_content这一个函数做了两件事情啊,①获取网页内容;②保存html文件;其实我上面写了:每次获取成功都要保存为html文件,现在这两件事情是强关联的,只是分为两个函数处理事情,这个很多小白开始可能不明白这样做的用意是什么,刚开始学习时我其实也是懵的,这得靠自己悟,熟悉了大家一定都会拥有这种编程思维。我大概提一下,如果save_html中有10行代码处理,好10行代码直接写在get_html_content中,突然哪天获取网页内容成功后不想保存,想要在发送邮件成功后保存,是不是10行代码又得从get_html_content中拿到send_message中,如果我封装为函数处理,是不是在get_html_content中不需要调用save_html,改为send_message去调用save_html就行了,可能有小伙伴会发现,直接在main中调用不就行了,在send_message下面去调用save_html,这是当然可以的,只需要将send_message返回一个发送邮件结果状态就行了。这只是简单的描述,代码量少的时候也没什么关系,可一旦代码量多了,很多事情都放到一起去处理,后期维护真的超累超辛苦的🤕。讲得太多了,尽量保持好的编程习惯,所有编程语言都一样,一个函数只处理一件事情。我们人生又何尝不是呢👨💻
总结
好了,这也是21天学习的一个小成果,虽然活动会结束,但保持热爱学习的心不会结束,心跳不止,学习不止!


【推荐】国内首个AI IDE,深度理解中文开发场景,立即下载体验Trae
【推荐】编程新体验,更懂你的AI,立即体验豆包MarsCode编程助手
【推荐】抖音旗下AI助手豆包,你的智能百科全书,全免费不限次数
【推荐】轻量又高性能的 SSH 工具 IShell:AI 加持,快人一步
· TypeScript + Deepseek 打造卜卦网站:技术与玄学的结合
· Manus的开源复刻OpenManus初探
· AI 智能体引爆开源社区「GitHub 热点速览」
· C#/.NET/.NET Core技术前沿周刊 | 第 29 期(2025年3.1-3.9)
· 从HTTP原因短语缺失研究HTTP/2和HTTP/3的设计差异