docsify
部署
已有项目
安装 Node.js
npm i docsify-cli -g
cd /d D:\Git\docsify\docs
docsify serve
浏览器输入 http://localhost:3000
网页图标
<!DOCTYPE html>
<html>
  <head>
    <meta http-equiv="X-UA-Compatible" content="IE=edge,chrome=1" />
    <meta name="viewport" content="width=device-width,initial-scale=1" />
    <meta charset="UTF-8" />
    <link rel="stylesheet" href="//cdn.jsdelivr.net/npm/docsify@4/themes/vue.css" />
    <!-- 在标签中的图标 -->
    <link rel="icon" href="https://mypic2016.oss-cn-beijing.aliyuncs.com/picGo/202209291356476.jpg">
Edit on github

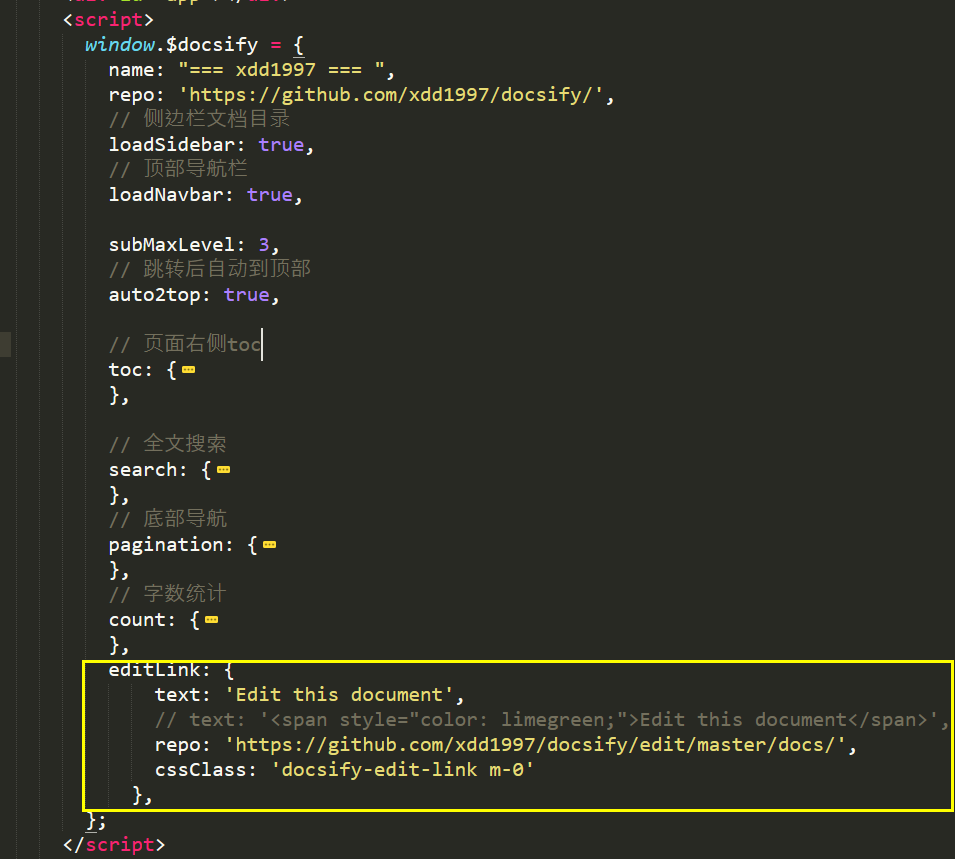
editLink: {
text: 'Edit this document',
// text: '<span style="color: limegreen;">Edit this document</span>',
repo: 'https://github.com/xdd1997/docsify/edit/master/docs/',
cssClass: 'docsify-edit-link m-0'
},


<script src="https://unpkg.com/docsify-edit-link@1.0.1/index.js"></script>
来必力账号
- xdd2026@qq.com --- docsify-gitee ---
MTAyMC81NzY5Ny8zNDE2MA== - xdd2026@163.com --- docsify-github ---
MTAyMC81MDc3MS8yNzI1Mw==
配置参考
https://huaji8.top/post/live2d-plugin-2.0/
(24条消息) docsify 构建文档网站之定制功能(全网最全)_WuGenQiang的博客-CSDN博客
ETS' NoteBook - By Mr.Wu - 微信公众号:码客趣分享 🌹
(24条消息) 有了docsify神器,从此爱上看文档_星河_赵梓宇的博客-CSDN博客
好多好多案例:https://docsify.js.org/#/zh-cn/awesome
shields
订阅标签,github标签,铭牌
- 在官网制作图片
- 使用下面方式插入markdown
# markdown仅插入图片

# markdown插入图片,图片上附链接
[](http://wpa.qq.com/msgrd?v=1&uin=1837990190&site=qq&menu=yes)
](https://img.shields.io/badge/Email-xdd2026%40qq.com-green)](http://mail.qq.com/cgi-bin/qm_share?t=qm_mailme&email=gfnl5bOxs7fB8PCv4u7s))
](https://img.shields.io/badge/QQ-1837990190-brightgreen)](http://wpa.qq.com/msgrd?v=1&uin=1837990190&site=qq&menu=yes))
嵌入html
参考
<p align="center">
  <a href="https://tobebetterjavaer.com/blog.html" target="_blank"><img src="https://img.shields.io/badge/博客-在线阅读-green.svg?style=for-the-badge"></a>
  <a href="#联系方式" target="_blank"><img src="https://img.shields.io/badge/公众号-沉默王二-brightgreen.svg?style=for-the-badge"></a>
  <a href="https://space.bilibili.com/513340480" target="_blank"><img src="https://img.shields.io/badge/bilibili-哔哩哔哩-critical?style=for-the-badge"></a>
  <a href="https://tobebetterjavaer.com/download/java.html" target="_blank"><img src="https://img.shields.io/badge/计算机经典电子书-下载-yellow.svg?style=for-the-badge" alt="无套路下载"></a>
  <a href="https://github.com/itwanger/toBeBetterJavaer" target="_blank"><img alt="Java程序员进阶之路" src="https://img.shields.io/github/stars/itwanger/toBeBetterJavaer?style=for-the-badge"></a>
</p>
giscus评论
参考:https://github.com/ruanqizhen/test 蓝奏云备份
致谢:https://github.com/mzlogin/blog-comments/discussions/204
开启 Discussions
打开gitgub上的相关项目---Setttings---General---向下滑---勾选Discussions---回到项目界面

安装giscus
进入https://github.com/apps/giscus --- 点击Install --- 选择你的仓库---save
配置giscus
- 进入giscus.app
- 在仓库中输入:
xdd1997/docsify

- 页面 ↔️ discussion 映射关系: 勾选
Discussion 的标题包含页面的<title> - Discussion 分类选择:
General,并勾选:只搜索该分类中的 discussion - 特性中勾选:将评论框放在评论上方 与 懒加载评论
- 主题选:
Github Light - 获得如下脚本作为参考
<script src="https://giscus.app/client.js"
        data-repo="xdd1997/docsify"
        data-repo-id="R_kgDOIg7OMQ"
        data-category="Announcements"
        data-category-id="DIC_kwDOIg7OMc4CSz3V"
        data-mapping="title"
        data-strict="0"
        data-reactions-enabled="0"
        data-emit-metadata="0"
        data-input-position="top"
        data-theme="light"
        data-lang="zh-CN"
        data-loading="lazy"
        crossorigin="anonymous"
        async>
</script>
嵌入docsify
在index.html中添加下面代码
注意:data-category与data-category-id要对应,不能随便写,评论区的显示与crossorigin无关
General`对应`DIC_kwDOIg7OMc4CSz3W
Announcements`对应`DIC_kwDOIg7OMc4CSz3V
plugins: [
      function(hook, vm) {
          hook.beforeEach(function (md) {
            const regex = new RegExp("\"images/", 'ig');
            md = md.replace(regex, "\"docs/images/");
            return md;
          });
          hook.doneEach(function() {
            const path = vm.route.path === '/' ? '/README' : vm.route.path;
            const path_split = path.split('/');
            const last_item = path_split[path_split.length - 1];
            var dsq = document.createElement('script');
            dsq.type = 'text/javascript';
            dsq.async = true;
            dsq.setAttribute('src', 'https://giscus.app/client.js');
            dsq.setAttribute('data-repo', 'xdd1997/docsify');
            dsq.setAttribute('data-repo-id', 'R_kgDOIg7OMQ');
            dsq.setAttribute('data-category', 'Announcements');
            dsq.setAttribute('data-category-id', 'DIC_kwDOIg7OMc4CSz3W');
            dsq.setAttribute('data-mapping', 'specific');
            dsq.setAttribute('data-term', last_item);
            dsq.setAttribute('data-reactions-enabled', '1');
            dsq.setAttribute('data-emit-metadata', '0');
            dsq.setAttribute('data-theme', 'light');
            dsq.setAttribute('data-lang', 'zh-CN');
            dsq.setAttribute('crossorigin', 'anonymous');
            document.getElementById('main').appendChild(dsq);
          });
        },
      ],
gitalk 评论未成功
获取js脚本
Github---头像---Settings---Developer settings---OAuth Apps---获取Client ID与Client secrets
github-personal access token
此处为语雀加密文本卡片,点击链接查看:https://www.yuque.com/xdd1997/ek3kug/nimcw3#hsnG6
将下面代码嵌入index.html
<script>
      let client_id = '06261ec18e4260f1a013';
      let client_secret = 'ed4f6ab3396cdcafaa2756e15cca78e9e93b317b';

      let props = {
        clientID: client_id,
        clientSecret: client_secret,
        repo: 'ArchLinuxTutorialComments',
        owner: 'ArchLinuxStudio',
        admin: ['ryosukeeeeee'],
        distractionFreeMode: false,
        id: decodeURI(location.hash.split('?')[0]),
        language: 'en',
      };
      let gitalk = new Gitalk(props);
      // 哈希路由切换时 重新加载Gitalk
      window.addEventListener('hashchange', onHashChange);
      function onHashChange() {
        props.id = decodeURI(location.hash.split('?')[0]); //如果不切分,在docsify里面的各个段落都会生成新的评论issue
      }
</script>
自定义开发插件
本文来自博客园,作者:xdd1997
转载请注明:https://www.cnblogs.com/xdd1997/p/docsify.html


 浙公网安备 33010602011771号