布局管理器
容器内可以存放各种组件,而组件的位置和大小是由容器内的布局管理器来决定的。在AWT中为我们提供了以下5种布局管理器:
① FlowLayout 流式布局管理器
② BorderLayout 边界布局管理器
③ GridLayout 网格布局管理器
④ CradLayout 卡片布局管理器
⑤ GridBagLayout 网格包布局管理器
容器中组件的布局通常由布局管理器控制。每个Container(比如一个Panel或一个Frame)都有一个与他相关的缺省布局管理器,Panel容器默认的是FlowLayout,Frame容器默认的是BorderLayout,我们可以通过调用setLayout()来改变布局管理器;
可以通过设置空布局管理器,来控制组件的大小金和位置。可以调用setLayout(null)。
在设置空布局管理器后,必须对所有的组件调用setLocation(),setSize()或setBounds(),将它们定位在容器中。
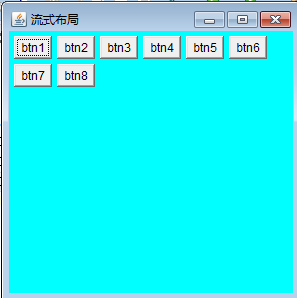
流式布局管理器
 1 class MyFrame3 extends Frame {
 2     public MyFrame3(String title) {
 3         super(title);
 4     }
 5
 6     public void init() {
 7         FlowLayout layout=new FlowLayout(FlowLayout.LEFT);//设置左对齐
 8         this.setLayout(layout);
 9         this.setBackground(Color.CYAN);
10         this.add(new Button("btn1"));
11         this.add(new Button("btn2"));
12         this.add(new Button("btn3"));
13         this.add(new Button("btn4"));
14         this.add(new Button("btn5"));
15         this.add(new Button("btn6"));
16         this.add(new Button("btn7"));
17         this.add(new Button("btn8"));
18         this.setSize(300, 300);
19         this.setVisible(true);
20     }
21 }

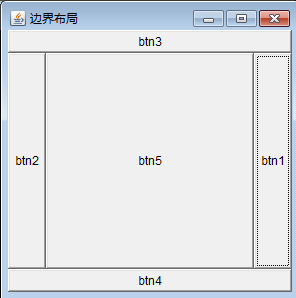
边界布局管理器
 1 class MyFrame4 extends Frame {
 2     public MyFrame4(String title) {
 3         super(title);
 4     }
 5
 6     public void init() {
 7         this.setBackground(Color.CYAN);
 8         this.add(new Button("btn1"),BorderLayout.EAST);
 9         this.add(new Button("btn2"),BorderLayout.WEST);
10         this.add(new Button("btn3"),BorderLayout.NORTH);
11         this.add(new Button("btn4"),BorderLayout.SOUTH);
12         this.add(new Button("btn5"),BorderLayout.CENTER);
13         this.setSize(300, 300);
14         this.setVisible(true);
15     }
16 }

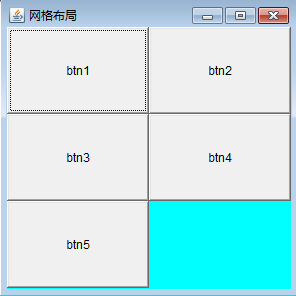
网格布局管理器
 1 class MyFrame5 extends Frame {
 2     public MyFrame5(String title) {
 3         super(title);
 4     }
 5
 6     public void init() {
 7         GridLayout layout=new GridLayout(3,2);//创建一个3行2列的网格
 8         this.setLayout(layout);
 9         this.setBackground(Color.CYAN);
10         this.add(new Button("btn1"));
11         this.add(new Button("btn2"));
12         this.add(new Button("btn3"));
13         this.add(new Button("btn4"));
14         this.add(new Button("btn5"));
15         this.setSize(300, 300);
16         this.setVisible(true);
17     }
18 }

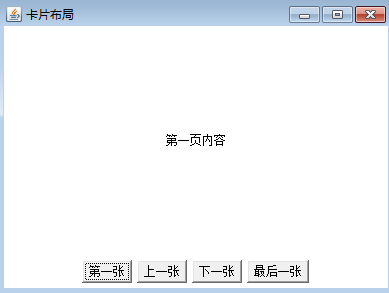
卡片布局管理器
 1 class MyFrame6 extends Frame {
 2     private Panel cardPanel=null;
 3     private Panel ctrolPanel=null;
 4     private CardLayout cardLayout=null;
 5     private FlowLayout flowLayout=null;
 6     private Label lb1,lb2,lb3,lb4;
 7     private Button btnFirst,btnPrevious,btnNext,btnLast;
 8     private TextField txtContent;
 9     public MyFrame6(String title) {
10         super(title);
11     }
12
13     public void init() {
14         //创建2个面板容器
15         cardPanel=new Panel();
16         ctrolPanel=new Panel();
17
18         //创建2个布局管理器
19         cardLayout=new CardLayout();
20         flowLayout=new FlowLayout();
21
22         //给容器设置指定的布局管理器
23         cardPanel.setLayout(cardLayout);//卡片容器中放置卡片布局
24         ctrolPanel.setLayout(flowLayout);//控制容器放置流式布局
25
26         //声明创建4个标签控件和一个文本框控件
27         lb1=new Label("第一页内容",Label.CENTER);
28         lb2=new Label("第二页内容",Label.CENTER);
29         txtContent=new TextField();//编辑文本框
30         lb3=new Label("第四页内容",Label.CENTER);
31         lb4=new Label("第五页内容",Label.CENTER);
32
33         //构建四个按钮对象
34         btnFirst=new Button("第一张");
35         btnPrevious=new Button("上一张");
36         btnNext=new Button("下一张");
37         btnLast=new Button("最后一张");
38         ctrolPanel.add(btnFirst);
39         ctrolPanel.add(btnPrevious);
40         ctrolPanel.add(btnNext);
41         ctrolPanel.add(btnLast);
42
43         //把四个标签控件和一个文本框控件添加到卡片容器中
44         cardPanel.add(lb1);
45         cardPanel.add(lb2);
46         cardPanel.add(txtContent);
47         cardPanel.add(lb3);
48         cardPanel.add(lb4);
49         this.add(cardPanel,BorderLayout.CENTER);//将卡片容器放在中部
50         this.add(ctrolPanel,BorderLayout.SOUTH);//将控制容器放在南部
51         this.setSize(400, 300);
52         this.setVisible(true);
53     }
54 }

按钮事件的实现请查看下一篇...


