SpringCache从入门到弃坑

死锁问题

在编写接口时,需要将数据库查询出来的结果进行redis缓存,由于之前项目中有使用过对应@Cacheable注解,这次也是使用的@Cacheable接口进行缓存,于是一顿操作完, 开始写单元测试并开始测试, 刚开始的时候还正常执行完,等我修改了部分代码并重新执行单元测试的时候,发现单元测试死锁.代码逻辑很简单,大致如下

@Cacheable(cacheNames = "cache", key = "cache_Pagelist", sync = true)
public List getList() {
	List list = dao.selectAll();
	return Converter.convertList(list);
}

这里就很奇怪了,不过之前就踩过一个springCache的坑见之前踩的坑 ,所以源码的断点都还没去掉,开始打开jar包跟着对应代码执行看,对应版本号:

spring-data-redis: 1.8.3

spring-context: 5.2.6

执行流程

Spring 框架支持透明地向现有 Spring 应用程序添加缓存。与事务支持类似,springCache使用了代理模式,缓存抽象允许一致使用各种缓存解决方案,而对代码的影响最小。

cache增强类执行流程

图片

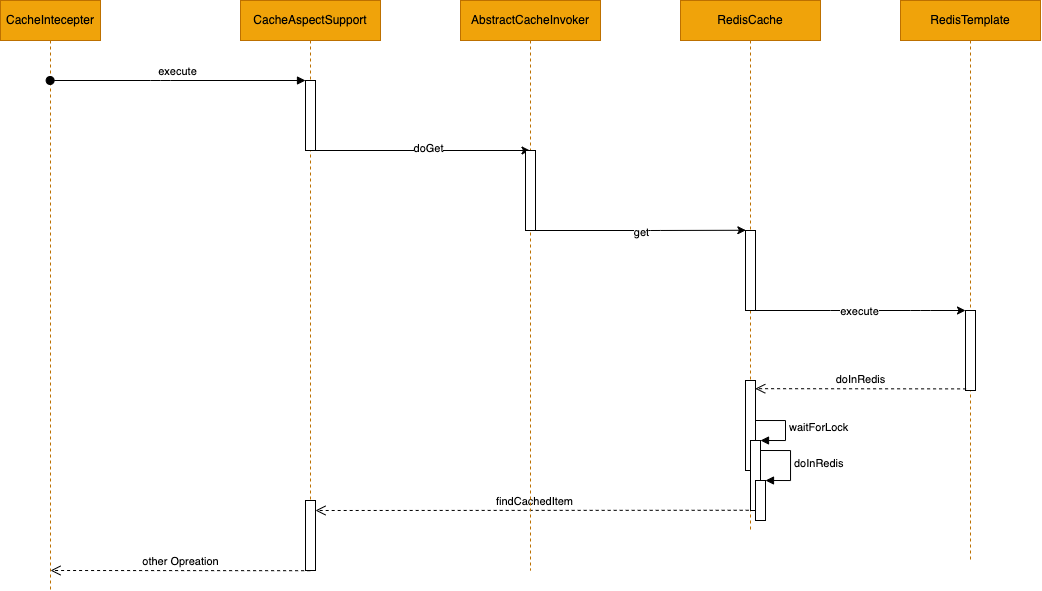
与redis交互的相关流程如上图展示,可见,当使用springCache的时候,执行任意redis操作后都会调用RedisCache的doInRedis方法,然后再进行值的相关处理与返回,也就是只有在waitForLock会出现死锁的情况,那出现问题的具体代码,我们还要深入看下

定位结果分析

RedisCache对应模块代码如下

org.springframework.data.redis.cache.RedisCache.AbstractRedisCacheCallback#doInRedis(org.springframework.data.redis.connection.RedisConnection)

 public T doInRedis(RedisConnection connection) throws DataAccessException {
            this.waitForLock(connection);
            return this.doInRedis(this.element, connection);
 }

发现等待锁的代码,进入看下

protected boolean waitForLock(RedisConnection connection) {
  boolean foundLock = false;
  boolean retry;
  do {
    retry = false;
    if (connection.exists(this.cacheMetadata.getCacheLockKey())) {
      foundLock = true;

      try {
        Thread.sleep(this.WAIT_FOR_LOCK_TIMEOUT);
      } catch (InterruptedException var5) {
        Thread.currentThread().interrupt();
      }

      retry = true;
    }
  } while(retry);

  return foundLock;
}

很明显, 这里使用了一个dowhile的循环来一直判断当前有没有获取到这个cacheMetadata.getCacheLockKey(),如果这里的CacheLock一直没有释放,那就会出现死锁的情况,那我们再看下后面的doInRedis,这里的方法是抽象方法,由下面几个类提供对应具体方法

上面除开本身执行的方法之外,在4个子类中, 只有当使用最后一个RedisWriteThroughCallback的时候,才会有使用到cacheMetadata.getCacheLockKey(),而里面执行的代码如下

@Override
public byte[] doInRedis(BinaryRedisCacheElement element, RedisConnection connection) throws DataAccessException {

			try {

				lock(connection);

				try {

					byte[] value = connection.get(element.getKeyBytes());

					if (value != null) {
						return value;
					}

					if (!isClusterConnection(connection)) {

						connection.watch(element.getKeyBytes());
						connection.multi();
					}

					value = element.get();

					if (value.length == 0) {
						connection.del(element.getKeyBytes());
					} else {
						connection.set(element.getKeyBytes(), value);
						processKeyExpiration(element, connection);
						maintainKnownKeys(element, connection);
					}

					if (!isClusterConnection(connection)) {
						connection.exec();
					}

					return value;
				} catch (RuntimeException e) {
					if (!isClusterConnection(connection)) {
						connection.discard();
					}
					throw e;
				}
			} finally {
				unlock(connection);
			}
}

在这个方法中, 使用了lockunlock方法来保证限制并发执行,可以看下里面的执行代码

lock:

protected void lock(RedisConnection connection) {
			waitForLock(connection);
			connection.set(cacheMetadata.getCacheLockKey(), "locked".getBytes());
}

Unlock:

protected void unlock(RedisConnection connection) {
			connection.del(cacheMetadata.getCacheLockKey());
}

可见如果在这个方法内部执行时中断了程序,那么这个finally是不会执行了,那就会导致cacheMetadata.getCacheLockKey()永远不会被删除,那么无论下次什么时候访问,无论访问多少次,永远都会在waitForLock这个方法里面死锁.那接下来让我们看下什么情况下会走到RedisWriteThroughCallback里面,看调用方,只发现一处:

org.springframework.data.redis.cache.RedisCache#get(java.lang.Object, java.util.concurrent.Callable<T>)

public <T> T get(final Object key, final Callable<T> valueLoader) {

		RedisCacheElement cacheElement = new RedisCacheElement(getRedisCacheKey(key),
				new StoreTranslatingCallable(valueLoader)).expireAfter(cacheMetadata.getDefaultExpiration());
		BinaryRedisCacheElement rce = new BinaryRedisCacheElement(cacheElement, cacheValueAccessor);

		ValueWrapper val = get(key);
		if (val != null) {
			return (T) val.get();
		}
	// 整个包中只有此处调用了该CallBack
		RedisWriteThroughCallback callback = new RedisWriteThroughCallback(rce, cacheMetadata);

		try {
			byte[] result = (byte[]) redisOperations.execute(callback);
			return (T) (result == null ? null : fromStoreValue(cacheValueAccessor.deserializeIfNecessary(result)));
		} catch (RuntimeException e) {
			throw CacheValueRetrievalExceptionFactory.INSTANCE.create(key, valueLoader, e);
		}
	}

再往上,又回到了我们最初的起点CacheAspectSupport,即1.2.2中的第二个节点,那看看怎么产生的这个get的调用

正向流程分析

org.springframework.cache.interceptor.CacheAspectSupport#execute(org.springframework.cache.interceptor.CacheOperationInvoker, java.lang.Object, java.lang.reflect.Method, java.lang.Object[])

@Nullable
	protected Object execute(CacheOperationInvoker invoker, Object target, Method method, Object[] args) {
		// Check whether aspect is enabled (to cope with cases where the AJ is pulled in automatically)
		if (this.initialized) {
			Class<?> targetClass = getTargetClass(target);
			CacheOperationSource cacheOperationSource = getCacheOperationSource();
			if (cacheOperationSource != null) {
				Collection<CacheOperation> operations = cacheOperationSource.getCacheOperations(method, targetClass);
				if (!CollectionUtils.isEmpty(operations)) {
					return execute(invoker, method,
							new CacheOperationContexts(operations, method, args, target, targetClass));
				}
			}
		}

		return invoker.invoke();
	}

上面的方法有2个重要步骤

  1. 生成CacheOperationSource 列表,并放入CacheOperationContexts
  2. 执行execute方法

生成的CacheOperationSource,进入代码便发现是根据方法上对应注解解析出来的值生成的对象,那接下来看下execute方法

private Object execute(final CacheOperationInvoker invoker, Method method, CacheOperationContexts contexts) {
		// Special handling of synchronized invocation
		if (contexts.isSynchronized()) {
			CacheOperationContext context = contexts.get(CacheableOperation.class).iterator().next();
			if (isConditionPassing(context, CacheOperationExpressionEvaluator.NO_RESULT)) {
				Object key = generateKey(context, CacheOperationExpressionEvaluator.NO_RESULT);
				Cache cache = context.getCaches().iterator().next();
				try {
					return wrapCacheValue(method, cache.get(key, () -> unwrapReturnValue(invokeOperation(invoker))));
				}
				catch (Cache.ValueRetrievalException ex) {
					// The invoker wraps any Throwable in a ThrowableWrapper instance so we
					// can just make sure that one bubbles up the stack.
					throw (CacheOperationInvoker.ThrowableWrapper) ex.getCause();
				}
			}
			else {
				// No caching required, only call the underlying method
				return invokeOperation(invoker);
			}
		}
	// 与问题无关的的other operation,
  ...
	}

当我们在注解中有设置sync = true 时,便进入了第一个if里面,这里可以看到

Cache cache = context.getCaches().iterator().next();
cache.get(key, () -> unwrapReturnValue(invokeOperation(invoker)))

正是调用的org.springframework.data.redis.cache.RedisCache#get(java.lang.Object, java.util.concurrent.Callable<T>) 方法,那这里我们可以下对应结论:

当在springCache相关注解中使用了 sync = true 时,springCache 会通过获取redis锁来控制并发,然而如果程序中出现异常的时候,则没删除这个锁,导致后续查询获取不到就一直等待,出现死锁的情况

问题定位

到底发生了什么? 我们来简单复盘下第一步中springCache的使用流程吧

  1. 开启SpringCache
    1. 设置RedisCahceManager 去管理对应CacheName
    2. RedisCacheManager 这个bean 注册完成之后,有对应afterPropertiesSet去初始化对应spring缓存配置
    3. 初始化缓存的时候,根据cacheName 生成对应的new RedisCache()并缓存起来
    4. 在创建RedisCache的时候,会new RedisCacheMetadata() ,而在这个构造方法里面就生成了对应的cacheLockName即cacheMetadata.getCacheLockKey()对应的值
  2. 在指定方法上加上 @Cacheable(cacheNames = "cache", key = "cache_Pagelist", sync = true) 等相关的注解,以便开启对应代理
  3. 在调用代理方法的时候,判断该方法开启了sync = true 则会调用redisCache.get()方法
    1. 在执行get()方法的时候,会执行对应传入的RedisWriteThroughCallback 里面的doInRedis方法
    2. 执行时中途发生中断(如单元测试中断),无法释放redis锁
  4. 后续调用该CacheName管理下的方法时,都会进入waitForLock()方法从而进入无限等待,导致死锁

解决方法

在1.8.3的版本中,问题在于所有的操作都会被这个锁所控制,而如果不想让这个锁出现,可以不设置sync=true 这个属性,

在2.6.x版本中,这个控制将选择的权利返回到了RedisCacheManager

/**
	 * @param connectionFactory must not be {@literal null}.
	 * @param sleepTime sleep time between lock request attempts. Must not be {@literal null}. Use {@link Duration#ZERO} =如果设置为0 则不开启对应锁
	 *          to disable locking.
	 * @param batchStrategy must not be {@literal null}.
	 */
	DefaultRedisCacheWriter(RedisConnectionFactory connectionFactory, Duration sleepTime, BatchStrategy batchStrategy) {
		this(connectionFactory, sleepTime, CacheStatisticsCollector.none(), batchStrategy);
	}

这样在创建对应bean的时候可以直接控制不开启对应锁.

删除异常

springCache 在项目刚刚开始引入使用的时候,其实就已经出现过一次问题,和刚刚遇到的点一样,都是在doInRedis 中出现,只不过这次是它的另外一个注解:cacheEvict,其执行方法如下

private void performCacheEvict(
			CacheOperationContext context, CacheEvictOperation operation, @Nullable Object result) {

		Object key = null;
		for (Cache cache : context.getCaches()) {
			if (operation.isCacheWide()) {
				logInvalidating(context, operation, null);
				doClear(cache, operation.isBeforeInvocation());
			}
			else {
				if (key == null) {
					key = generateKey(context, result);
				}
				logInvalidating(context, operation, key);
				doEvict(cache, key, operation.isBeforeInvocation());
			}
		}
	}

这注解的作用是执行对应方法之后删除对应缓存,但是问题出在它在不同的版本有不同的处理方式:

zrem or keys?

执行CacheEvict的时候, 删除多个key的时候是有分为2种情况,

  1. 当CacheEvict 有设置allEntries= true时,直接删除CacheName下的所有key
  2. 删除当前CacheEvict指定的key

我们先看1.8.3的当前版本:

这2种不同的方式调用的redis实现方式是不一样的,简单来说 doclear方法是执行的:

// 带有keys前缀
private static final byte[] REMOVE_KEYS_BY_PATTERN_LUA = new StringRedisSerializer().serialize(
				"local keys = redis.call('KEYS', ARGV[1]); local keysCount = table.getn(keys); if(keysCount > 0) then for _, key in ipairs(keys) do redis.call('del', key); end; end; return keysCount;");
// 不带前缀
public Void doInLock(RedisConnection connection) {

			int offset = 0;
			boolean finished = false;

			do {
				// need to paginate the keys
				Set<byte[]> keys = connection.zRange(metadata.getSetOfKnownKeysKey(), (offset) * PAGE_SIZE,
						(offset + 1) * PAGE_SIZE - 1);
				finished = keys.size() < PAGE_SIZE;
				offset++;
				if (!keys.isEmpty()) {
					connection.del(keys.toArray(new byte[keys.size()][]));
				}
			} while (!finished);

			connection.del(metadata.getSetOfKnownKeysKey());
			return null;
	}

上面2种不同的方法,而doEvict执行的是

public Void doInRedis(BinaryRedisCacheElement element, RedisConnection connection) throws DataAccessException {
			// 直接根据key 删除
			connection.del(element.getKeyBytes());
  	
  		//根据CacheName下的Keys 删除
		  connection.zRem(cacheMetadata.getSetOfKnownKeysKey(), element.getKeyBytes());
			return null;
	}

以上方法执行下来,在自定义脚本中keys是有一定风险, 因为在正式的环境中, 是会禁用掉keys的这个命令,

再在另外一个项目用的较高的2.3.0版本:

org.springframework.cache.interceptor.AbstractCacheInvoker#doClear

public void clean(String name, byte[] pattern) {
		Assert.notNull(name, "Name must not be null!");
		Assert.notNull(pattern, "Pattern must not be null!");
		execute(name, connection -> {
			boolean wasLocked = false;

			try {

				if (isLockingCacheWriter()) {
					doLock(name, connection);
					wasLocked = true;
				}

				byte[][] keys = Optional.ofNullable(connection.keys(pattern)).orElse(Collections.emptySet())
						.toArray(new byte[0][]);

				if (keys.length > 0) {
					connection.del(keys);
				}
			} finally {

				if (wasLocked && isLockingCacheWriter()) {
					doUnlock(name, connection);
				}
			}

			return "OK";
		});
	}

上面就是doclear方法真正执行的方法,我们再看下doEvict实际执行的方法

org.springframework.cache.interceptor.AbstractCacheInvoker#doEvict

@Override
	public void remove(String name, byte[] key) {

		Assert.notNull(name, "Name must not be null!");
		Assert.notNull(key, "Key must not be null!");

		execute(name, connection -> connection.del(key));
	}

所以从上得知,如果我们使用了allEntries= true 这个属性,可以看到无论是新老版本,都会调用doclear,使用到keys的这个命令,但是由于公司redis的设置,keys无法执行,导致异常报错

解决方法

那spring难道就没有解决这个问题的办法了么? 有的,在翻spring-data-redis当前支持版本的时候翻到了2.6.x,发现他是这么实现的:

org.springframework.data.redis.cache.DefaultRedisCacheWriter#clean

public void clean(String name, byte[] pattern) {
        Assert.notNull(name, "Name must not be null!");
        Assert.notNull(pattern, "Pattern must not be null!");
        this.execute(name, (connection) -> {
            boolean wasLocked = false;

            try {
                if (this.isLockingCacheWriter()) {
                    this.doLock(name, connection);
                    wasLocked = true;
                }

                long deleteCount;
                for(deleteCount = this.batchStrategy.cleanCache(connection, name, pattern); deleteCount > 2147483647L; deleteCount -= 2147483647L) {
                    this.statistics.incDeletesBy(name, 2147483647);
                }

                this.statistics.incDeletesBy(name, (int)deleteCount);
                return "OK";
            } finally {
                if (wasLocked && this.isLockingCacheWriter()) {
                    this.doUnlock(name, connection);
                }

            }
        });
    }

在选择scan还是keys的地方,使用了策略模式,将选择权返回给我们

// 设置RedisCacheManager的时候
public static RedisCacheManager create(RedisConnectionFactory connectionFactory) {

		Assert.notNull(connectionFactory, "ConnectionFactory must not be null!");

		return new RedisCacheManager(RedisCacheWriter.nonLockingRedisCacheWriter(connectionFactory),
				RedisCacheConfiguration.defaultCacheConfig());
	}
// 选择了keys的策略去删除
	static RedisCacheWriter nonLockingRedisCacheWriter(RedisConnectionFactory connectionFactory) {
		return nonLockingRedisCacheWriter(connectionFactory, BatchStrategies.keys());
	}

如果后续有最新版本使用的话,在写RedisCacheManager bean的时候需要改写对应的删除策略为scan ,这样就可以避免上面出现的问题

总结

springCache虽然作为Spring 框架的一员,是Integration 模块中的组成部分,但是每每在使用过程中踩到坑,只能说要理解才能更好的去使用

posted @ 2022-05-16 14:58  _我在清水河边  阅读(513)  评论(0编辑  收藏  举报