moco使用指南
1.概述
Moco可以通过简单的配置request和response 对象,达到模拟后端返回的效果;
- 支持HTTP、HTTPS、socket协议;
- 支持在request中设置Headers、cookies、statusCode;
- 支持get、post、put、delete请求;
- 无需环境配置,只需要java运行环境即可;
2.下载安装
moco安装使用只需要下载moco jar包,即可使用;
moco jar包下载地址:
https://repo1.maven.org/maven2/com/github/dreamhead/moco-runner/1.1.0/
下载moco-runner-1.1.0-standalone.jar文件即可;
3.moco使用
1)新建json配置文件(test.json),用于配置请求和响应内容,可根据需求自定义配置,内容如下:
[
  {
    "request":{
        "uri":"/demo"
    },
    "response":{
        "text":"The first moco script!"
    }
  }
]
2)启动moco服务
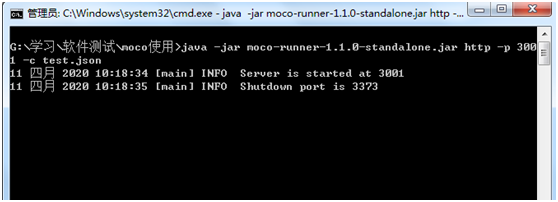
在moco服务器cmd窗口,进入moco jar包所在目录,执行命令:
java –jar moco-runner-1.1.0-standalone.jar http –p 3001 –c test.json
http:指定http协议
-p:指定启动服务的端口号
-c:指定启动服务使用的json文件
成功启动界面如下:

3)接口请求调用
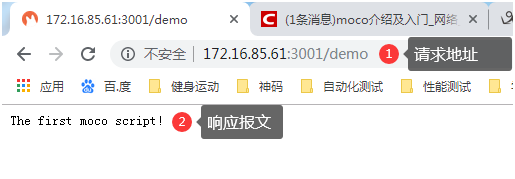
通过浏览器或者通过接口调用工具(postman、jmeter等)输入接口请求地址,http://172.16.85.61:3001/demo
调用结果如下:

4.Json配置文件
1)不带参数请求
[
  {
    "description":"moco test01",
    "request":{
        "uri":"/moco/test01"
    },
    "response":{
        "text":"The first moco script!"
    }
  }
]
- description:脚本备注,不执行;
- uri:脚本请求路径
- response:响应内容
执行请求:
http://172.16.85.61:3001/moco/test01
执行结果:

注:请求路径或响应内容修改,不需要重新启动moco,重新访问请求地址即可生效;
2)响应报文添加头文件headers
[
  {
    "description":"moco test01",
    "request":{
        "uri":"/moco/test01"
    },
    "response":{
        "headers":{
            "Content-Type":"text/html;charset=utf-8"
        },
        "text":"The first moco script!moco第一个脚本。"
    }
  }
]
执行请求:
http://172.16.85.61:3001/moco/test01
执行结果:

3)多个请求多个响应
[
  {
    "description":"moco test03",
    "request":{
        "uri":"/moco/test01"
    },
    "response":{
        "headers":{
            "Content-Type":"text/html;charset=utf8"
        },
        "text":"The first moco script!moco 第一个脚本。"
    }
  },
  {
    "description":"moco test03",
    "request":{
        "uri":"/moco/test02"
    },
    "response":{
        "headers":{
            "Content-Type":"text/html;charset=utf8"
        },
        "text":"The first moco script!moco第2个脚本。"
    }
  }
]
注:多个请求和响应时间通过逗号隔开;
执行请求:
http://172.16.85.61:3001/moco/test02
执行结果:

4)带参数请求
[
{
    "description":"moco test03",
    "request":{
        "method":"get",
        "uri":"/moco/test01",
        "queries":{
            "UserName":"wzl",
            "Password":"123456"
        }
    },
    "response":{
        "headers":{
            "Content-Type":"text/html;charset=utf8"
        },
        "text":"Login success"
    }
  }
]
- method:请求方法;
- queries:请求参数;
执行请求:
http://172.16.85.61:3001/moco/test01?UserName=wzl&Password=123456
执行结果:

5)响应结果读取外部文件
[
  {
    "description":"moco test03",
    "request":{
        "method":"get",
        "uri":"/moco/test01",
        "queries":{
            "UserName":"wzl",
            "Password":"123456"
        }
    },
    "response":{
        "headers":{
            "Content-Type":"text/html;charset=utf8"
        },
        "file":"success_result.json"
    }
  }
]
file:响应结果读取外部文件success_result.json,文件内容如下:
{
    "status":"200",
    "msg":"Login Success",
    "data":{
        "UserName":"wzl",
        "Password":"123456"
    }
}
执行请求:
http://172.16.85.61:3001/moco/test01?UserName=wzl&Password=123456
执行结果:


