
spring boot集成getway笔记
spring boot集成getway笔记
1.get-way介绍
Spring Cloud Gateway是一个基于Spring Framework 5,使用非阻塞编程模型的轻量级API网关。它的主要目标是通过提供一种简单而有效的方式来路由请求。Spring Cloud Gateway作为Spring Cloud生态系中的网关,旨在为微服务架构提供一种简单而有效的统一的API路由管理方式。
以下是Spring Cloud Gateway的一些主要特性:
- 路由:Spring Cloud Gateway可以根据请求路径、方法、头部等信息将请求路由到指定的微服务。
- 负载均衡:Spring Cloud Gateway支持轮询、随机、最少活跃调用等负载均衡策略。
- 高可用:Spring Cloud Gateway可以与Eureka、Consul等服务注册中心集成,实现服务的自动发现和故障转移。
- 安全性:Spring Cloud Gateway支持OAuth2、JWT等多种安全机制,可以保护API的安全。
- 限流:Spring Cloud Gateway内置了限流功能,可以防止系统过载。
- 熔断:Spring Cloud Gateway内置了熔断功能,可以在服务出现问题时快速失败,避免影响整个系统。
- API监控:Spring Cloud Gateway可以集成多种API监控工具,如Prometheus、SkyWalking等,实现对API的全方位监控。
2.集成get way
2.1 添加依赖
<dependency>
    <groupId>org.springframework.cloud</groupId>
    <artifactId>spring-cloud-starter-netflix-eureka-client</artifactId>
</dependency>
<dependency>
    <groupId>org.springframework.cloud</groupId>
    <artifactId>spring-cloud-starter-gateway</artifactId>
</dependency>
注意:1.本次项目集成demo 使用到的 spring cloud版本为:3.1.6. spring boot 的版本为2.7.12
2.集成getway 时不需要添加spring boot的依赖 (如果单纯作为网关启动),因为这次需要从注册中心获取服务,因此加入了eureka client 的依赖。 get way的依赖与spring boot starter web 依赖有冲突,因此一定不要加spring boot starter web 的依赖。
2.2添加配置
1.eureka 配置
因为get way 依赖于注册中心(本次用eureka作为注册中心),需要从注册中心获取各个服务的实际地址,因此也要加入eureka 配置
eureka:
  instance:
    lease-renewal-interval-in-seconds: 10
    #    hostname: localhost
    instance-id: ${spring.application.name}
    ip-address: localhost
  #    ip-address: 111.201.151.126
  server:
    # eureka 服务的端口
    port: 8613
    #服务端30s 定时清除操作
    eviction-interval-timer-in-ms: 30000
    enable-self-preservation: true
    sync-when-timestamp-differs: true
  client:
    service-url:
      defaultZone: http://1.15.134.32:${eureka.server.port}/eureka
    #    defaultZone: http://localhost:${eureka.server.port}/eureka
    #应用是否可以去拉取服务列表到本地
    fetch-registry: true
    # 自己是否注册服务到eureka
    register-with-eureka: true
    #间隔10秒去拉取,时间越短脏读越少,性能消耗大
    registry-fetch-interval-seconds: 30
    enabled: true
    eureka-server-read-timeout-seconds: 10
2.get way 配置
gateway:
  discovery:
    locator:
     # enabled: true  #表明gateway开启服务注册和发现的功能,并且spring cloud gateway自动根据服务发现为每一个服务创建了一个router,这个router将以服务名开头的请求路径转发到对应的服务
      lowerCaseServiceId: true   #是将请求路径上的服务名配置为小写(因为服务注册的时候,向注册中心注册时将服务名转成大写的了  #lower-case-service-id: true  #另一种写法
  routes:   #路由配置
    # eureka中的服务1(每个服务中可集群多个应用,可在eureka中配置与治理)
    - id: auth
      uri: lb://auth
      predicates:
       - Path=/auth/**
    - id: qury
      uri: lb://qury
  #    uri: http://localhost:8082  如果只有单个服务也可以直接写请求地址 (注意要去掉前面的lb )
      predicates:
         - Path=/qury/**
    - id: consumer
      uri: lb://consumer
      predicates:
         - Path=/consumer/**
    - id: producer
      uri: lb://producer
      predicates:
         - Path=/producer/**
      filters:    # 校验  # 去除一个前缀
         - StripPrefix=1
  globalcors:  #跨域设置
    corsConfigurations:
      '[/**]':
        allowedOriginPatterns: "*"
        allowed-methods: "*"
        allowed-headers: "*"
        allow-credentials: true
        exposedHeaders: "Content-Disposition,Content-Type,Cache-Control"
  enabled: true
注意: 如果加入get way配置启动后 但是请求其他服务404时,检查下 get way.enable= true 这个配置是否添加
3.完整的get way服务配置文件
spring:
  application:
    name: get-way
  mvc:
    pathmatch:
      matching-strategy: ant_path_matcher
  cloud:
    # gateway 配置
    gateway:
      discovery:
        locator:
         # enabled: true  #表明gateway开启服务注册和发现的功能,并且spring cloud gateway自动根据服务发现为每一个服务创建了一个router,这个router将以服务名开头的请求路径转发到对应的服务
          lowerCaseServiceId: true   #是将请求路径上的服务名配置为小写(因为服务注册的时候,向注册中心注册时将服务名转成大写的了  #lower-case-service-id: true  #另一种写法
      routes:   #路由配置
        # eureka中的服务1(每个服务中可集群多个应用,可在eureka中配置与治理)
        - id: auth
          uri: lb://auth
          predicates:
           - Path=/auth/**
        - id: qury
          uri: lb://qury
      #    uri: http://localhost:8082 如果只有单个服务也可以直接写请求地址 (注意要去掉前面的lb )
          predicates:
             - Path=/qury/**
        - id: consumer
          uri: lb://consumer
          predicates:
             - Path=/consumer/**
        - id: producer
          uri: lb://producer
          predicates:
             - Path=/producer/**
          filters:    # 校验  # 去除一个前缀
             - StripPrefix=1
      globalcors:  #跨域设置
        corsConfigurations:
          '[/**]':
            allowedOriginPatterns: "*"
            allowed-methods: "*"
            allowed-headers: "*"
            allow-credentials: true
            exposedHeaders: "Content-Disposition,Content-Type,Cache-Control"
      enabled: true
    # 安全配置
#security:
#  # 不校验白名单
#  ignore:
#    urls:
    #  - "/auth/user/login"
    #  - "/auth/user/register"
    #  - "/springboot/v2/api-docs"

# 暴露监控端点
#management:
#  endpoints:
#    web:
#      exposure:
#        include: '*'


server:
  port: 8013
  # erueka 配置
eureka:
  instance:
    lease-renewal-interval-in-seconds: 10
    #    hostname: localhost
    instance-id: ${spring.application.name}
    ip-address: localhost
  #    ip-address: 111.201.151.126
  server:
    # eureka 服务的端口
    port: 8613
    #服务端30s 定时清除操作
    eviction-interval-timer-in-ms: 30000
    enable-self-preservation: true
    sync-when-timestamp-differs: true
  client:
    service-url:
      defaultZone: http://1.15.134.32:${eureka.server.port}/eureka
    #    defaultZone: http://localhost:${eureka.server.port}/eureka
    #应用是否可以去拉取服务列表到本地
    fetch-registry: true
    # 自己是否注册服务到eureka
    register-with-eureka: true
    #间隔10秒去拉取,时间越短脏读越少,性能消耗大
    registry-fetch-interval-seconds: 30
    enabled: true
    eureka-server-read-timeout-seconds: 10
2.3启动类
启动类要在该服务java包下,因为集成了eureka 需要添加 @EnableEurekaClient @EnableDiscoveryClient 这两个注解,一遍服务能够被eureka 服务端发现并注册到上面
@ComponentScan("com.wz") //bao扫描
@SpringBootApplication // spring boot 启动类注解
@EnableEurekaClient // eureka 客户端注解
@EnableDiscoveryClient // 以便服务被eureka 发现
public class getWayApplication {
    public static void main(String[] args) {
        SpringApplication.run(getWayApplication.class,args);
    }
}
3.eureka 服务端配置
3.1添加依赖
<dependencies>
    <dependency>
        <groupId>org.springframework.boot</groupId>
        <artifactId>spring-boot-starter-web</artifactId>
    </dependency>
    <dependency>
        <groupId>org.springframework.boot</groupId>
        <artifactId>spring-boot-starter</artifactId>
    </dependency>
    <dependency>
        <groupId>org.springframework.boot</groupId>
        <artifactId>spring-boot-starter-test</artifactId>
        <scope>test</scope>
    </dependency>
    <dependency>
        <groupId>org.springframework.cloud</groupId>
        <artifactId>spring-cloud-starter-netflix-eureka-server</artifactId>
    </dependency>
    <dependency>
        <groupId>org.springframework.cloud</groupId>
        <artifactId>spring-cloud-starter</artifactId>
    </dependency>
</dependencies>
注意:本次项目集成demo 使用到的 spring cloud版本为:3.1.6. spring boot 的版本为2.7.12 spring boot starter test 可以不加
3.2 添加eureka service配置文件
eureka:
  instance:
    lease-renewal-interval-in-seconds: 10
    hostname: localhost
    instance-id: ${spring.application.name}
  server:
    # eureka 服务的端口
    port: ${server.port}
    #服务端30s 定时清除操作
    eviction-interval-timer-in-ms: 30000
    enable-self-preservation: true
    sync-when-timestamp-differs: true
  client:
    service-url:
      defaultZone: http://${eureka.instance.hostname}:${eureka.server.port}/eureka
    #应用是否可以去拉取服务列表到本地
    fetch-registry: true
    # 自己是否注册服务到eureka
    register-with-eureka: false
    #间隔10秒去拉取,时间越短脏读越少,性能消耗大
    registry-fetch-interval-seconds: 30
    enabled: true
    eureka-server-read-timeout-seconds: 10
3.3完整eureka service 服务配置文件
spring:
  application:
    name: eureka
server:
  port: 8613
eureka:
  instance:
    lease-renewal-interval-in-seconds: 10
    hostname: localhost
    instance-id: ${spring.application.name}
  server:
    # eureka 服务的端口
    port: ${server.port}
    #服务端30s 定时清除操作
    eviction-interval-timer-in-ms: 30000
    enable-self-preservation: true
    sync-when-timestamp-differs: true
  client:
    service-url:
      defaultZone: http://${eureka.instance.hostname}:${eureka.server.port}/eureka
    #应用是否可以去拉取服务列表到本地
    fetch-registry: true
    # 自己是否注册服务到eureka
    register-with-eureka: false
    #间隔10秒去拉取,时间越短脏读越少,性能消耗大
    registry-fetch-interval-seconds: 30
    enabled: true
    eureka-server-read-timeout-seconds: 10
3.4启动类
@EnableEurekaServer // eureka 服务端的注解是这个
@EnableDiscoveryClient
@SpringBootApplication
public class eurekaApplication {
    public static void main(String[] args) {
        SpringApplication.run(eurekaApplication.class, args);
    }
}
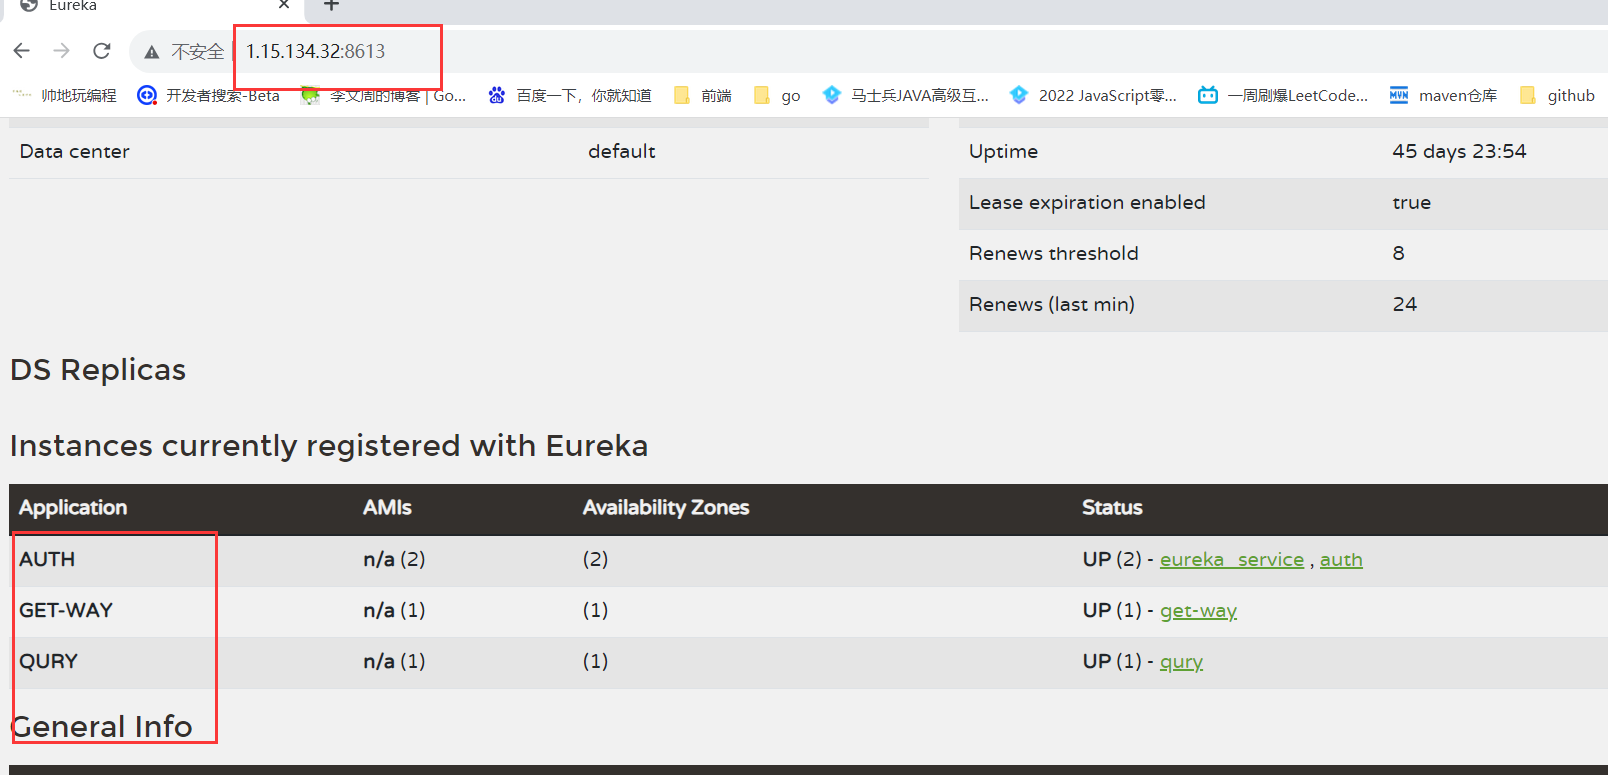
eureka 服务的的web 界面 为 服务地址:端口 eg: localhost:8613 打开就能看的eureka web端的界面

上面是服务地址 , 左下红框为注册成功的服务。
4.启动,测试
4.1准备一个测试接口
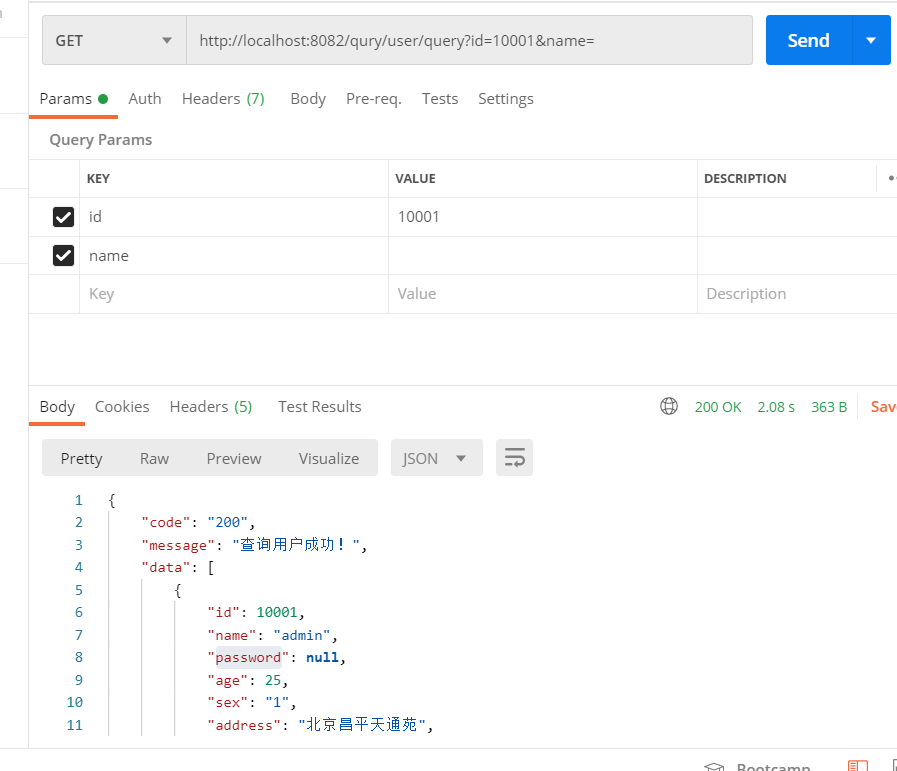
本次demo 在query模块下 有一个查询接口

该接口完整的请求路径为:
http://localhost:8082/qury/user/query?id=10001&name= (为了方便就用了一个查询参数)
4.2启动eureka服务
启动eureka服务 看服务是否成功在注册中心进行注册
eureka 服务ui页面为 本机地址:端口 eg:localhost:8013
4.3启动服务
启动get way query 模块服务
本次get way模块服务的端口为8013 如果我想通过get way转发去请求query 模块的服务 则只需将上面请求接口换成8013即可
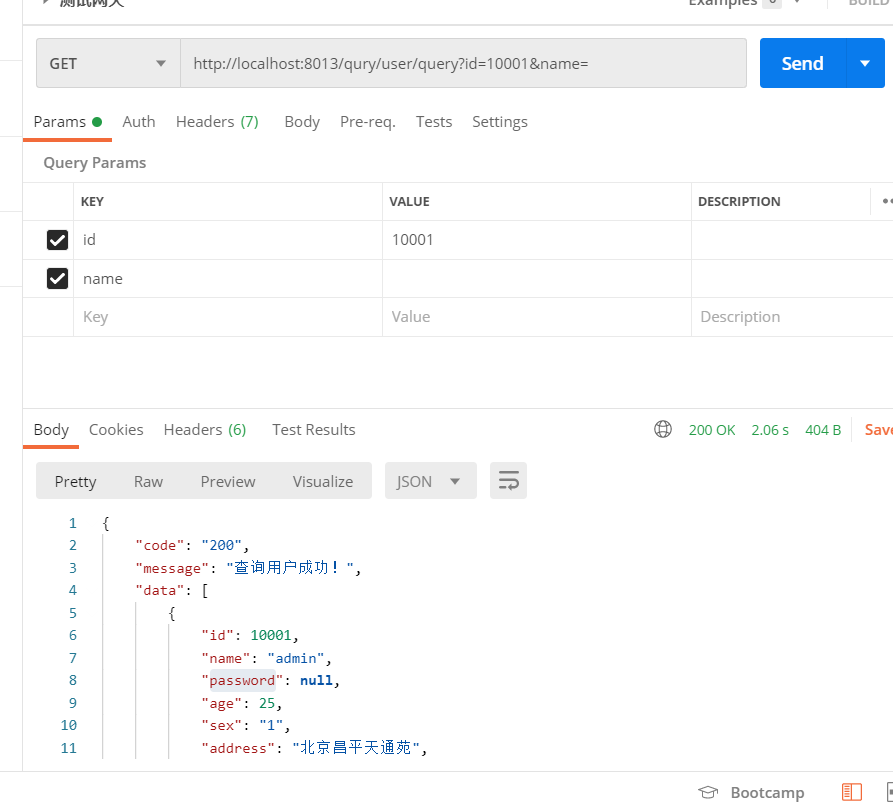
服务经过get way 寻找到正确的服务,请求成功!

 浙公网安备 33010602011771号