深入理解SpringBoot自动装配原理
我们先来看一个注解:@Configuration,该注解的源码其实也非常简单
@Target(ElementType.TYPE)
@Retention(RetentionPolicy.RUNTIME)
@Documented
@Component
public @interface Configuration {

	/**
	 * Explicitly specify the name of the Spring bean definition associated with the
	 * {@code @Configuration} class. If left unspecified (the common case), a bean
	 * name will be automatically generated.
	 * <p>The custom name applies only if the {@code @Configuration} class is picked
	 * up via component scanning or supplied directly to an
	 * {@link AnnotationConfigApplicationContext}. If the {@code @Configuration} class
	 * is registered as a traditional XML bean definition, the name/id of the bean
	 * element will take precedence.
	 * @return the explicit component name, if any (or empty String otherwise)
	 * @see AnnotationBeanNameGenerator
	 */
	@AliasFor(annotation = Component.class)
	String value() default "";

	/**
	 * Specify whether {@code @Bean} methods should get proxied in order to enforce
	 * bean lifecycle behavior, e.g. to return shared singleton bean instances even
	 * in case of direct {@code @Bean} method calls in user code. This feature
	 * requires method interception, implemented through a runtime-generated CGLIB
	 * subclass which comes with limitations such as the configuration class and
	 * its methods not being allowed to declare {@code final}.
	 * <p>The default is {@code true}, allowing for 'inter-bean references' via direct
	 * method calls within the configuration class as well as for external calls to
	 * this configuration's {@code @Bean} methods, e.g. from another configuration class.
	 * If this is not needed since each of this particular configuration's {@code @Bean}
	 * methods is self-contained and designed as a plain factory method for container use,
	 * switch this flag to {@code false} in order to avoid CGLIB subclass processing.
	 * <p>Turning off bean method interception effectively processes {@code @Bean}
	 * methods individually like when declared on non-{@code @Configuration} classes,
	 * a.k.a. "@Bean Lite Mode" (see {@link Bean @Bean's javadoc}). It is therefore
	 * behaviorally equivalent to removing the {@code @Configuration} stereotype.
	 * @since 5.2
	 */
	boolean proxyBeanMethods() default true;

}
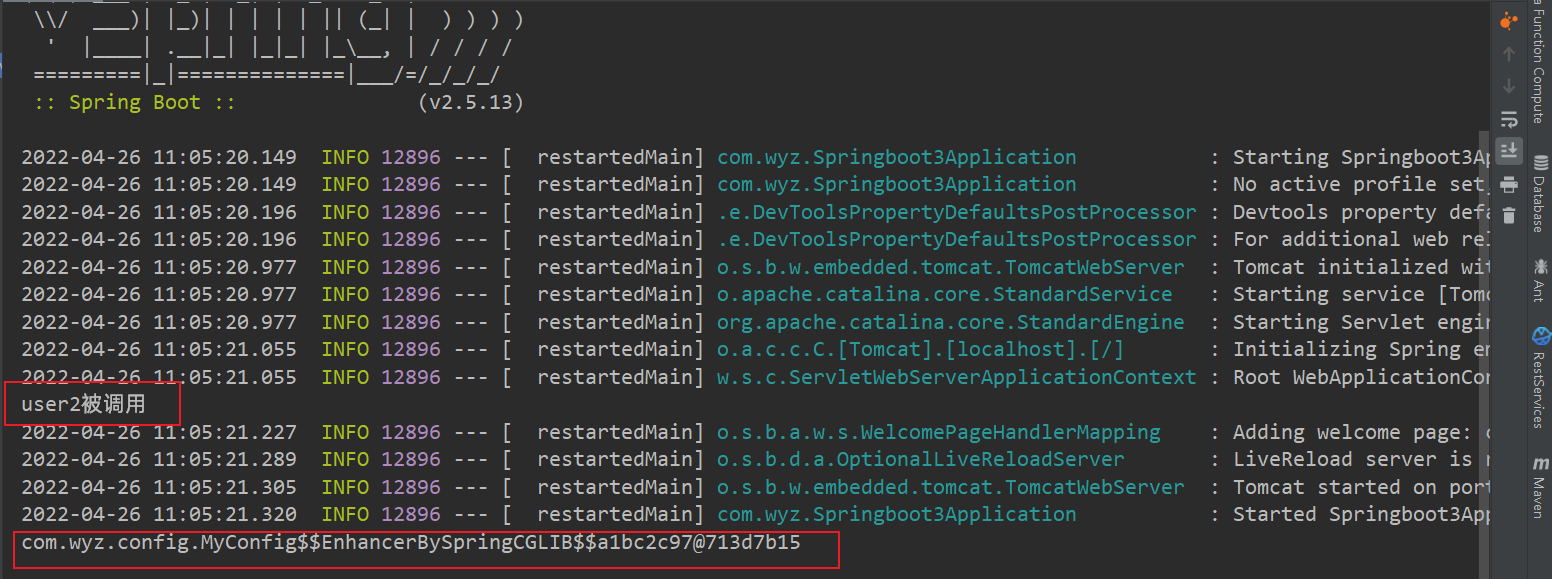
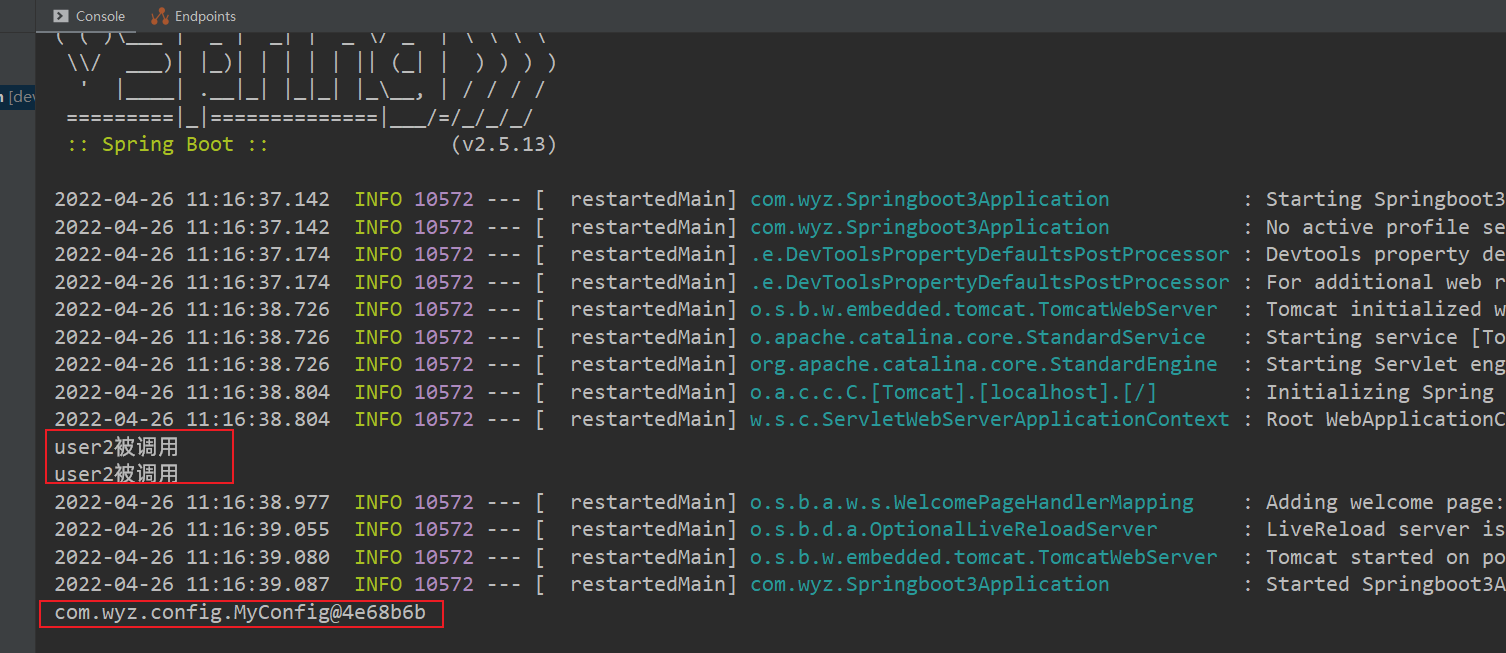
方法proxyBeanMethods默认是true,也就是默认开启代理,这种模式也被称为Full模式,当为false的时候不开启代理模式,这种模式也被称为Lite模式。在Full模式的时候可以很好的处理依赖关系,从容器中获取依赖的对象,全局只有一个对象,在Lite模式的时候,不会使用代码,默认每次都会创建新对象,启动速度快一点。
//定义一个对象
@Data
@AllArgsConstructor
@NoArgsConstructor
@ToString
public class User {
    private Integer id;
    private String name;
}


//编写一个配置类
@Configuration
public class MyConfig {
    @Bean
    public User user1(){
        user2();
        return new User(1,"root");
    }

    @Bean
    public User user2(){
        System.out.println("user2被调用");
        return new User(2,"root2");
    }
}
我们可以在启动SpringBoot的时候查看,当为true的时候:
当为false的时候:
现在我们来详细看看SpringBoot的自动装配,我们编写SpringBoot启动类一般代码如下:
@SpringBootApplication
public class Springboot3Application {

    public static void main(String[] args) {
        SpringApplication.run(Springboot3Application.class, args);
    }
}
main方法里面是启动,那自动装配肯定跟@SpringBootApplication有关,那么我们看看该注解的源代码
@Target(ElementType.TYPE)
@Retention(RetentionPolicy.RUNTIME)
@Documented
@Inherited
@SpringBootConfiguration
@EnableAutoConfiguration
@ComponentScan(excludeFilters = { @Filter(type = FilterType.CUSTOM, classes = TypeExcludeFilter.class),
		@Filter(type = FilterType.CUSTOM, classes = AutoConfigurationExcludeFilter.class) })
public @interface SpringBootApplication {}
这个注解是一个组合注解,最重要的是@SpringBootConfiguration、@EnableAutoConfiguration、ComponentScan先看第一个注解@SpringBootConfiguration
@Target(ElementType.TYPE)
@Retention(RetentionPolicy.RUNTIME)
@Documented
@Configuration
@Indexed
public @interface SpringBootConfiguration {}
主要是描述这个类是一个配置类,@ComponentScan是一个包扫描注解,那么跟自动配置有关的肯定是@EnableAutoConfiguration字面含义是启动自动配置,我们看源代码:
@Target(ElementType.TYPE)
@Retention(RetentionPolicy.RUNTIME)
@Documented
@Inherited
@AutoConfigurationPackage
@Import(AutoConfigurationImportSelector.class)
public @interface EnableAutoConfiguration {}
里面有两个非常重要的注解或者类,一个是@AutoConfigurationPackage注解,一个是导入了AutoConfigurationImportSelector.class类。
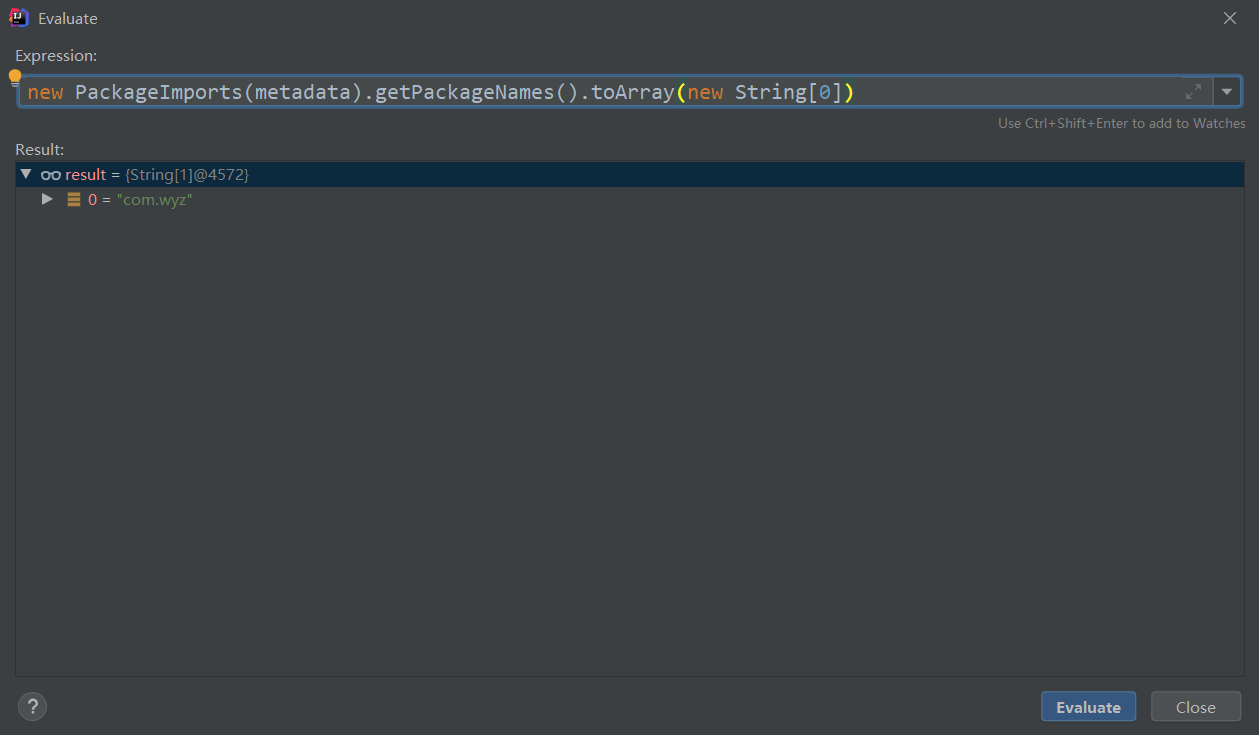
在@AutoConfigurationPackage里面有一个最重要的类导入就是@Import(AutoConfigurationPackages.Registrar.class)
@Override
public void registerBeanDefinitions(AnnotationMetadata metadata, BeanDefinitionRegistry registry) {
    register(registry, new PackageImports(metadata).getPackageNames().toArray(new String[0]));
}
通过这个类的静态内部类的这个方法的主要作用是看我们的注解标记在哪个类上面,获取他所在的包,然后把他所在的包里面的组建加载到容器中。
AutoConfigurationImportSelector加载自动配置类
public class AutoConfigurationImportSelector implements DeferredImportSelector, BeanClassLoaderAware,
		ResourceLoaderAware, BeanFactoryAware, EnvironmentAware, Ordered {}
可以看出,AutoConfigurationImportSelector 类实现了 ImportSelector接口,也就实现了这个接口中的 selectImports方法,该方法主要用于获取所有符合条件的类的全限定类名,这些类需要被加载到 IoC 容器中。
@Override
public String[] selectImports(AnnotationMetadata annotationMetadata) {
    if (!isEnabled(annotationMetadata)) {
        return NO_IMPORTS;
    }
    AutoConfigurationEntry autoConfigurationEntry = getAutoConfigurationEntry(annotationMetadata);
    return StringUtils.toStringArray(autoConfigurationEntry.getConfigurations());
}
里面调用了getAutoConfigurationEntry
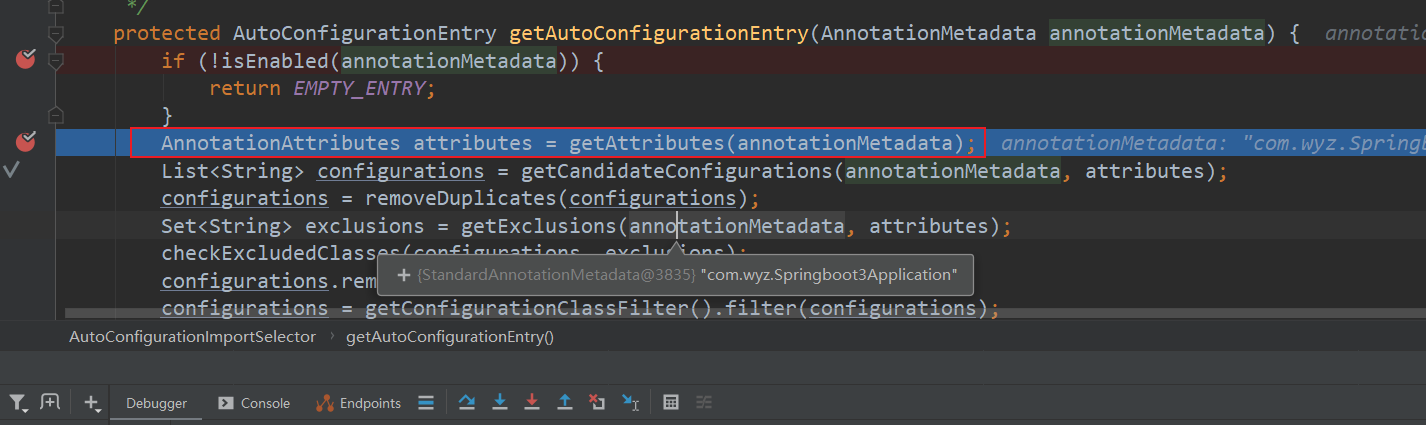
protected AutoConfigurationEntry getAutoConfigurationEntry(AnnotationMetadata annotationMetadata) {
    if (!isEnabled(annotationMetadata)) {
        return EMPTY_ENTRY;
    }
    AnnotationAttributes attributes = getAttributes(annotationMetadata);
    List<String> configurations = getCandidateConfigurations(annotationMetadata, attributes);
    configurations = removeDuplicates(configurations);
    Set<String> exclusions = getExclusions(annotationMetadata, attributes);
    checkExcludedClasses(configurations, exclusions);
    configurations.removeAll(exclusions);
    configurations = getConfigurationClassFilter().filter(configurations);
    fireAutoConfigurationImportEvents(configurations, exclusions);
    return new AutoConfigurationEntry(configurations, exclusions);
}
首先判断自动配置是否开启默认spring.boot.enableautoconfiguration=true,可在 application.properties 或 application.yml 中设置。

第二步:用于获取EnableAutoConfiguration注解中的 exclude 和 excludeName。
第三步:获取需要自动装配的所有配置类,读取META-INF/spring.factories
List<String> configurations = getCandidateConfigurations(annotationMetadata, attributes);

protected List<String> getCandidateConfigurations(AnnotationMetadata metadata, AnnotationAttributes attributes) {
    List<String> configurations = SpringFactoriesLoader.loadFactoryNames(getSpringFactoriesLoaderFactoryClass(),
                                                                         getBeanClassLoader());
    Assert.notEmpty(configurations, "No auto configuration classes found in META-INF/spring.factories. If you "
                    + "are using a custom packaging, make sure that file is correct.");
    return configurations;
}
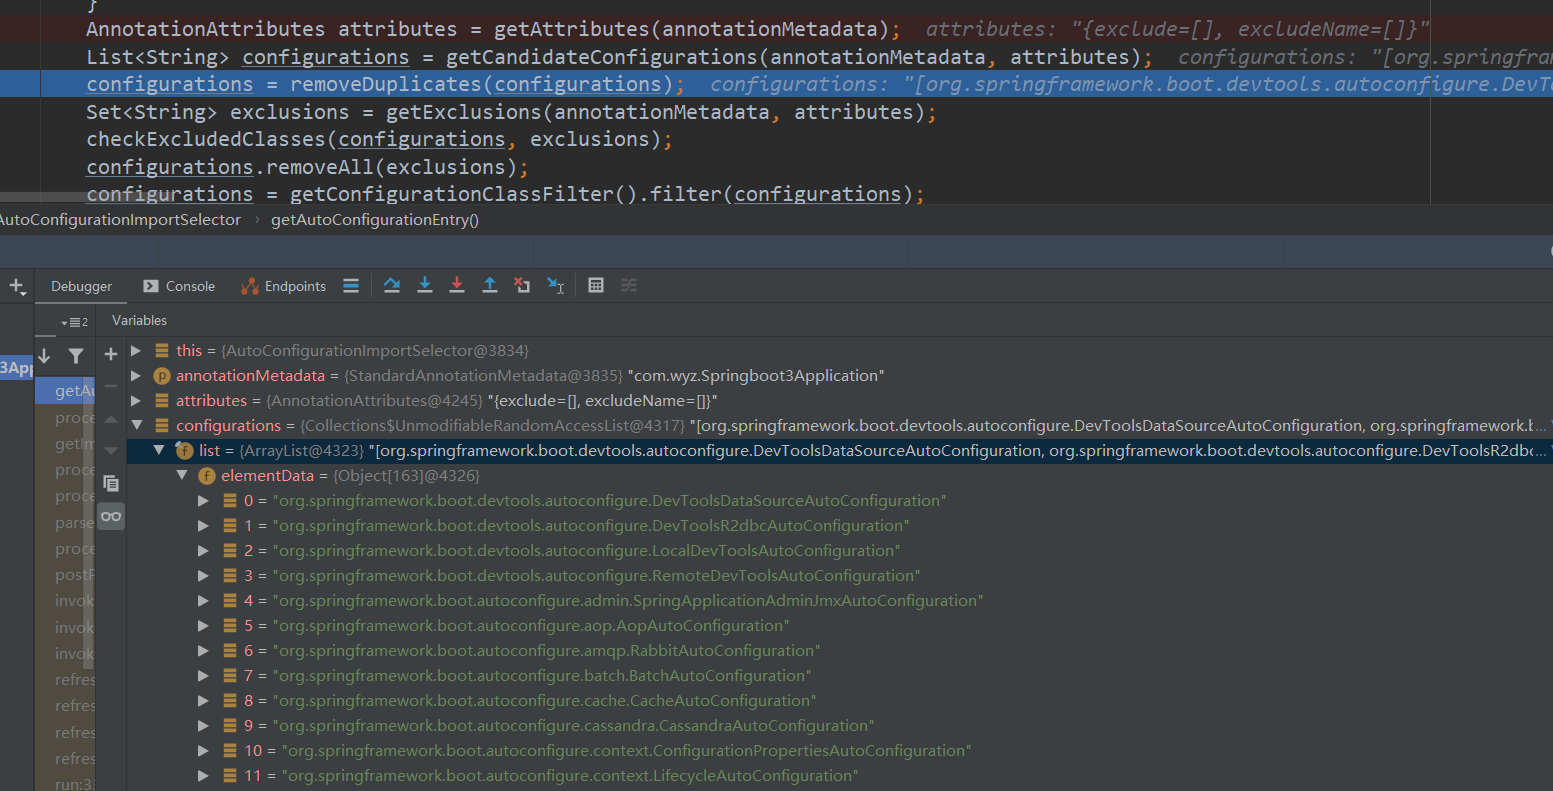
从下图可以看到这个文件的配置内容都被我们读取到了。XXXAutoConfiguration的作用就是按需加载组件。
不光是这个依赖下的META-INF/spring.factories被读取到,所有 Spring Boot Starter 下的META-INF/spring.factories都会被读取到。
第四步:到这里可能面试官会问你:“spring.factories中这么多配置,每次启动都要全部加载么?”。
很明显,这是不现实的。我们 debug 到后面你会发现,configurations 的值变小了。
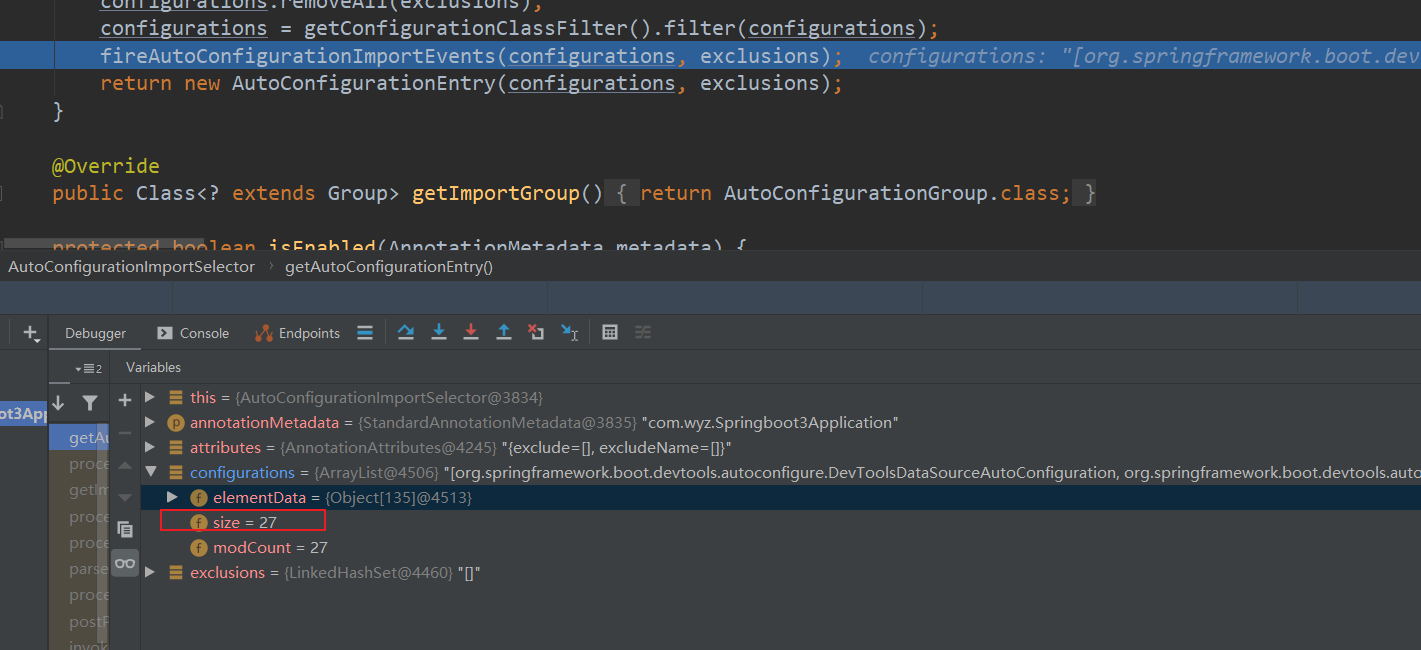
因为,这一步有经历了一遍筛选,@ConditionalOnXXX 中的所有条件都满足,该类才会生效。
如何实现一个 Starter
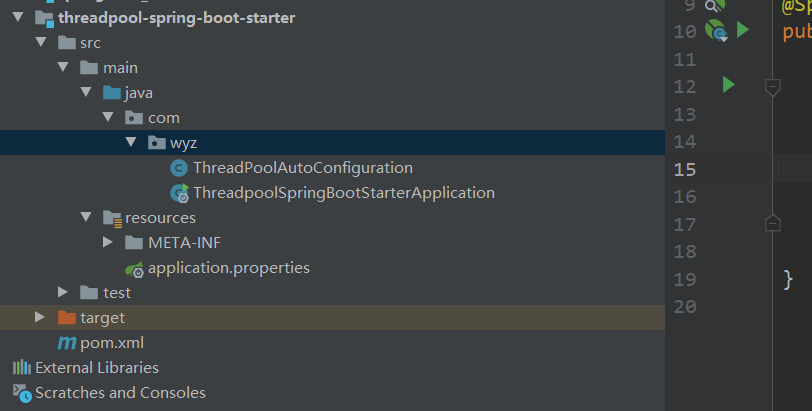
第一步,创建threadpool-spring-boot-starter工程
第二步,引入 Spring Boot 相关依赖
<parent>
    <groupId>org.springframework.boot</groupId>
    <artifactId>spring-boot-starter-parent</artifactId>
    <version>2.5.13</version>
</parent>
<dependency>
    <groupId>org.springframework.boot</groupId>
    <artifactId>spring-boot-starter</artifactId>
</dependency>
第三步,创建ThreadPoolAutoConfiguration
@Configuration
public class ThreadPoolAutoConfiguration {

    @Bean
    @ConditionalOnClass(ThreadPoolExecutor.class)
    public ThreadPoolExecutor MyThreadPool(){
        System.out.println("自定义MyThreadPool");
        return new ThreadPoolExecutor(10,10,10, TimeUnit.SECONDS,new ArrayBlockingQueue<>(100));
    }
}
第四步,在threadpool-spring-boot-starter工程的 resources 包下创建META-INF/spring.factories文件
# Auto Configure
org.springframework.boot.autoconfigure.EnableAutoConfiguration=\
com.wyz.ThreadPoolAutoConfiguration
最后新建工程引入threadpool-spring-boot-starter
<dependency>
    <groupId>com.wyz</groupId>
    <artifactId>threadpool-spring-boot-starter</artifactId>
    <version>0.0.1-SNAPSHOT</version>
</dependency>
启动测试:
@SpringBootApplication
public class ThreadpoolSpringBootStarterApplication {

    public static void main(String[] args) {
        final ConfigurableApplicationContext run = SpringApplication.run(ThreadpoolSpringBootStarterApplication.class, args);
        final ThreadPoolExecutor myThreadPool = run.getBean("MyThreadPool", ThreadPoolExecutor.class);
        System.out.println(myThreadPool.getCorePoolSize());

    }

}

撒花花,搞定!

 浙公网安备 33010602011771号