201871010126 王亚涛《面向对象程序设计 JAVA》 第十三周学习总结
|
内容 |
|
|
这个作业属于哪个课程 |
https://www.cnblogs.com/nwnu-daizh/ |
|
这个作业的要求在哪里 |
|
|
作业学习目标 |
(1) 掌握事件处理的基本原理,理解其用途; (2) 掌握AWT事件模型的工作机制; (3) 掌握事件处理的基本编程模型; (4) 了解GUI界面组件观感设置方法; (5) 掌握WindowAdapter类、AbstractAction类的用法; (6) 掌握GUI程序中鼠标事件处理技术。 |
随笔博文正文内容包括:
第一部分:总结第十一章理论知识(35分)
第十一章 事件处理
11.1 事件处理基础
AWT事件处理机制的概要
- 事件:当用户在界面上执行一个操作,例如按下键盘、拖动或者单击鼠标时,都将产生一个事件。Java中事件是用来描述不同类型用户操作的对象,Java中有很多不同类型的事件。例如:单击,双击,右击,拖动,键盘的按下、释放,文本域内容改变等
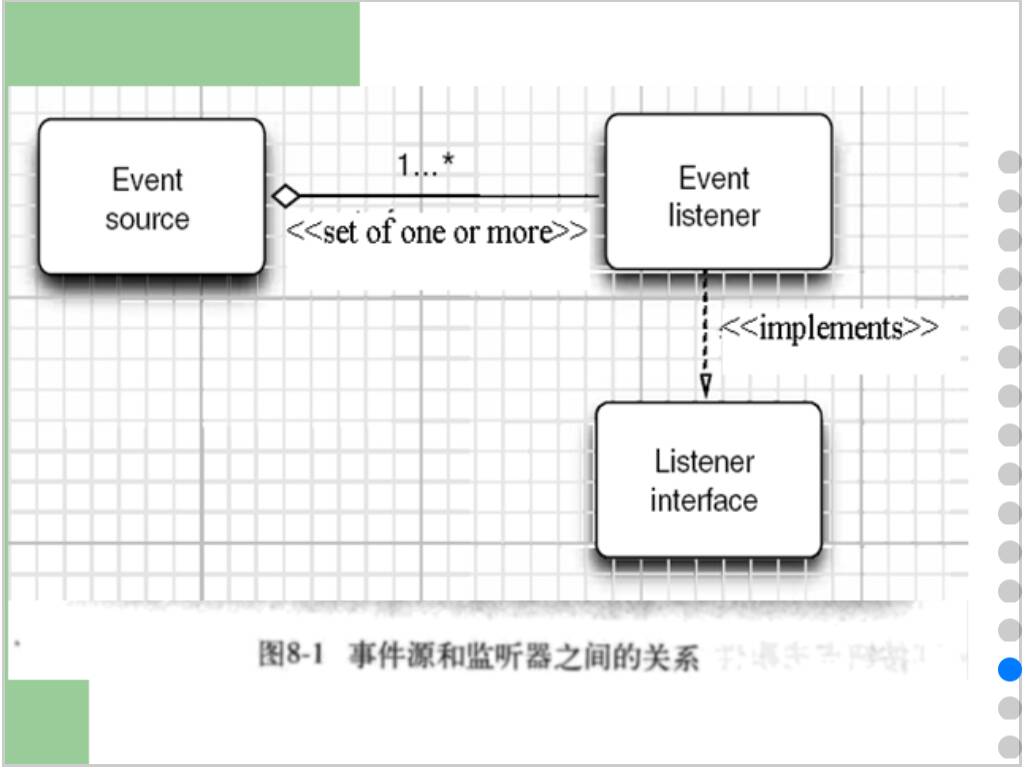
- 事件监听器:就是调用事件处理方法的对象。当界面操作事件产生并被发送到产生事件的组件时,该组件将把事件发送给能接受和处理该事件的监听器。
- 事件源 (eventevent eventeventsource source source ):能够产生事件的对象都可 :能够产生事件的对象都可 :能够产生事件的对象都可 :能够产生事件的对象都可 :能够产生事件的对象都可 :能够产生事件的对象都可 :能够产生事件的对象都可 :能够产生事件的对象都可 :能够产生事件的对象都可 :能够产生事件的对象都可 :能够产生事件的对象都可 :能够产生事件的对象都可 以成为事件源 ,如文本框 、按钮等 。一个 事件源是能够注册监听器并向发送事件对象 的能够注册监听器并向发送事件对象 的能够注册监听器并向发送事件对象 的能够注册监听器并向发送事件对象 的。
4.事件对象:事件发生后,在flex中就称为事件对象,事件对象有针对其的侦听器,事件对象有其属性,比如:target。
5.事件源与监听器之间的关系
6.注册监听器的方法
6.1.使用内部类:一个个设置Button然后创建一个内部类, 用ActionPerformed来实现按钮事件内容;
6.2.使用lambda表达式“需要创建一个内部类, 其实有更简单的方法, 比如使用lambda表达式, 而不需要创建内部类, 我们可以把创建按钮和响应的部分放到一个方法里面
6.3.使用匿名对象:使用lambda表达式肯定不是非用不可的, 以前的方法是使用匿名对象, 也是可以的。
6.4.自身框架做事件源容器:其实可以直接用JFrame本身做事件源容器, 使ButtonFrame支持ActionListener接口, 需要把按钮定义在属性中, 然后在构造函数中添加的监听器中直接使用this 像这样:greenButton.addActionListener(this);然后在自己类中实现ActionPerformed方法, 使用Object source = e.getSource();获取到事件的更新源, 然后用判断语句来判断是哪个按钮的事件依次执行事件操作;
7.动作事件:动作事件的监听接口是ActionListener接口,在这个接口中的抽象方法如下:public void actionPerformed(ActionEvent e) .
8.事件处理的基本编程模型;
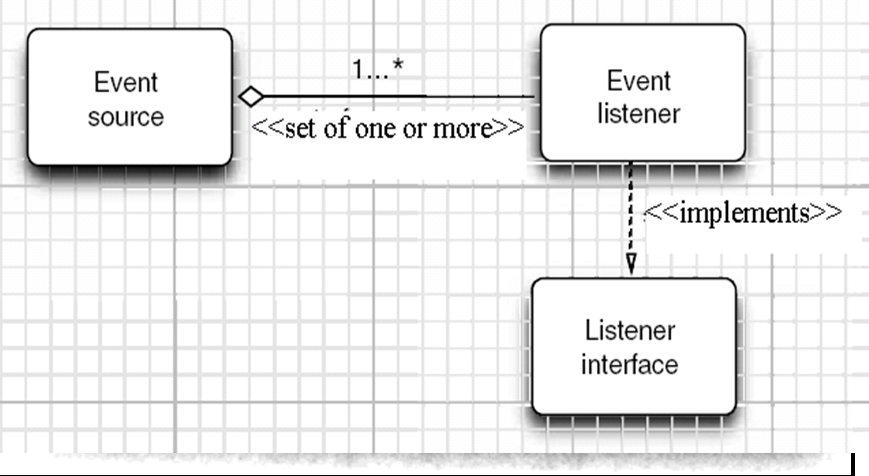
11.1.1监听器接口的实现
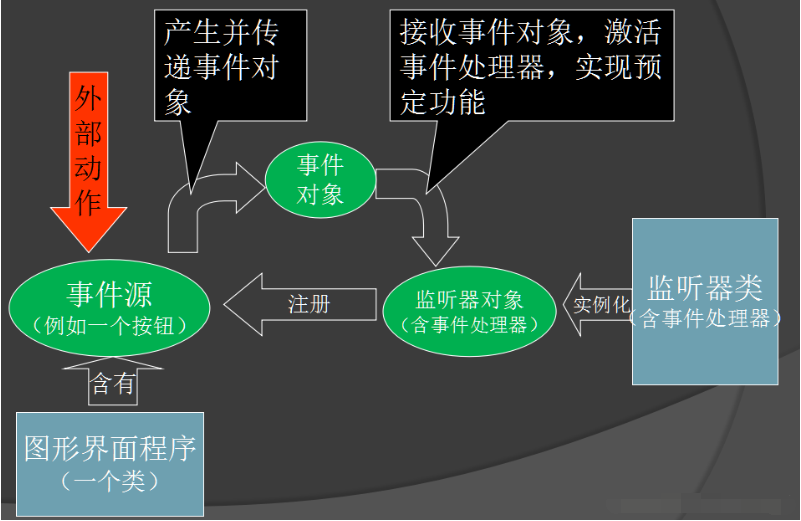
执行顺序如下:
1、给事件源注册监听器。
2、组件接受外部作用,也就是事件被触发。
3、组件产生一个相应的事件对象,并把此对象传递给与之关联的事件处理器。
4、事件处理器启动,并执行相关的代码来处理该事件。
监听器模式:事件源注册监听器之后,当事件源触发事件,监听器就可以回调事件对象的方法;更形象地说,监听者模式是基于:注册-回调的事件/消息通知处理模式,就是被监控者将消息通知给所有监控者。
1、注册监听器:事件源.setListener。
2、回调:事件源实现onListener。
11.1.2 用匿名类与lambda简化程序
匿名内部类:适合创建只需要使用一次的类,如果需要重复使用,将实现类定义成一个独立的类
new 实现接口()
{
匿名内部类的类体部分
}
Lambda表达式:主要作用代替匿名内部类的繁琐语法
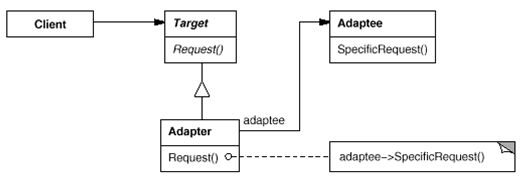
11.1.3 适配器类
1. 概念
适配器模式把一个类的接口转换成客户端期待的另外一种接口, 从而是原本应用接口不匹配而无法在一起工作的两个类能够在一起工作.
举个例子来说,现在一般的家用电器要求的电压都是 220V,但有个别电器要求使用110V 电压,怎么办?这时就需要用一个能把 220V 电压转换成 110V 电压的变压器,这个变压器就是一个适配器。
2. 哪些情况需要适配器模式?
2.1系统需要使用类的接口不符合系统的要求
2.2要建立一个可以重复使用的类, 用于与该类之间的关联不大的一些类, 包括工作中引用的类
2.3类的适配器模式使用起来有点像多重集成机制, 利用接口的特性, 把一些零散类组织到一起, 成为一个新的类来实现调用, 并且看起来像是对一个类的操作. 实际上, 适配器模式更过的是强调对代码的组织, 而不是功能的实
3. 适配器的作用
适配器模式可以方便代码的主治和模型的准确标识, 可以把一个类中的成员插入到另一个类的继承子类中, 从而上这个继承的子类看起来像一个新类, 同事可以对父类减少依赖.
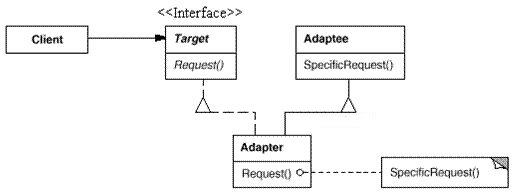
4. 适配器的角色
Target: 目标接口类, 客户所期待的接口, 目标可以是具体的或者抽象的类, 也可以是接口
Adaptee: 需要适配的类
Adapter: 通过包装一个需要的支配器对象, 把原来的接口转换成目标接口
5. 适配器的实现方式
1).对象适配器模式(采用对象组合方式实现)
2. 类的适配器模式(采用继承实现)
11.2 掌握GUI程序中鼠标事件处理技术
所有组件都能发出鼠标事件,MouseEvent类负责捕获鼠标事件,可以通过为组件添加实现了MouseListener接口的监听器类来处理相应的鼠标事件。
MouseListener接口共有5个抽象方法,分别在光标移入或移出组件时、鼠标按键被按下或释放时和发生单击事件时被触发。所谓单击事件,就是按键被按下并释放。
注意:如果按键是在移出组件之后才被释放,则不会触发单击事件。
当双击鼠标时,第一次单击单击鼠标将触发第一次单击事件。(也就是先会输出第一次,在输出第二次)。
用户点击鼠标按钮时,会调用三个监听器方法:
鼠标第一次被按下时调用mousePressed方法;
鼠标被释放时调用mouseReleased方法;
两个动作完成之后,调用mouseClicked方法。 鼠标在组件上移动时,会调用mouseMoved方法。 如果鼠标在移动的时候还按下了鼠标,则会调用mouseDragged方法。
11.3。了解GUI界面组件观感设置方法;
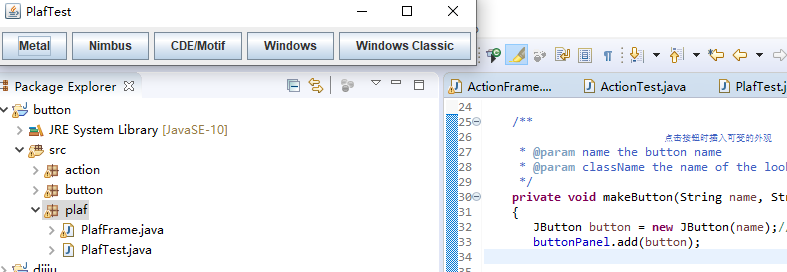
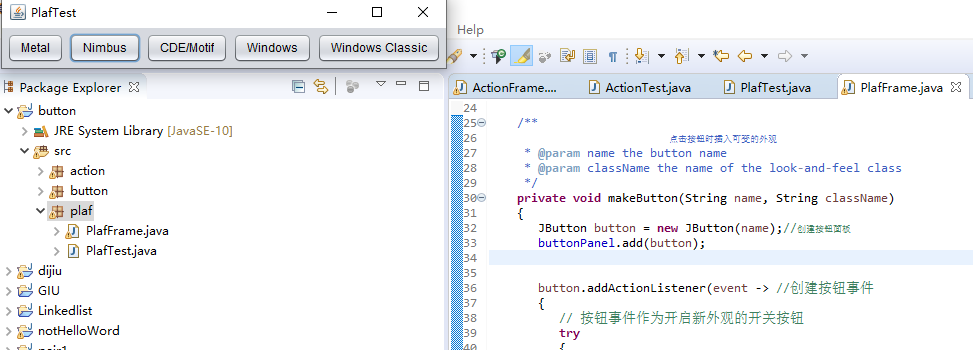
在默认情况下,Swing程序使用Metal观感,可以采用两种方式改变观感。 第一种方式是在Java安装的子目录jre/lib下有一个文件swing.properties。在这个文件中,将属性swing.defaultlaf设置为所希望的观感类名。 swing.defaultlaf = com.sun.java.swing.plaf.motif.MotifLookAndFeel 第二种方式是动态地改变观感,需要调用静态的UIManager.setLookAndFeel方法,并提供所想要的观感类名,然后再调用静态方法SwingUtilities. updateComponentTreeUI来刷新全部的组件集。
11.4.掌握WindowAdapter类、AbstractAction类的用法;
扩展WindowAdapter类,继承六个空方法,并覆盖WindowClosing()方法: class Terminator extends WindowAdapter { public void windowClosing(WindowEvent e) { if(user agress) System.exit(0); } }、
实验1:导入第11章示例程序,测试程序并进行代码注释。
测试程序1(5分)
l 在elipse IDE中调试运行教材443页-444页程序11-1,结合程序运行结果理解程序;
l 在事件处理相关代码处添加注释;
l 用lambda表达式简化程序;
l 掌握JButton组件的基本API;
掌握Java中事件处理的基本编程模型。
例题11-1实验代码如下:
package button;

import java.awt.*;
import javax.swing.*;

/**
 * @version 1.35 2018-04-10
 * @author Cay Horstmann
 */
public class ButtonTest
{
   public static void main(String[] args)
   {
      EventQueue.invokeLater(() -> {
         var frame = new ButtonFrame();
         frame.setTitle("ButtonTest");//设置框架名称
         frame.setDefaultCloseOperation(JFrame.EXIT_ON_CLOSE);//窗口关闭按钮设置为可用
         frame.setVisible(true);//将框架设置为可见
      });
   }
}
package button;

  import java.awt.*;
  import java.awt.event.*;
  import javax.swing.*;

  /**
   * 按钮面板框架
   */
 public class ButtonFrame extends JFrame
 {
    private JPanel buttonPanel;
    private static final int DEFAULT_WIDTH = 600;//设置面板的私有属性,长和宽
    private static final int DEFAULT_HEIGHT = 400;

    public ButtonFrame()
    {
       setSize(DEFAULT_WIDTH, DEFAULT_HEIGHT);

       JButton yellowButton = new JButton("Yellow");// 创建以Yellow,Blue,Red命名的三个按钮
       JButton blueButton = new JButton("Blue");
       JButton redButton = new JButton("Red");

       buttonPanel = new JPanel();

       buttonPanel.add(yellowButton);    // 在面板中添加按钮
       buttonPanel.add(blueButton);
       buttonPanel.add(redButton);

       add(buttonPanel);// 添加框架

       ColorAction yellowAction = new ColorAction(Color.YELLOW);  // 创建三个响应按钮
       ColorAction blueAction = new ColorAction(Color.BLUE);
       ColorAction redAction = new ColorAction(Color.RED);

       yellowButton.addActionListener(yellowAction);// 将按钮与事件进行关联
       blueButton.addActionListener(blueAction);
       redButton.addActionListener(redAction);
    }


    private class ColorAction implements ActionListener//设置面板背景色的事件监听器
    {
       private Color backgroundColor;//添加背景色的私有属性

       public ColorAction(Color c)
       {
          backgroundColor = c;
       }

       public void actionPerformed(ActionEvent event)
       {
          buttonPanel.setBackground(backgroundColor);
       }
    }
 }
用lambda表达式简化后的程序代码如下:
package button;

import java.awt.*;
import java.awt.event.*;
import javax.swing.*;
/**
 * A frame with a button panel.
 */
public class ButtonFrame extends JFrame
{
   private JPanel buttonPanel;
   private static final int DEFAULT_WIDTH = 300;//设置面板的私有属性,长和宽
   private static final int DEFAULT_HEIGHT = 200;

   public void  makeButton(String name,Color backgroundColor)
   {
       JButton button = new JButton(name);
       buttonPanel.add(button);
       button.addActionListener((e)->{
         buttonPanel.setBackground(backgroundColor);
       });
   }

   public ButtonFrame()
   {
      setSize(DEFAULT_WIDTH, DEFAULT_HEIGHT);

      // create buttons
      //JButton yellowButton = new JButton("Yellow");
      //JButton blueButton = new JButton("Blue");
      //JButton redButton = new JButton("Red");
      //// 创建以Yellow,Blue,Red命名的三个按钮
      makeButton("yellow", Color.YELLOW);
      makeButton("blue", Color.BLUE);
      makeButton("red", Color.RED);
      buttonPanel = new JPanel();

      // add buttons to panel
       //ttonPanel.add(yellowButton);
      //ttonPanel.add(blueButton);
      //ttonPanel.add(redButton);

      // add panel to frame
      // 在面板中添加按钮
      add(buttonPanel);// 添加框架

      // create button actions
      ColorAction yellowAction = new ColorAction(Color.YELLOW);
      ColorAction blueAction = new ColorAction(Color.BLUE);
      ColorAction redAction = new ColorAction(Color.RED);
      // 将按钮与事件进行关联
      // associate actions with buttons

      //yellowButton.addActionListener(yellowAction);
      //ueButton.addActionListener(blueAction);
      //redButton.addActionListener(redAction);
   }
    /**
    * An action listener that sets the panel's background color.
    */
   private class ColorAction implements ActionListener
   {
      private Color backgroundColor;

      public ColorAction(Color c)
      {
         backgroundColor = c;
      }

      public void actionPerformed(ActionEvent event)
      {
         buttonPanel.setBackground(backgroundColor);
      }
   }
}
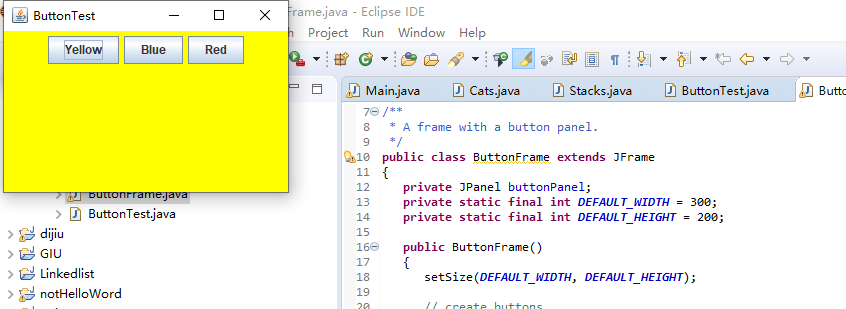
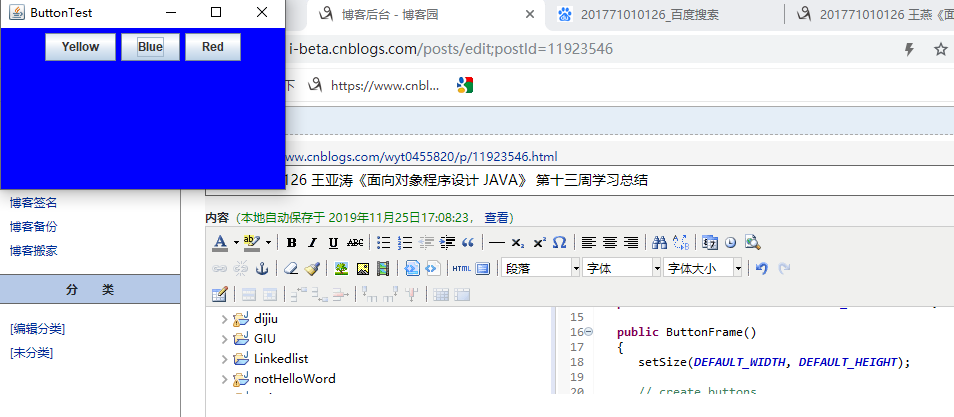
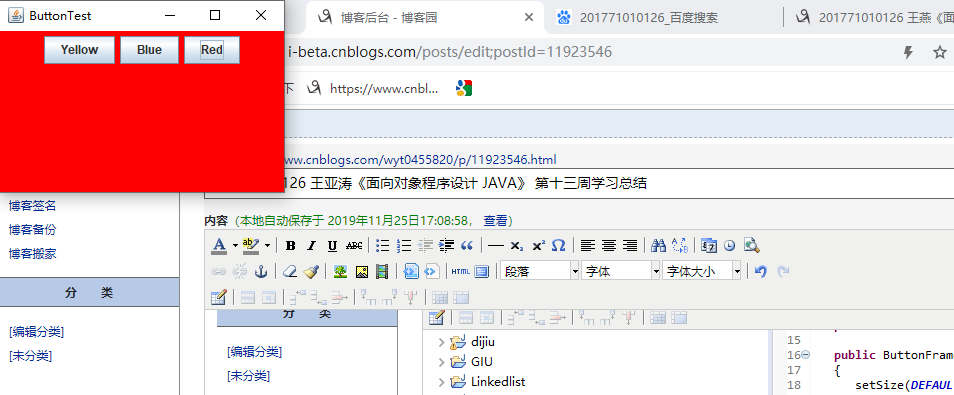
实验运行截图如下:
测试程序2:
l 在elipse IDE中调试运行教材449页程序11-2,结合程序运行结果理解程序;
l 在组件观感设置代码处添加注释;
l 了解GUI程序中观感的设置方法。
例题11.2程序代码及注释如下:
package plaf;

 import java.awt.*;
  import javax.swing.*;

 /**
  * @version 1.32 2015-06-12
  * @author Cay Horstmann
  */
 public class PlafTest
 {
    public static void main(String[] args)
    {
      EventQueue.invokeLater(() -> {
          JFrame frame = new PlafFrame();
          frame.setTitle("PlafTest");//设置框架名称
          frame.setDefaultCloseOperation(JFrame.EXIT_ON_CLOSE);//窗口关闭按钮设置为可用
          frame.setVisible(true); //将框架设置为可见
       });
   }
 }
package plaf;

  import javax.swing.JButton;
  import javax.swing.JFrame;
  import javax.swing.JPanel;
  import javax.swing.SwingUtilities;
  import javax.swing.UIManager;

  public class PlafFrame extends JFrame//设置框架和面板的外观
 {
    private JPanel buttonPanel;

    public PlafFrame()
    {
       buttonPanel = new JPanel();//创建一个按钮面板对象

       UIManager.LookAndFeelInfo[] infos = UIManager.getInstalledLookAndFeels();//获取所有的显示样式
       for (UIManager.LookAndFeelInfo info : infos)
          makeButton(info.getName(), info.getClassName());

       add(buttonPanel);
       pack();
    }

    /**
                                                                                          点击按钮时插入可变的外观
     * @param name the button name
     * @param className the name of the look-and-feel class
     */
    private void makeButton(String name, String className)
    {
       JButton button = new JButton(name);//创建按钮面板
       buttonPanel.add(button);


       button.addActionListener(event -> //创建按钮事件
       {
          // 按钮事件作为开启新外观的开关按钮
          try
          {
             UIManager.setLookAndFeel(className);//将树结构中的每个节点转到 updateUI()
             SwingUtilities.updateComponentTreeUI(this);
             pack();
          }
          catch (Exception e)//捕获异常
          {
             e.printStackTrace();
          }
       });
    }
 }
运行截图如下:


测试程序3:
l 在elipse IDE中调试运行教材457页-458页程序11-3,结合程序运行结果理解程序;
l 掌握AbstractAction类及其动作对象;
l 掌握GUI程序中按钮、键盘动作映射到动作对象的方法。
例题11.3程序代码及注释如下:
package action;

import java.awt.*;
import javax.swing.*;

/**
 * @version 1.34 2015-06-12
 * @author Cay Horstmann
 */
public class ActionTest
{
   public static void main(String[] args)
   {
      EventQueue.invokeLater(() -> {
         var frame = new ActionFrame();
         frame.setTitle("ActionTest");//设置框架名称
         frame.setDefaultCloseOperation(JFrame.EXIT_ON_CLOSE);//窗口关闭按钮设置为可用
         frame.setVisible(true);//将框架设置为可见
      });
   }
}
package action;

import java.awt.*;
import java.awt.event.*;
import javax.swing.*;

/**
 * A frame with a panel that demonstrates color change actions.
 */
public class ActionFrame extends JFrame//设置框架和面板的外观
{
   private JPanel buttonPanel;
   private static final int DEFAULT_WIDTH = 300;
   private static final int DEFAULT_HEIGHT = 200;//设置面板的私有属性,长和宽

   public ActionFrame()
   {
      setSize(DEFAULT_WIDTH, DEFAULT_HEIGHT);

      buttonPanel = new JPanel();//创建一个按钮面板对象

      // define actions定义三个事件
      var yellowAction = new ColorAction("Yellow", new ImageIcon("yellow-ball.gif"),
            Color.YELLOW);
      var blueAction = new ColorAction("Blue", new ImageIcon("blue-ball.gif"), Color.BLUE);
      var redAction = new ColorAction("Red", new ImageIcon("red-ball.gif"), Color.RED);

      // add buttons for these actions
      buttonPanel.add(new JButton(yellowAction));//添加按钮对应的事件
      buttonPanel.add(new JButton(blueAction));
      buttonPanel.add(new JButton(redAction));

      // add panel to frame
      add(buttonPanel);//在框架中添加面板

      // associate the Y, B, and R keys with names
      InputMap inputMap = buttonPanel.getInputMap(JComponent.WHEN_ANCESTOR_OF_FOCUSED_COMPONENT);//关联Y,R,B,与事件
      inputMap.put(KeyStroke.getKeyStroke("ctrl Y"), "panel.yellow");
      inputMap.put(KeyStroke.getKeyStroke("ctrl B"), "panel.blue");
      inputMap.put(KeyStroke.getKeyStroke("ctrl R"), "panel.red");

      // associate the names with actions将名称与事件联系起来
      ActionMap actionMap = buttonPanel.getActionMap();
      actionMap.put("panel.yellow", yellowAction);
      actionMap.put("panel.blue", blueAction);
      actionMap.put("panel.red", redAction);
   }

   public class ColorAction extends AbstractAction
   {
      /**
       * Constructs a color action.
       * @param name the name to show on the button
       * @param icon the icon to display on the button
       * @param c the background color
       */
      public ColorAction(String name, Icon icon, Color c)
      {
         putValue(Action.NAME, name);//在构造器中设置键值对映射,设置的属性将会被JPanel读取
         putValue(Action.SMALL_ICON, icon);
         putValue(Action.SHORT_DESCRIPTION, "Set panel color to " + name.toLowerCase());
         putValue("color", c);
      }

      public void actionPerformed(ActionEvent event)
      {
         var color = (Color) getValue("color");
         buttonPanel.setBackground(color);
      }
   }
}
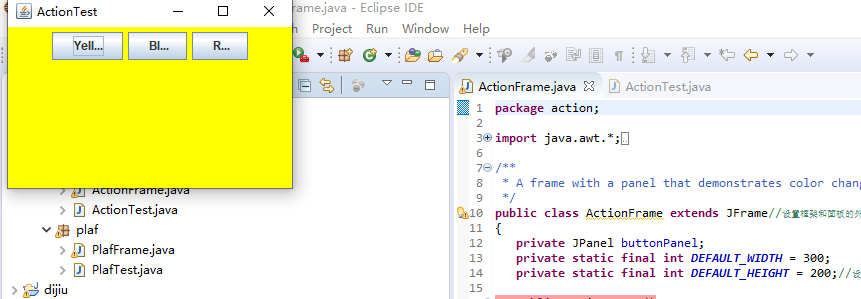
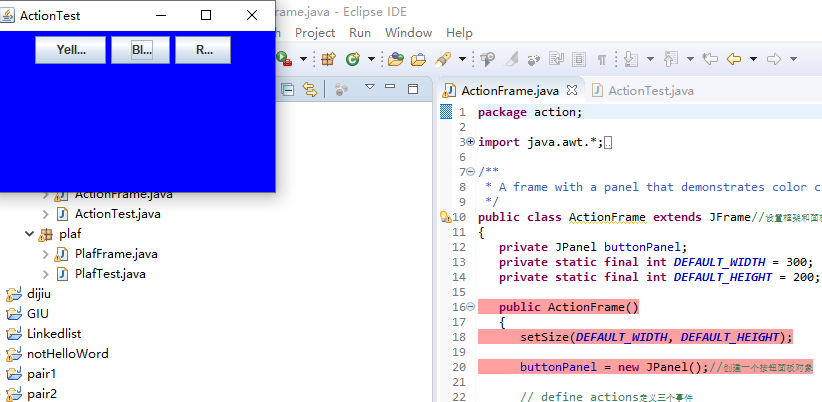
运行截图如下:
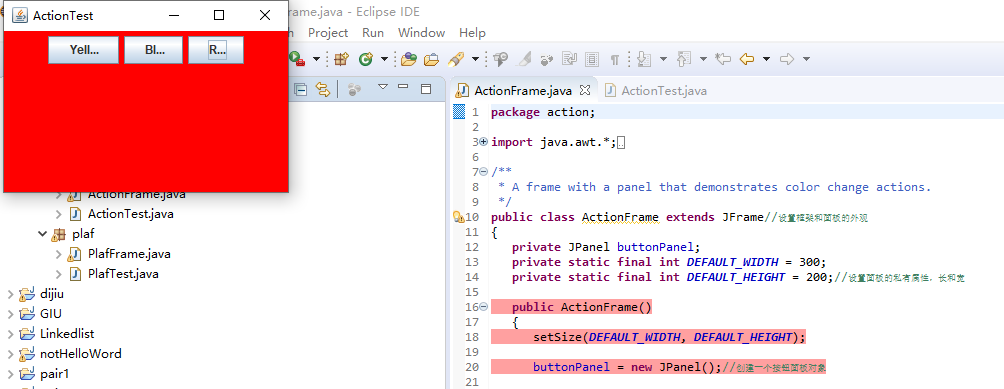
测试程序4:
l 在elipse IDE中调试运行教材462页程序11-4、11-5,结合程序运行结果理解程序;
l 掌握GUI程序中鼠标事件处理技术。
例题11.4程序代码如下:
package mouse;

import java.awt.*;
import javax.swing.*;

/**
 * @version 1.35 2018-04-10
 * @author Cay Horstmann
 */
public class MouseTest
{
   public static void main(String[] args)
   {
      EventQueue.invokeLater(() -> {
         var frame = new MouseFrame();
         frame.setTitle("MouseTest"); //设置框架名称
         frame.setDefaultCloseOperation(JFrame.EXIT_ON_CLOSE);//窗口关闭按钮设置为可用
         frame.setVisible(true); //将框架设置为可见
      });
   }
}
package mouse;

import javax.swing.*;

/**
 * A frame containing a panel for testing mouse operations
 */
public class MouseFrame extends JFrame
{
   public MouseFrame()
   {
      add(new MouseComponent());//向框架中添加一个JComponent对象
      pack();;//根据窗口大小, 使组件可被容纳
   }
}
package mouse;

import java.awt.*;
import java.awt.event.*;
import java.awt.geom.*;
import java.util.*;
import javax.swing.*;

/**
 * A component with mouse operations for adding and removing squares.一个带有鼠标操作的用于添加和删除正方形的组件。
 */
public class MouseComponent extends JComponent
{
   private static final int DEFAULT_WIDTH = 300;
   private static final int DEFAULT_HEIGHT = 200;

   private static final int SIDELENGTH = 10;// 定义边长
   private ArrayList<Rectangle2D> squares;
   private Rectangle2D current; // the square containing the mouse cursor
   //定义矩形类

   public MouseComponent()
   {
      squares = new ArrayList<>();
      current = null;

      addMouseListener(new MouseHandler());// 添加一个继承了监测鼠标点击情况的类对象
      addMouseMotionListener(new MouseMotionHandler());// 添加继承了监测鼠标移动情况的类对象
   }

   public Dimension getPreferredSize()
   {
      return new Dimension(DEFAULT_WIDTH, DEFAULT_HEIGHT);
   }

   public void paintComponent(Graphics g)
   {
      var g2 = (Graphics2D) g;

      // draw all squares
      for (Rectangle2D r : squares)// 绘制正方形
         g2.draw(r);
   }

   /**
    * Finds the first square containing a point.判断在这个坐标上是否有图形
    * @param p a point
    * @return the first square that contains p
    */
   public Rectangle2D find(Point2D p)
   {
      for (Rectangle2D r : squares)
      {
         if (r.contains(p)) return r;//判断坐标是否在图形内部
      }
      return null;
   }

   /**
    * Adds a square to the collection.在这个坐标位置增加一个图形
    * @param p the center of the square
    */
   public void add(Point2D p)
   {
      double x = p.getX();
      double y = p.getY();

      current = new Rectangle2D.Double(x - SIDELENGTH / 2, y - SIDELENGTH / 2,SIDELENGTH, SIDELENGTH);//构建的正方形的数据添加到队列中
      squares.add(current);//构建的正方形的数据添加到队列中
      repaint();
   }

   /**
    * Removes a square from the collection.从集合中移除正方形。
    * @param s the square to remove
    */
   public void remove(Rectangle2D s)
   {
      if (s == null) return;
      if (s == current) current = null;
      squares.remove(s);//将s从squares的列表中直接删去
      repaint();//重绘component的方法
   }

   private class MouseHandler extends MouseAdapter
   {
      public void mousePressed(MouseEvent event)
      {
         // add a new square if the cursor isn't inside a square
         current = find(event.getPoint());
         if (current == null) add(event.getPoint());
      }

      public void mouseClicked(MouseEvent event)//点击鼠标的构造器
      {
         // remove the current square if double clicked// 如果双击,删除当前方块
         current = find(event.getPoint());
         if (current != null && event.getClickCount() >= 2) remove(current);
      }
   }

   private class MouseMotionHandler implements MouseMotionListener
   {
      public void mouseMoved(MouseEvent event)
      {
         // set the mouse cursor to cross hairs if it is inside a rectangle

         if (find(event.getPoint()) == null) setCursor(Cursor.getDefaultCursor());
         else setCursor(Cursor.getPredefinedCursor(Cursor.CROSSHAIR_CURSOR));//将光标的图像设置为默认的图像
      }

      public void mouseDragged(MouseEvent event)//拖动鼠标时的构造器
      {
         if (current != null)
         {
            int x = event.getX();
            int y = event.getY();

            // drag the current rectangle to center it at (x, y)
            current.setFrame(x - SIDELENGTH / 2, y - SIDELENGTH / 2, SIDELENGTH, SIDELENGTH);
            repaint();//重绘图像
         }
      }
   }
}
运行截图如下:
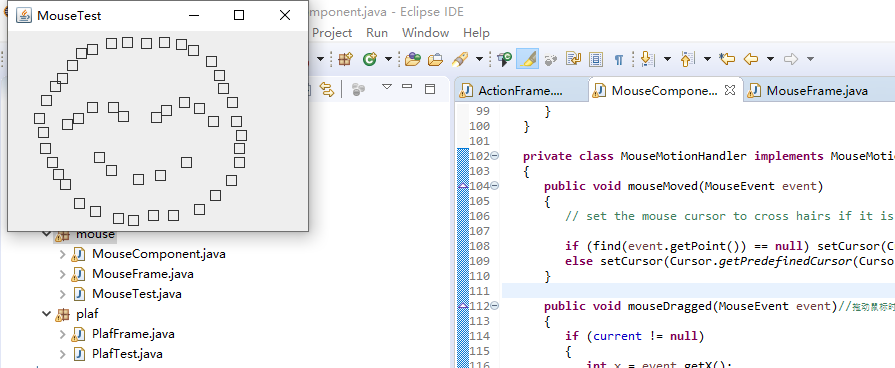
实验2:结对编程练习包含以下4部分:(20分)
1) 程序设计思路简述;
2) 符合编程规范的程序代码;
3) 程序运行功能界面截图;
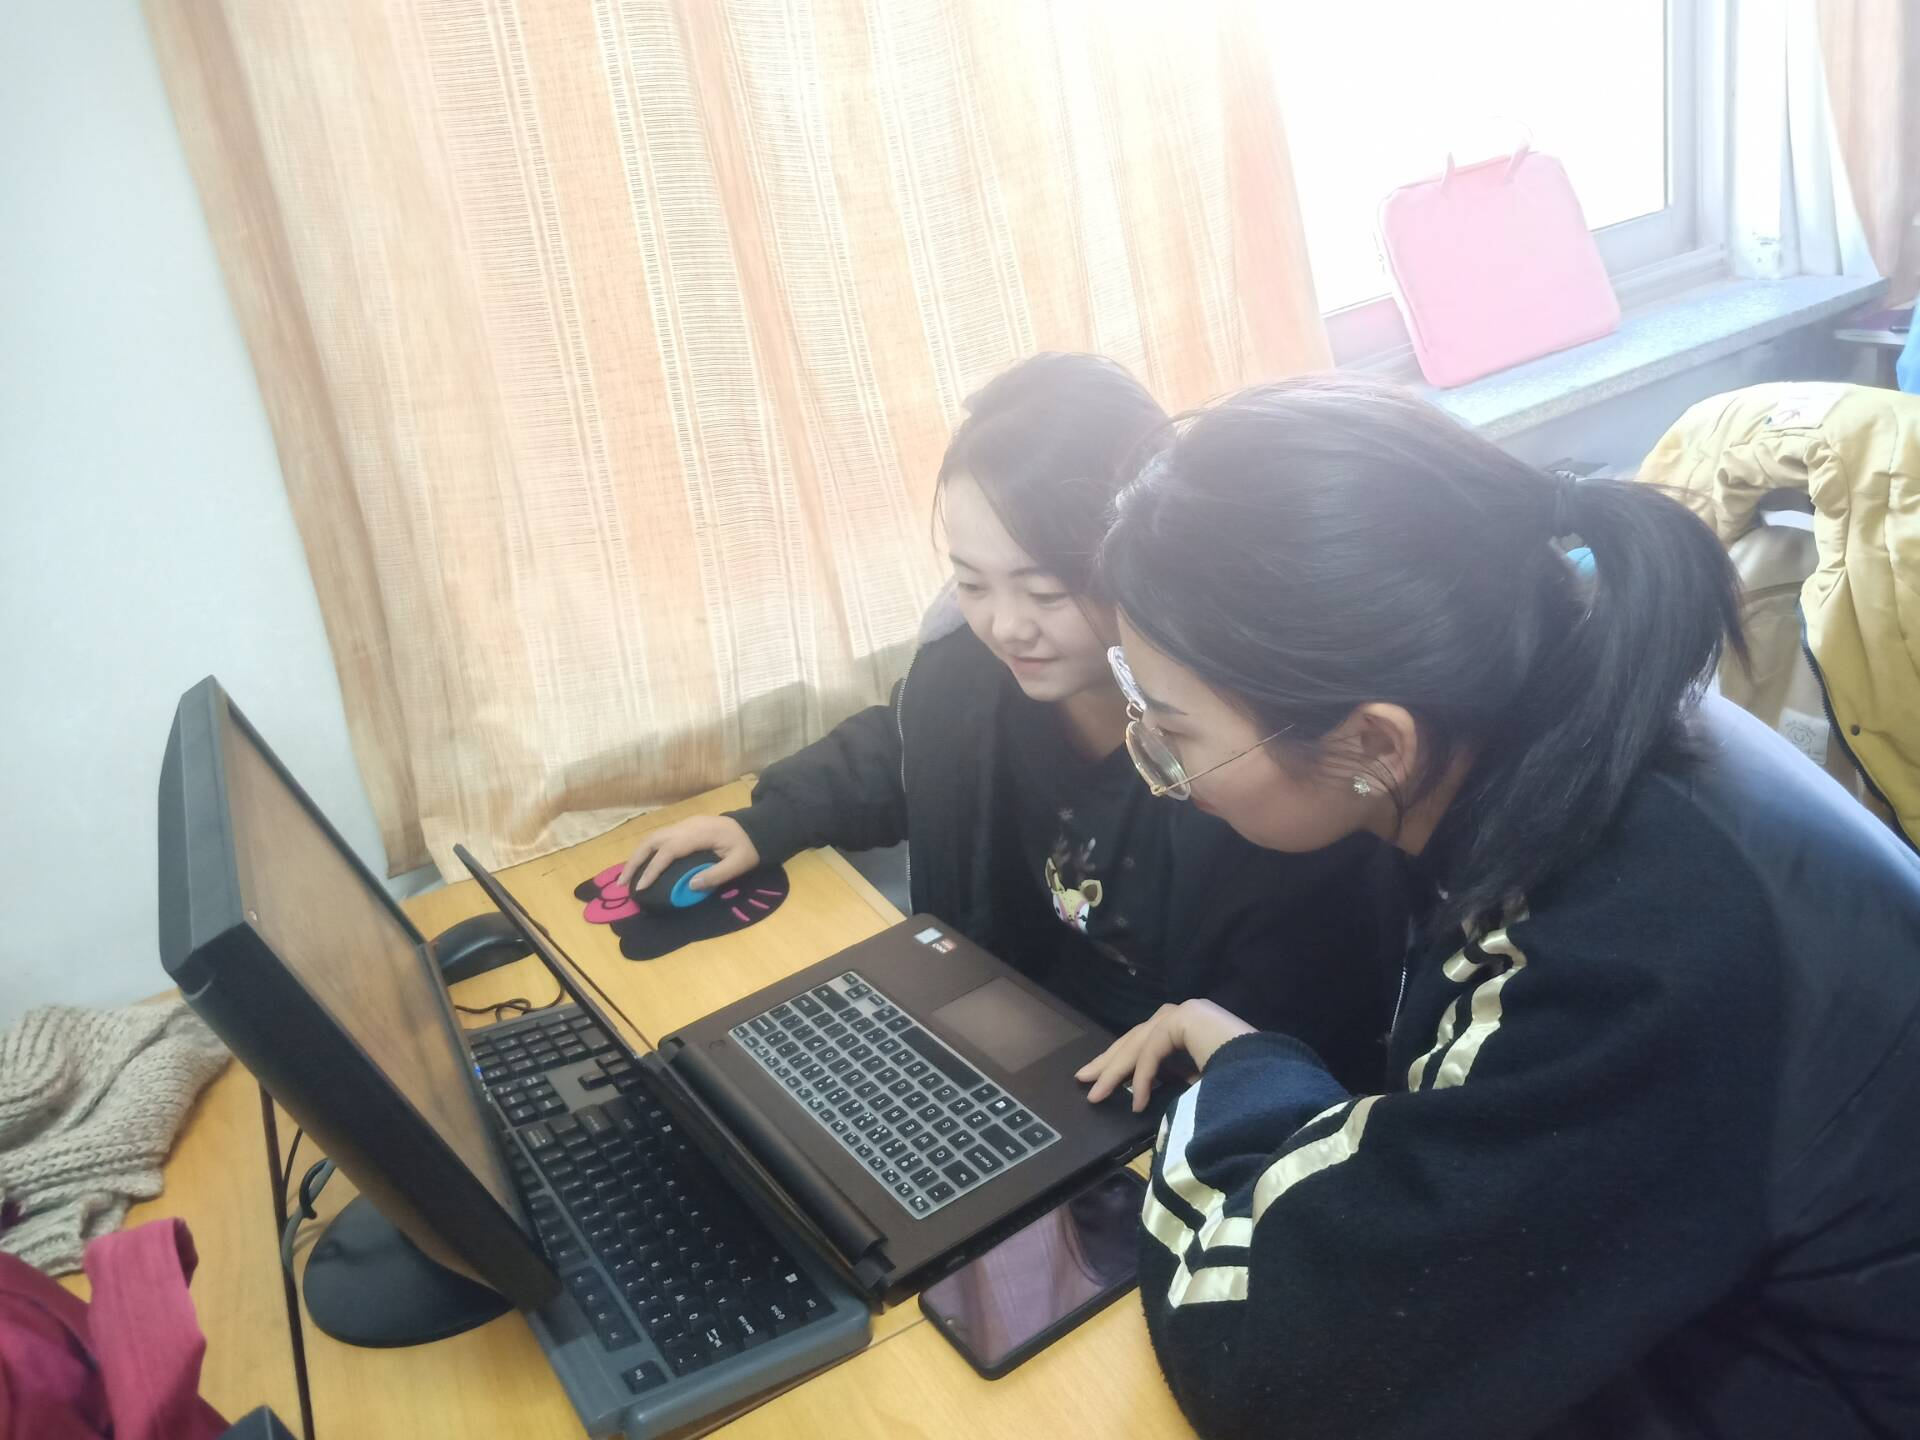
4) 结对过程描述,提供两人在讨论、细化和编程时的结对照片(非摆拍)。
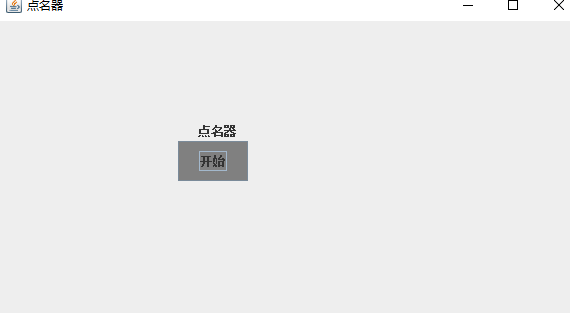
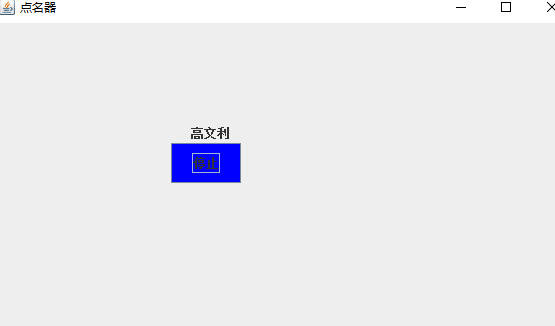
利用班级名单文件、文本框和按钮组件,设计一个有如下界面(图1)的点名器,要求用户点击开始按钮后在文本输入框随机显示2018级计算机科学与技术(1)班同学姓名,如图2所示,点击停止按钮后,文本输入框不再变换同学姓名,此同学则是被点到的同学姓名,如图3所示。
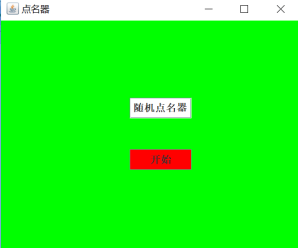
图1 点名器启动界面
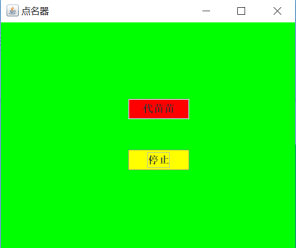
图2 点名器随机显示姓名界面

图3 点名器点名界面
结对编程代码如下:
package demo;

import java.awt.EventQueue;

import javax.management.Query;
import javax.swing.JFrame;

public class Main {
    public static void main(String[] args) {
        EventQueue.invokeLater(()->{
            ButtonFrame buttonFrame = new ButtonFrame();
            buttonFrame.setVisible(true);
            buttonFrame.setTitle("点名器");
            buttonFrame.setDefaultCloseOperation(JFrame.EXIT_ON_CLOSE);

        });
    }
}
package demo;

import java.awt.Color;
import java.awt.event.ActionEvent;
import java.awt.event.ActionListener;
import java.io.BufferedInputStream;
import java.io.BufferedReader;
import java.io.File;
import java.io.FileInputStream;
import java.io.FileNotFoundException;
import java.io.IOException;
import java.io.InputStreamReader;
import java.io.StringBufferInputStream;
import java.util.ArrayList;
import java.util.Timer;
import java.util.TimerTask;

import javax.swing.JButton;
import javax.swing.JFrame;
import javax.swing.JLabel;
import javax.swing.JPanel;

public class ButtonFrame extends JFrame {
    private JPanel buttonPanel;
    private static final int DEFAULT_WIDTH = 300 * 2;
    private static final int DEFAULT_HEIGHT = 200 * 2;
    private JButton jButton;
    private JLabel jLabel;
    private ArrayList<String> arrayList;

    public ButtonFrame() {
        setSize(DEFAULT_WIDTH, DEFAULT_HEIGHT);
        buttonPanel = new JPanel();
        buttonPanel.setLayout(null);
        add(buttonPanel);
        jLabel = new JLabel("点名器");
        jButton = new JButton("开始");
        jButton.setBackground(Color.gray);
        jLabel.setBounds(100, 50, 60, 30);
        jButton.setBounds(100, 120, 60, 30);
        arrayList = new ArrayList<>();
        //读文件
        File file = new File("D:/studentnamelist.txt");
        FileInputStream fis;
        try {
            fis = new FileInputStream(file);
            InputStreamReader in = new InputStreamReader(fis);
            BufferedReader buf = new BufferedReader(in);
            String readLine;
            while ((readLine = buf.readLine())!=null) {
                arrayList.add(readLine);

            }
        } catch (FileNotFoundException e1) {
            // TODO Auto-generated catch block
            e1.printStackTrace();
        } catch (IOException e1) {
            // TODO Auto-generated catch block
            e1.printStackTrace();
        }

        jButton.addActionListener(new ActionListener() {
            Timer timer;

            public void actionPerformed(ActionEvent e) {
                if (jButton.getText().equals("开始")) {
                    timer = new Timer();;
                    TimerTask timerTask = new TimerTask() {
                        public void run() {
                            jButton.setText("停止");
                            jButton.setBackground(Color.red);
                            jLabel.setText(arrayList.get((int) (Math.random() * 43)));
                        }

                    };
                    timer.schedule(timerTask, 0, 10);
                }
                if (jButton.getText().equals("停止")) {
                    timer.cancel();
                    jButton.setText("开始");
                    jButton.setBackground(Color.gray);
                }
            }
        });
        buttonPanel.add(jLabel);
        buttonPanel.add(jButton);
        add(buttonPanel);

    }
}
代码运行截图如下:

两人在讨论、细化和编程时的结对照片:
实验总结:(20分)
1):通过本次课程的学习让我们对Java中第十一章相关内容有了初步的了解;在上课老师的讲解过程中学习了Java中的事件处理基础等知识。掌握事件处理的基本原理,理解其用途;AWT事件模型的工作机制;事件处理的基本编程模型等相关的知识。这周通过对事件以及监听器的学习,对按钮实现人机交互所必需的的一些编程机制有了进一步的理解,但是实现的窗口比较简陋,与平常生活中接触到的相差甚远,所以,应该进一步学习窗口的程序设计,是的呈现出来的窗口更加美观。
2):通过老师上课详细的讲解和实验过程中助教的讲解我们对第十一章的知识点有了进一步的强化认识,在做作业的过程中遇到了一些问题,但都通过问同学一一解决了,在讨论的过程中了解了自己的不足,掌握了许多不知道不熟悉的知识。
3).通过这次的实验使我学到了不少实用的知识,并且锻炼了自己的动手能力;虽然在学习的过程中遇到了许多不懂得地方,但是通过问同学及查找相关资料都一一解决了;相信在以后的学习中,通过不断努力,我可以学到更多的关于Java编程的相关知识。


