基于Mysql数据库的SSM分页查询
前言: Hello,本Y又来了,"分页"在我们使用软件的过程中是一个很常见的场景,比如博客园对于每个博主的博客都进行了分页展示。可以简单清晰的展示数据,防止一下子将过多的数据展现给用户,毕竟用户的阅读能力和短期接受力都有限,使用分页可以避免带给用户浏览上的不舒服感,利用它可以带给用户良好的体验,便于浏览和查询数据。那么本期我们的博客就来探讨关于分页,使用的Java的框架是Spring+Springmvc+mybatis,这也是目前企业非常流行的搭配方式,使用的数据库是Mysql,我们将采用项目驱动的方式,模拟一个论坛帖子浏览的功能,做一个对论坛中的帖子进行分页查询的Demo
目录:
一:SSM框架的搭建
二:Mysql的分页机制
三:代码的分层结构
四:功能演示
五:原理总结
一:SSM框架的搭建
1.1:基本的文件配置
1.1.1:web.xml
任何一个web项目的起点都是web.xml,通过它我们可以知道这个项目所使用的技术,本次我们使用的是MVC框架是springmvc,所以我们必须在web.xml中配置SpringMvc,我们来看看web.xml的代码(这里我只写关键的部分):
    <!-- 编码过滤器 -->
    <filter>
        <filter-name>encodingFilter</filter-name>
        <filter-class>org.springframework.web.filter.CharacterEncodingFilter</filter-class>
        <init-param>
            <param-name>encoding</param-name>
            <param-value>UTF-8</param-value>
        </init-param>
    </filter>

    <filter-mapping>
        <filter-name>encodingFilter</filter-name>
        <url-pattern>/*</url-pattern>
    </filter-mapping>

   <!--  Springmvc的配置 -->
    <servlet>
        <servlet-name>Springmvc</servlet-name>
        <servlet-class>org.springframework.web.servlet.DispatcherServlet</servlet-class>
        <init-param>
            <param-name>contextConfigLocation</param-name>
            <param-value>/WEB-INF/springmvc-config.xml</param-value>
        </init-param>
    </servlet>
    <servlet-mapping>
        <servlet-name>Springmvc</servlet-name>
        <url-pattern>*.do</url-pattern>
    </servlet-mapping>

    <!-- 上下文监听器 -->
    <context-param>
        <param-name>contextConfigLocation</param-name>
        <param-value>classpath:mybatis-config.xml</param-value>
    </context-param>
    <listener>
        <listener-class>org.springframework.web.context.ContextLoaderListener</listener-class>
    </listener>
其中编码过滤器主要是对web的请求进行过滤,防止其编码不统一而产生乱码,这里统一设定为utf-8,接下来就是Springmvc的配置,主要配置了DispatcherServlet,注意这里的适配url是以.do方式结尾的,所以我们后面 的请求方式都要是.do结尾的,这样Springmvc才能识别,其中又引用了springmvc-config.xml这个文件,这个文件的作用就是Spring的具体配置了,我们来看看:
1.1.2:springmvc-config.xml配置文件
    <!-- 注解扫描 -->
    <context:annotation-config></context:annotation-config>

    <!-- 扫描的包 -->
    <context:component-scan base-package="com.wyq"></context:component-scan>

    <!--视图解析器 -->
    <bean id="viewResolver"
        class="org.springframework.web.servlet.view.InternalResourceViewResolver">
        <property name="prefix" value="/" />
        <property name="suffix" value=".jsp" />
    </bean>
可以看出其中主要配置了注解扫描器,以包级为单位用来扫描我们代码中的注解,这里的注解包括@Controller @Service等,有了这个配置我们的注解才能生效。接下来就是视图解析器,它主要就是给我们的控制器返回的值加路径和.jsp,我们就不用在java代码中写.jsp了,很方便的一个东西
。1.1.3:mybatis-config.xml
顺着web.xml往下看,可以看到mybatis-config.xml,顾名思义,这个主要作用就是用来配置mybatis的:
     <!-- 数据源 -->
    <bean name="dataSource" class="org.apache.commons.dbcp.BasicDataSource">
        <property name="url" value="jdbc:mysql://localhost:3306/pageparation?characterEncoding=utf8" />
        <property name="driverClassName" value="com.mysql.jdbc.Driver" />
        <property name="username" value="root" />
        <property name="password" value="123" />
    </bean>
     <!--  事务管理器 -->
    <bean name="transactionManager"
        class="org.springframework.jdbc.datasource.DataSourceTransactionManager">
        <property name="dataSource" ref="dataSource" />
    </bean>
     <!--   注解驱动 -->
    <tx:annotation-driven transaction-manager="transactionManager"></tx:annotation-driven>
    <!--  会话工厂 -->
    <bean id="sqlSessionFactory" class="org.mybatis.spring.SqlSessionFactoryBean">
        <property name="dataSource" ref="dataSource" />
        <property name="mapperLocations" value="classpath:com/wyq/Dao/*.xml"/>
    </bean>
    <!-- mapper文件配置器 -->
    <bean name="mapperScannerConfigurer" class="org.mybatis.spring.mapper.MapperScannerConfigurer">
        <property name="basePackage" value="com.wyq.*" />
        <property name="sqlSessionFactory" ref="sqlSessionFactory" />
    </bean>
可以看出,我们其中主要是配置了数据源、事务等相关的东西,数据源也就是连接mysql的属性,事务管理器就是用来管理事务的,比如增删改都需要用到事务管理器(查询一般不需要事务)。下面的两个都是mybatis特有的,我们写的Mapper的路径等等
二:Mysql的分页机制
2.1:数据库构造数据
我们这次模拟的是一个分页查询论坛中帖子的demo,所以首先建一张表,用来存放数据:(下面的数据都来自天涯论坛),我们要做的就是对这些数据进行显示,然后分页
2.2:Mysql的分页机制
Mysql的分页查询语句是:select * from table limit param1,param2 ,其中param1是查询的开始,param2是查询的条数,其实也就是我们的页大小,然后利句这些sql,我们就可以在每次点击“上一条”,下一条“的时候在服务器端完成数据的分页,具体的原理请看下面的代码
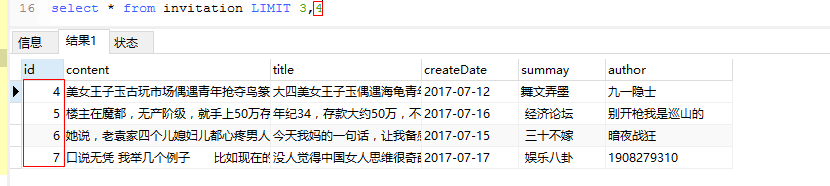
如图所示,其中limit第一个数字表示的是开始查询的编号(注意:它是从0开始的,而Id是从1开始的),所以查出来的第一条是4,然后第二个数字是4,也就是最终查出来是4条数据。这样4就充当了分页中的PageSize的角色
三:代码分层结构
按照 我们以往的代码习惯,我们的代码分为Controller层、Service层,Dao层,我们来依次看一下按照这三个层次划分的代码结构,首先我们先看看DB层,也就是Dao层:
3.1:Dao层
public interface InvactionMapper { //Mapper接口

    public List<Invitation>  searchInvList(Page page);//查询帖子列表

    public List<Invitation> getInvBycondtion(Page page);//根据条件查询帖子

    public Integer searchTotalCount(Page page);//搜索总数量

    public Integer deleteInvition(Integer id);//根据id删除帖子

}
这里定义了一系列的接口方法,主要是用来操作数据库的,而对于其具体的实现,这里我们不需要写实现类,根据mybatis的特性,我们需要有一个对应的Mapper的文件,然后把其方法和mapper中的xml文件对应,就可以完成对数据库的操作了,需要注意的是:(mapper和xml最好在一个包下,否则会有很蛋疼的异常,楼主在这上面花费了一个晚会才解决 - -)具体的代码如下:
<mapper namespace="com.wyq.Dao.InvactionMapper">

     <!--注意: nameSpace要和接口的名字和路径对应 -->

    <resultMap id="invatition" type="com.wyq.Entities.Invitation">
        <id column="id" property="id"></id>
        <result column="content" property="content"></result>
        <result column="title" property="title"></result>
        <result column="createDate" property="createDate"></result>
        <result column="summay" property="summay"></result>
        <result column="author" property="author"></result>
    </resultMap>

    <select id="searchInvList" parameterType="com.wyq.Entities.Page" resultMap="invatition">

        select * from invitation limit #{startRow},#{pageSize}

    </select>

    <select id="searchTotalCount" parameterType="com.wyq.Entities.Page"
        resultType="java.lang.Integer">
        select count(id) from invitation <where>
            <if test="queryCondition!=null">
                and title like CONCAT('%',#{queryCondition},'%')
            </if>
        </where>
    </select>


    <select id="getInvBycondtion" parameterType="com.wyq.Entities.Page" resultMap="invatition">

        select * from invitation
         <where>
            <if test="queryCondition!=null">
                 title like  CONCAT('%',#{queryCondition},'%')
            </if>
        </where>
      </select>

    <delete id="deleteInvition" parameterType="java.lang.Integer">
        delete from INVITATION
        where
        id=#{id}
    </delete>

</mapper>
其中可以看出我们在mapper文件中写了sql,而sql的写法其中用#{}这种方式携带参数,这里就是方法中的参数了,我们需要用的时候,只需要把值传入进去,mybaits,就会自动进行解析
3.2:Service层:
首先我们还是先来定义一个服务层的接口:
public interface InvitationService {


    List<Invitation> searchInvList(Page page);


    Integer searchTotalCount(Page page);


    Integer deleteInvition(Integer id);

    List<Invitation> getInvBycondtion(Page page);

}
然后是其具体的实现,需要注入mapper层:
@Service
@Transactional
public class InvitationServiceImpl implements InvitationService {

    @Autowired
    private InvactionMapper invactionMapper;


    @Override
    public List<Invitation> searchInvList(Page page) {
        return invactionMapper.searchInvList(page);
    }


    public Integer deleteInvition(Integer id){
         return invactionMapper.deleteInvition(id);
    }


    public Integer searchTotalCount(Page page) {
        return invactionMapper.searchTotalCount(page);
    }

    public List<Invitation> getInvBycondtion(Page page){
        return invactionMapper.getInvBycondtion(page);
    }

}
注意这里我们加入了@Service注解,主要用来表示这就是一个Service层,然后注意这里有delete方法,所以这里也必须有一个@Transaction注解用来表示事务的操作
3.3:controller层
@Controller
@Scope("prototype")
public class InvacationController {

    @Autowired
    private InvitationServiceImpl invitationServiceImpl;

    @RequestMapping("init.do")
    public String searchInvList(Page page,HttpServletRequest request) throws UnsupportedEncodingException {

        //组装page对象,传入方法中查询列表 回显数据
        Page p =page;
        int pageSize=4; //设置每页大小
        p.setPageSize(pageSize);
        int curPage=p.getCurrentPage();

        if (curPage==0) {
            curPage=1;
            p.setCurrentPage(curPage);
        }
        int startRow =page.getStartRow();

        if (!(p.getCurrentPage()==0)) {
             startRow = getStartRowBycurrentPage(curPage, pageSize);
        }

        p.setStartRow(startRow);

        String queryCondition=null;
        if (page.getQueryCondition()!=null) {
             queryCondition = page.getQueryCondition();//查询条件
        }


        List<Invitation> Invlist = getInvListByCondition(page);

        Integer totalCounts = invitationServiceImpl.searchTotalCount(page);//总条数

        int totalPages=(totalCounts%pageSize==0)?(totalCounts/pageSize):(totalCounts/pageSize+1);//总页数=总条数/页大小+1

        p.setTotalPage(totalPages);//总页数

        page.setTotalRows(totalCounts);//总行数

        request.setAttribute("invList", Invlist);

        request.setAttribute("page", page);

        return "index";
    }

    private List<Invitation> getInvListByCondition(Page page) {

        List<Invitation> InvList =null;

        if (page.getQueryCondition()==null) {

            InvList = invitationServiceImpl.searchInvList(page);

            return InvList;

        }

         InvList = invitationServiceImpl.getInvBycondtion(page);


        return InvList;

    }

    /**
     * 删除帖子的方法
     * @param id
     * @return
     */
    @RequestMapping("isdelete.do")
    public String deleteInvition(Integer id) {

         invitationServiceImpl.deleteInvition(id);

         return "index";
    }

    /**
     * 根据当前页获取开始行
     * @param currentPage
     * @param pageSize
     * @return
     */

    public int getStartRowBycurrentPage(int currentPage,int pageSize){

        int startRow=0;

        if (currentPage==1) {

            return startRow=0;
        }

        startRow=(currentPage-1)*pageSize;

        return startRow;

    }


}
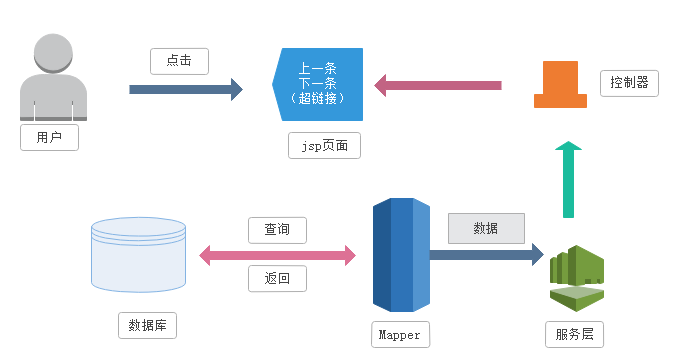
Controller就是我们的具体的控制器,这里实现对象的封装,调用Service层,Service层去操作数据库,数据库把数据返回来,我们再把数据放在服务端,在经过jsp进行渲染,其中这里一定要注意分页数据的操作,controller中主要实现的对所有的数据查询分页,然后还有我们对具体的条件查询出来的结果进行分页展示
3.4:jsp视图层页面
<body>
<center>
<table border="1" style="text-align:center">
<tr>
<td colspan="6"><h1>帖子列表</h1></td>
</tr>
<tr>
<td colspan="6">帖子标题:
<form action="init.do" method="get">
<input type="text" name="queryCondition"
value="${page.queryCondition}" id="condition"> <input
type="submit" value="查询" />
</form>
</td>
</tr>
<th>编号</th>
<th>标题</th>
<th>内容摘要</th>
<th>作者</th>
<th>发布时间</th>
<th>操作</th>
</tr>
<tr <c:if="" test="${status.count%2!=0}">
style="background-color:#dbce8f" >
<td>${item.id}</td>
<td>${item.title}"</td>
<td>${item.summay}</td>
<td>${item.author}</td> <%--
<td>${item.content}</td> --%>
<td>
<fmt:formatdate value="${item.createDate}" pattern="yyyy-MM-dd" /></td>
<td><a href="isdelete.do?id=${item.id}">删除</a></td>
</tr>
</tbody>
</table>
<br />
<br />
<label>第${page.currentPage}/${page.totalPage}页 共${page.totalRows}条</label>
<a href="init.do?currentPage=0">首页</a>
<a href="init.do?currentPage=${page.currentPage-1}" onclick="return checkFirst()">上一页</a>
<a href="init.do?currentPage=${page.currentPage+1}" onclick="return checkNext()">下一页</a>
<a href="init.do?currentPage=${page.totalPage}">尾页</a> 跳转到:
<input type="text" style="width:30px" id="turnPage" />页
<input type="button" onclick="startTurn()" value="跳转" />
</center>
<script type="text/javascript">
function checkFirst(){
if(${page.currentPage>1}){
return true;
}
alert("已到页首,无法加载更多");
return false;
}
function checkNext(){
if(${page.currentPage<page.totalPage}){
return true;
}
alert("已到页尾,无法加载更多页");
return false;
}
function startTurn(){
var turnPage=document.getElementById("turnPage").value;
if(turnPage>${page.totalPage}){
alert("对不起已超过最大页数");
return false;
}
var shref="init.do?currentPage="+turnPage;
window.location.href=shref;
}
</script>
</body>
</html>
其中主要是对数据的展示,用到了jstl表达式和javascript,js的目的在于防止其越界,超出页数的最大或最小值
四:功能演示
4.1:分页功能,
其中第1/4页表示的当前是第一页,一共4页,数据库中查询出来的条数一共是13条,每页显示4条数据。然后点击下一页可以返回下一页的数据,这些都是动态获取的,只要数据库中的条数或者页数发生变化,这里也会发生变化。

4.2:跳转功能
其中可以在小框中输入你想跳转的页数(这里会做校验,如果你超过总页数,那么会提示你已经超过总页数,这些都是js来完成的),然后点击跳转按钮,会跳转到具体的页数

4.3:删除帖子功能
假如你想删除指定帖子,只需要点击删除,然后就会删除这条记录,同时数据库中的值也会发生变化,就会显示一共12条


4.4:根据标题查询文章的功能
这里做的是一个模糊搜索,利用具体的查询条件,然后去数据库里查询,输入关键字进行查询,就可以查到具体的帖子,并且会显示条数

5:总结
本篇博文主要是探讨了数据库分页技术,对数据库中的数据进行查询与显示,采用的技术框架是javaWeb中的SSM,数据库是mysql。这里简单说一下原理:我们点击上一条下一条的时候其实是利用超链接携带参数值,然后把值传入Controller中,Controller对值进行解析,然后封装去数据库查询,最后再返回给视图层,这就是原理:
本篇博文就讲到这里:Demo下载链接:http://pan.baidu.com/s/1hsBsye4 密码:knot
注:采用的java jdk:1.7 Tomcat:8.0 IDE:Myeclipse 2016 stable 1.0

 浙公网安备 33010602011771号