
Mysql一次安装问题记录
本次在redhat8.7的系统上安装MySQL5.7.37版本,关于一些启动失败的问题
MySQL包地址:
https://downloads.mysql.com/archives/get/p/23/file/mysql-5.7.37-el7-x86_64.tar.gz
安装脚本
#!/bin/bash
set -ex
###Mysql5.7二进制包 脚本安装
##准备环境:一个足够大的硬盘空间

## 变量文件
#initdir=/app                ##基础目录
basedir=/usr/local/mysql         ## mysql安装二进制包目录
datadir=/data/mysql        ## mysql数据目录
logdir=/var/log/mysql      ## mysql日志文件
bin_log=$datadir/binlog/mysql-bin
relay_log=$datadir/relay-log/mysql-relay
server_id=2
mysql_name=mysql-5.7.37-el7-x86_64

## 创建初始目录、用户
#mkdir -p $initdir

useradd -s /sbin/nologin mysql
## 清理mariadb环境
if     &>/dev/null ;then
   yum remove mariadb-libs -y
fi


# 安装mysql
#wget $mysql_url
echo "正在解压mysql"
tar -zxf $mysql_name.tar.gz
echo "解压完毕"
sleep 2
mv $mysql_name  $basedir
chown -R mysql:mysql $basedir
if [ ! -d $datadir ];then
    mkdir -p $datadir
fi

chown -R mysql:mysql  $datadir
mkdir $logdir
chown -R mysql:mysql $logdir
echo "export basedir=$basedir" >> /etc/profile
echo 'export PATH=$basedir/bin:$PATH' >> /etc/profile
source /etc/profile


## mysql初始化
mysqld --initialize-insecure  --user=mysql --basedir=$basedir --datadir=$datadir

mkdir -p $bin_log
mkdir -p $relay_log
chown -R mysql:mysql  $datadir
## mysql配置文件
cat > /etc/my.cnf << EOF
[mysqld]
basedir = $basedir
datadir = $datadir
pid-file = /tmp/mysql.pid
socket = /tmp/mysql.sock
port = 3306
user = root
log_error = $logdir/mysql-error.log
slow-query-log-file = $logdir/mysql-slow.log
log_bin = $bin_log
relay-log = $relay_log
server-id = ${server_id}
innodb_buffer_pool_size = 1024M
innodb_log_buffer_size = 16M
key_buffer_size = 128M
query_cache_size = 256M
tmp_table_size = 128M
binlog_format = mixed
skip-external-locking
skip-name-resolve
character-set-server = utf8
collation-server = utf8_bin
max_allowed_packet = 16M
thread_cache_size = 256
table_open_cache = 4096
back_log = 1024
max_connect_errors = 100000
interactive_timeout = 1800
wait_timeout = 1800
max_connections = 500
sort_buffer_size = 16M
join_buffer_size = 4M
read_buffer_size = 4M
read_rnd_buffer_size = 16M
binlog_cache_size = 2M
thread_stack = 192K
max_heap_table_size = 128M
myisam_sort_buffer_size = 128M
bulk_insert_buffer_size = 256M
open_files_limit = 65535
query_cache_limit = 2M
slow-query-log
long_query_time = 2
expire_logs_days = 3
max_binlog_size = 1000M
slave_parallel_workers = 4
log-slave-updates
binlog_ignore_db = mysql
replicate_wild_ignore_table = mysql.%
sync_binlog = 1
innodb_file_per_table = 1
innodb_flush_method = O_DIRECT
innodb_buffer_pool_instances = 4
innodb_log_file_size = 512M
innodb_log_files_in_group = 3
innodb_open_files = 4000
innodb_read_io_threads = 8
innodb_write_io_threads = 8
innodb_thread_concurrency = 8
innodb_io_capacity = 2000
innodb_io_capacity_max = 6000
innodb_lru_scan_depth = 2000
innodb_max_dirty_pages_pct = 85
innodb_flush_log_at_trx_commit = 2
sql_mode=NO_ENGINE_SUBSTITUTION,STRICT_TRANS_TABLES
[mysqldump]
quick
quote-names
max_allowed_packet = 16M
[client]
default-character-set = utf8
[mysql]
default-character-set = utf8
[isamchk]
key_buffer = 128M
sort_buffer_size = 4M
read_buffer = 2M
write_buffer = 2M
[myisamchk]
key_buffer = 128M
sort_buffer_size = 4M
read_buffer = 2M
write_buffer = 2M
EOF

## 创建systemd管理文件
cat > /etc/systemd/system/mysqld.service << EOF
[Unit]
Description=MySQL Server
Documentation=man:mysqld(8)
Documentation=http://dev.mysql.com/doc/refman/en/using-systemd.html
After=network.target
After=syslog.target
[Install]
WantedBy=multi-user.target
[Service]
User=mysql
Group=mysql
ExecStart=$basedir/bin/mysqld --defaults-file=/etc/my.cnf
LimitNOFILE = 5000
EOF
systemctl daemon-reload
systemctl start mysqld
systemctl enable mysqld
systemctl status mysqld
安装都照常进行,到最后,无法启动(这个其实由于粗心引起的)
报错为:
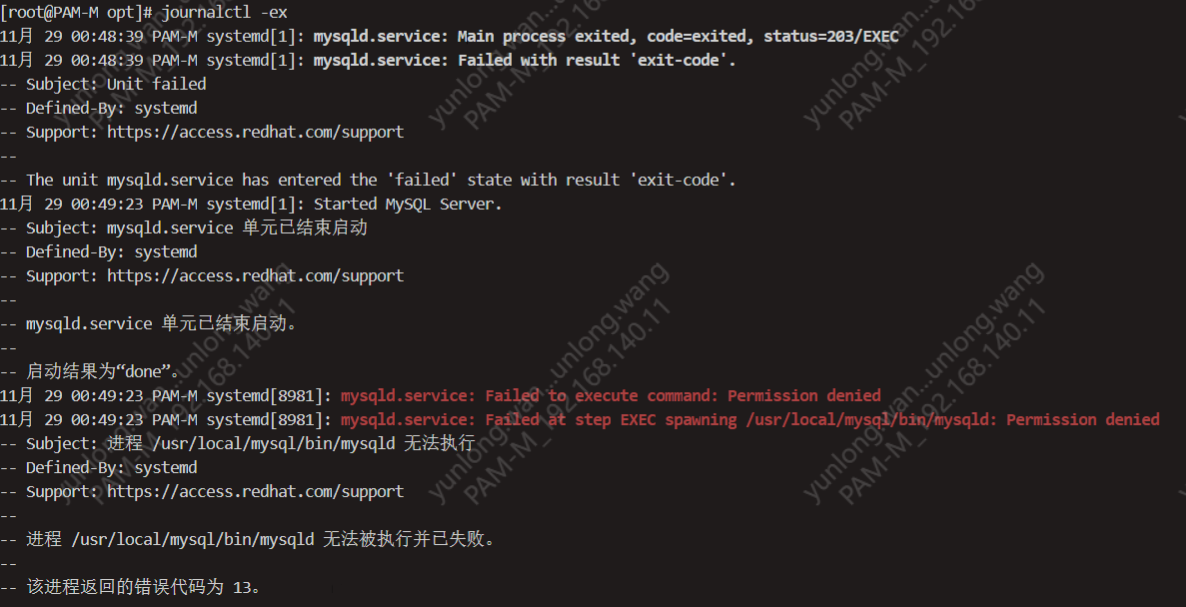
这个权限问题其实是selinux导致的,关闭selinux即可
setenforce 0
vim /etc/selinux/config
# This file controls the state of SELinux on the system.
# SELINUX= can take one of these three values:
#     enforcing - SELinux security policy is enforced.
#     permissive - SELinux prints warnings instead of enforcing.
#     disabled - No SELinux policy is loaded.
#SELINUX=enforcing
SELINUX=disabled
# SELINUXTYPE= can take one of these three values:
#     targeted - Targeted processes are protected,
#     minimum - Modification of targeted policy. Only selected processes are protected.
#     mls - Multi Level Security protection.
SELINUXTYPE=targeted
主要是一下问题,登陆的时候出现该报错

查找半天后,解决方法如下:
yum install libncurs* -y

rm -f /usr/lib64/libtinfo.so.5
ln -s /usr/lib64/libtinfo.so.6.1 /usr/lib64/libtinfo.so.5

rm -f rm -f /lib64/libncurses.so.5
ln -s /lib64/libncurses.so.6.1 /lib64/libncurses.so.5
主要应该是一些类包版本的问题,具体原因还未深究,待有时间深究一下

 浙公网安备 33010602011771号